Hi, I'm jshufelt

Build #28: E6.5

If there were any doubts that the mechanical keyboard hobby is exploding in popularity, Exclusive’s E6.5 group buy in March was one of the early warning shots signaling a new phase. Exclusive had intended to run this as a 100-slot first-come-first-served buy, but went to sleep after posting the entry form, woke up to a surprise - far more orders than expected, well beyond the intended 100-order limit - and elected to close the buy after half a day. Rather than impose a 100-order cutoff, Exclusive chose to honor all orders before the GB close: 268, assuming the posted Google form remains accurate, not including a small number of additional orders for a founder’s edition.

While I was pleased that Exclusive chose to err on the side of making people happy, I wondered how this might impact the group buy; we’re all familiar with horror stories of group buys gone bad under increased fulfillment load. How would this story go?

In early August, we found out that orders with the e-black finish, including mine, would have to be changed to another finish, as Exclusive was not happy with the e-black results. For me, not a big deal with the color scheme I had in mind for this build, since black anodization was an alternate option. Nonetheless, between this finish issue and the size of the GB, I expected a substantial delay at that point, so I was pleasantly surprised when shipping commenced a few weeks later and this showed up in late August:

Removing the banderole, here’s the box for the E6.5 kit. Nice packaging.

Opening the box, the first thing you see is a pair of gloves, and a set of Exclusive logo stickers (with a handwritten ‘thank you’ on the back of the sticker sheet). Nice touch.

The PCB has a yellow solder mask with an interesting mesh texture.

The underside of the PCB. Note the 4 LEDs on each side of the board. I hadn’t really given underglow much thought when I joined the buy, but this arrangement made me curious…

As readers of my build logs know, I like to try new things with every build, and this was no exception:

  • Along with two PCBs, I picked up two plates for this board: polycarbonate and aluminum. I wanted to build two plate/PCB assemblies with the same switches in both, to get as direct a sound comparison between the two as I could manage.
  • While I’m a tactile guy, I find that tactiles often have a less precise sound than linears. So in the interests of sound comparison, I went with Gateron Black Inks for both plate/PCB builds.
  • Finally, this board has an interesting gasket mount approach - a silicone O-ring for the entire PCB, positioned in the gap between the plate and PCB. We’ll take a look at that later.

Let’s get to the build. First, because of that gasket placement, I went with snap-in stabilizers, to avoid any issues with the screws on the usual screw-in stabilizers interfering with the gasket placement. Second, since a sound comparison was going to be a central aspect of this project, I wanted the stabilizers to have a clean, crisp sound, and for that, I find Christo 111 to be the best choice. SuperLube imparts a softer stabilizer feel, but I find that it can soften and mute the sound as well, which I didn’t want for this build.

Christo 111 has the nice property that you can’t really overdo it, as you can see here on the stabilizer wires and contact points with the stab housings.

Mounting the Gat Inks and checking alignment. Note the logo cutout on the plate, directly over the logo on the PCB. Sometimes it’s the little details.

One of the features of the E6.5 buy was the option to engrave a badge in the upper right of the case top, using a custom font. Most people seem to have chosen their online handle, but that’s not my thing, so I instead used “E6.5” - simple and direct. I spent a while online trying to find a font that echoed the hexagonal design of Exclusive’s logo. Not quite perfect, but I think it’s in the ballpark.

However, white-engraving-on-white-badge doesn’t have the contrast I had hoped to see…but we’re seasoned veterans here (cough), which is why we ordered an extra badge. Replacing the badge just requires a screwdriver.

There, that’s more like it.

After soldering switches, the aluminum plate/PCB sandwich is ready for the next step.

And the next step is: the gasket! It’s a silicone O-ring with a circular cross-section.

Installation is a matter of placing it between the plate and PCB at one corner of the board, and then stretching it to work it into place around the other corners of the plate/PCB assembly. The O-ring is just elastic enough to allow you to do this. Here’s a look at one corner to show what it looks like when it’s installed, and to give you a look at the snaps for the stabs. You can hopefully see why screws in those holes might have interfered with the gasket.

The E6.5 supports either top-mount or gasket-mount installation. In the former case, the PCB/plate assembly attaches to the top of the case with screws, just like any other top-mount. In the latter case, the PCB/plate assembly just sits in the top half of the case, and screwing the bottom half into place holds the assembly by compression - you don’t need the top-mount screws when you’re doing gasket-mount on this board, which is the direction I went.

We can see what’s going on a little more clearly by looking at the underside of the case top with the PCB/plate assembly resting in place.

And now a brief digression. When I placed my order for this board, I inexplicably failed to order a second gasket for the second plate/PCB assembly. Sigh. I could have just contacted Exclusive and arranged for another one, but this must be something you can just find on Amazon, right? Well, I found one, but it took a couple of weeks to get here, and, well, close but no cigar. This one was a bit shorter and a bit narrower than the original:

However, informed by my first attempt, the second time was the charm. For any E6.5 owners out there - while YMMV, I found a gasket that appears to be a good substitute for the original. As a side benefit, I learned about O-ring specs:

  • The outside diameter (OD), the maximum distance between the outside edges of the O-ring when it’s laid down in a circle;
  • The inside diameter (ID), the maximum distance between the inside edges of the O-ring when it’s laid down in a circle;
  • The cross-sectional width of the gasket.

And, in case you’re wondering, yes, OD = 2 * width + ID, so any two of the three measurements should be sufficient. Without further ado, here’s the second PCB/plate assembly, using the PC plate and the OD=225mm ID=217mm width=4mm O-ring I found on Amazon:

An unanticipated benefit of using the PC plate instead of the aluminum plate is that we can see the positioning of the gasket through the plate.

Back to the build. After screwing the whole thing together, we can take a look at the underside of the E6.5. There are plastic diffusers on either side of the board, so you get underglow from the finger grips if you’re into that sort of thing.

With a PC plate, you’ll get some of that underglow through the top, as well.

OK, so how does it sound and feel? Really good, actually. With lube, the Gat Inks are very smooth and deliver a nice, crisp sound. Given my typical preferences, I expected to prefer the PC plate over aluminum, but at this stage, I’d have to say it’s a tossup: PC provides a softer feel than aluminum, which I generally prefer, but it also takes a bit of the crispness away from the switch sound, and at least in this board, and with these switches, I think the overall experience is slightly better with aluminum. But every time I’ve switched assemblies, I find myself thinking “oh, this is nice”, so again, too close to call.

More generally - the hype is real. The anodization is quite nice (although you will need those gloves if you have an aversion to smudges), and the tolerances are tight. Most importantly for my purposes, this is the first board in a long time where I’ve felt no need to do any sound dampening treatments beyond what the build kit offers, either between the plate and PCB, or in the bottom of the case. This is a comparatively light board by custom standards, less than three pounds fully built. Yet it has a crisp yet liquid sound and feel that I really enjoy - and it’ll be the first linear board I’ve built that will join my regular daily driver rotation. Bravo!

Lessons learned

  • I forget to do this somewhat frequently, so let me drop a reminder here now: before you install the PCB into the case, be sure you have the QMK RESET code available on one of your layers, in the event the PCB’s physical reset button isn’t accessible once the PCB is installed.
  • I lubed the switches with 3203 on the stems and 104 on the springs - nothing on the housings, instead making sure that all stem/housing contact points were lubed on the stems - and once again, this saved time and produced a good result.
  • Gateron Black Inks are now at the top of my linear list. I hope the problems people have been raising with recent Ink batches are atypical, because I’m looking forward to building more boards with these in the future - and this is coming from a tactile guy.
  • If this entire experience is typical of an Exclusive release, then I’m sold. From design to packaging to QC to build experience, attention to detail was solid throughout. I’ll be following his work going forward.
  • The gasket installation and function left me wondering whether it might be possible to retrofit O-rings between the PCB and plate on top-mount boards which didn’t originally offer them.
  • I suspect the gasket is making a substantial difference in terms of sound profile, but as I write this build log, I realize that I didn’t get around to trying the obvious experiment: top-mount, sans gasket, with either PCB/plate assembly. No board is ever done, is it?

Well - this one might be.

Specifications

case: E6.5
- black anodized aluminum case
- e-white crown-ring weight
- e-black anodized center weight
- e-black badge with white engraving
case dampening: n/a
PCB: E6.5
plates: 1.5mm e-white aluminum, 1.5mm polycarbonate
plate/PCB dampening: silicone O-ring gaskets
- approx dimensions: OD: 225mm ID: 217mm width: 4mm
stabilizers: GMK PCB snap-in
- 2x (1x6.25u, 3x2u)
stabilizer mods: clipped and lubed with Christo-Lube MCG 111
switches: 2x 67x Gateron Black Inks
switch mods:
- springs tub-lubed with Krytox GPL-104
- stems hand-lubed with Tribosys 3203
- no housing lube
keycaps:
- GMK White-on-Black alphas
- GMK Minimal modifiers
HxWxD (without caps or feet): 1.19" x 12.31" x 4.25"
HxWxD (without caps): 1.25" x 12.31" x 4.25"
HxWxD: 1.5" x 12.31" x 4.25"
assembled weight: 2.77 lb
12 Likes

Very nice build, and awsome build description as always :slight_smile:

How do you feel the gasket mount method compared to the top mount method you tested on other boards you built?
Better sound dampening, less harsh of keypresses?

Being at tactile guy like you, I also want to try linears in the future.
Unfortunately I can’t see any vendor selling Inks at the moment, was maybe willing to try Gat yellows or silent yellows as a backup.
Do you have any recommentation on good linears?

The nice hatching pattern you see on the PCB is done with the copper layer of the ground plane :wink:
I’d love to do that on my PCBs but unfortunately Kicad 5 does not have this feature … but Kicad 6 will so I may give it a try in the future :stuck_out_tongue:

1 Like

My subjective impression is that this gasket approach gives more even sound dampening across the board, compared to something like O-rings on the top mount screws - and from a build perspective, this kind of gasket installation is less finicky than getting O-rings on all the screws, but that’s a minor thing. Still, to properly answer that question, I need to open the board up and try top-mounting one of the assemblies, since this board supports both mounting styles.

NovelKeys has Inks in stock at the moment - don’t know if that’s an option, depending on where you are. I quite liked the TTC Gold V2 reds from my previous build log. With lube, comparable to Inks or Tealios in smoothness, with a nice sound, and significantly cheaper than Inks or Tealios (and also available at NovelKeys). I still haven’t tried good old Gat yellows!

1 Like

Don’t dismantle your build if it works for you as it is, just to test top mount system :wink:

Thanks for Novelkey tip, already ordered there, it takes it’s time but I’m not in a hurry :stuck_out_tongue:

TTC Gold V2 reds looks to be lighter than Inks, what is your preference between those two in term of stiffness ?

1 Like

Ha! No worries, not in any hurry to open it up. But it is something I want to try, I’m curious too. I also want to get a better look at just where the gasket is making contact with the board, to better understand whether it might be possible to retrofit this kind of gasket mount on other boards.

In terms of stiffness alone, I preferred the reds - but in the boards, the reds were right on the edge of being too responsive. I type reasonably quickly with a self-taught approximation of touch typing, but it’s a sloppy mistake-laden version of touch typing. and while the reds felt a bit better, I’ve been finding that I type slightly more accurately when the keys have a touch more resistance than the lubed TTC reds offered.

1 Like

Build #29: EXT65

Over the past several months, I’ve been living with the 1800 layout, and have really grown to love it.
Relative to a full-size, nothing I use is lost with 1800, and I gain valuable ergonomic real estate
for the mouse.

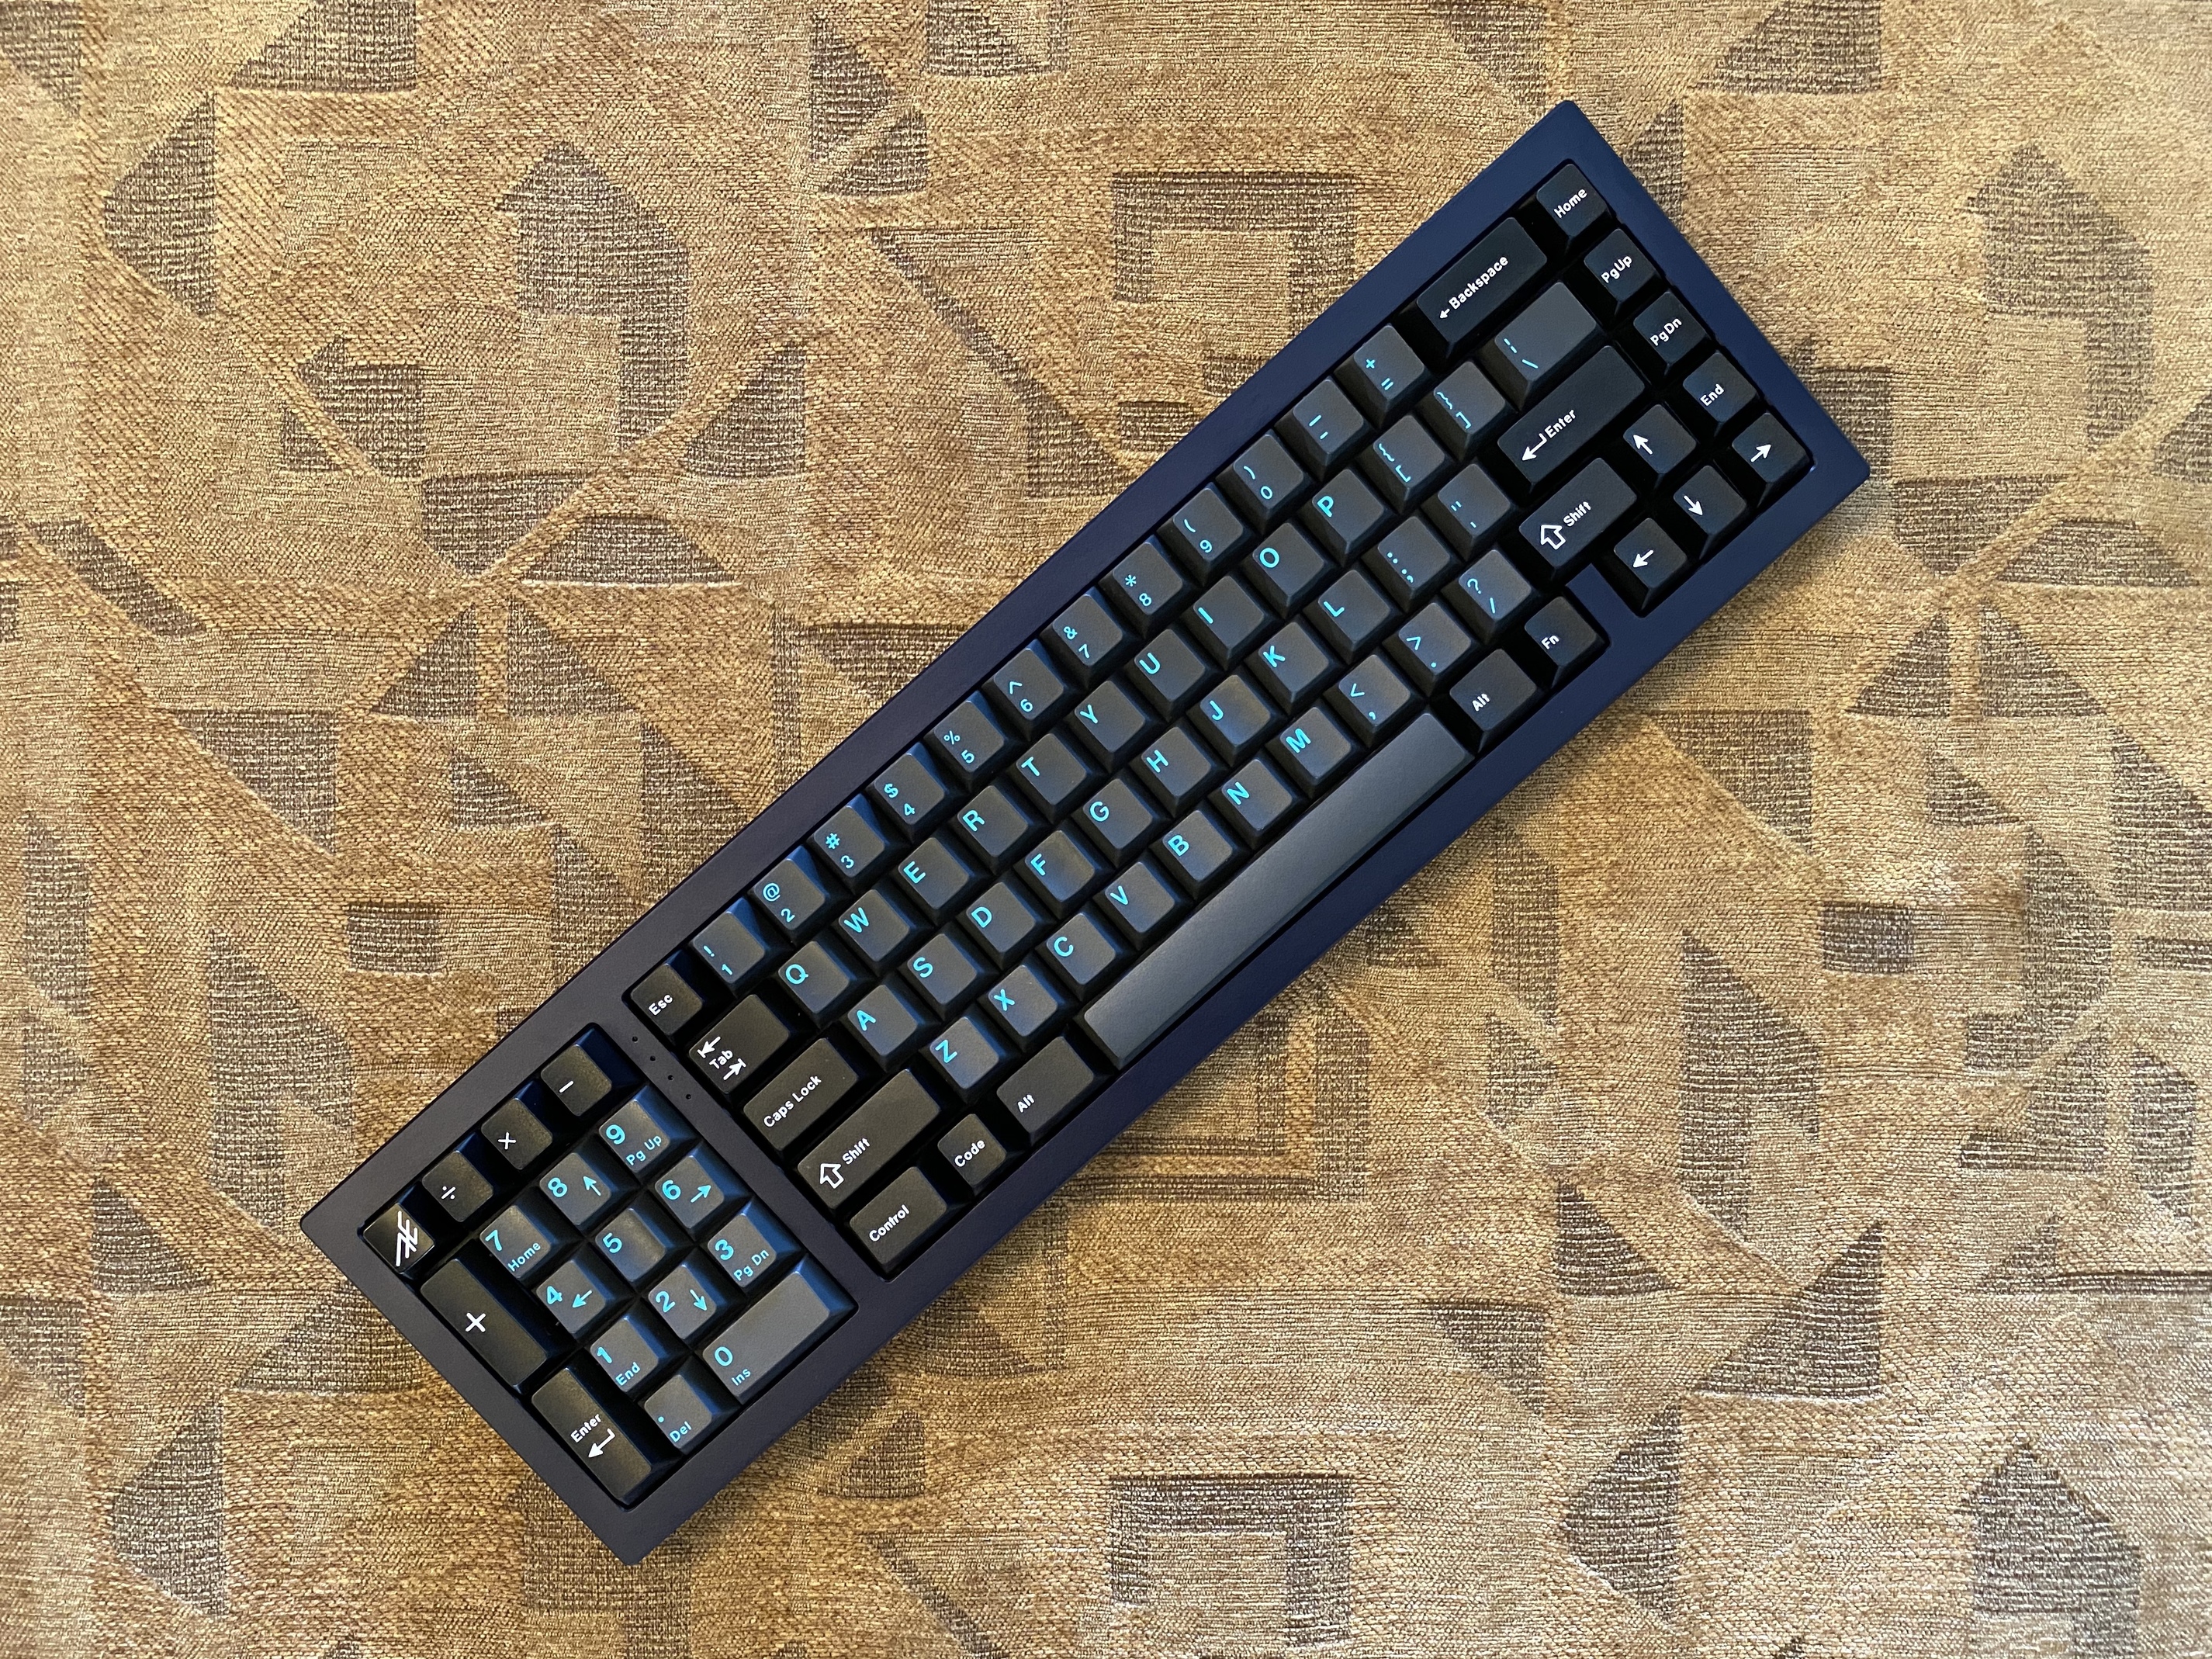
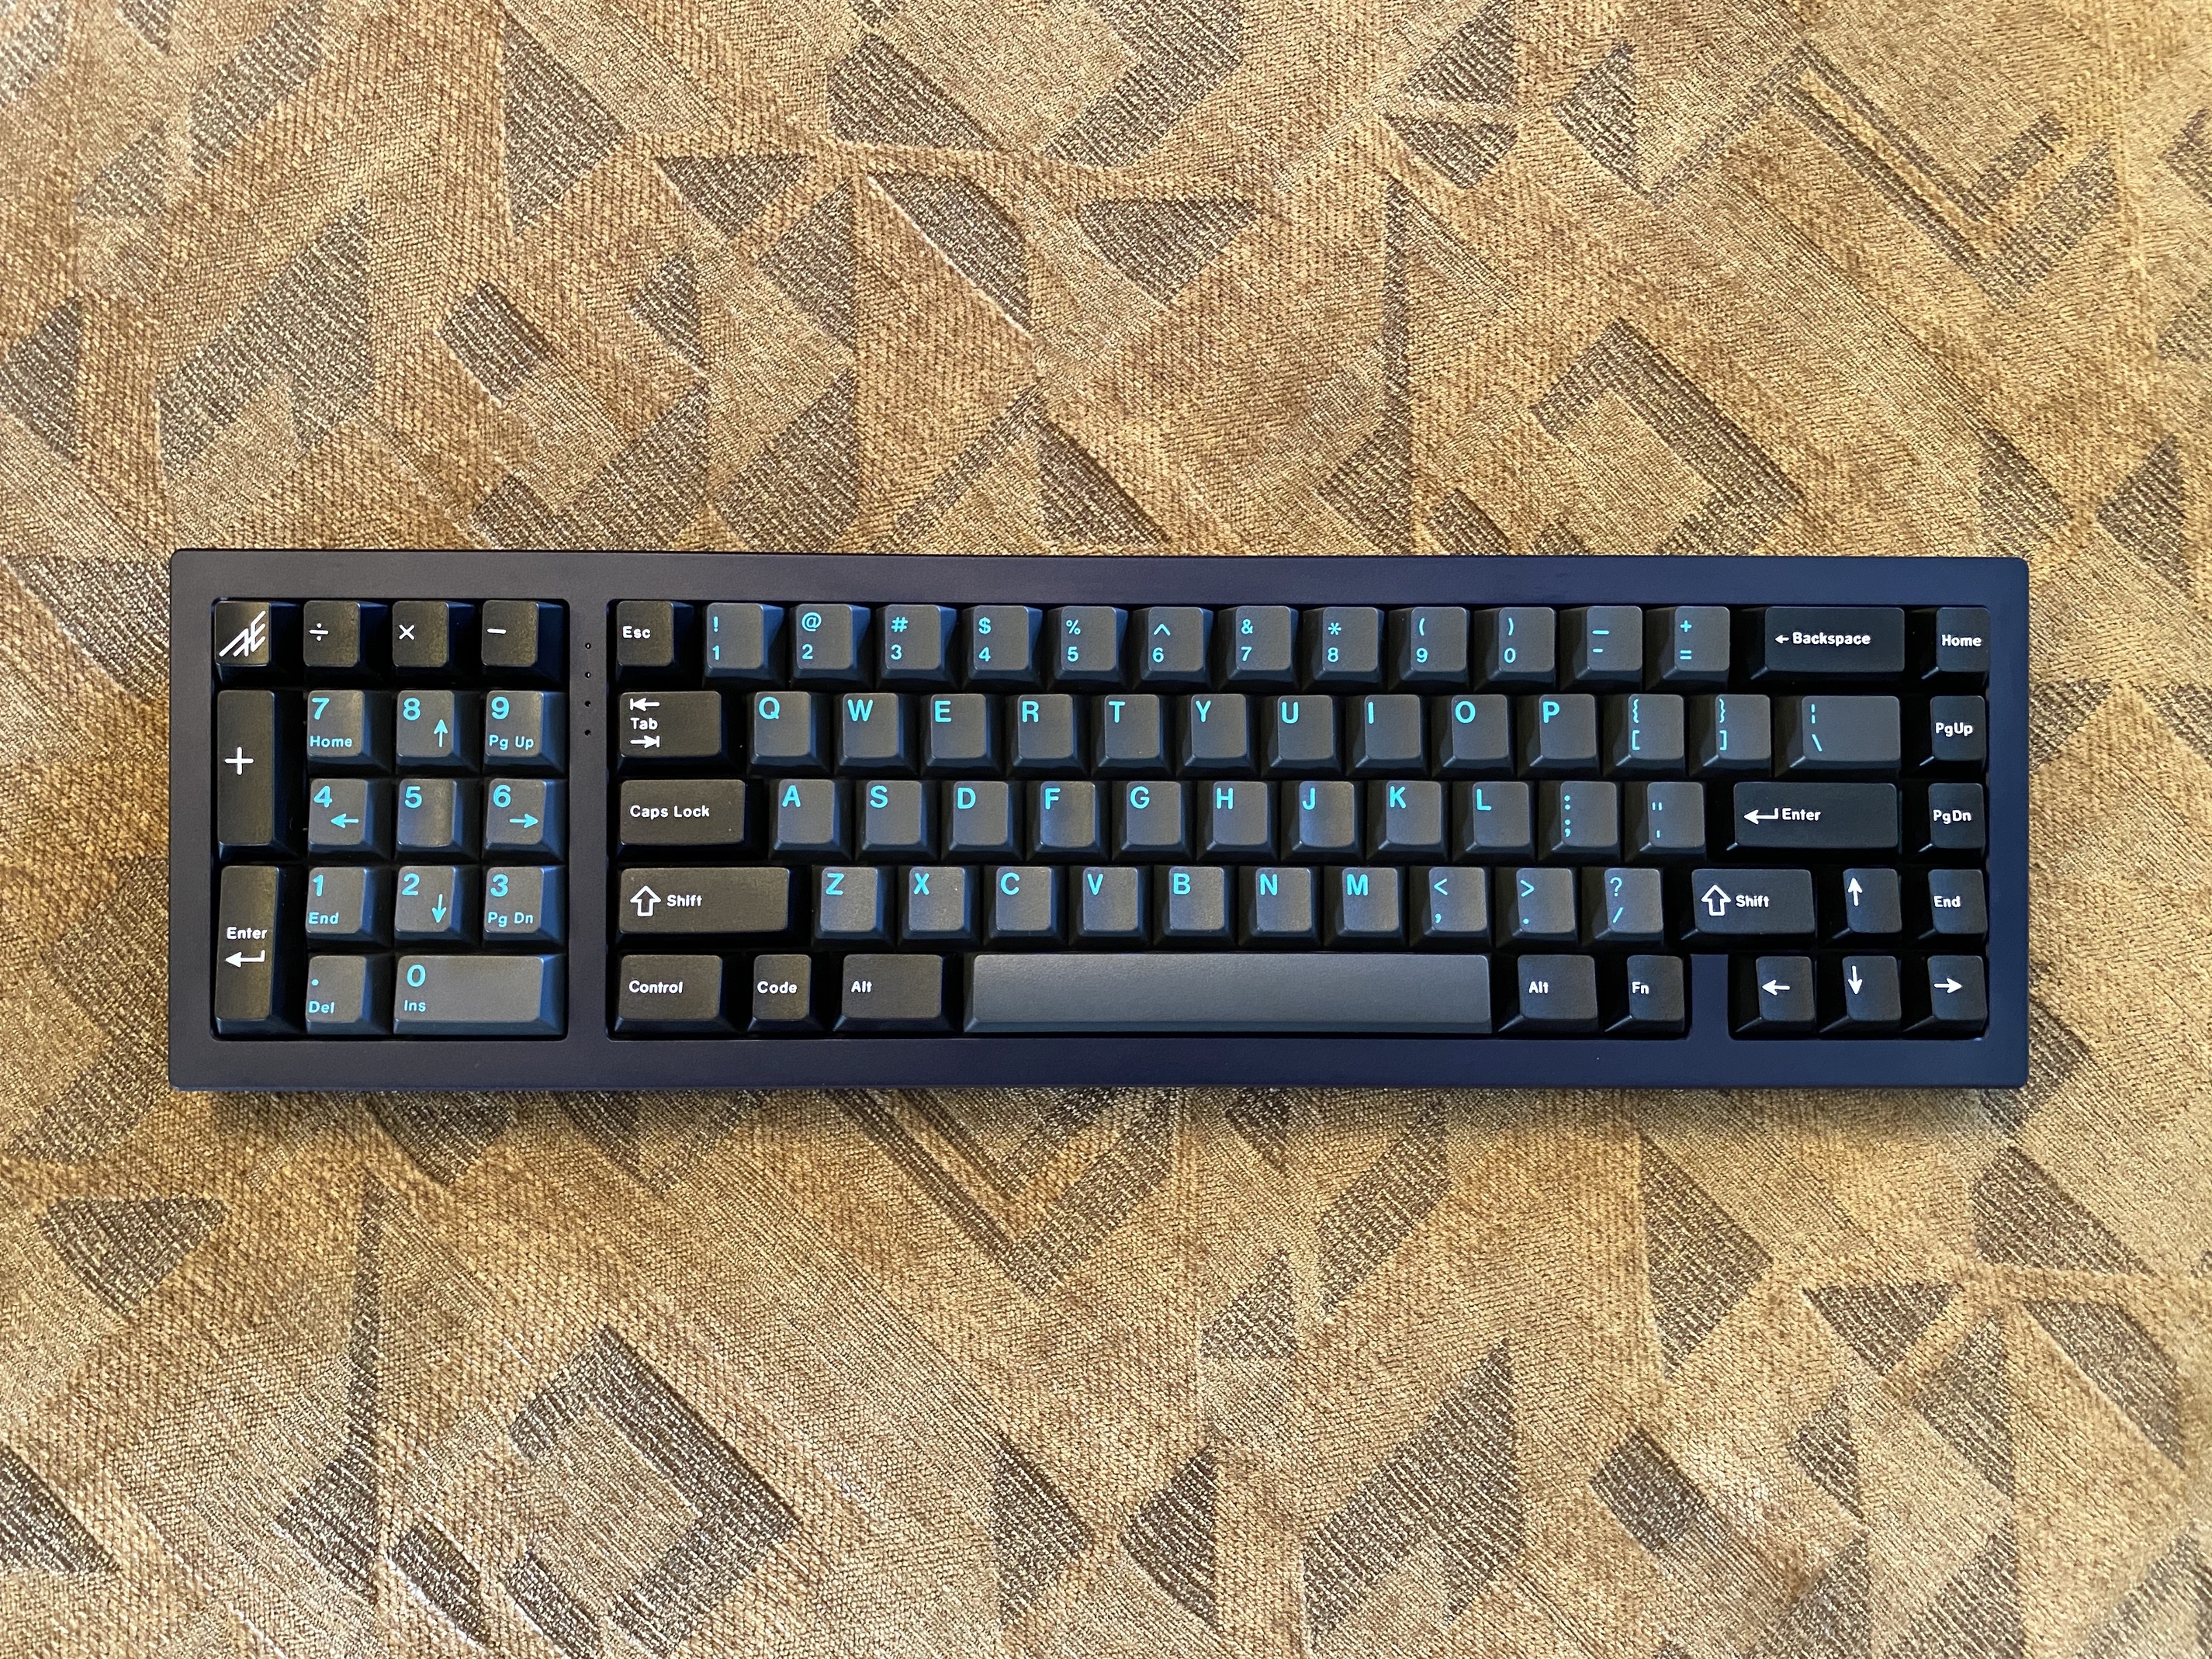
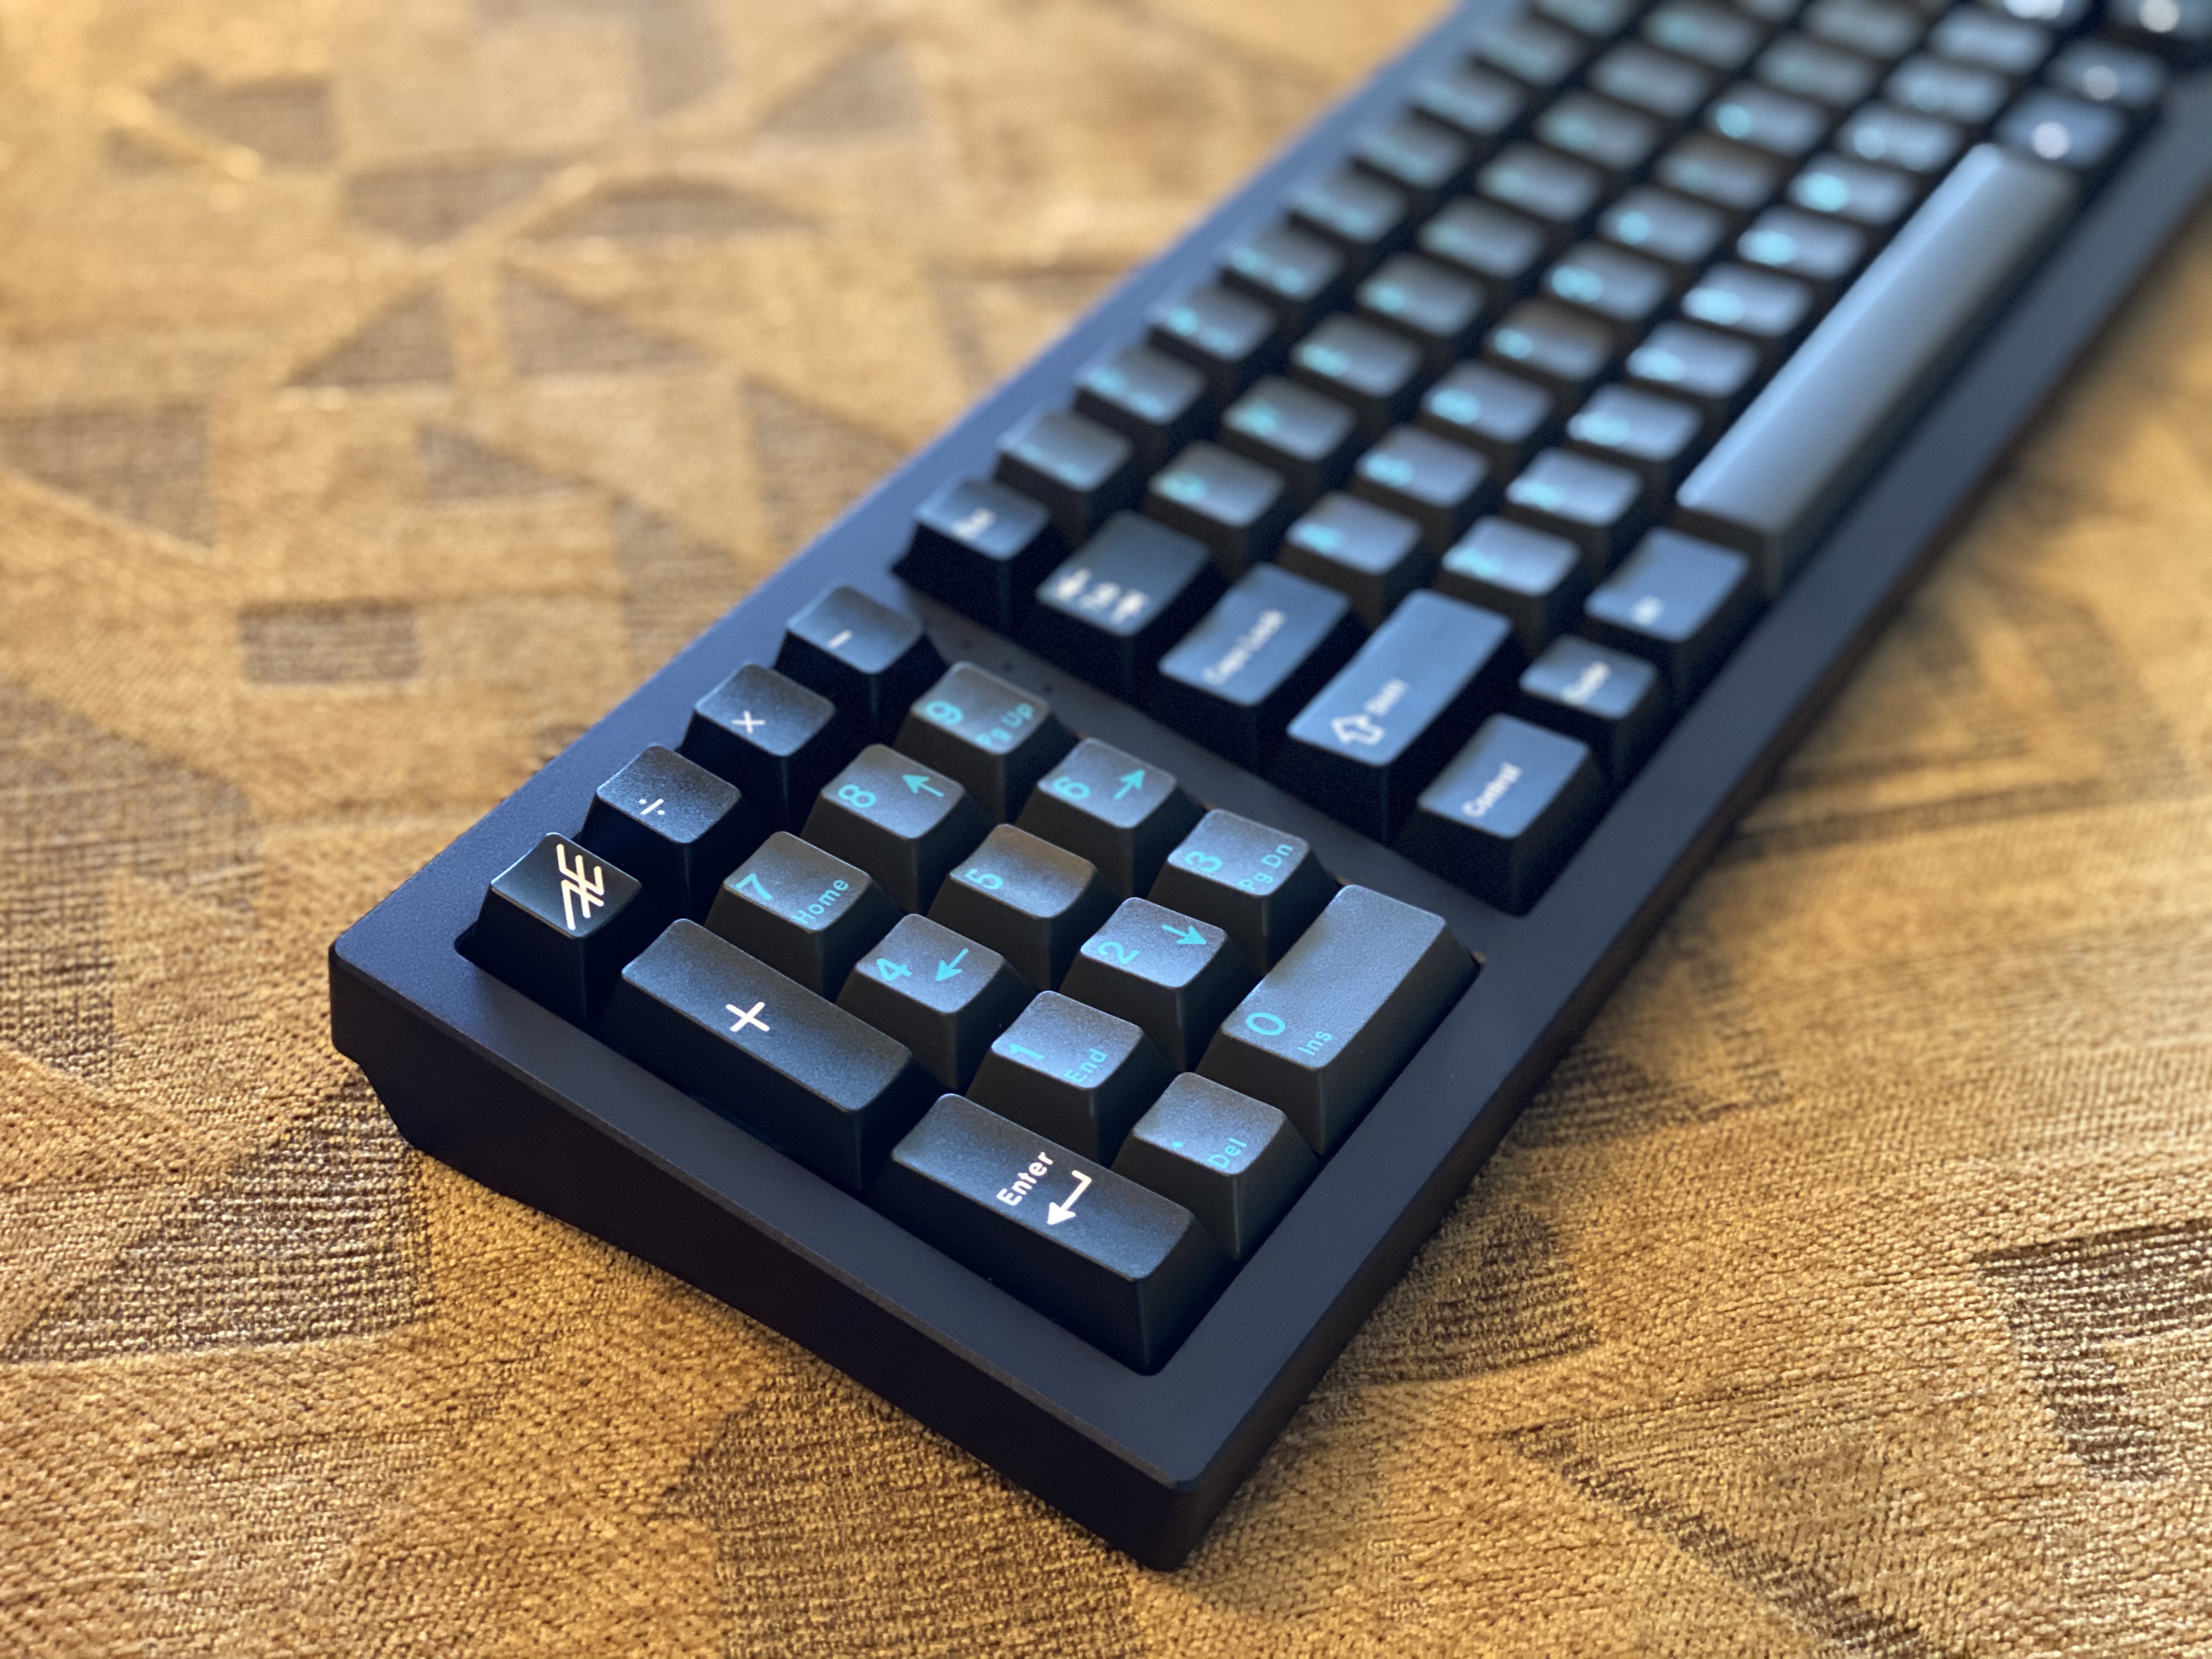
But that doesn’t mean there’s no room for improvement. Even though I’m right-handed, I can appreciate the idea of moving the numpad into a southpaw configuration, and turning the primary portion of the board into a 65, dropping the little-used F-row along the way. Which is more or less how you end up with the layout on the EXT65, the second board from AEboards. As soon as I saw this board for the first time, I knew I had to get in, just to give this layout a shot.

In unrelated news, Chewwy of Mechs on Deck came up with a new and interesting tactile frankenswitch, which he dubbed a Zyko - a combination of a V2 Zealio bottom, a Halo stem, and a Panda top. After assembling one from spare switches to form an impression, I found the tactility to be more rounded than a Holy Panda, but with a crisp and sharp sound, both of which appealed to me. I knew immediately I wanted to try this combination on a full board. Why not the EXT65? Why not, indeed.

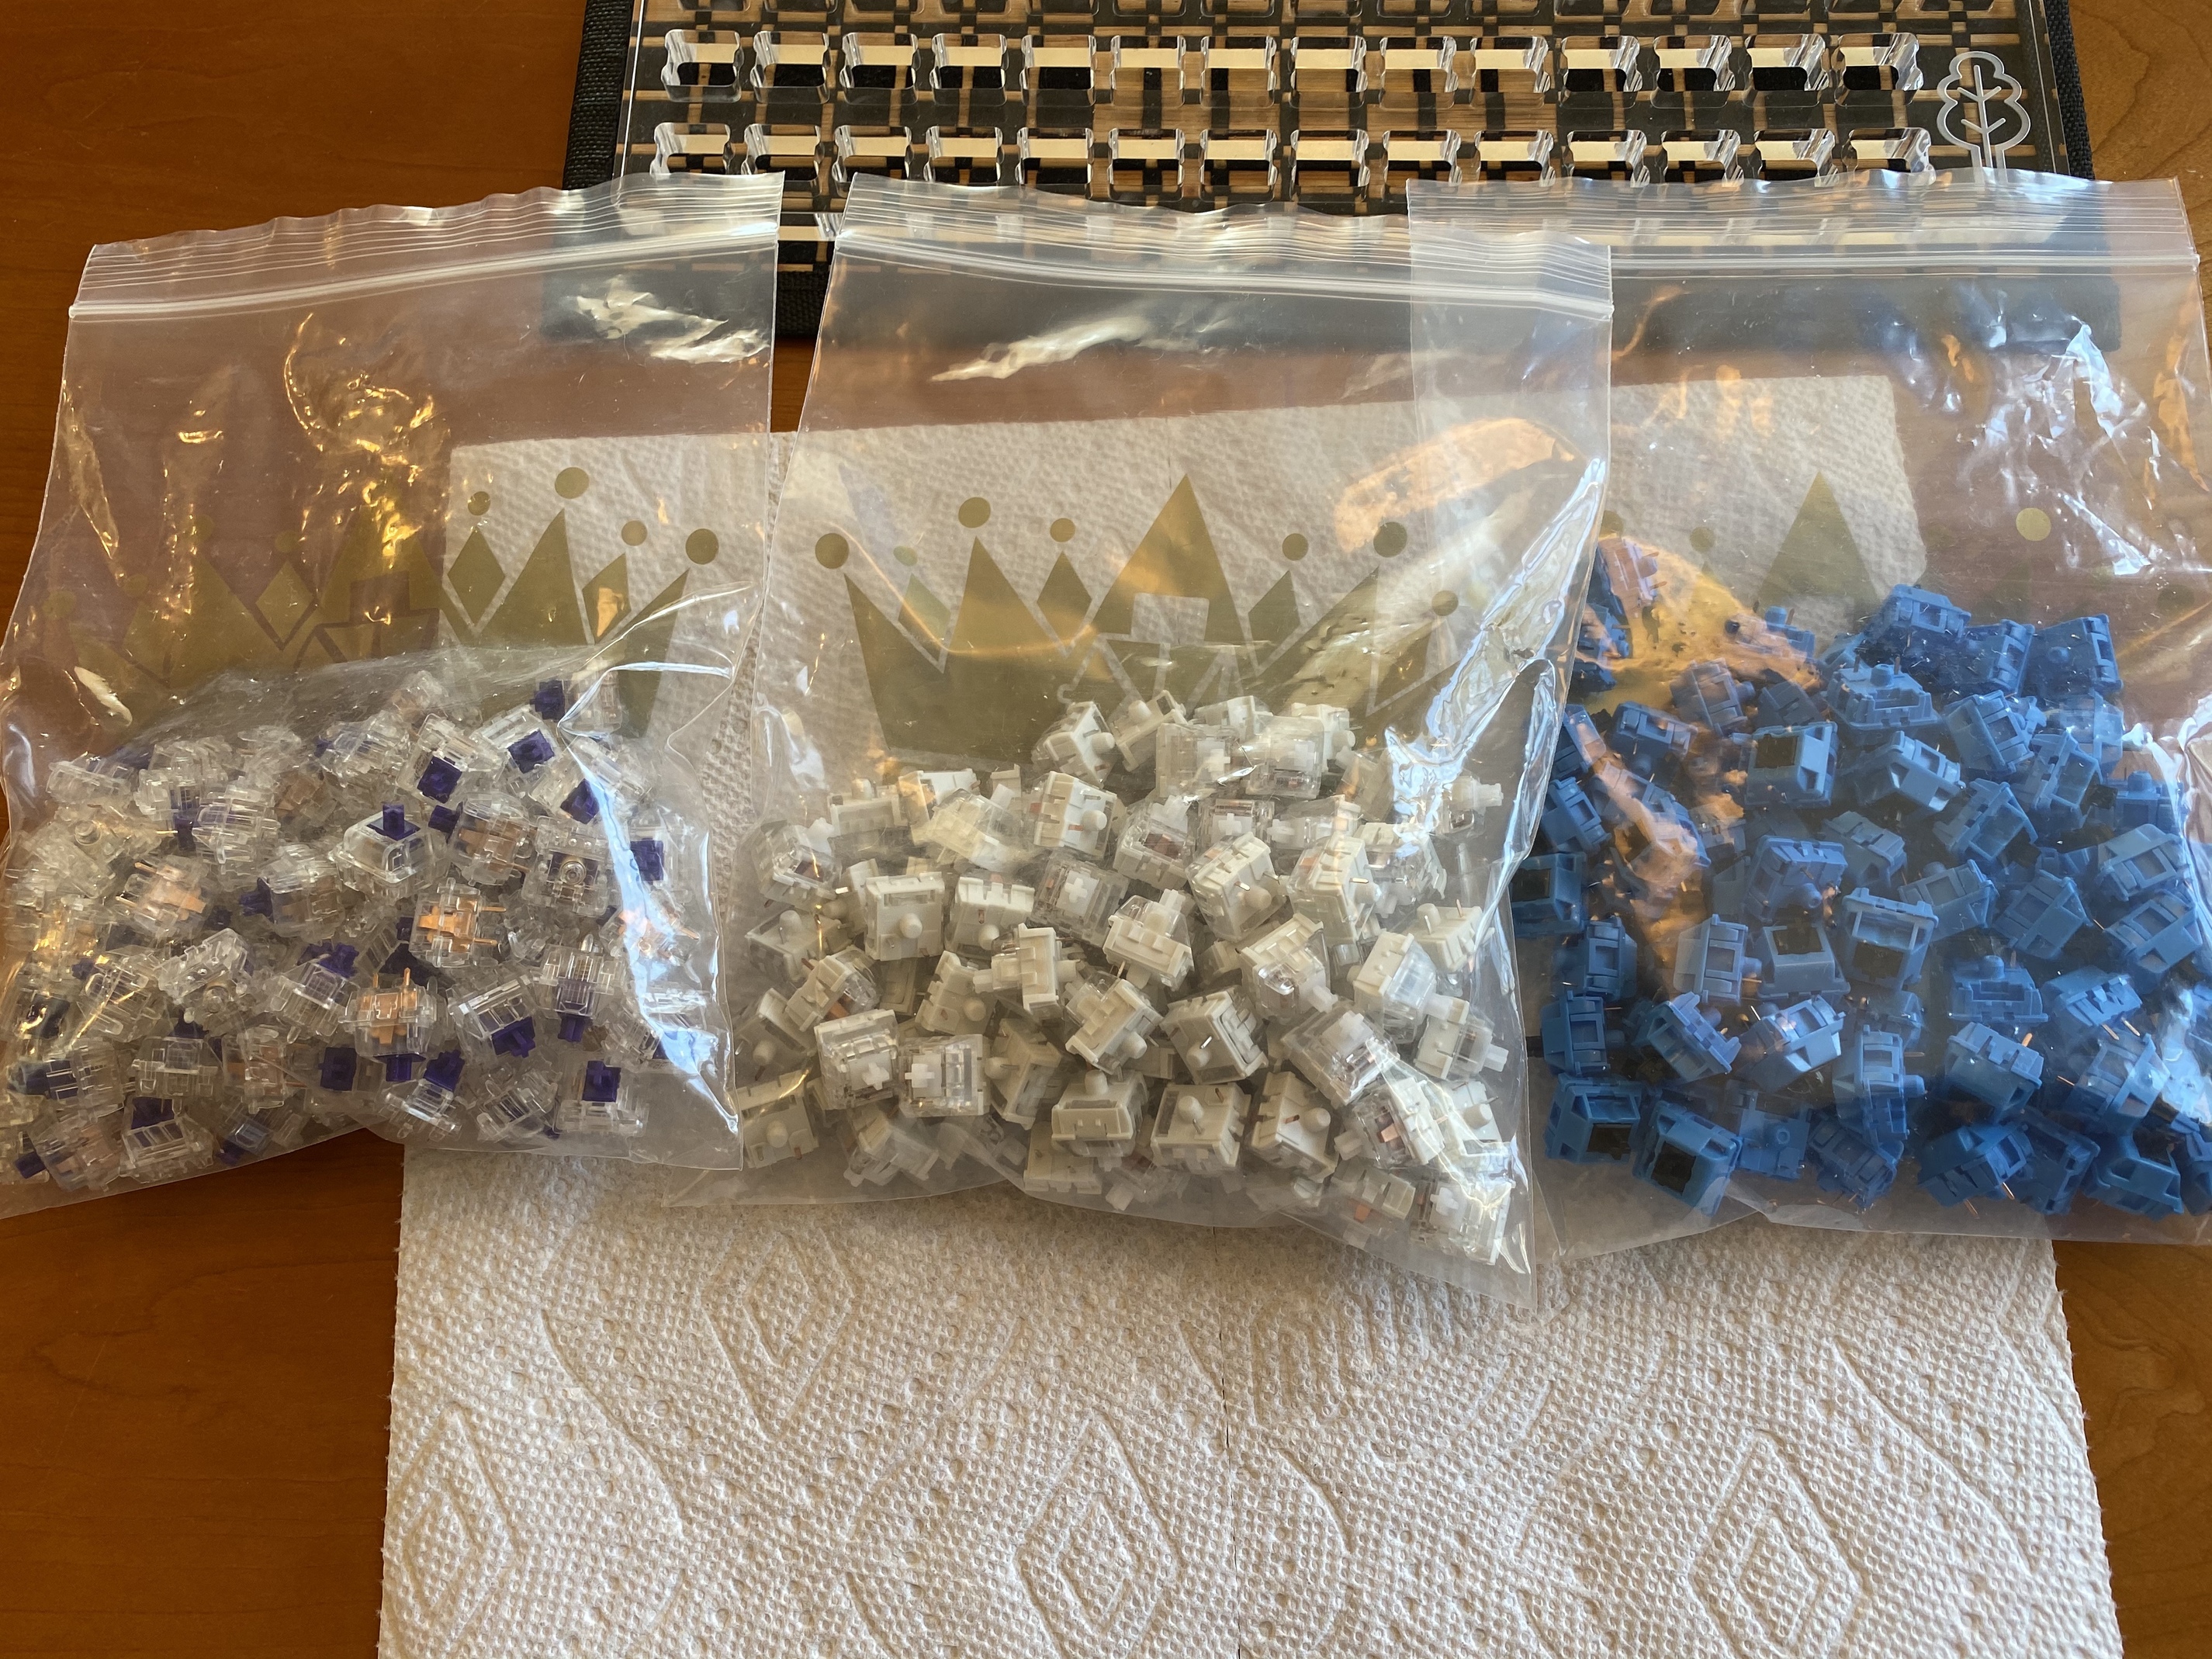
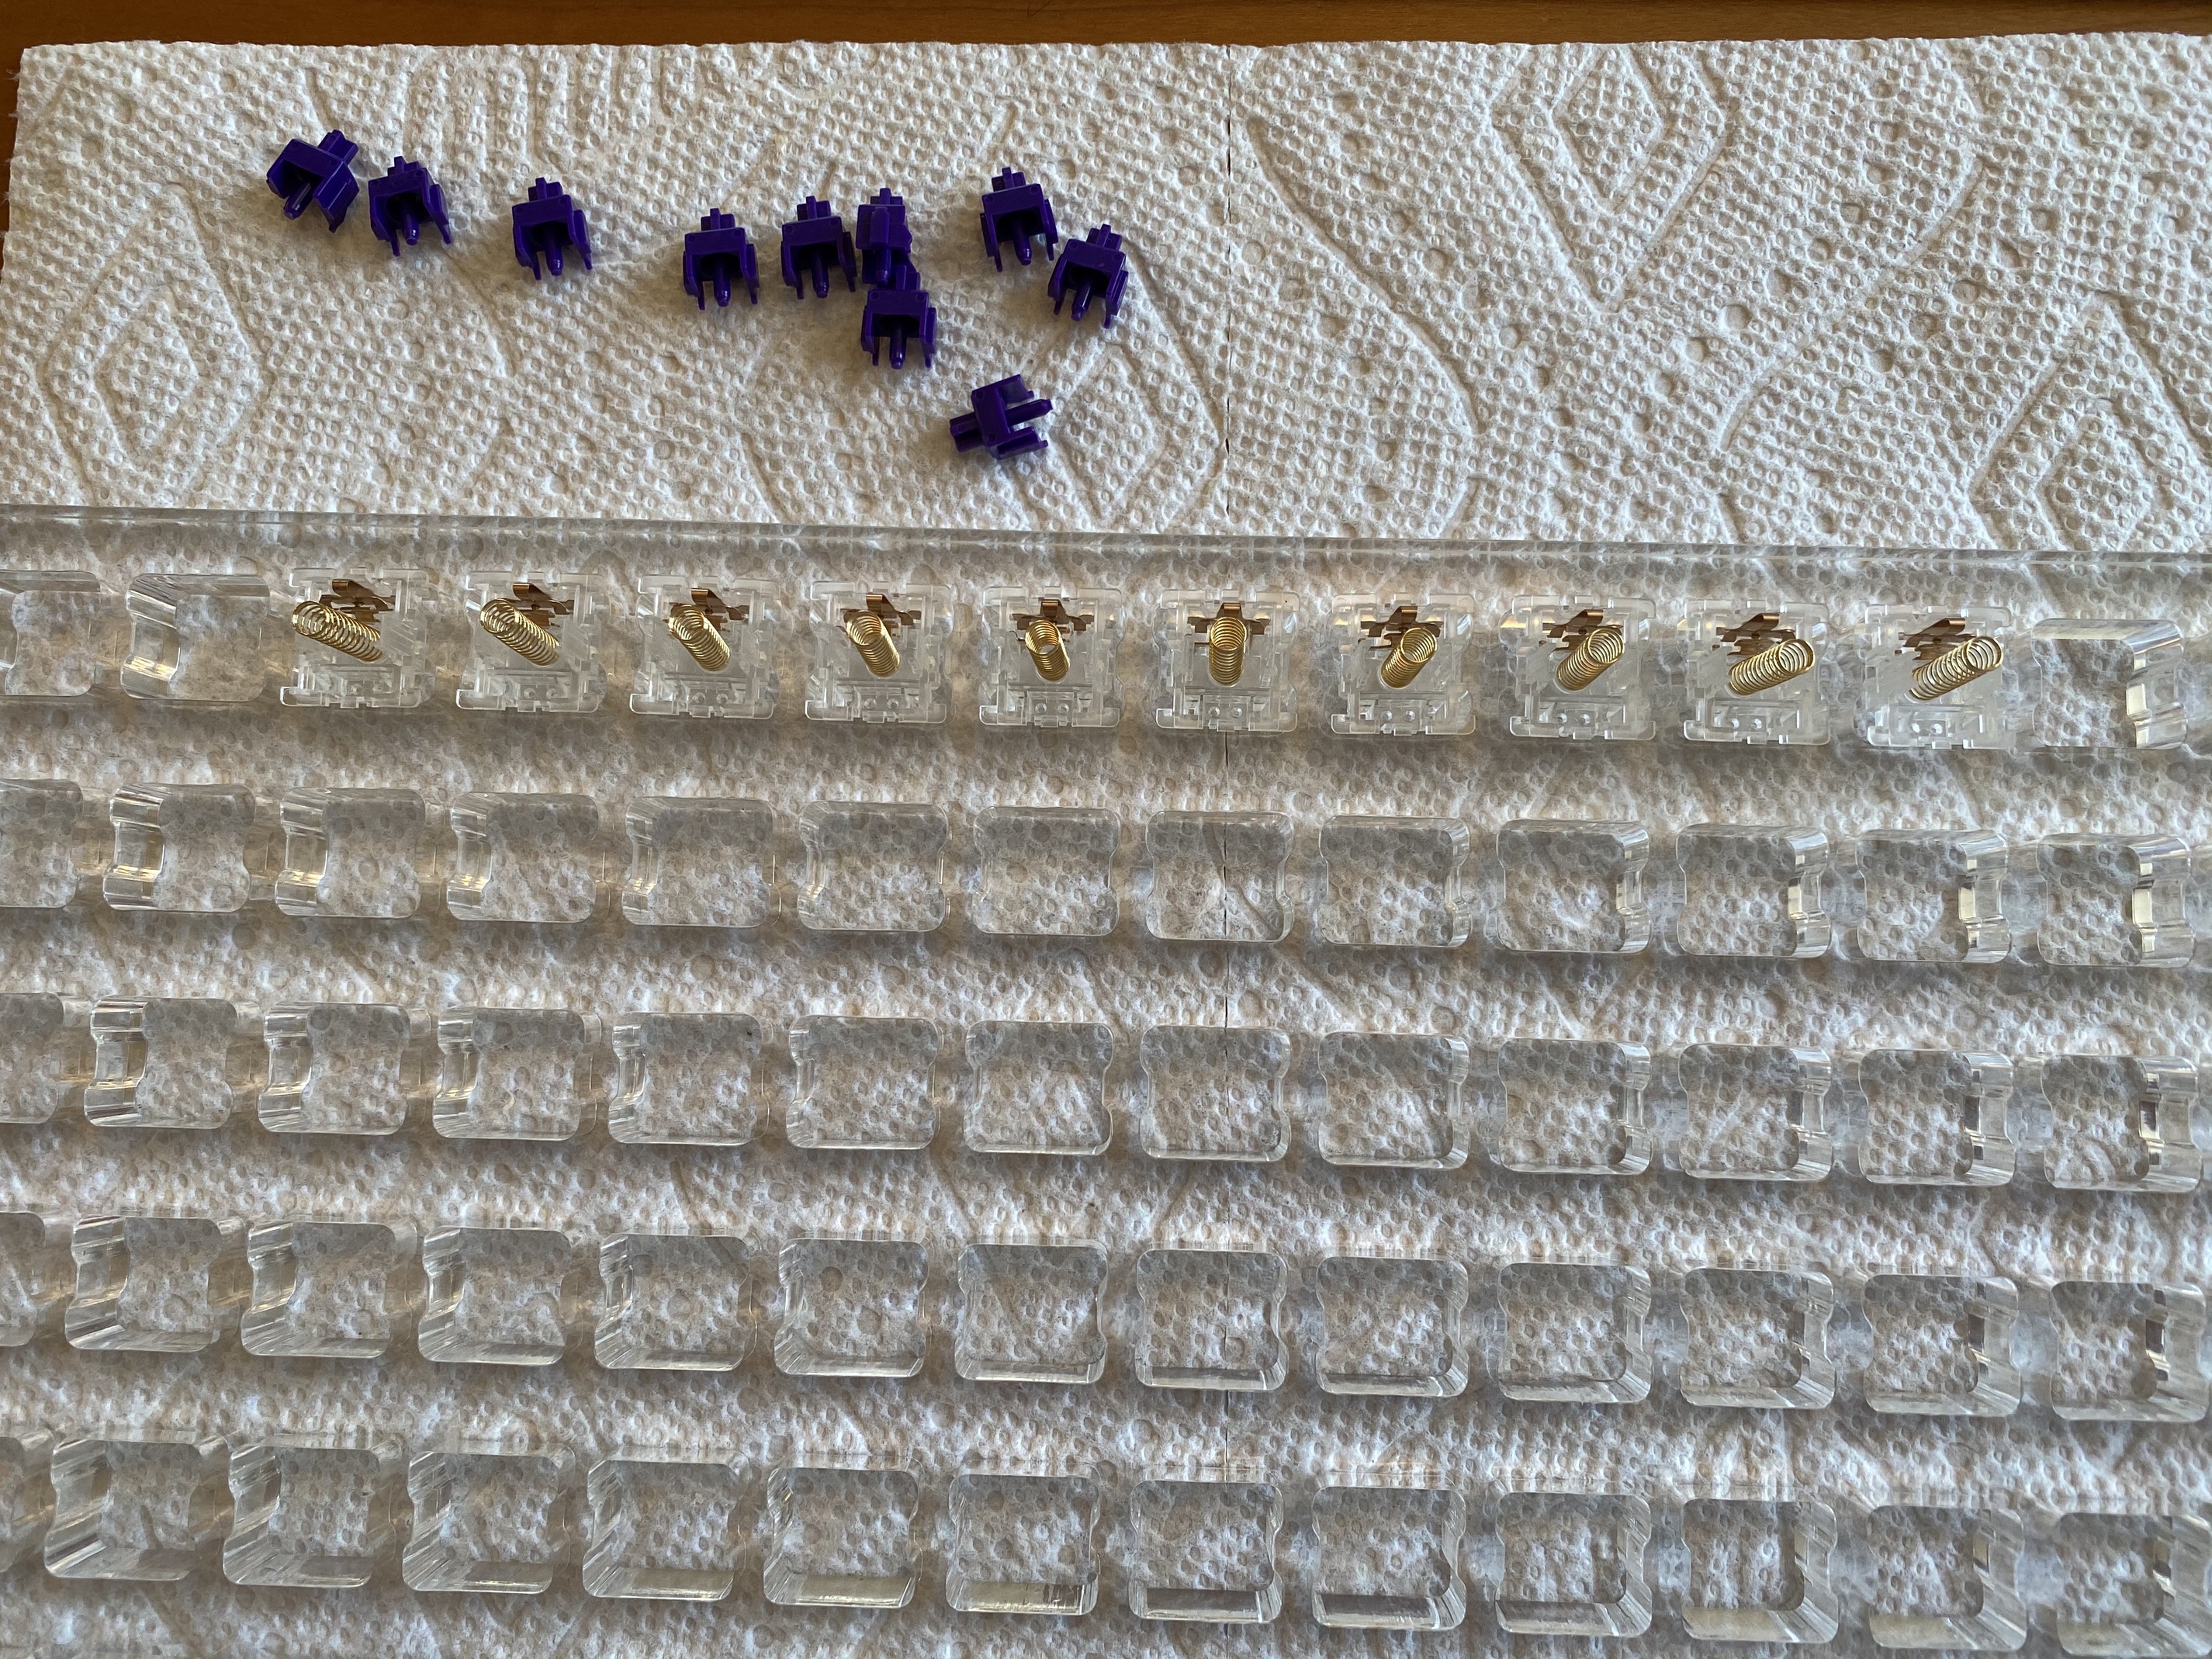
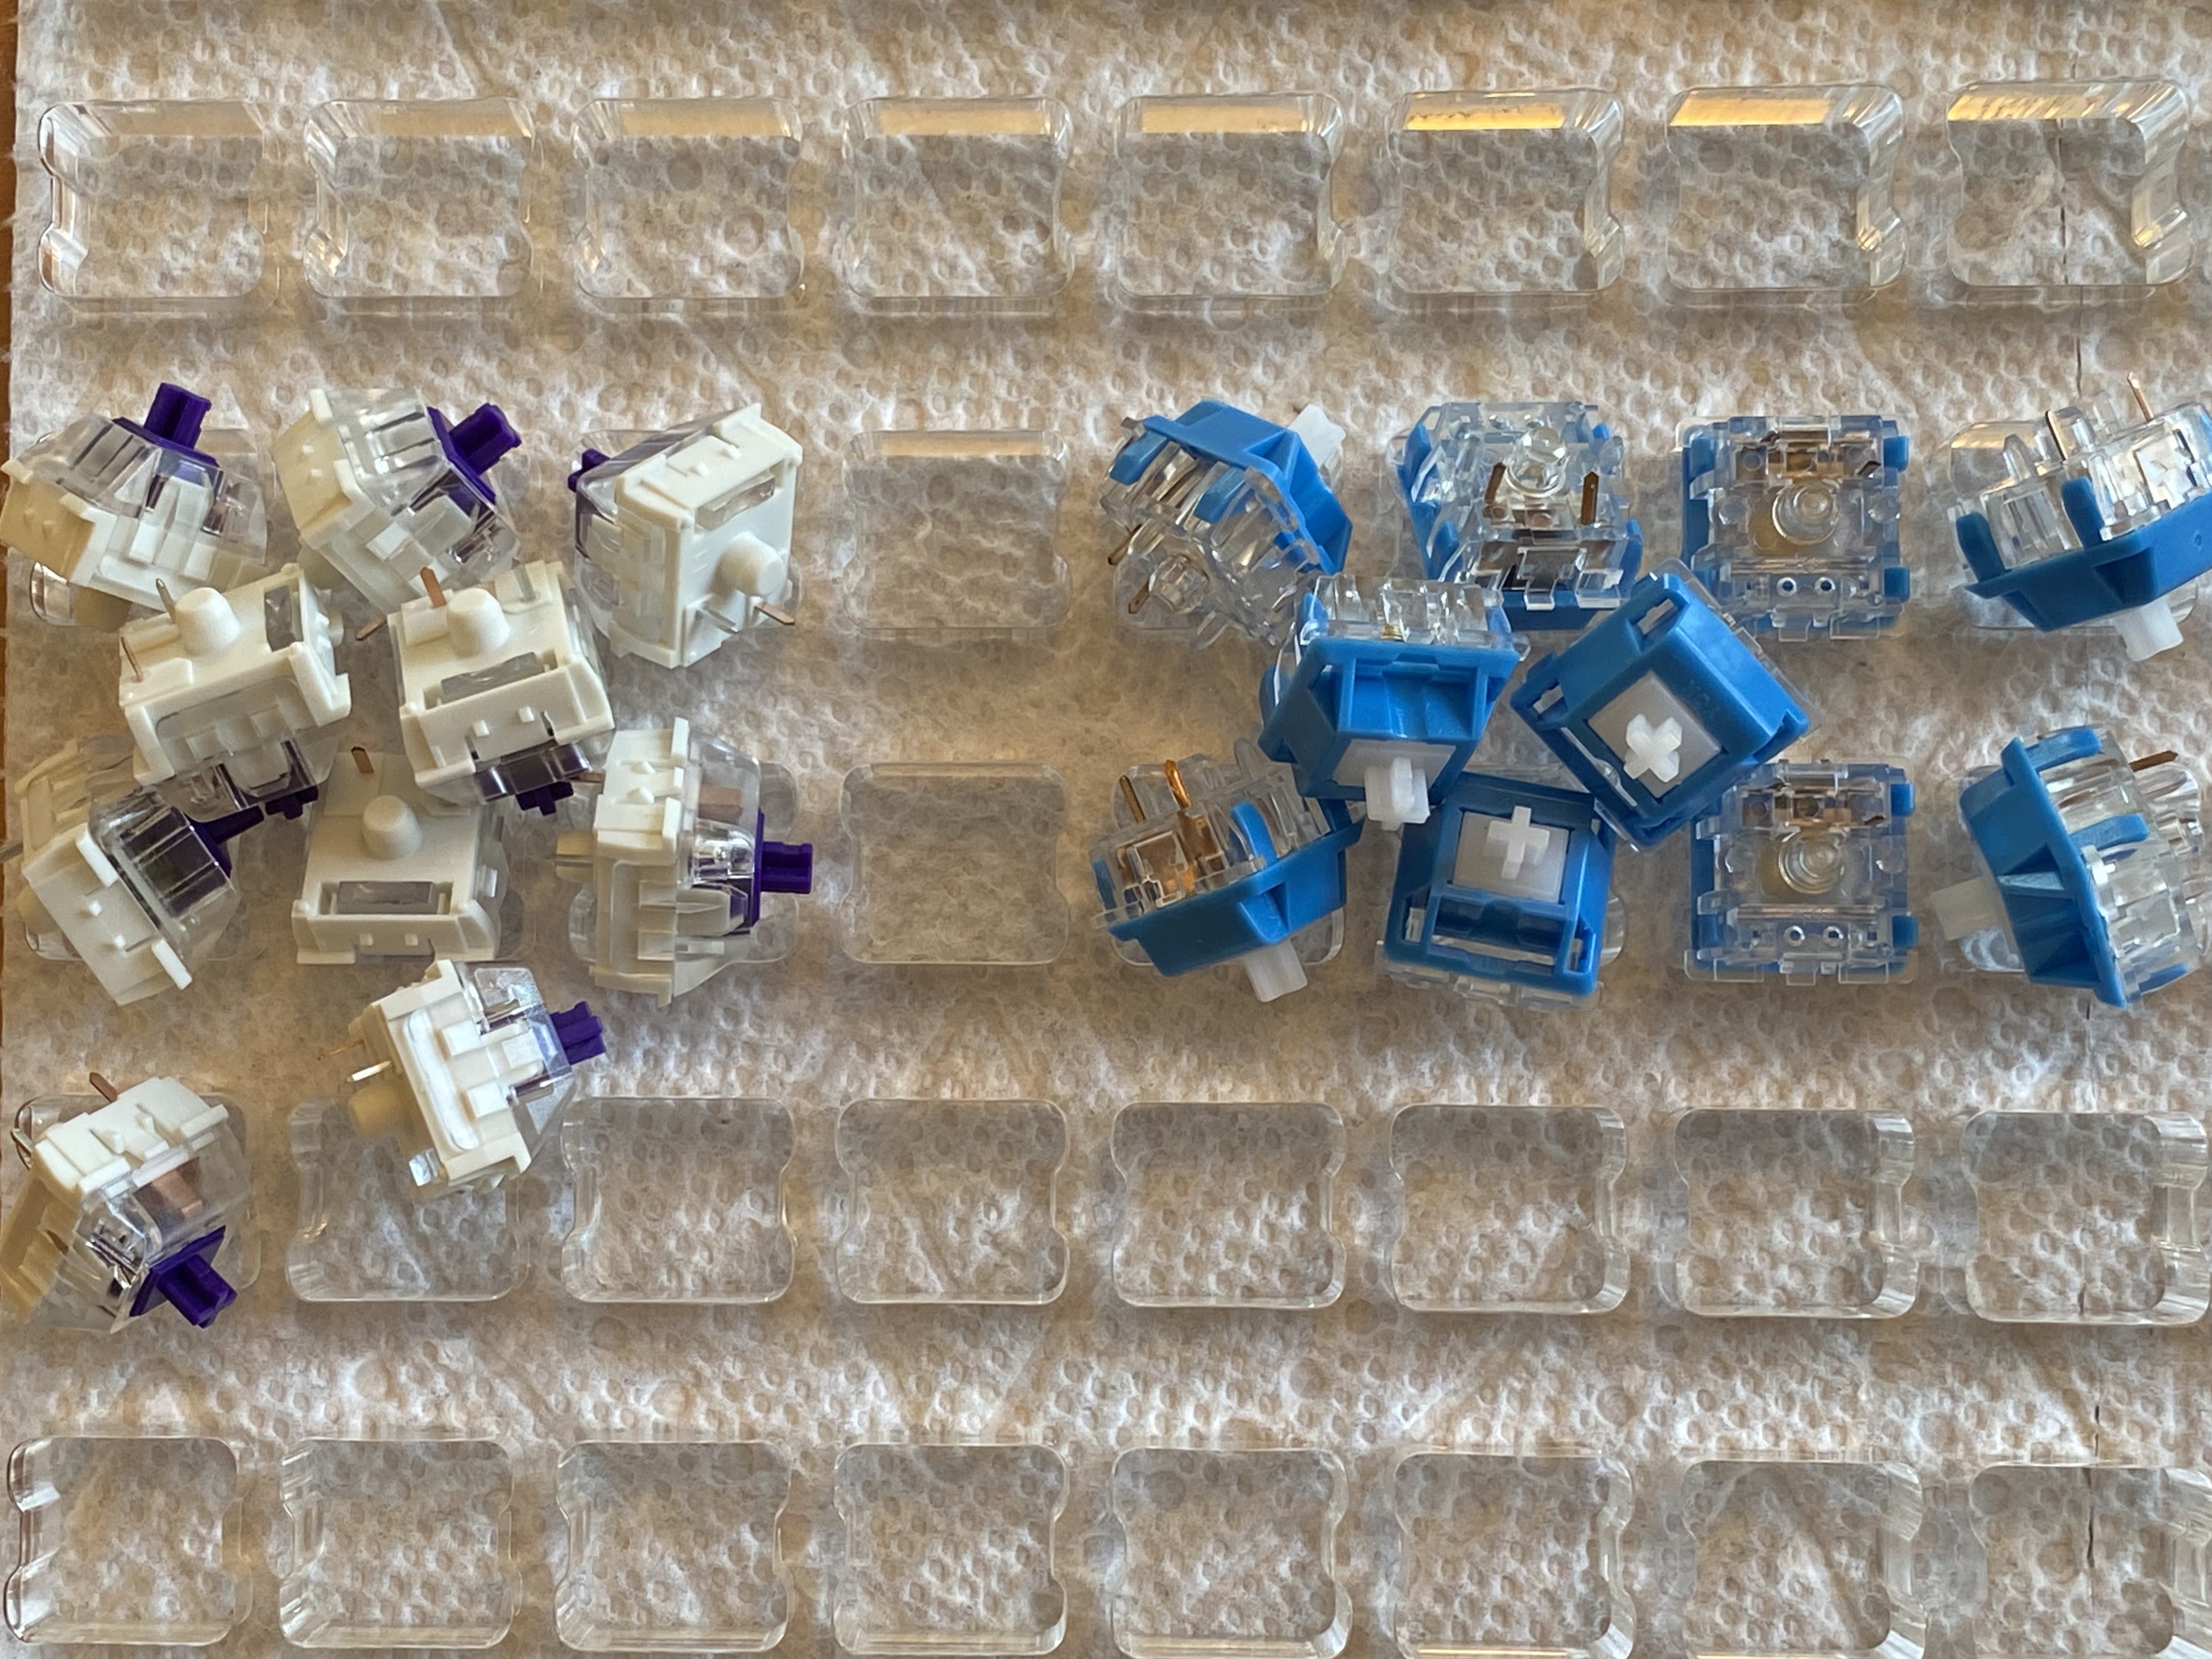
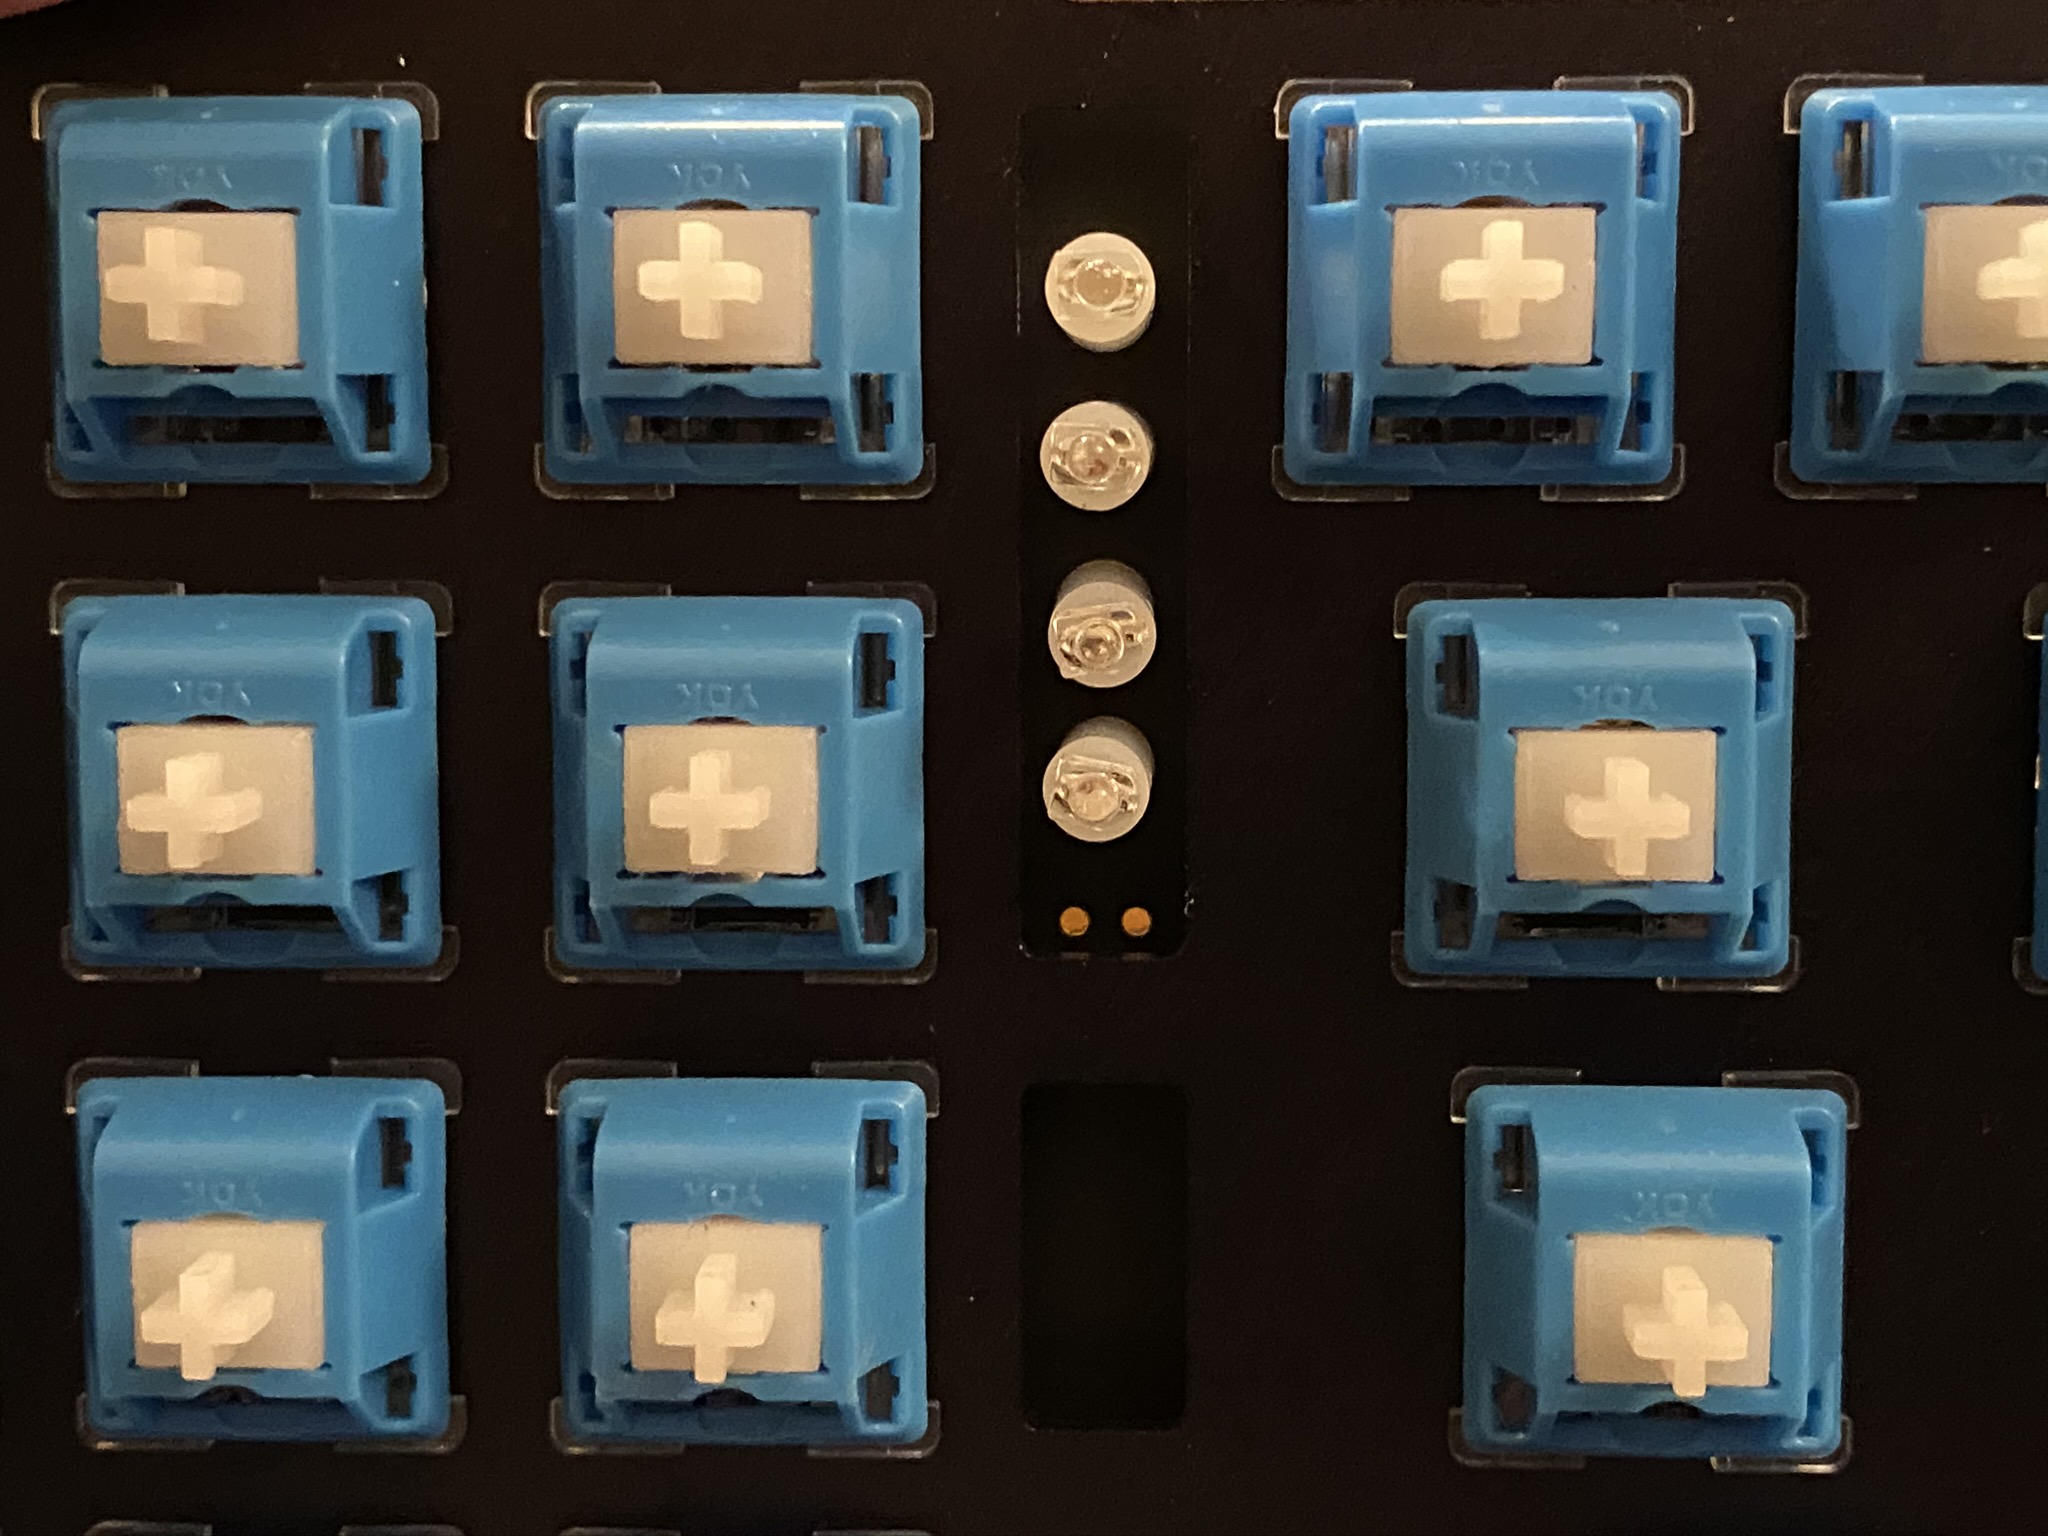
Let’s start with the Zykos. I used the following switches for the raw ingredients: V2 Zealios on the left, Halo Clears in the middle, and YOK Polar Pandas on the right.

Before we dive in and assemble some Zykos, it’s worth talking about housings for a bit. Here are the top housings for a V2 Zealio, a Halo, and the Polar YOK. From this side, other than the different side locking mechanisms on the Halo (Kailh), the geometries are relatively similar.

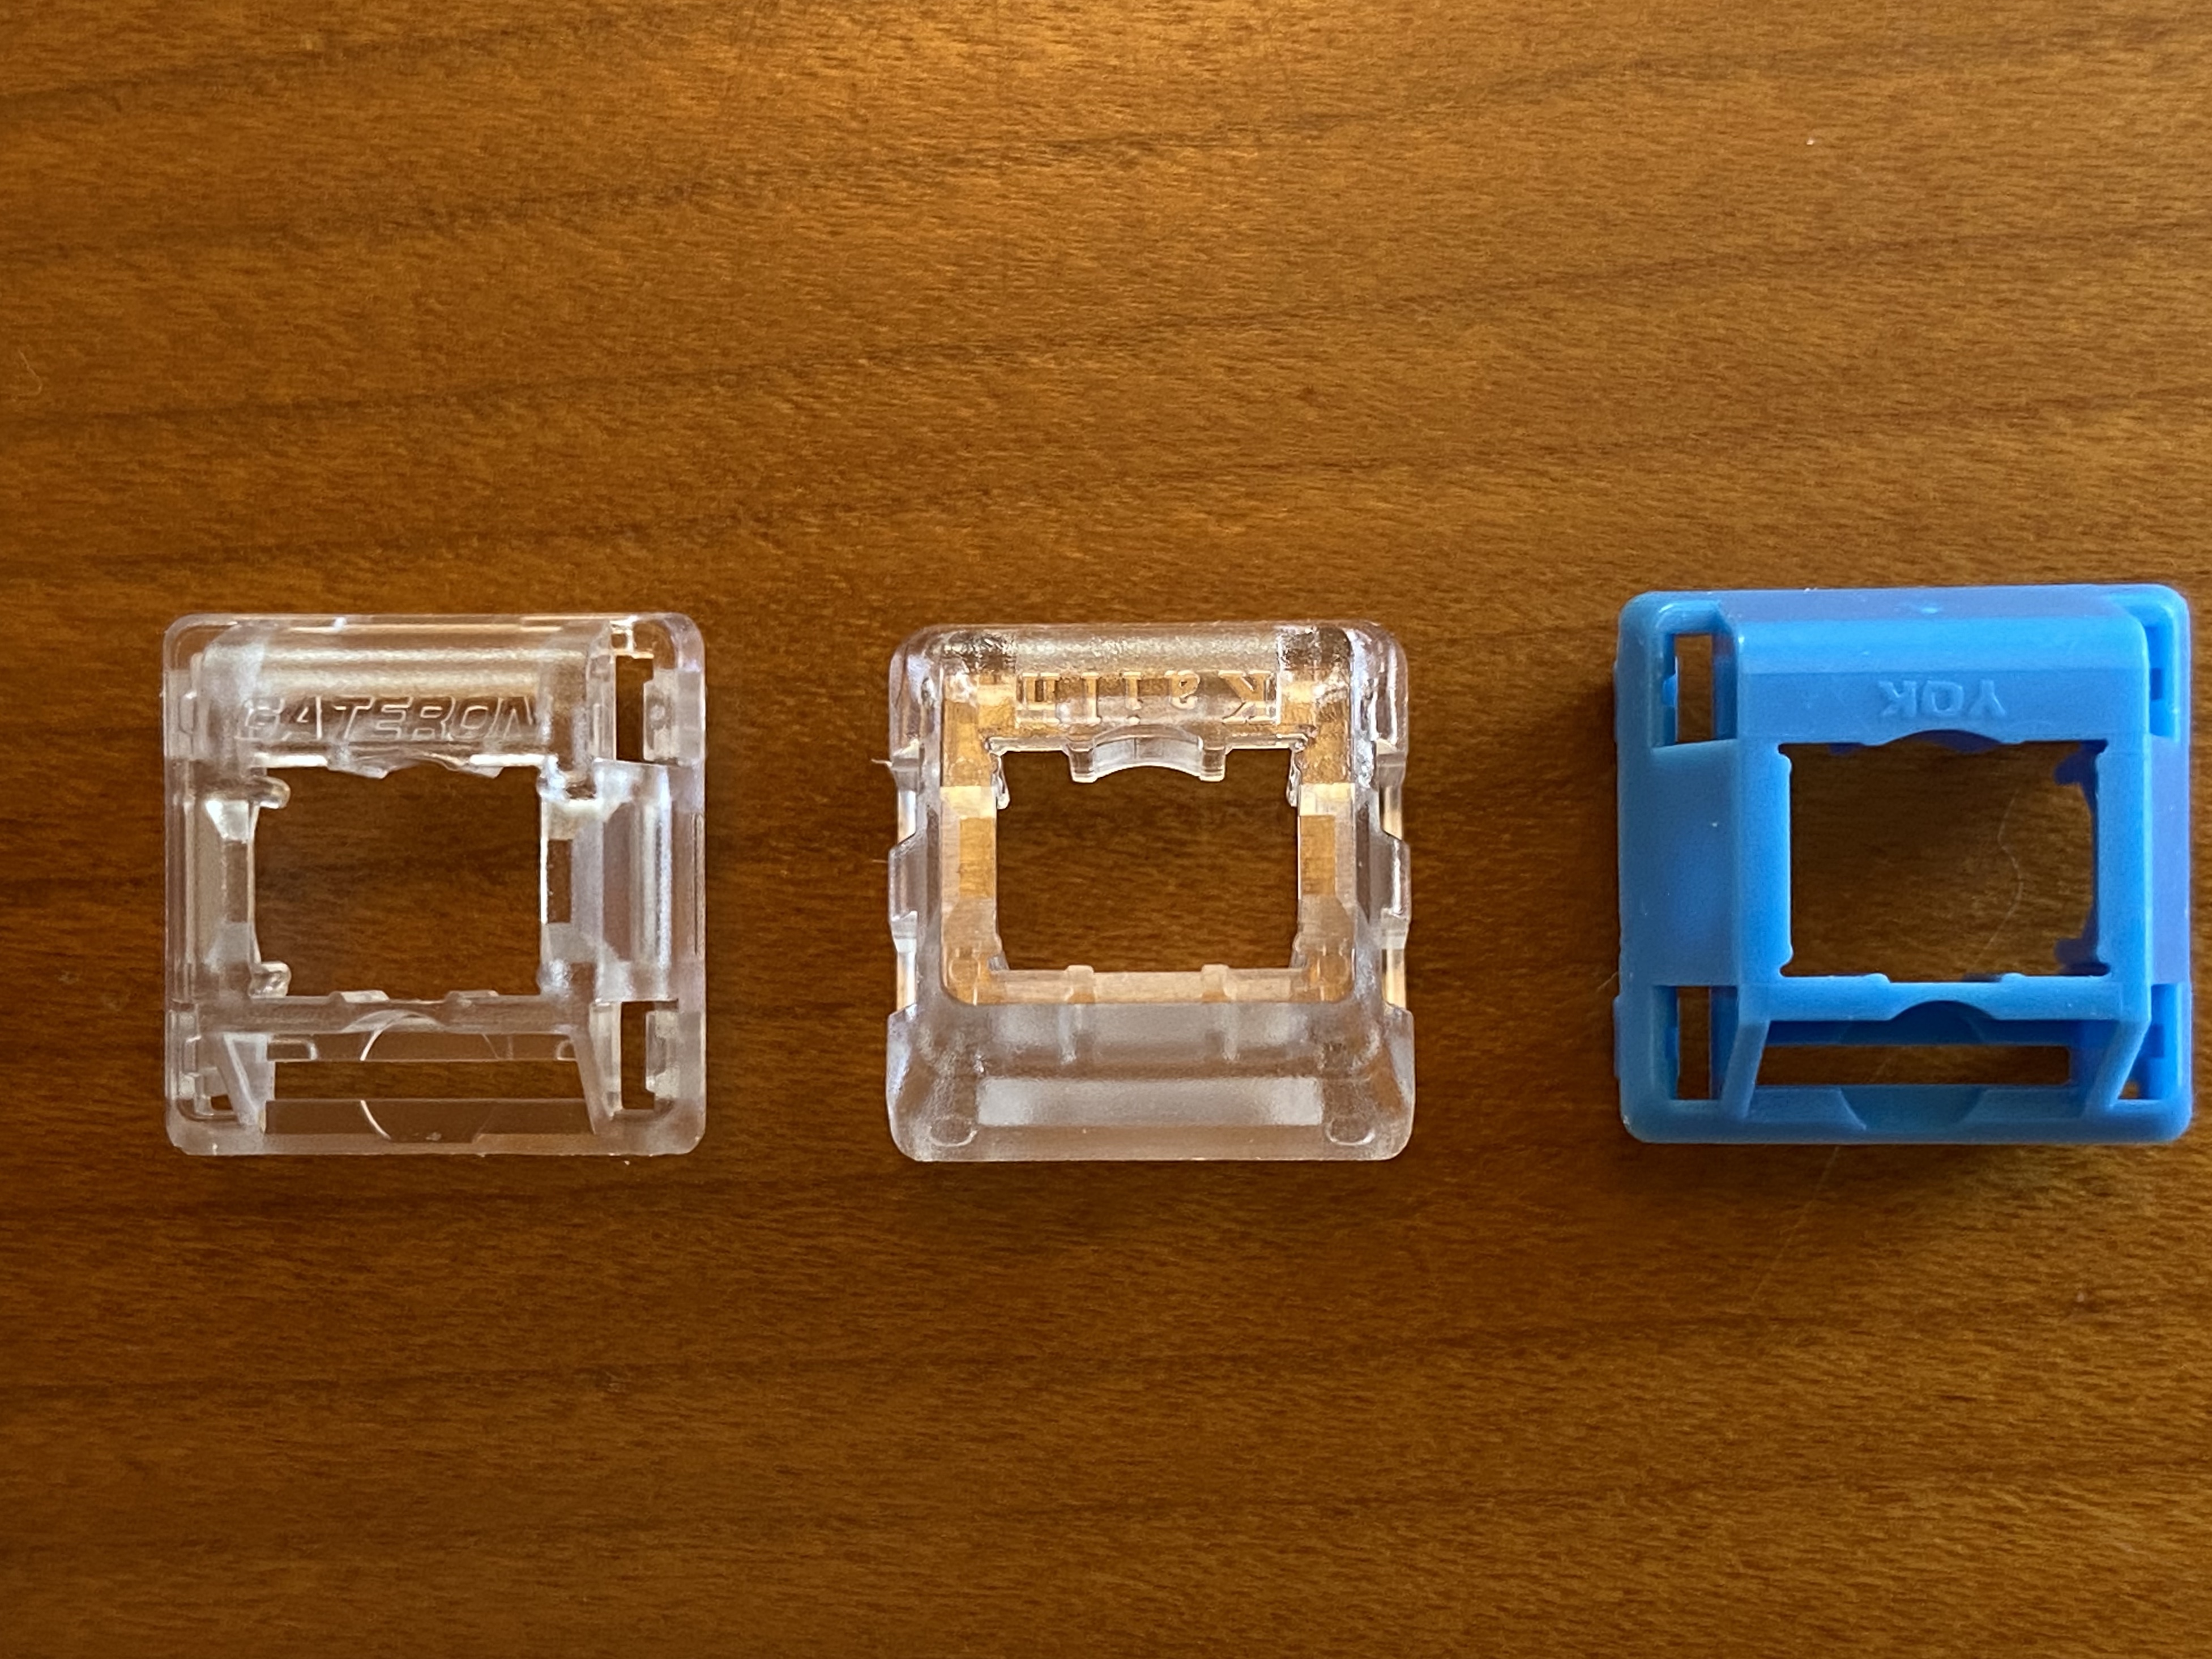
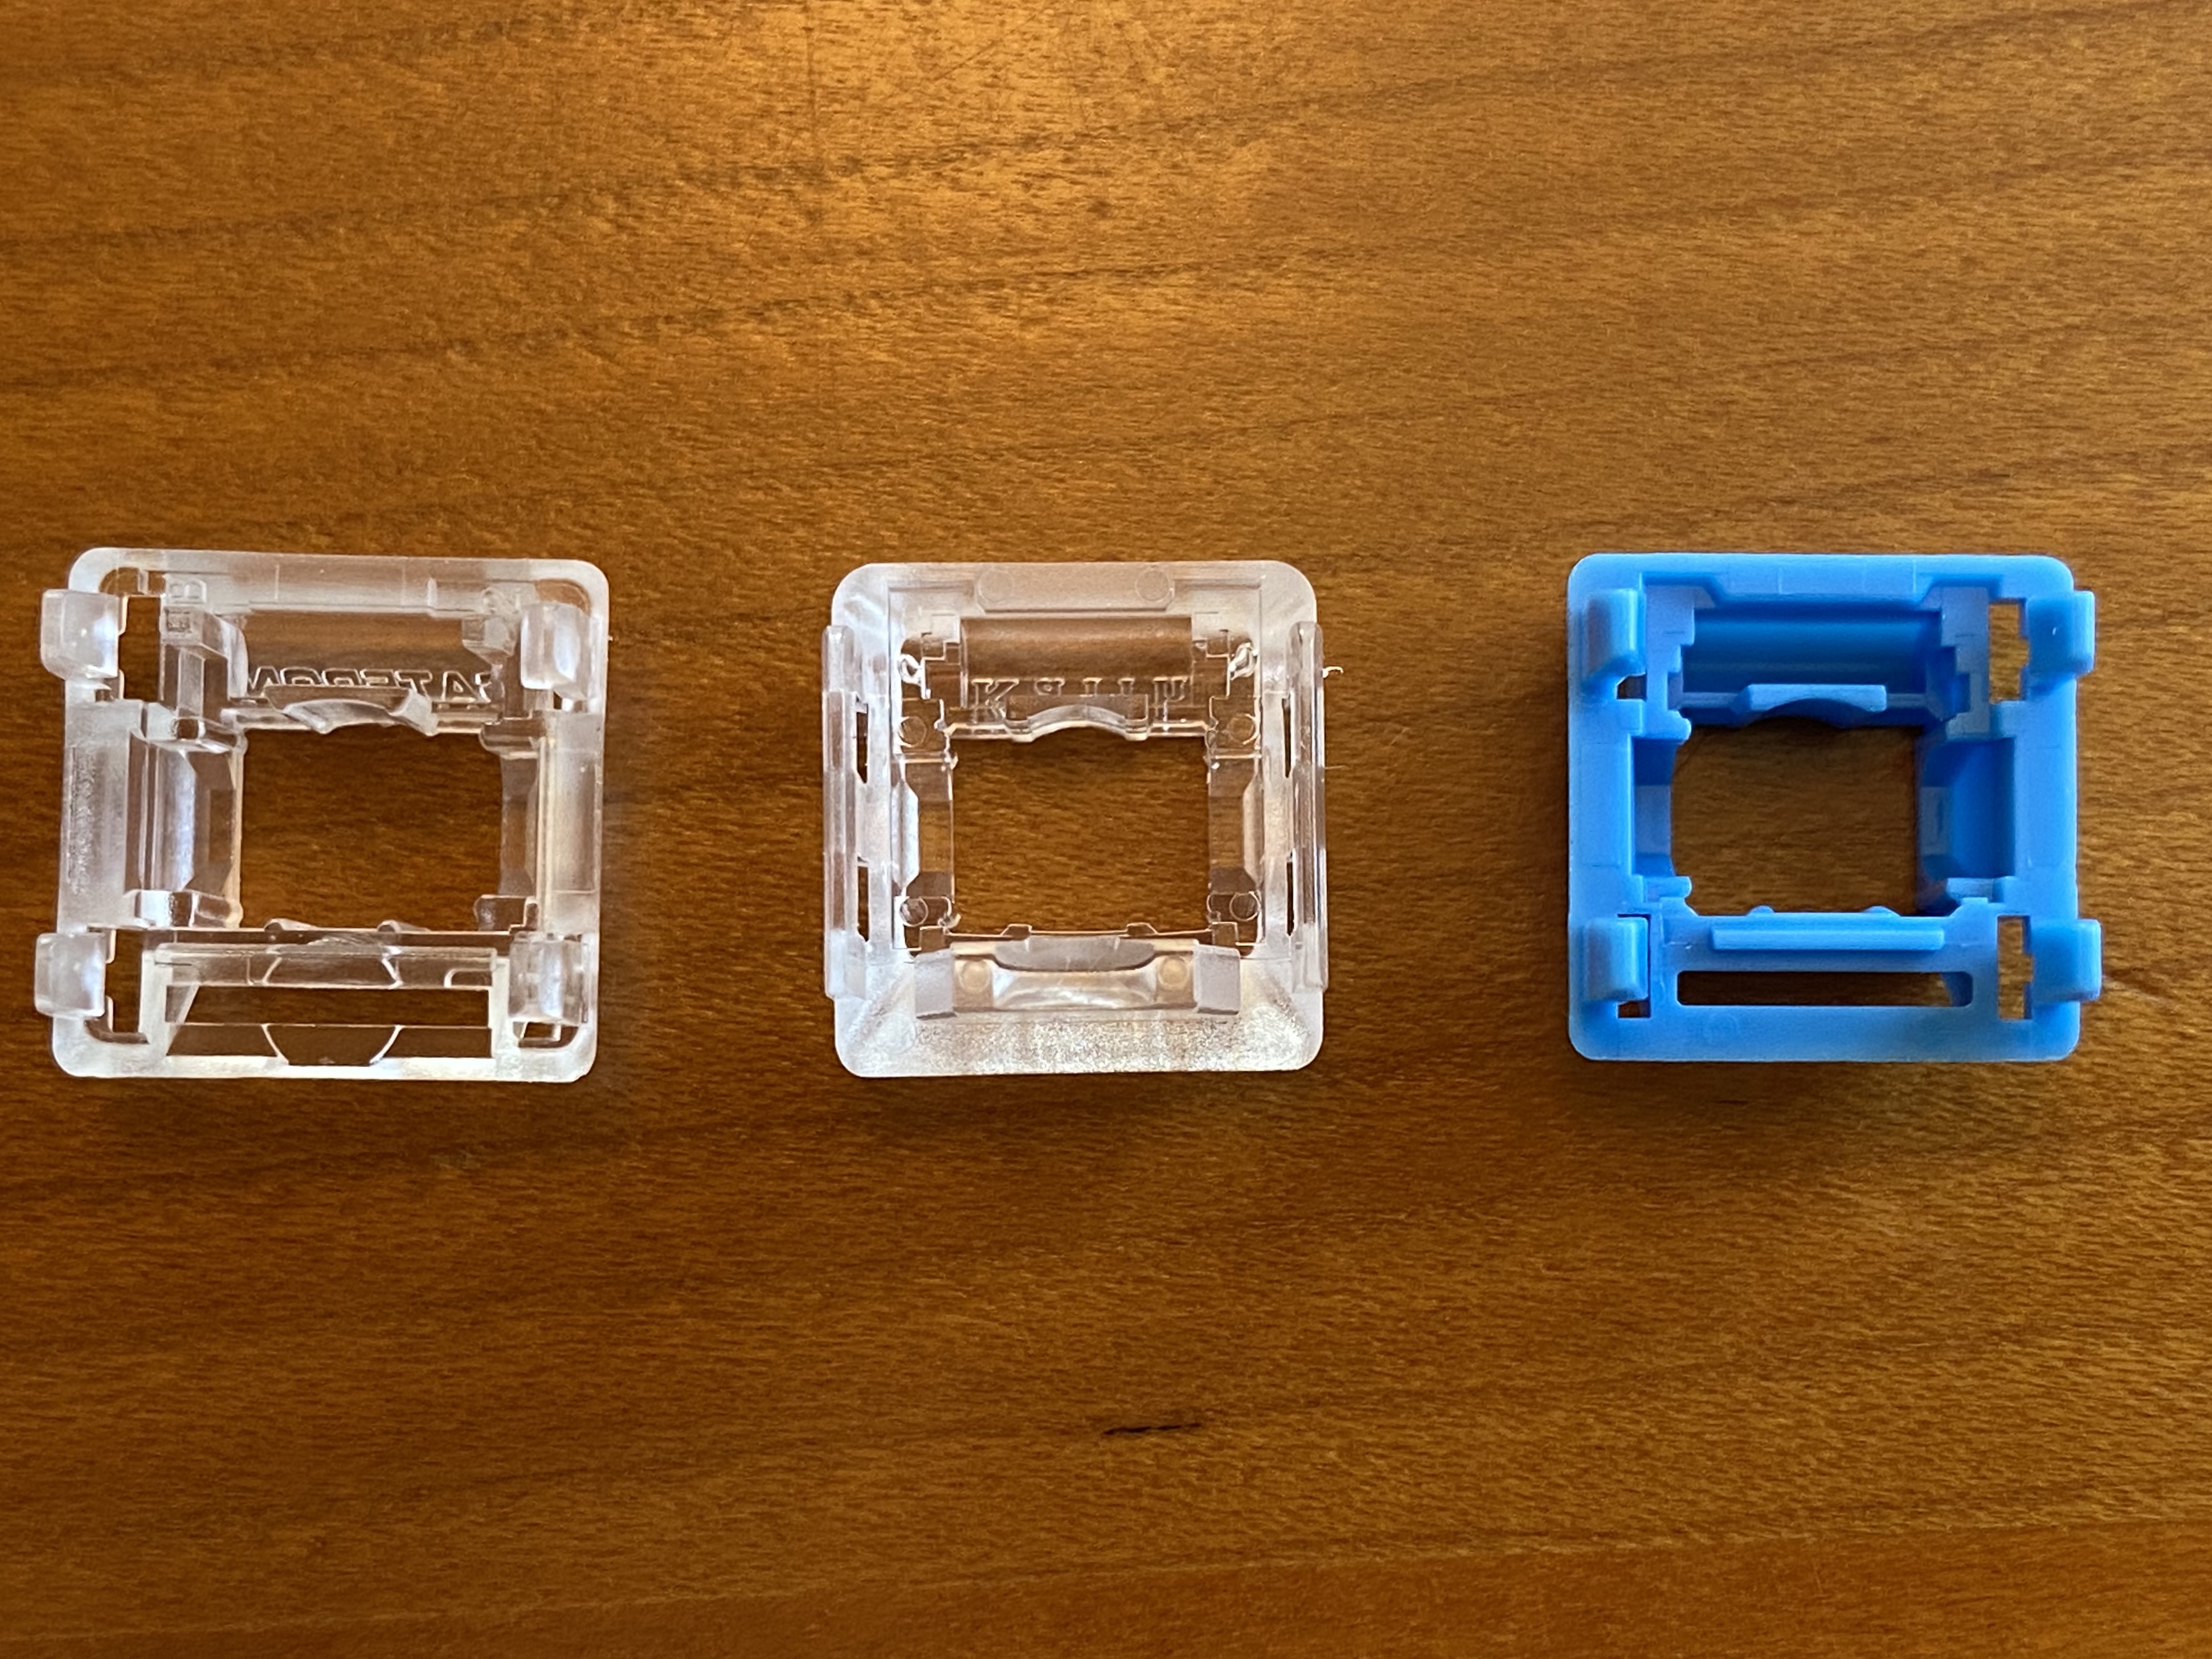
From the other side, however, there is an important difference. Looking at the photo below, do you see those two pins protruding up from Zealio top housing, above the ‘G’ and ‘N’ in “Gateron”? Those pins are what keep the switch leaf in place when it is fully assembled. Looking over at the Polar YOK housing, you’ll notice that no such pins exist. The implication is that the leaf in a Zyko is going to be free to move upward in a way it wouldn’t be in a stock V2 Zealio. This isn’t really a problem during Zyko assembly or lubing, but it can be a problem during the build if you’re not careful. We’ll come back to this issue.

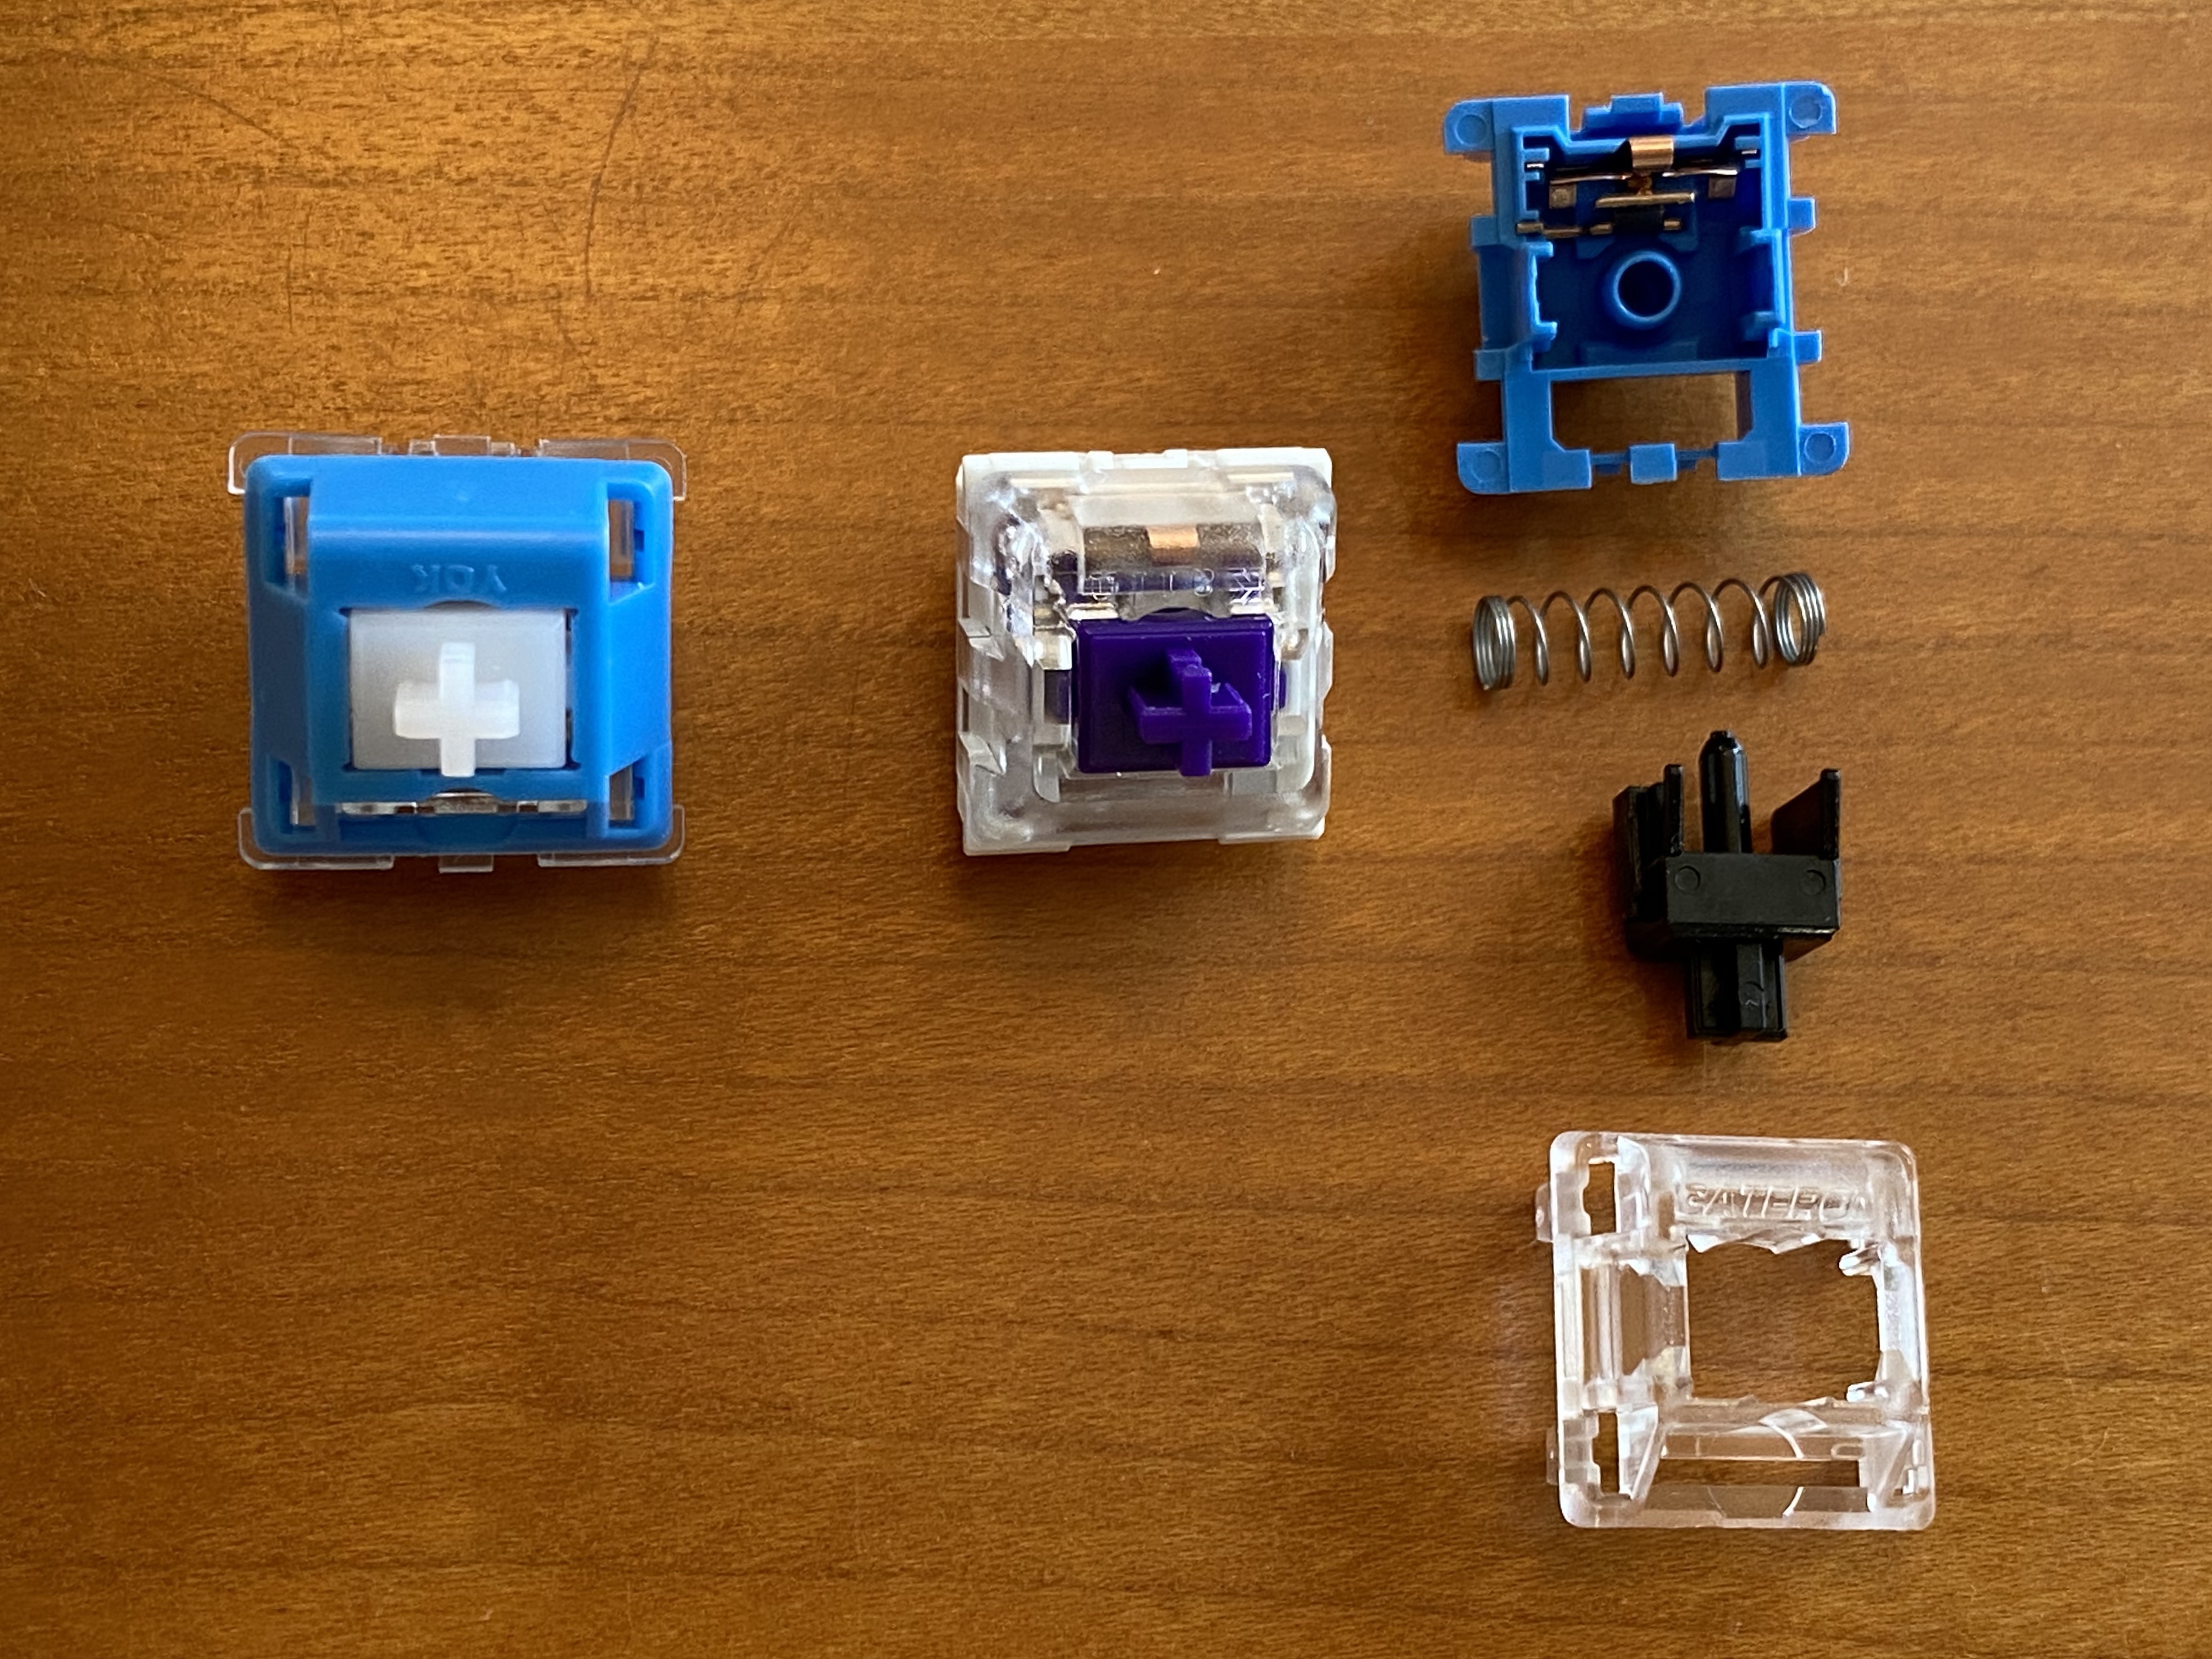
Taking the parts from the three switches I showed you earlier, here are the results of the crossbreeding. On the left, a Polar Zyko; in the middle, a Halo housing, a Zealio V2 stem, and a YOK spring as leftovers, in what I’m going to call a “Zykout”, and on the right, the leftover parts that we can’t directly use - a Polar YOK base and stem, a Halo spring, and a Zealio V2 top. To me, the “Zykout” feels like a slightly Halo Clear in terms of tactility, so in theory, it’s probably usable with careful lubing and perhaps filming as well, which makes building Zykos somewhat more palatable from a price perspective - at least you get two switches out for every three switches in…

I imagine most people would just lube the Zykos as they build them, but I’m not most people. When I’m frankenswitching, I prefer to build the frankenswitches first, without lube, and then open them up and lube at a later date when I’m actually ready to use them. I’d argue that when you’re working with three switches, this is actually preferable, to avoid mistakes in doing all of the necessary part swaps. But YMMV, as always.

At the risk of providing far too much detail, here are the steps I follow when assembling Zykos. I generally work with switches in batches of 15-20, so I can take frequent breaks and not lose my mind. Here, I’ve started by disassembling V2 Zealios, putting the bottoms in a lubing station, and reserving the stems for later.

Next up, I disassemble the Polar YOKs, reserving the tops and springs, and discarding the remaining YOK parts. OK, I don’t really throw away the stems and bottoms - I put them in Ziploc bags, in the event a use for them ever materializes.

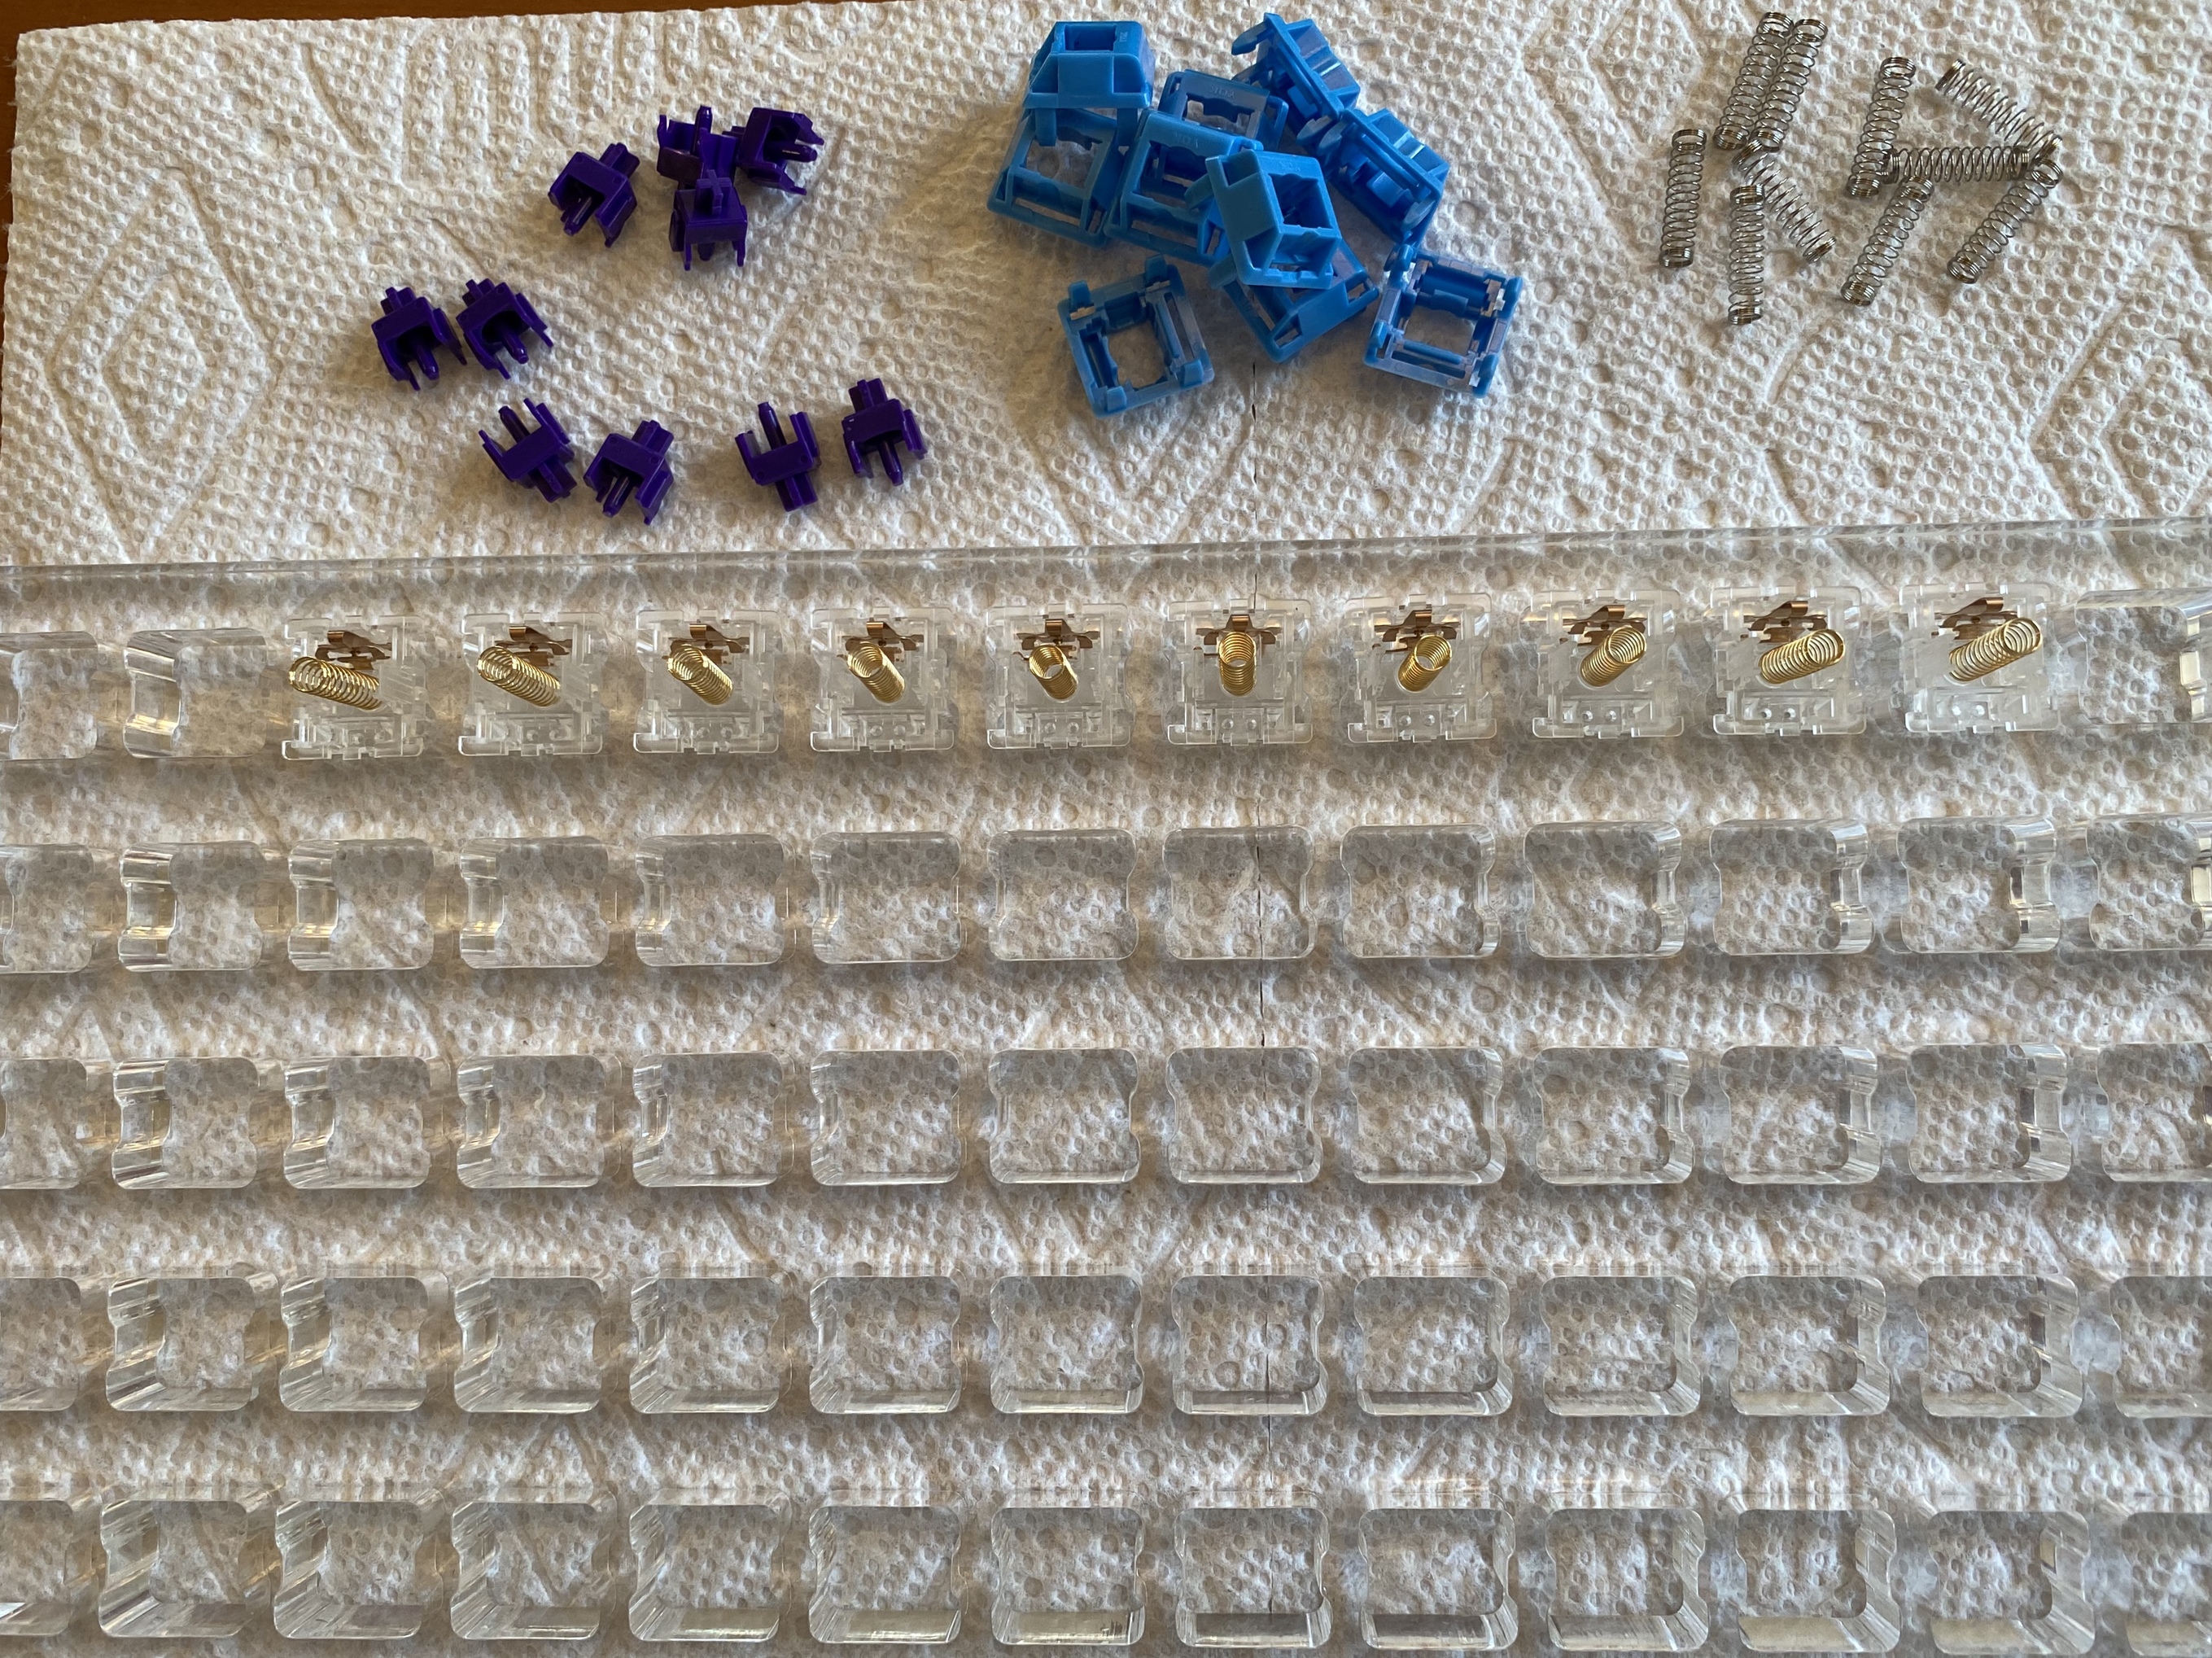
In the third step, I disassemble the Halos, putting their stems on the V2 Zealio bottoms, and reserving their tops. I know some people would prefer the Halo springs to the YOK springs for the “Zykouts”, but I find the Halo springs a bit too stiff for my taste, and I’ll be lubing springs to deal with ping in any case, so the leftover Halo springs get the ziploc treatment. At this point, all of the parts for Zykos and Zykouts are now ready for assembly.

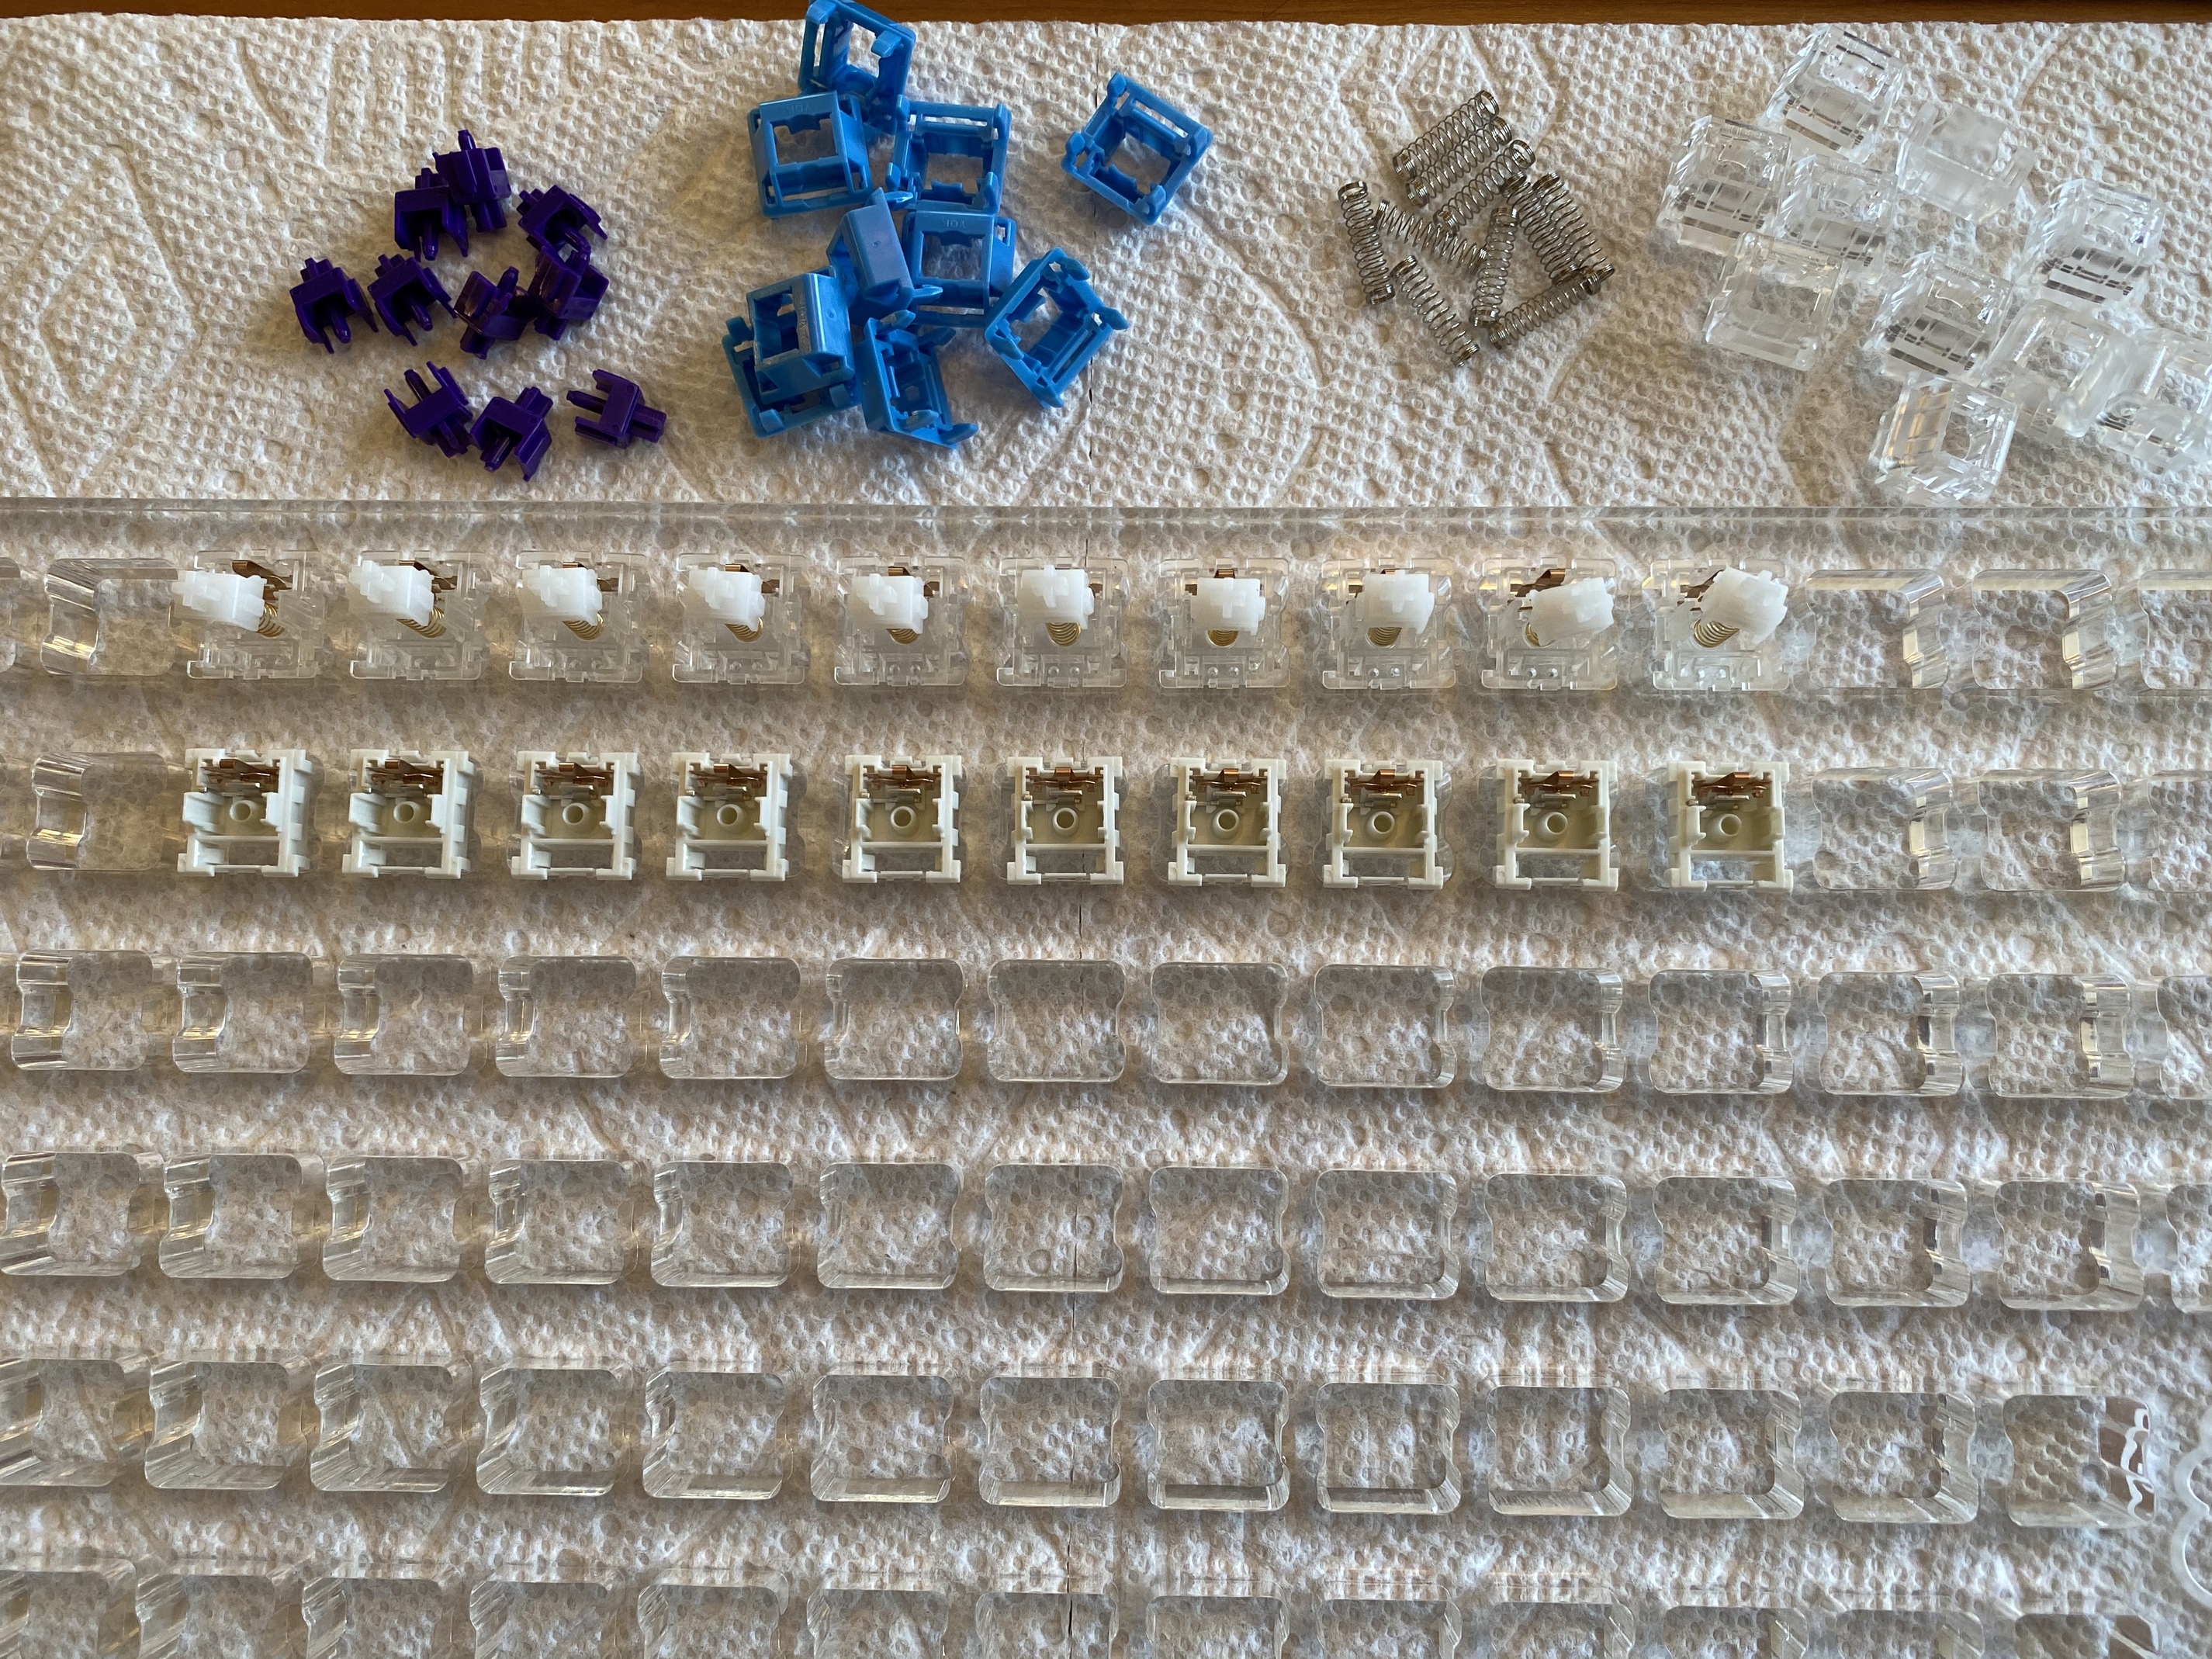
From here, there’s really only one way to put everything back together. The YOK springs go on the Halo bases, and the Zealio stems go on the YOK springs:

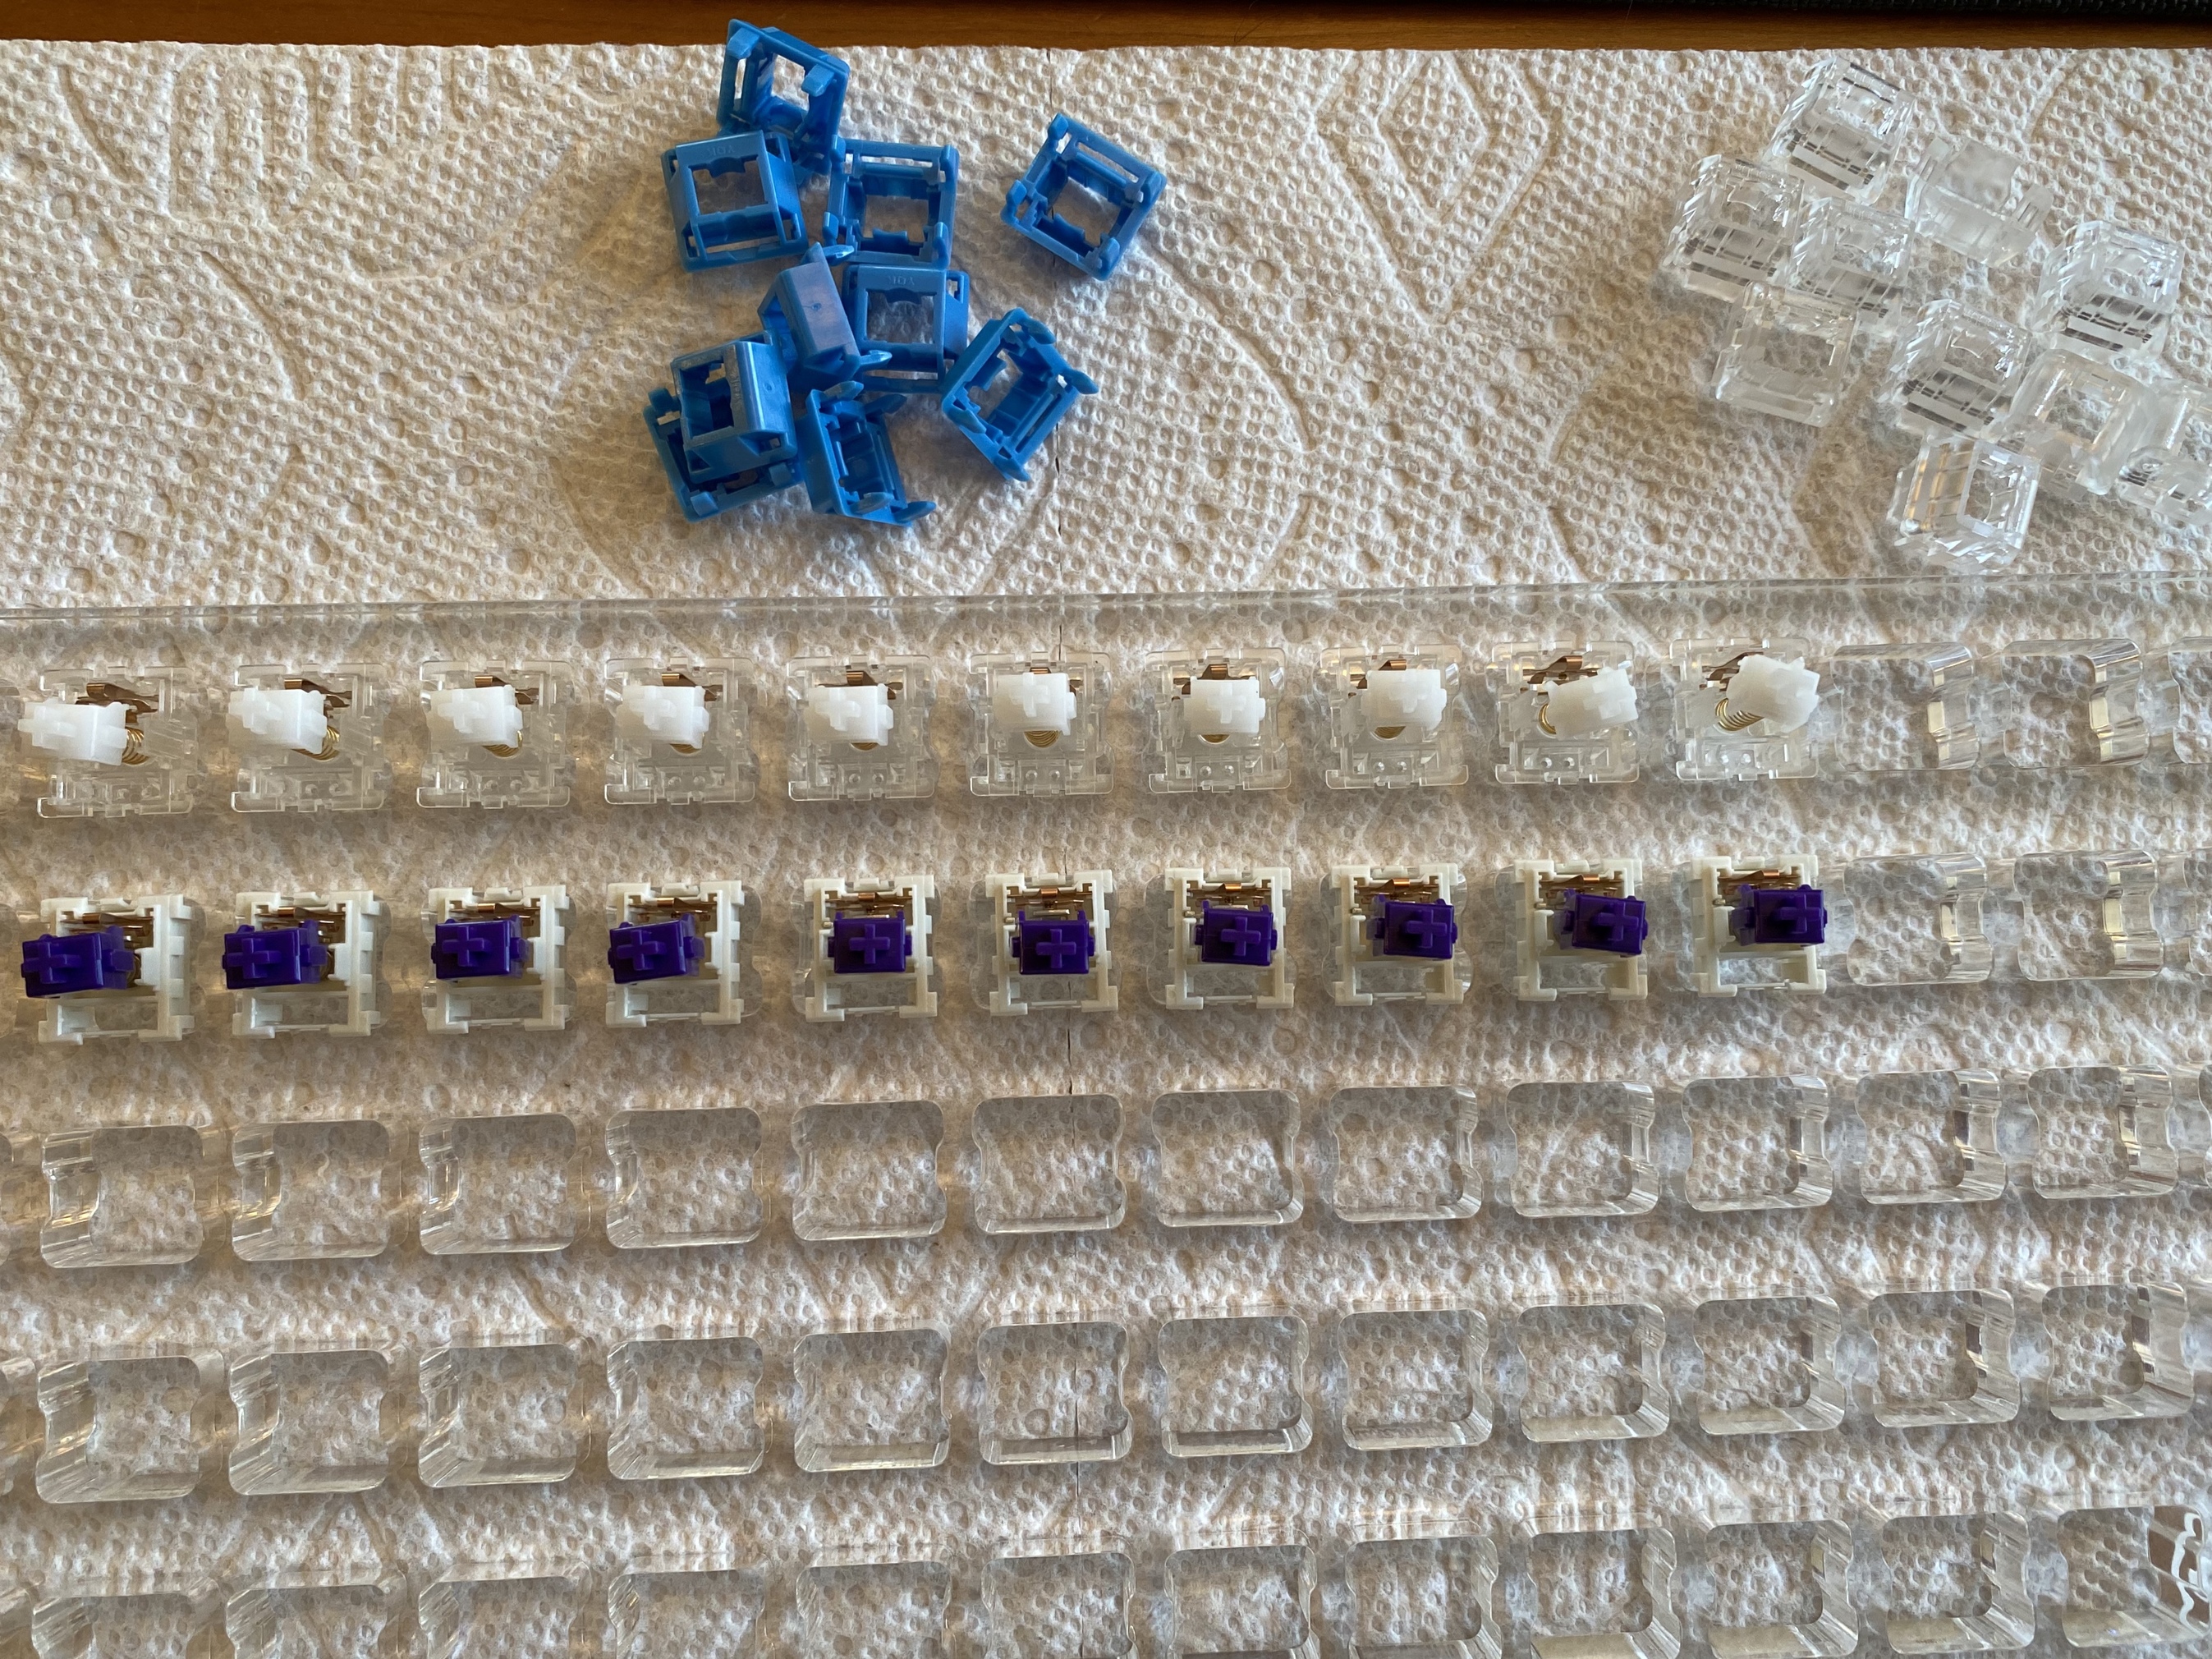
After that, the YOK tops go on the Zealio bottoms, and the Halo tops go back on the Halo bottoms, completing one batch of Zykos and Zykouts:

There is one little gotcha I want to highlight at this stage, before we actually try using Zykos on a board. As you assemble Zykos, you may find that the sound of the switch is not crisp and the tactility is not sharp. If this is the case, check the fit of the YOK top to the Zealio bottom. It’s highly likely you’ll see something like this, where one side of the YOK top has not fully snapped into place:

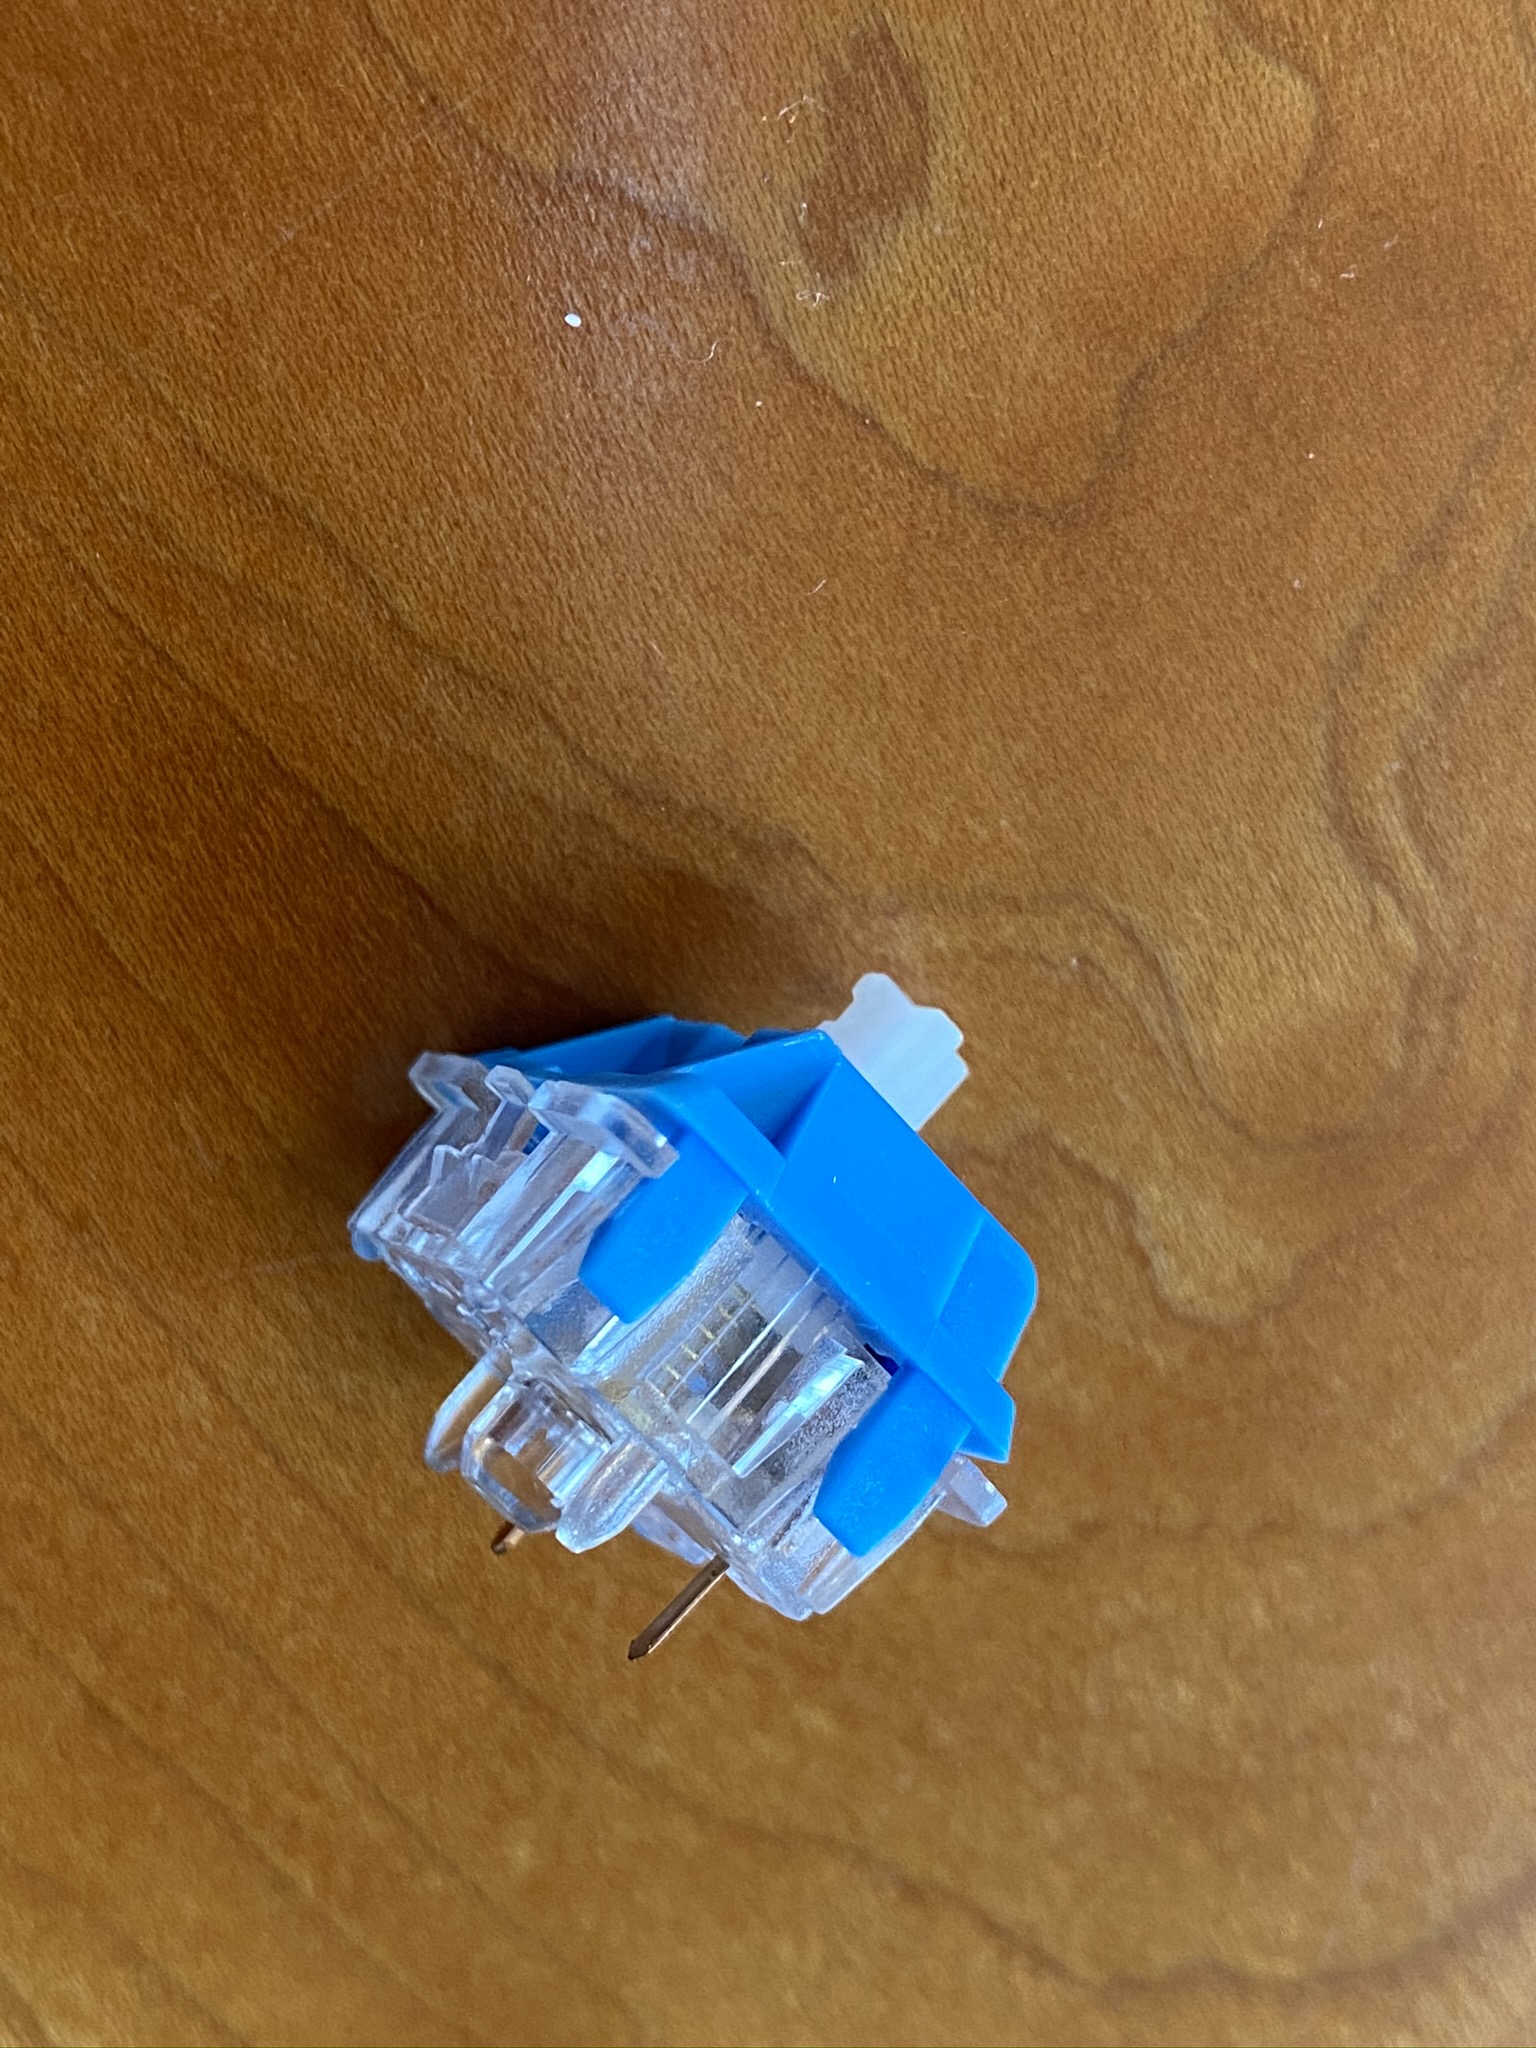
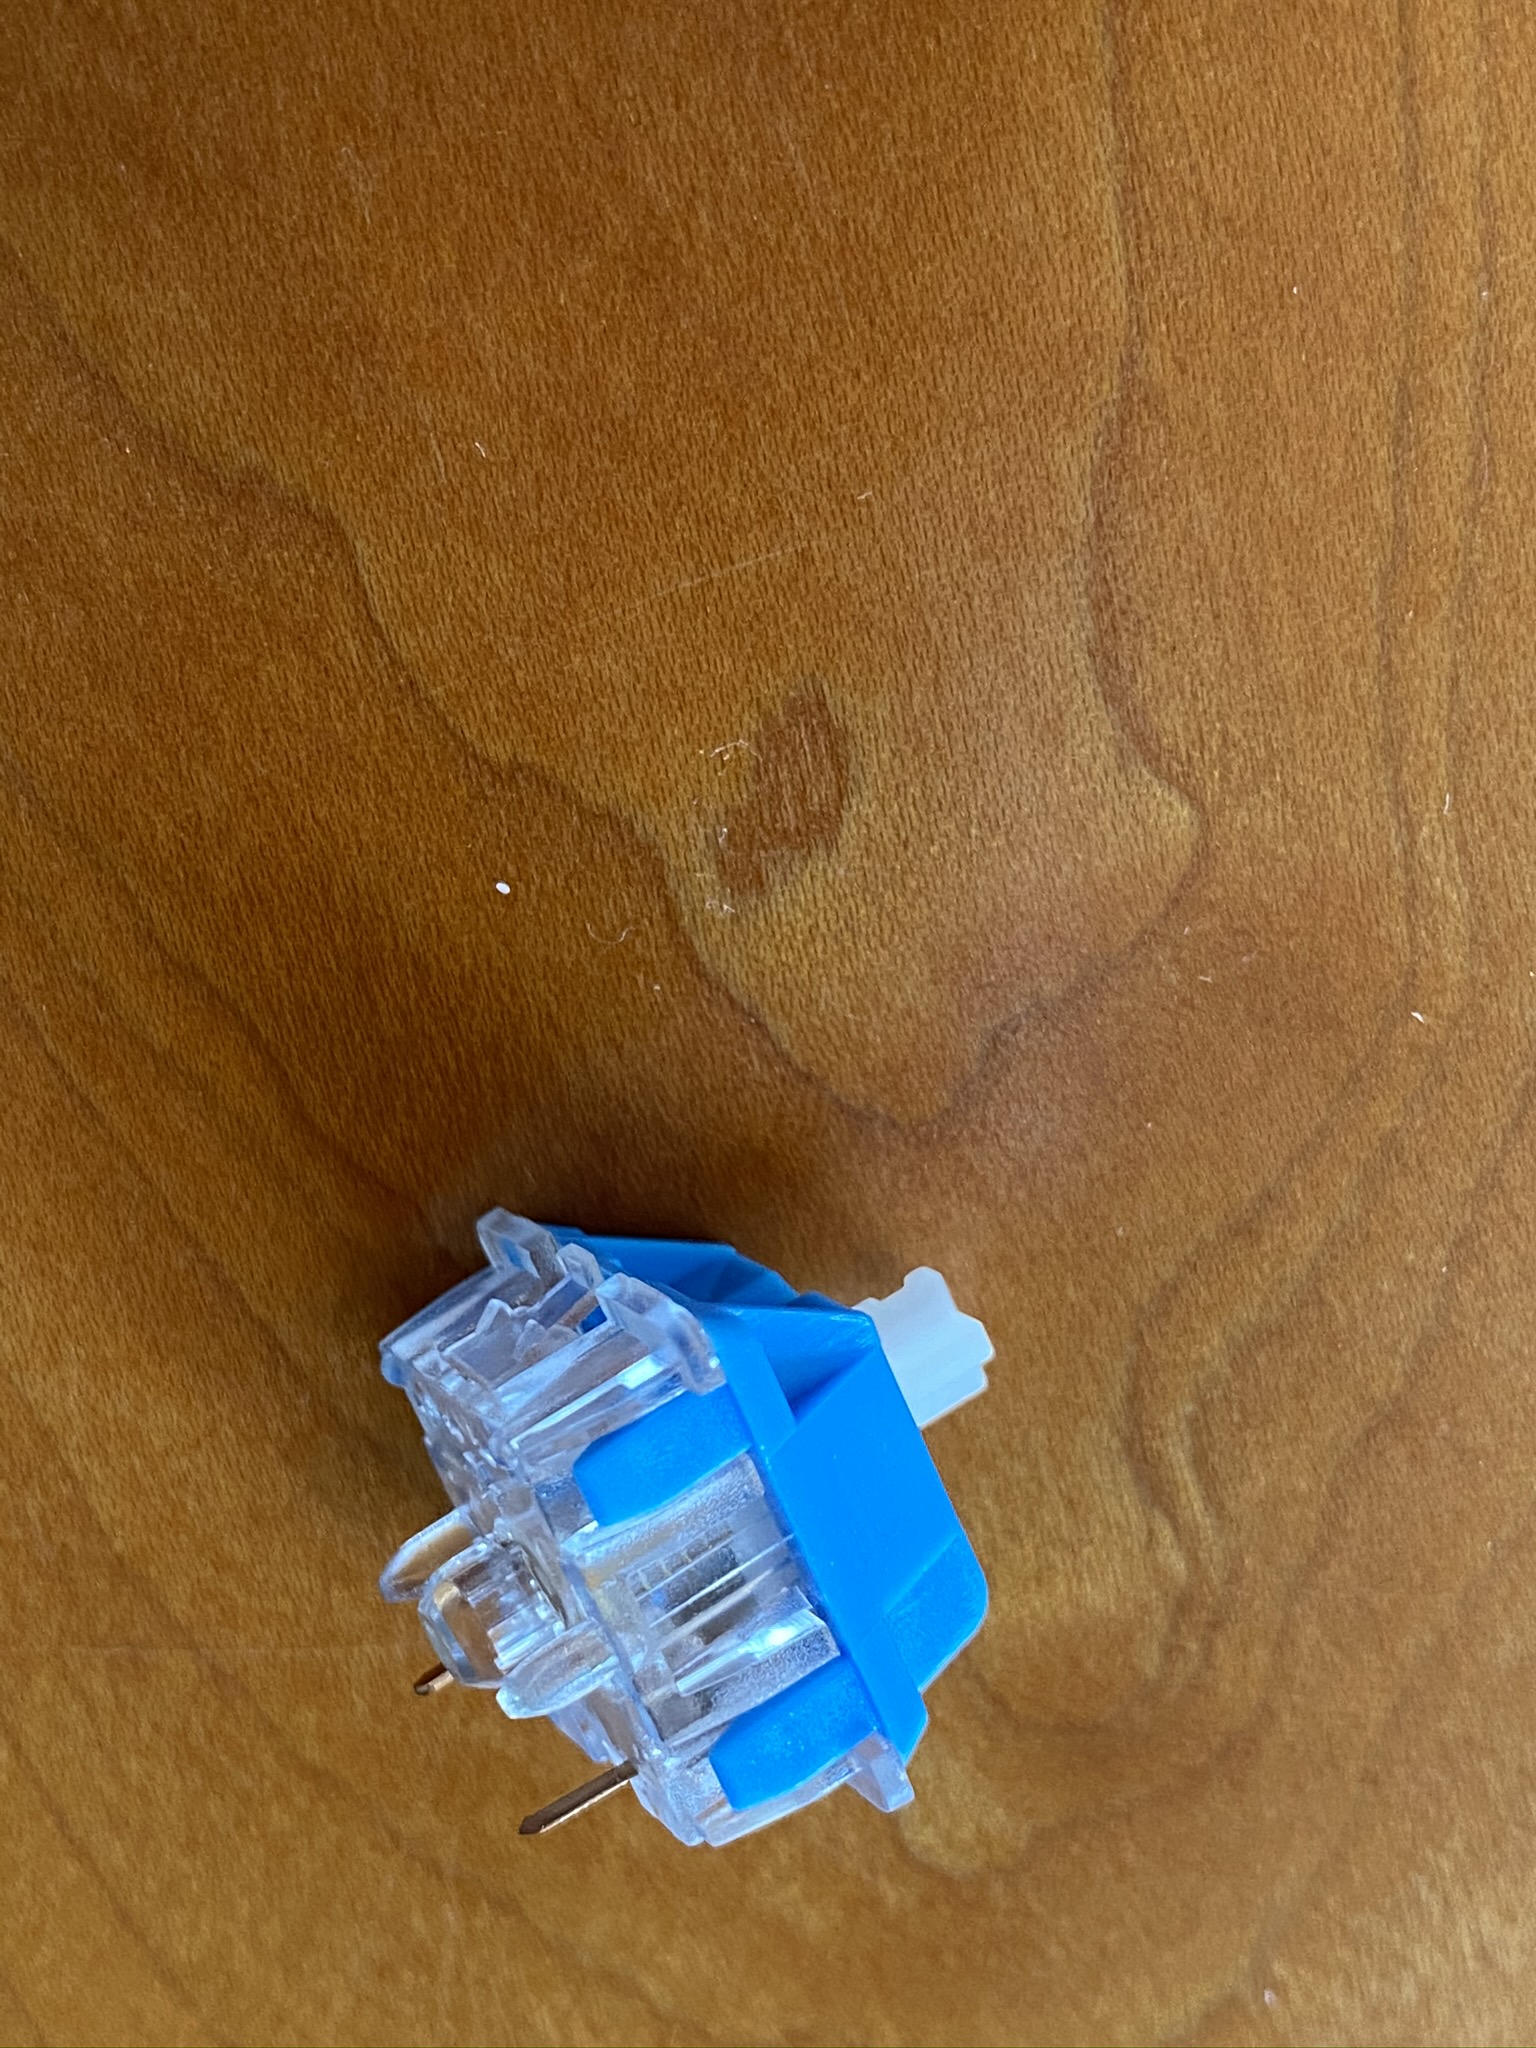
In that case, just press down the YOK top with more force until it snaps firmly into place:

At your leisure, lube as you see fit. For me, it ended up being my usual 104 tub-lubing on the springs, coupled with 3203 on the three non-leg sides of the stem, to preserve as much of the tactility and feel of the Zyko as possible. These days I haven’t been lubing the housing of the switch, instead taking care to carefully lube all possible housing/stem contact surfaces on the stem (other than the tactile side of the stem, of course).

Enough about Zykos for now. Let’s talk about the EXT65!

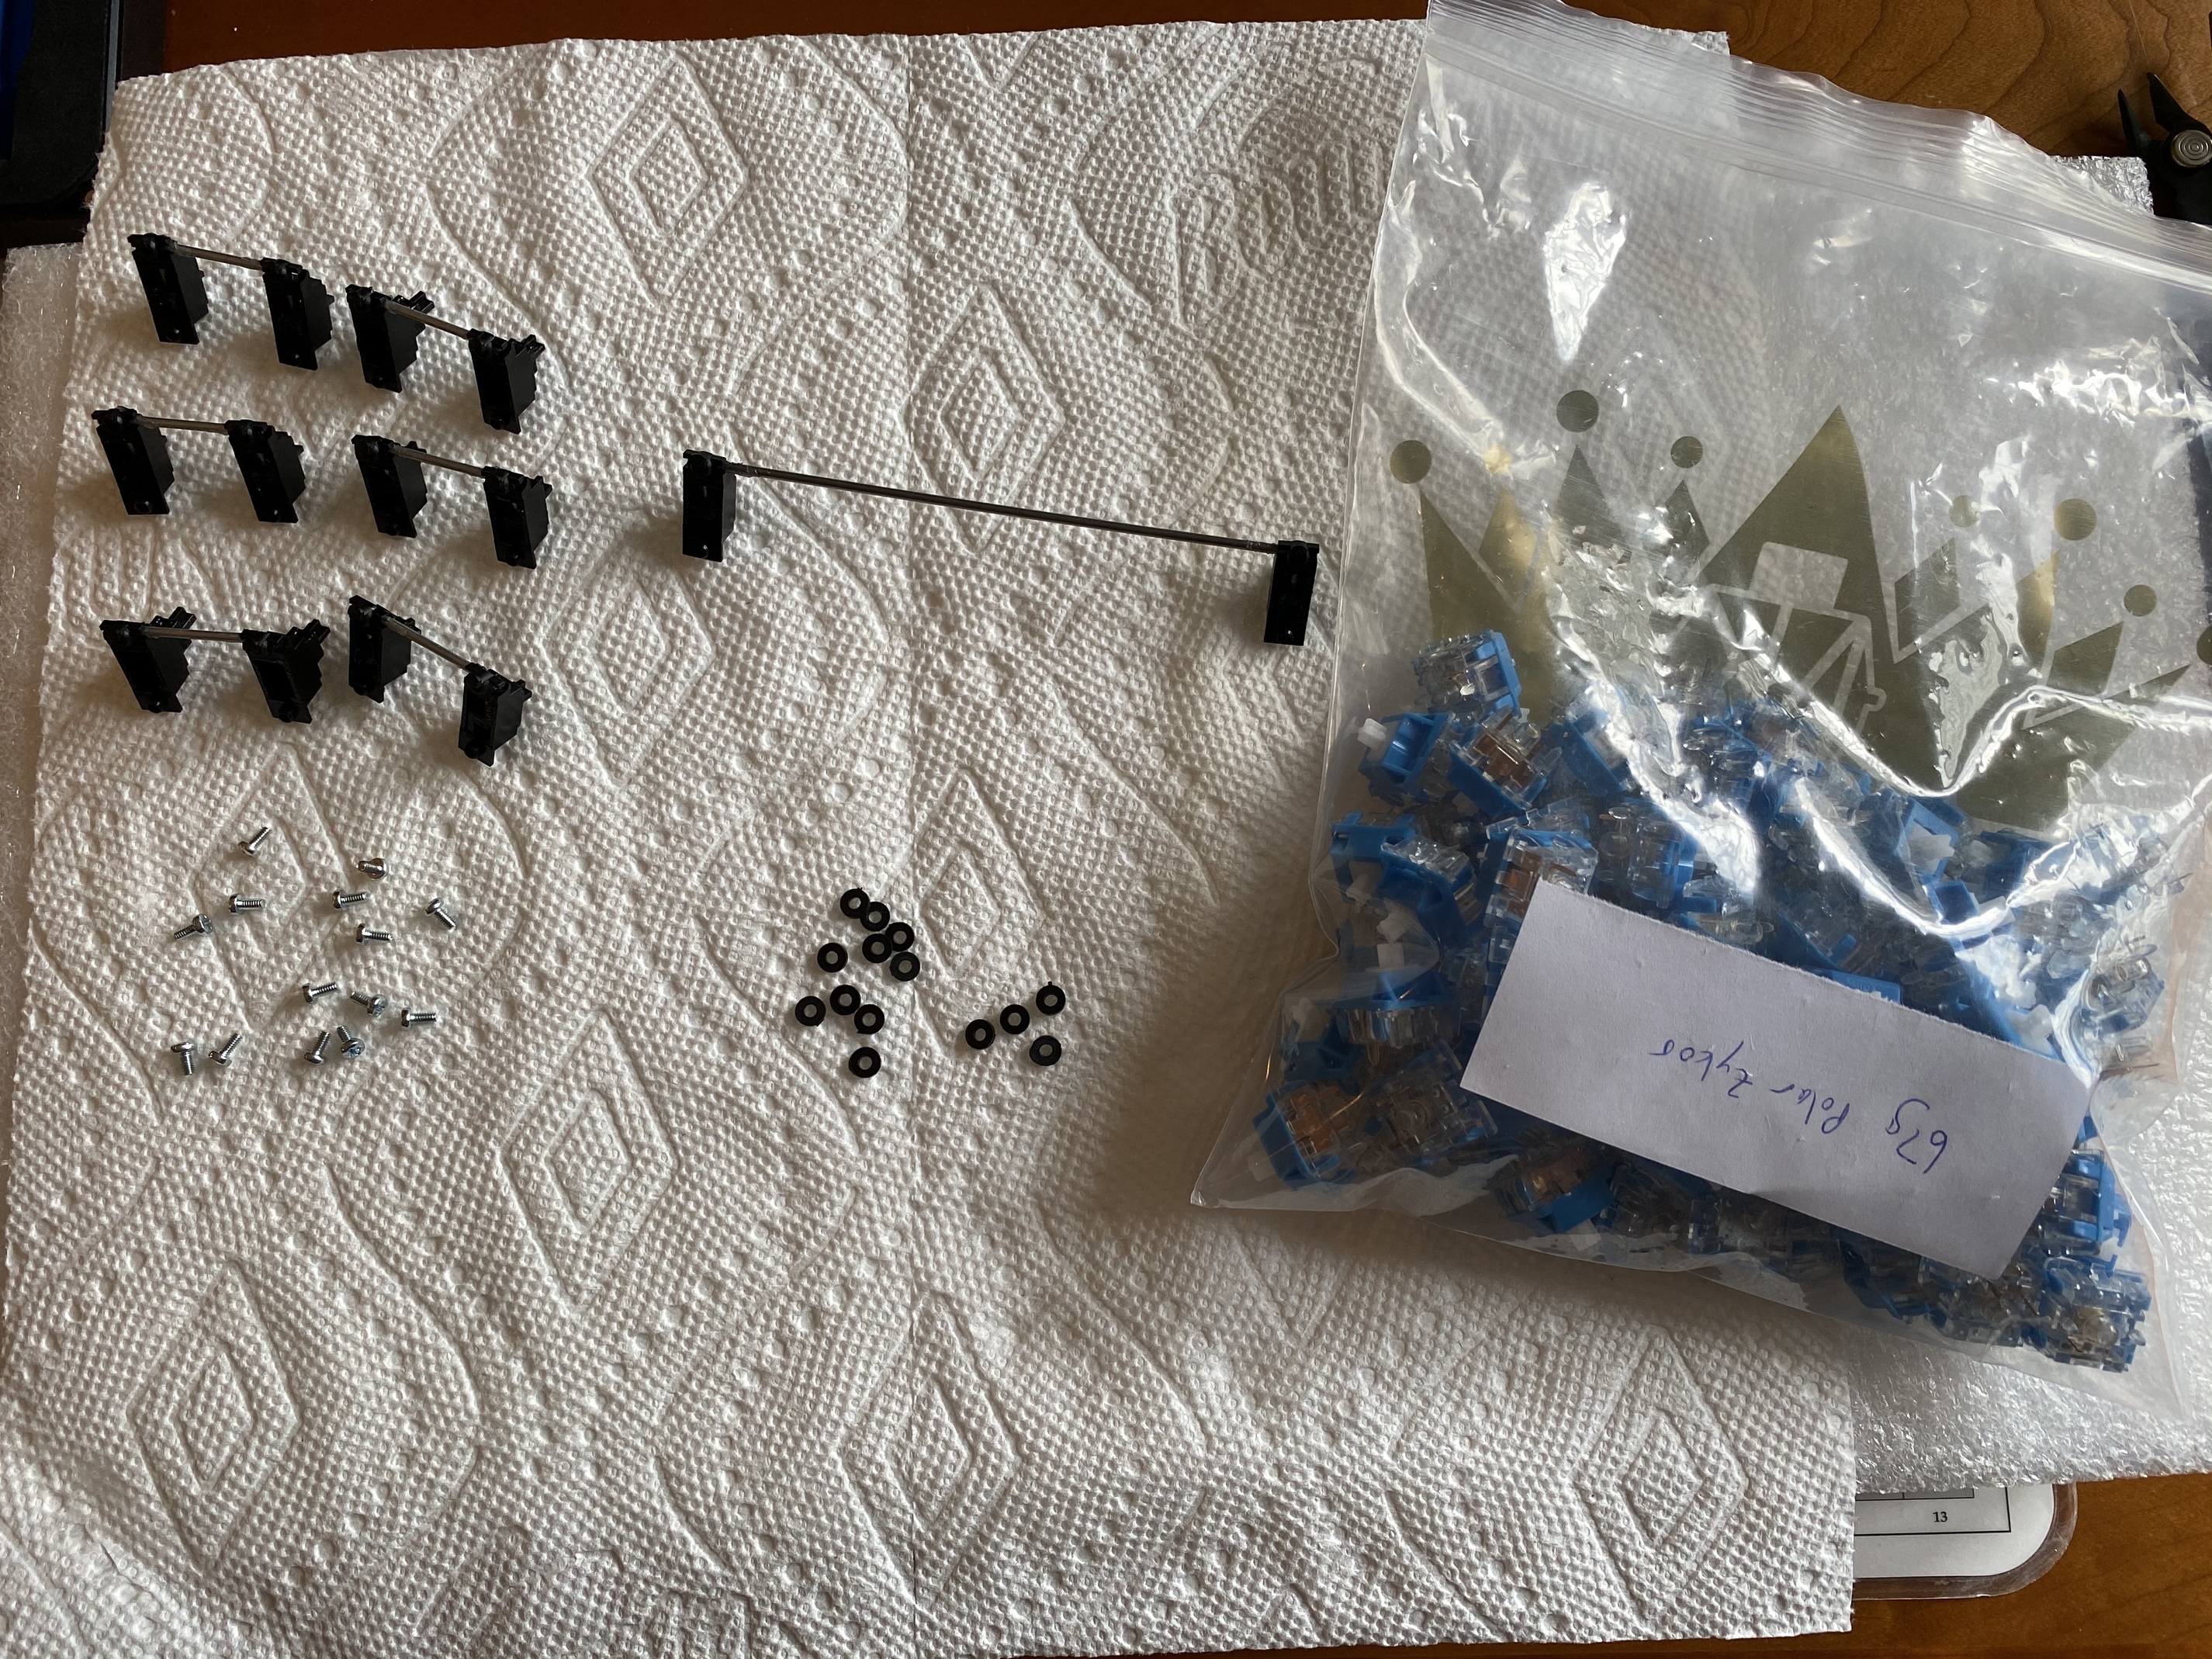
As usual, the build properly begins with stabilizer work, which in turn depends on our choice of layout. For the EXT65, the three 2u numpad keys and the backspace key can all be split into 1u keys, but I opted to keep all of these as 2u keys, which meant I needed to prep one 6.25u and six 2u stabilizers. After clipping and lubing, here we are:

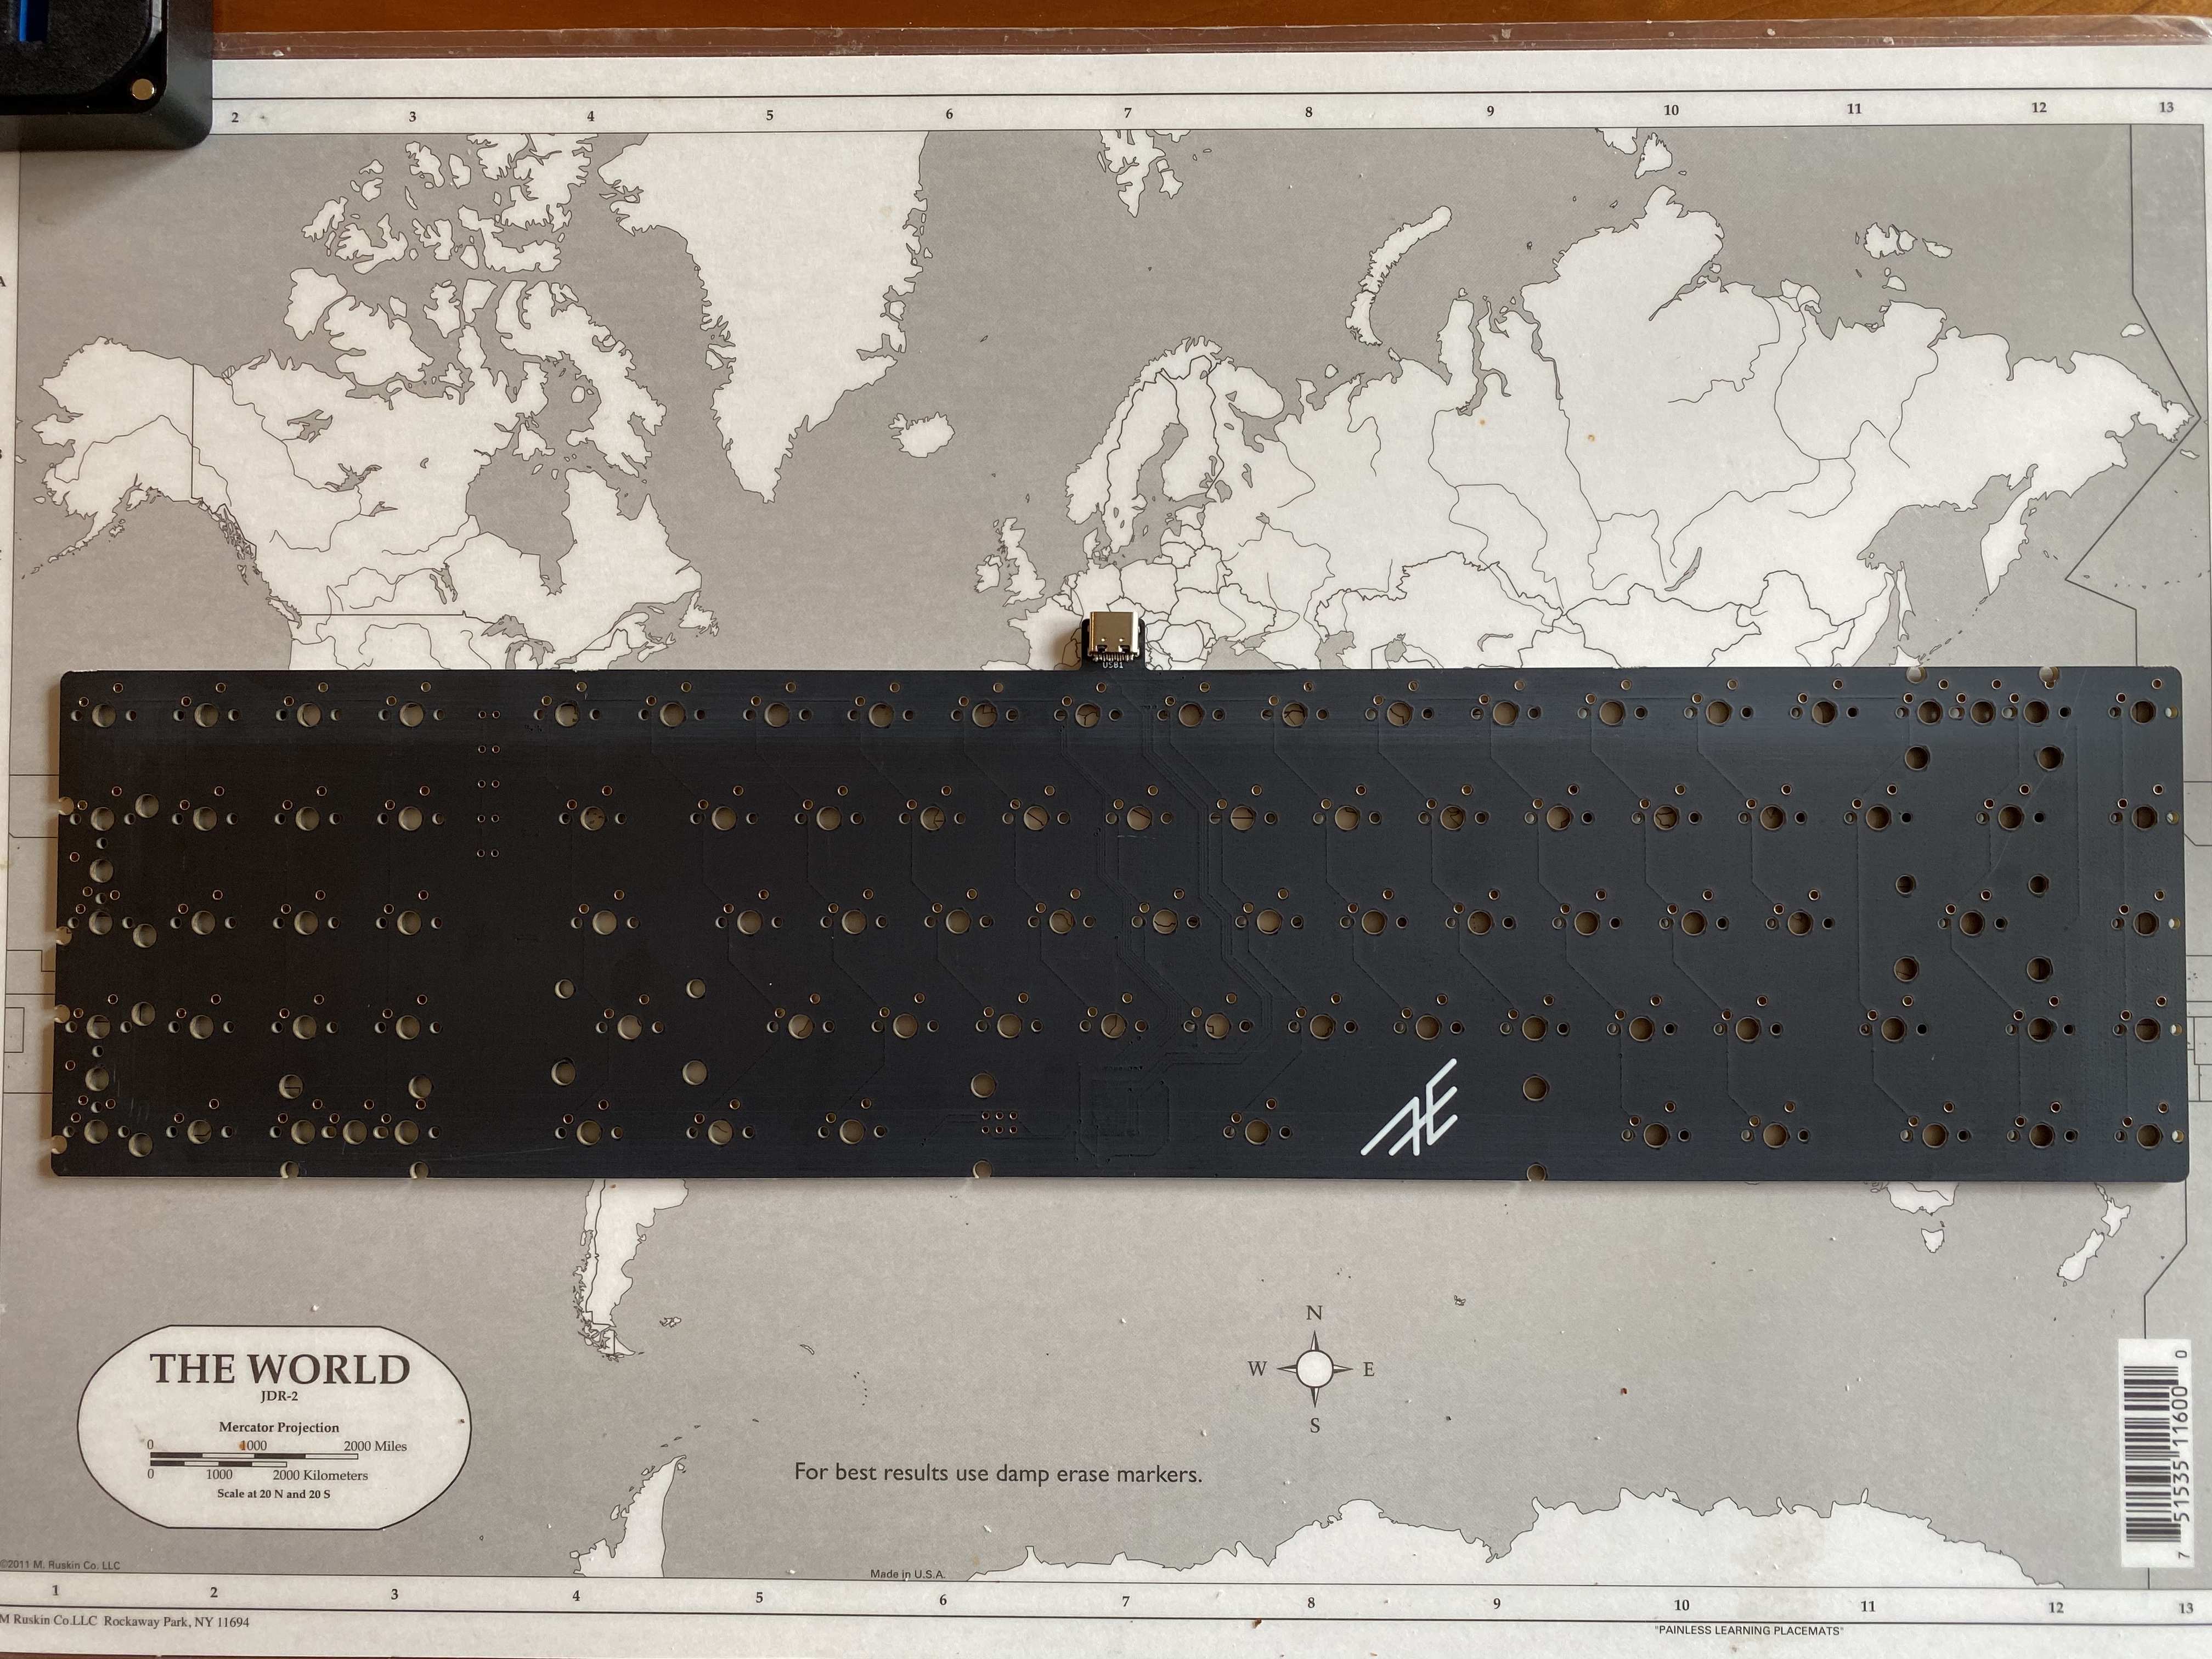
The EXT65 PCB is a matte-black affair, with USB-C connector on the top side:

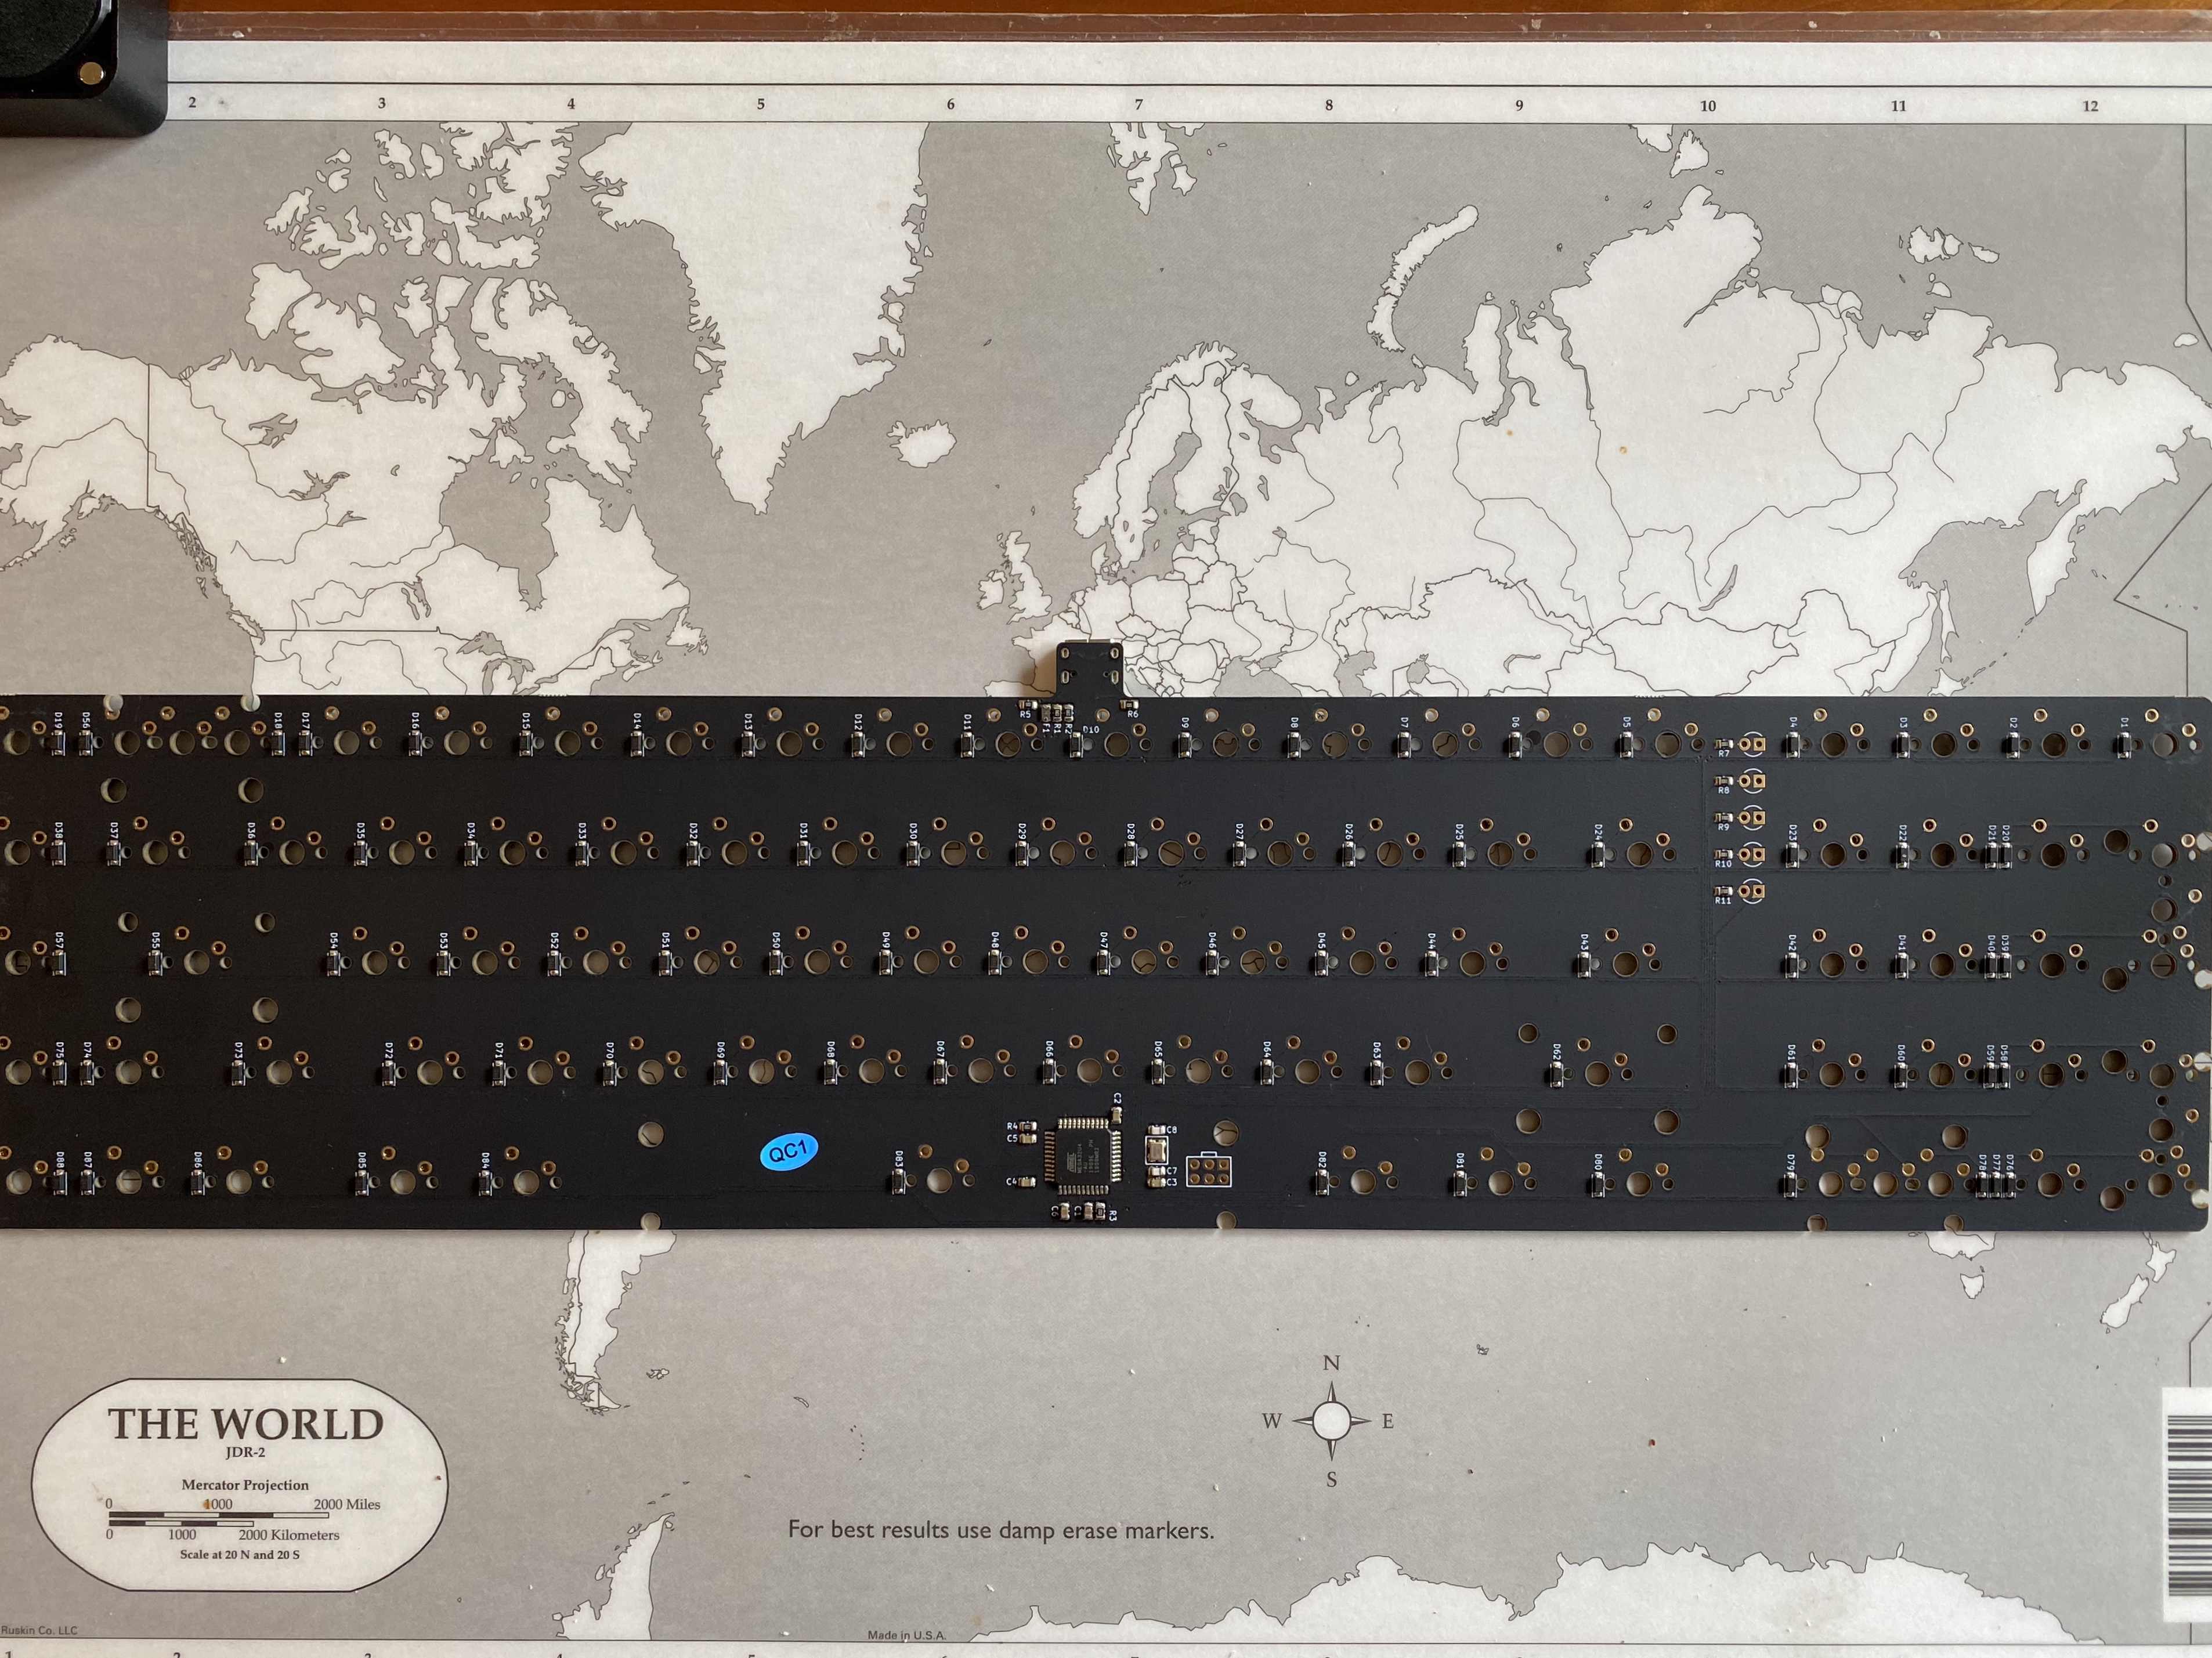
On the bottom, we see LEDs for Num Lock, Caps Lock, and Scroll Lock (NCS), as well as two more LEDs - one to indicate when we are switching QMK layers, and another which as far as I am aware is not actually used, perhaps a holdover from an earlier design iteration.

Because this isn’t a swiss cheese PCB, it’s pretty obvious where the stabs go, and easy enough to install them.

Even though I don’t think there was any real danger of screw-in stabs shorting pads on this PCB, whenever I see that a screw might make contact with a pad, I prefer to use cloth or nylon washers to completely eliminate the possibility. In the following photo, you can see one of the washers making contact with a pad on the PCB.

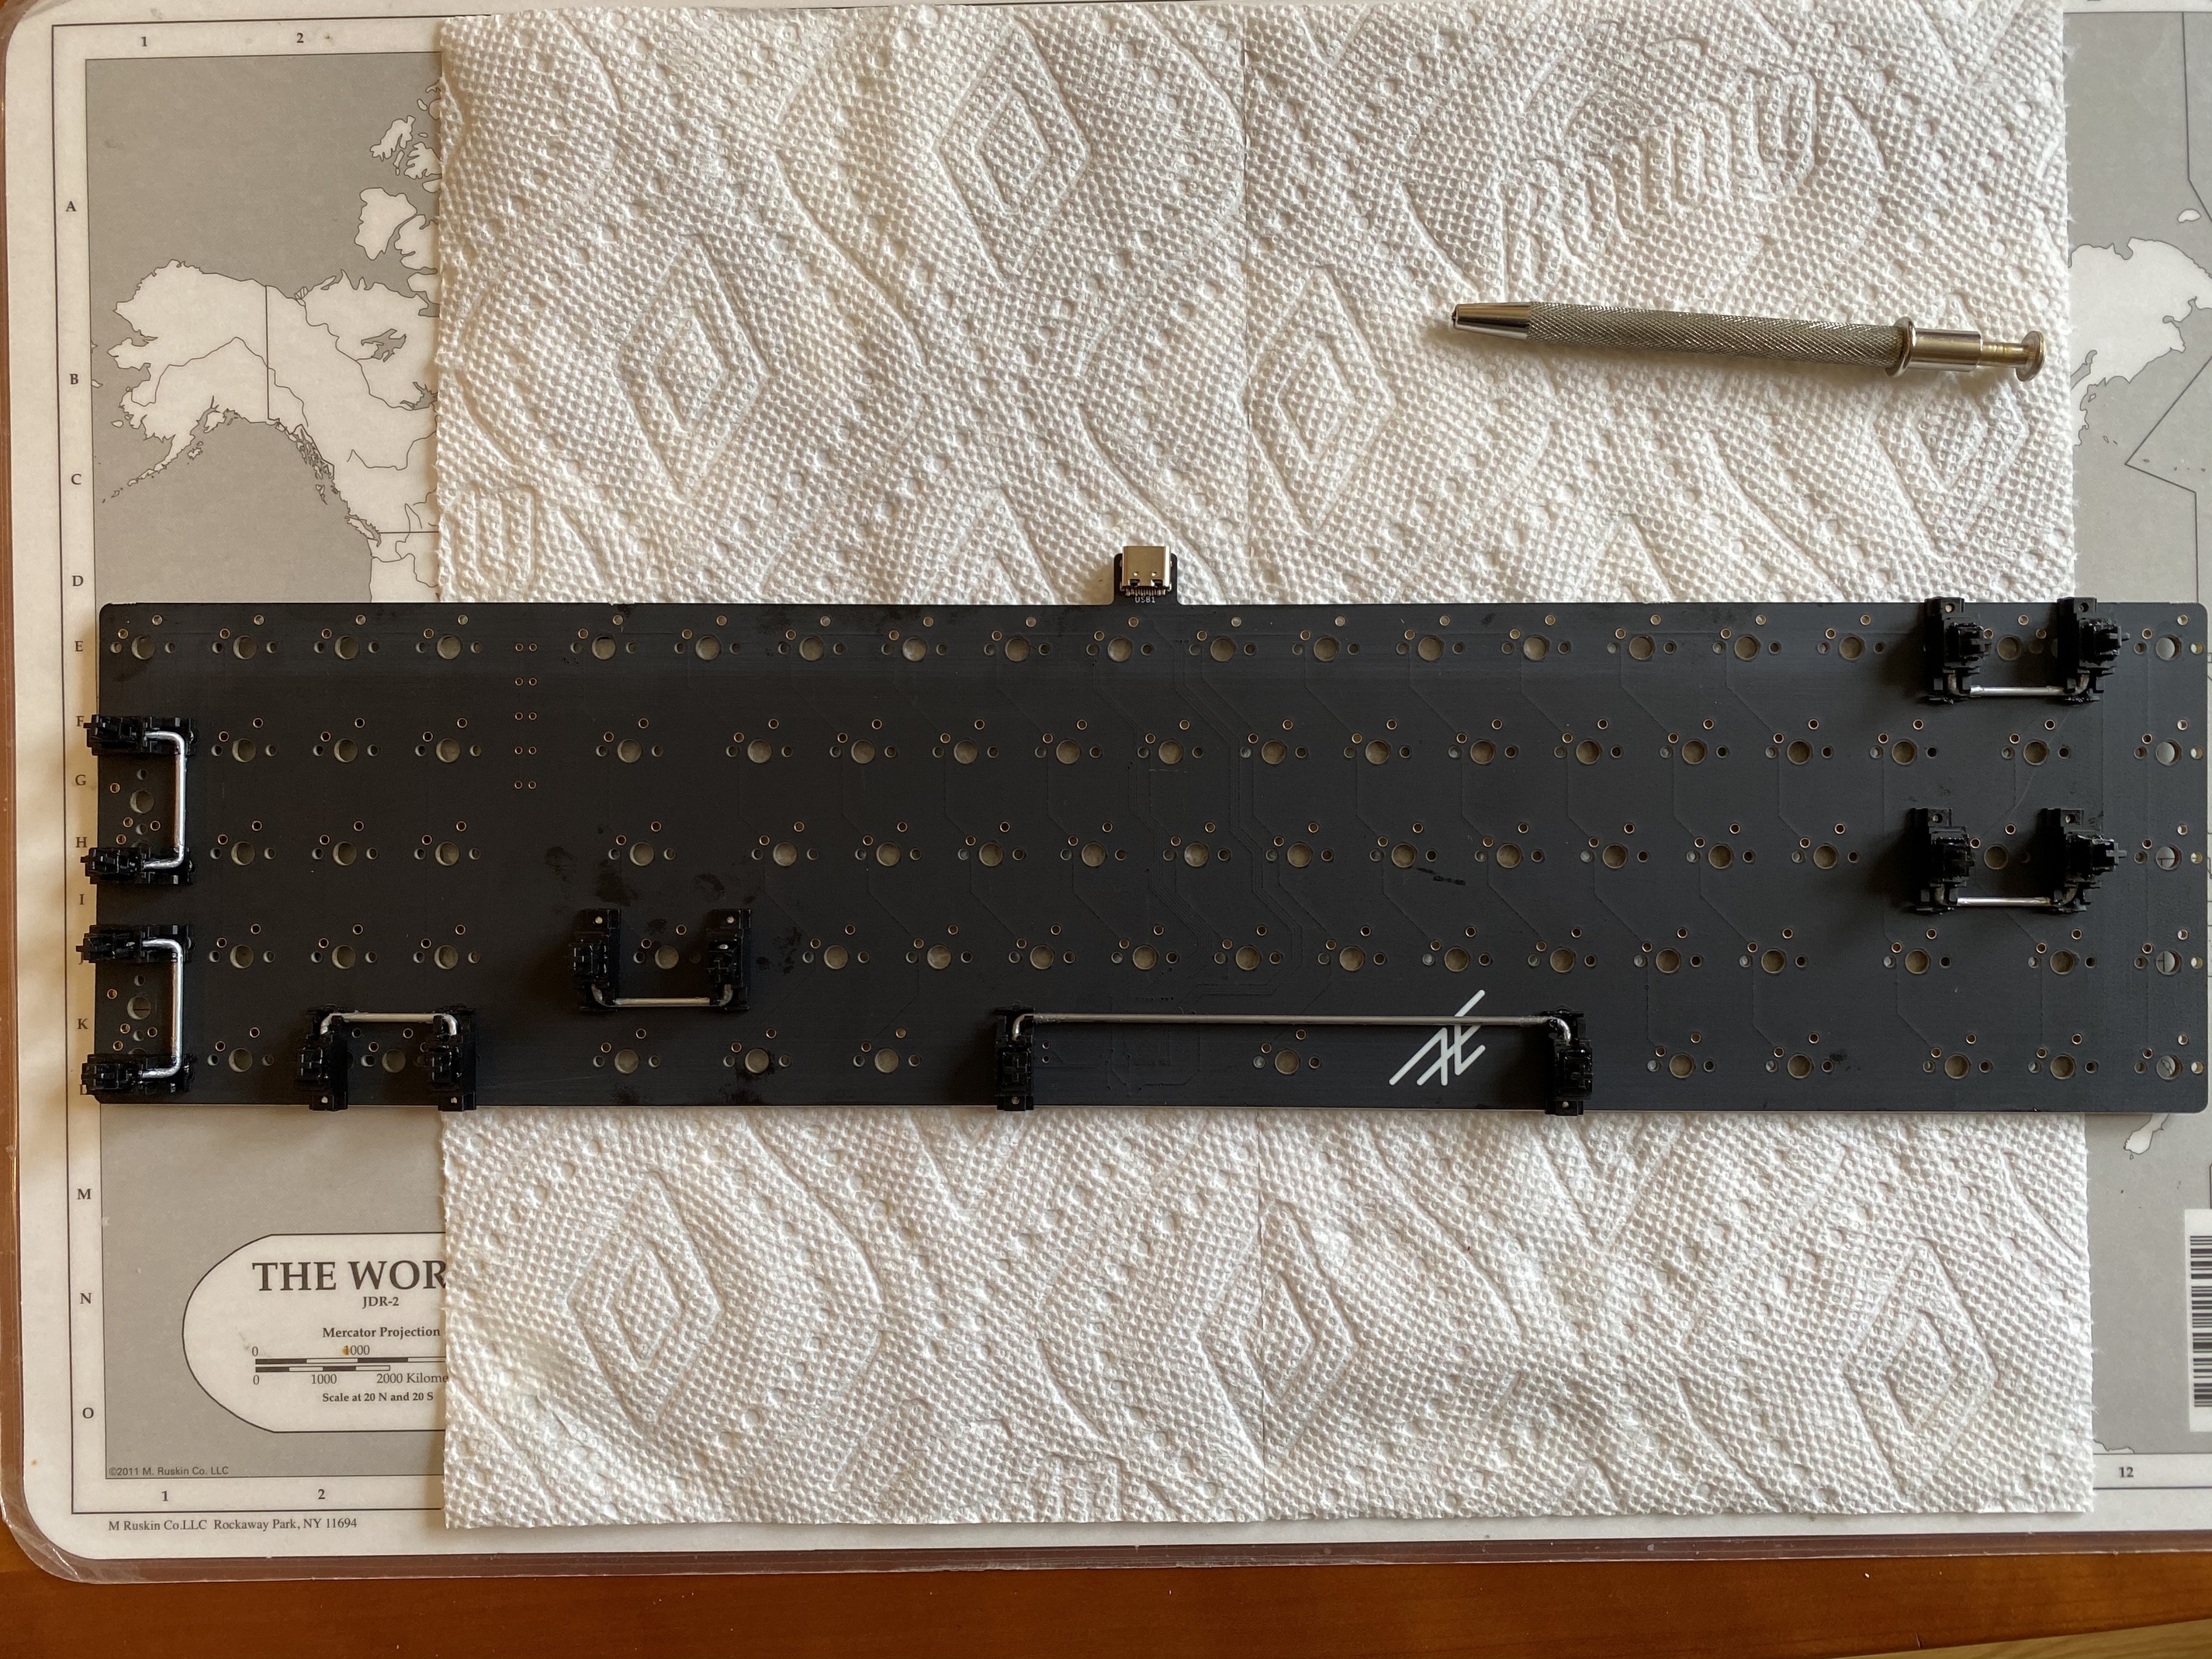
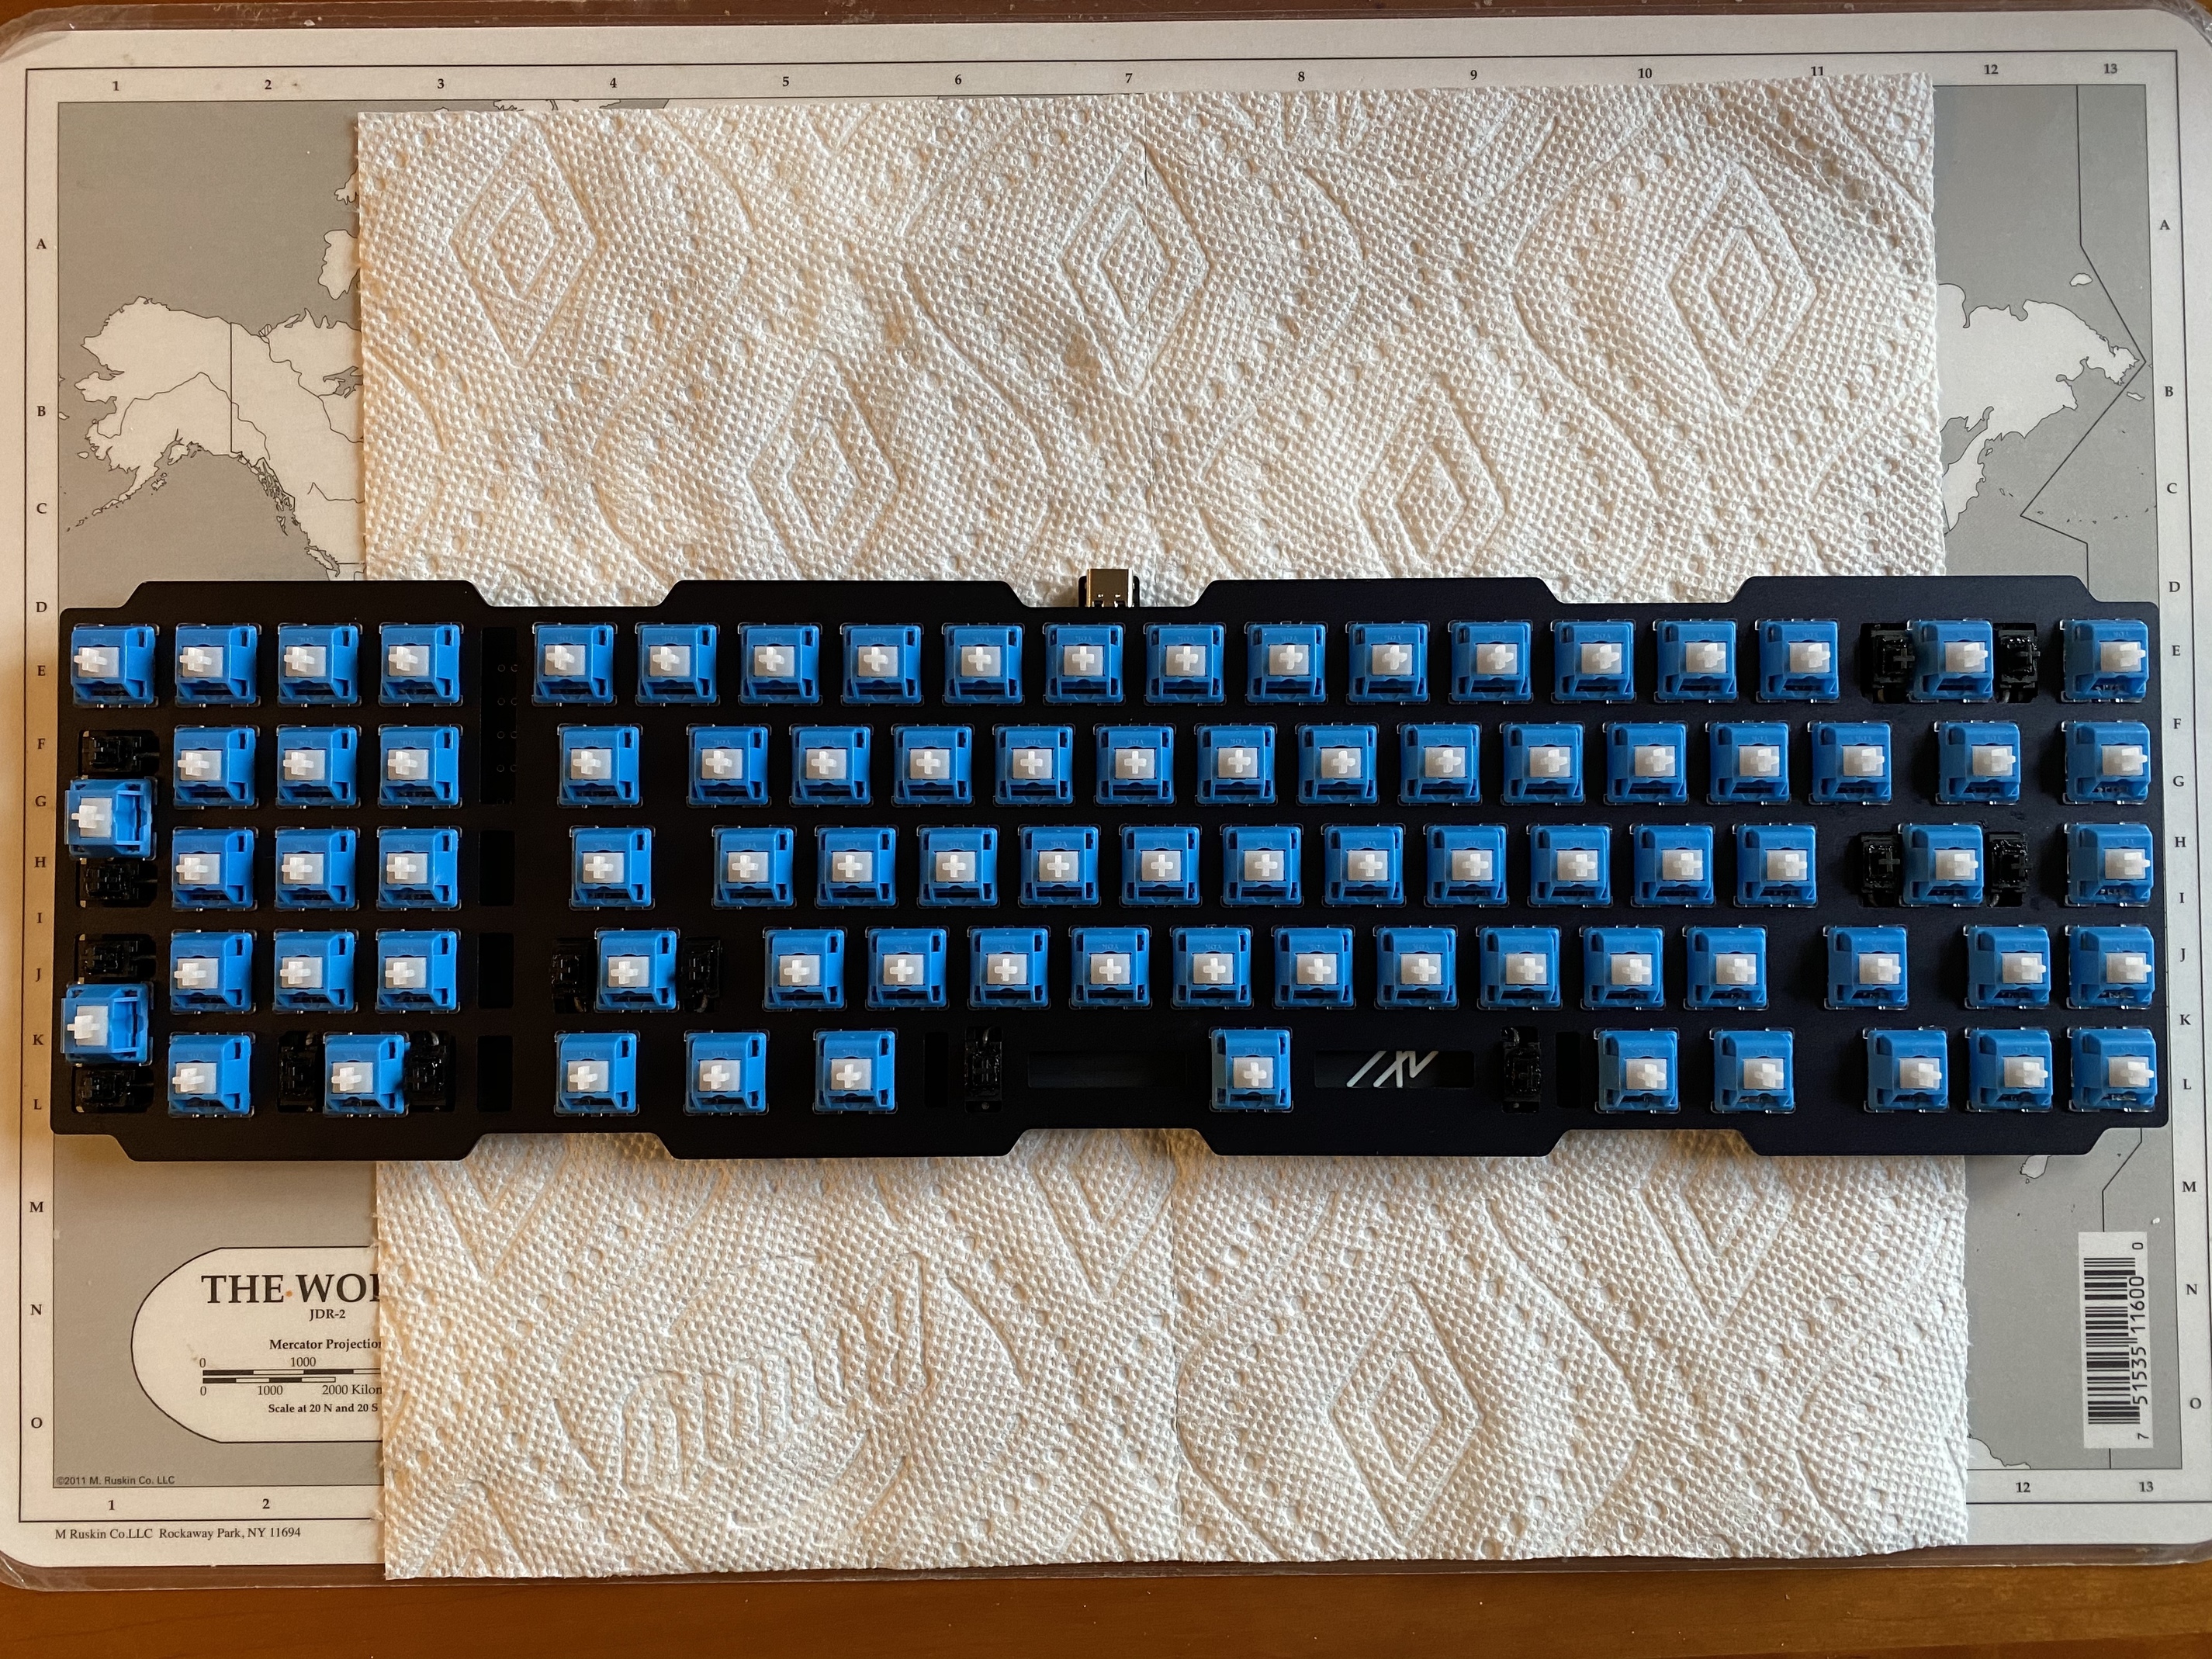
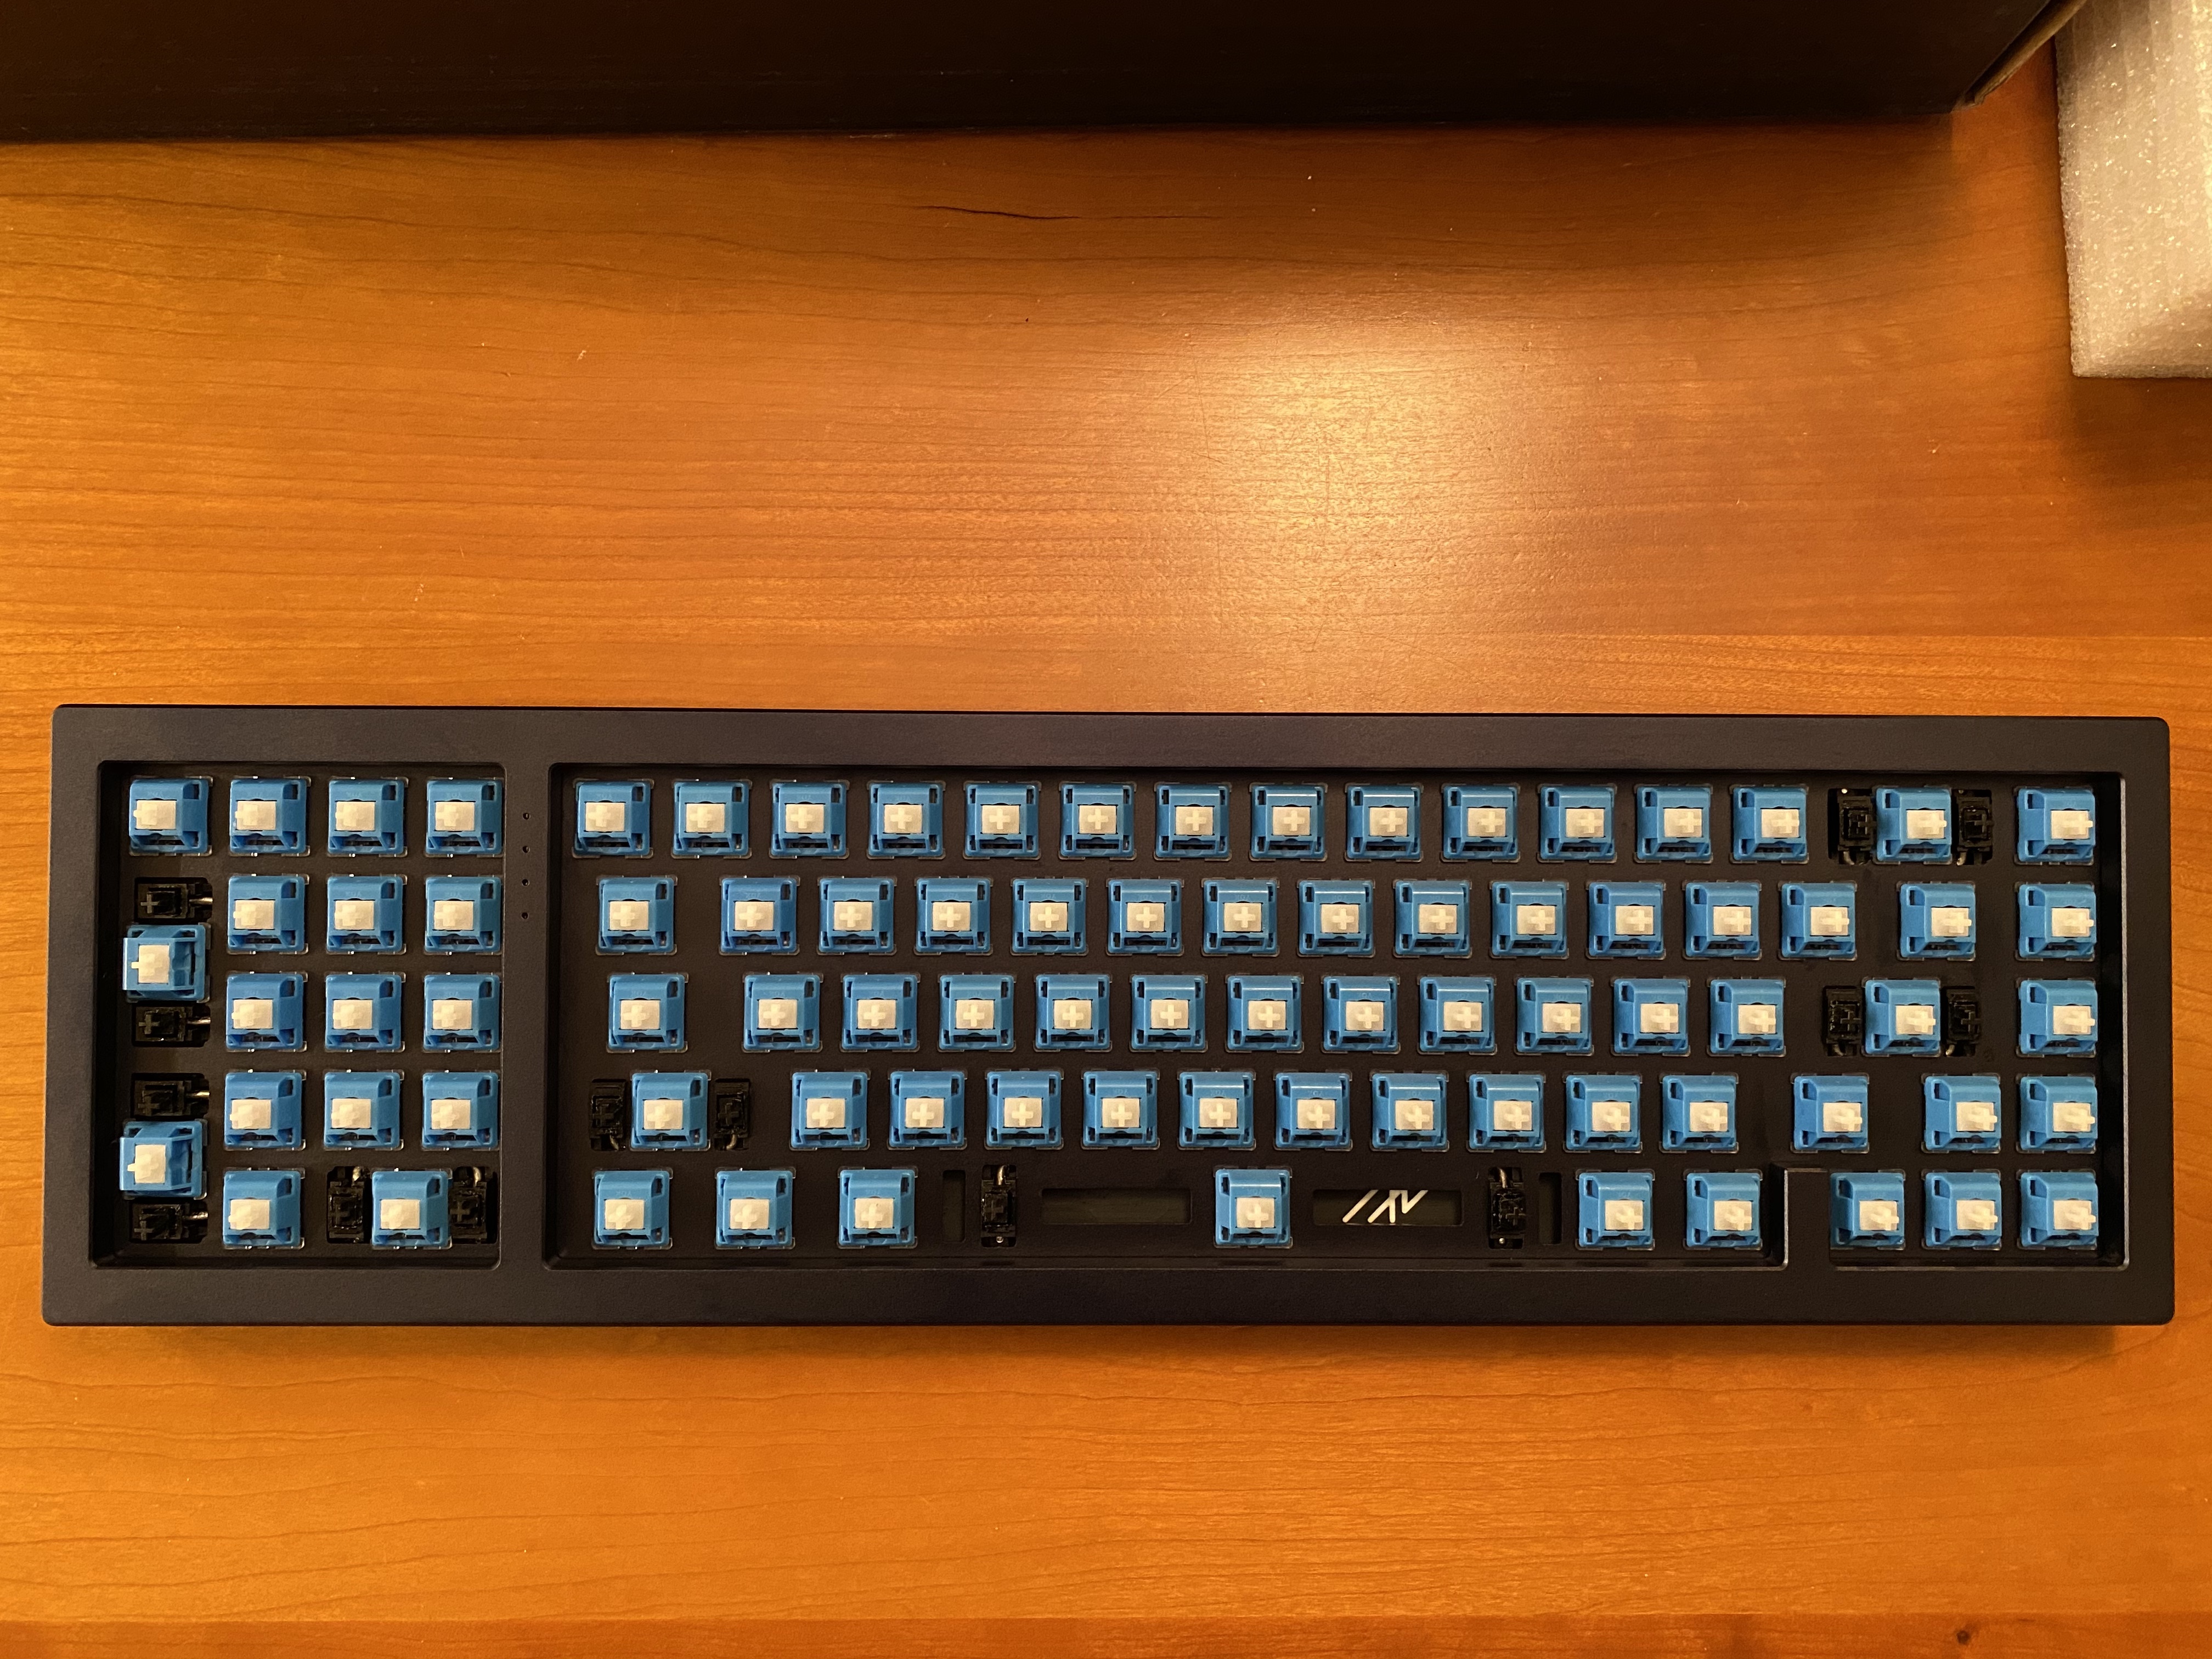
It’s time to start mounting and soldering a few switches on the board, and time for our first look at the plate. Notice the eight trapezoidal tabs on the plate - these will rest on gaskets in the bottom of the EXT65 housing.

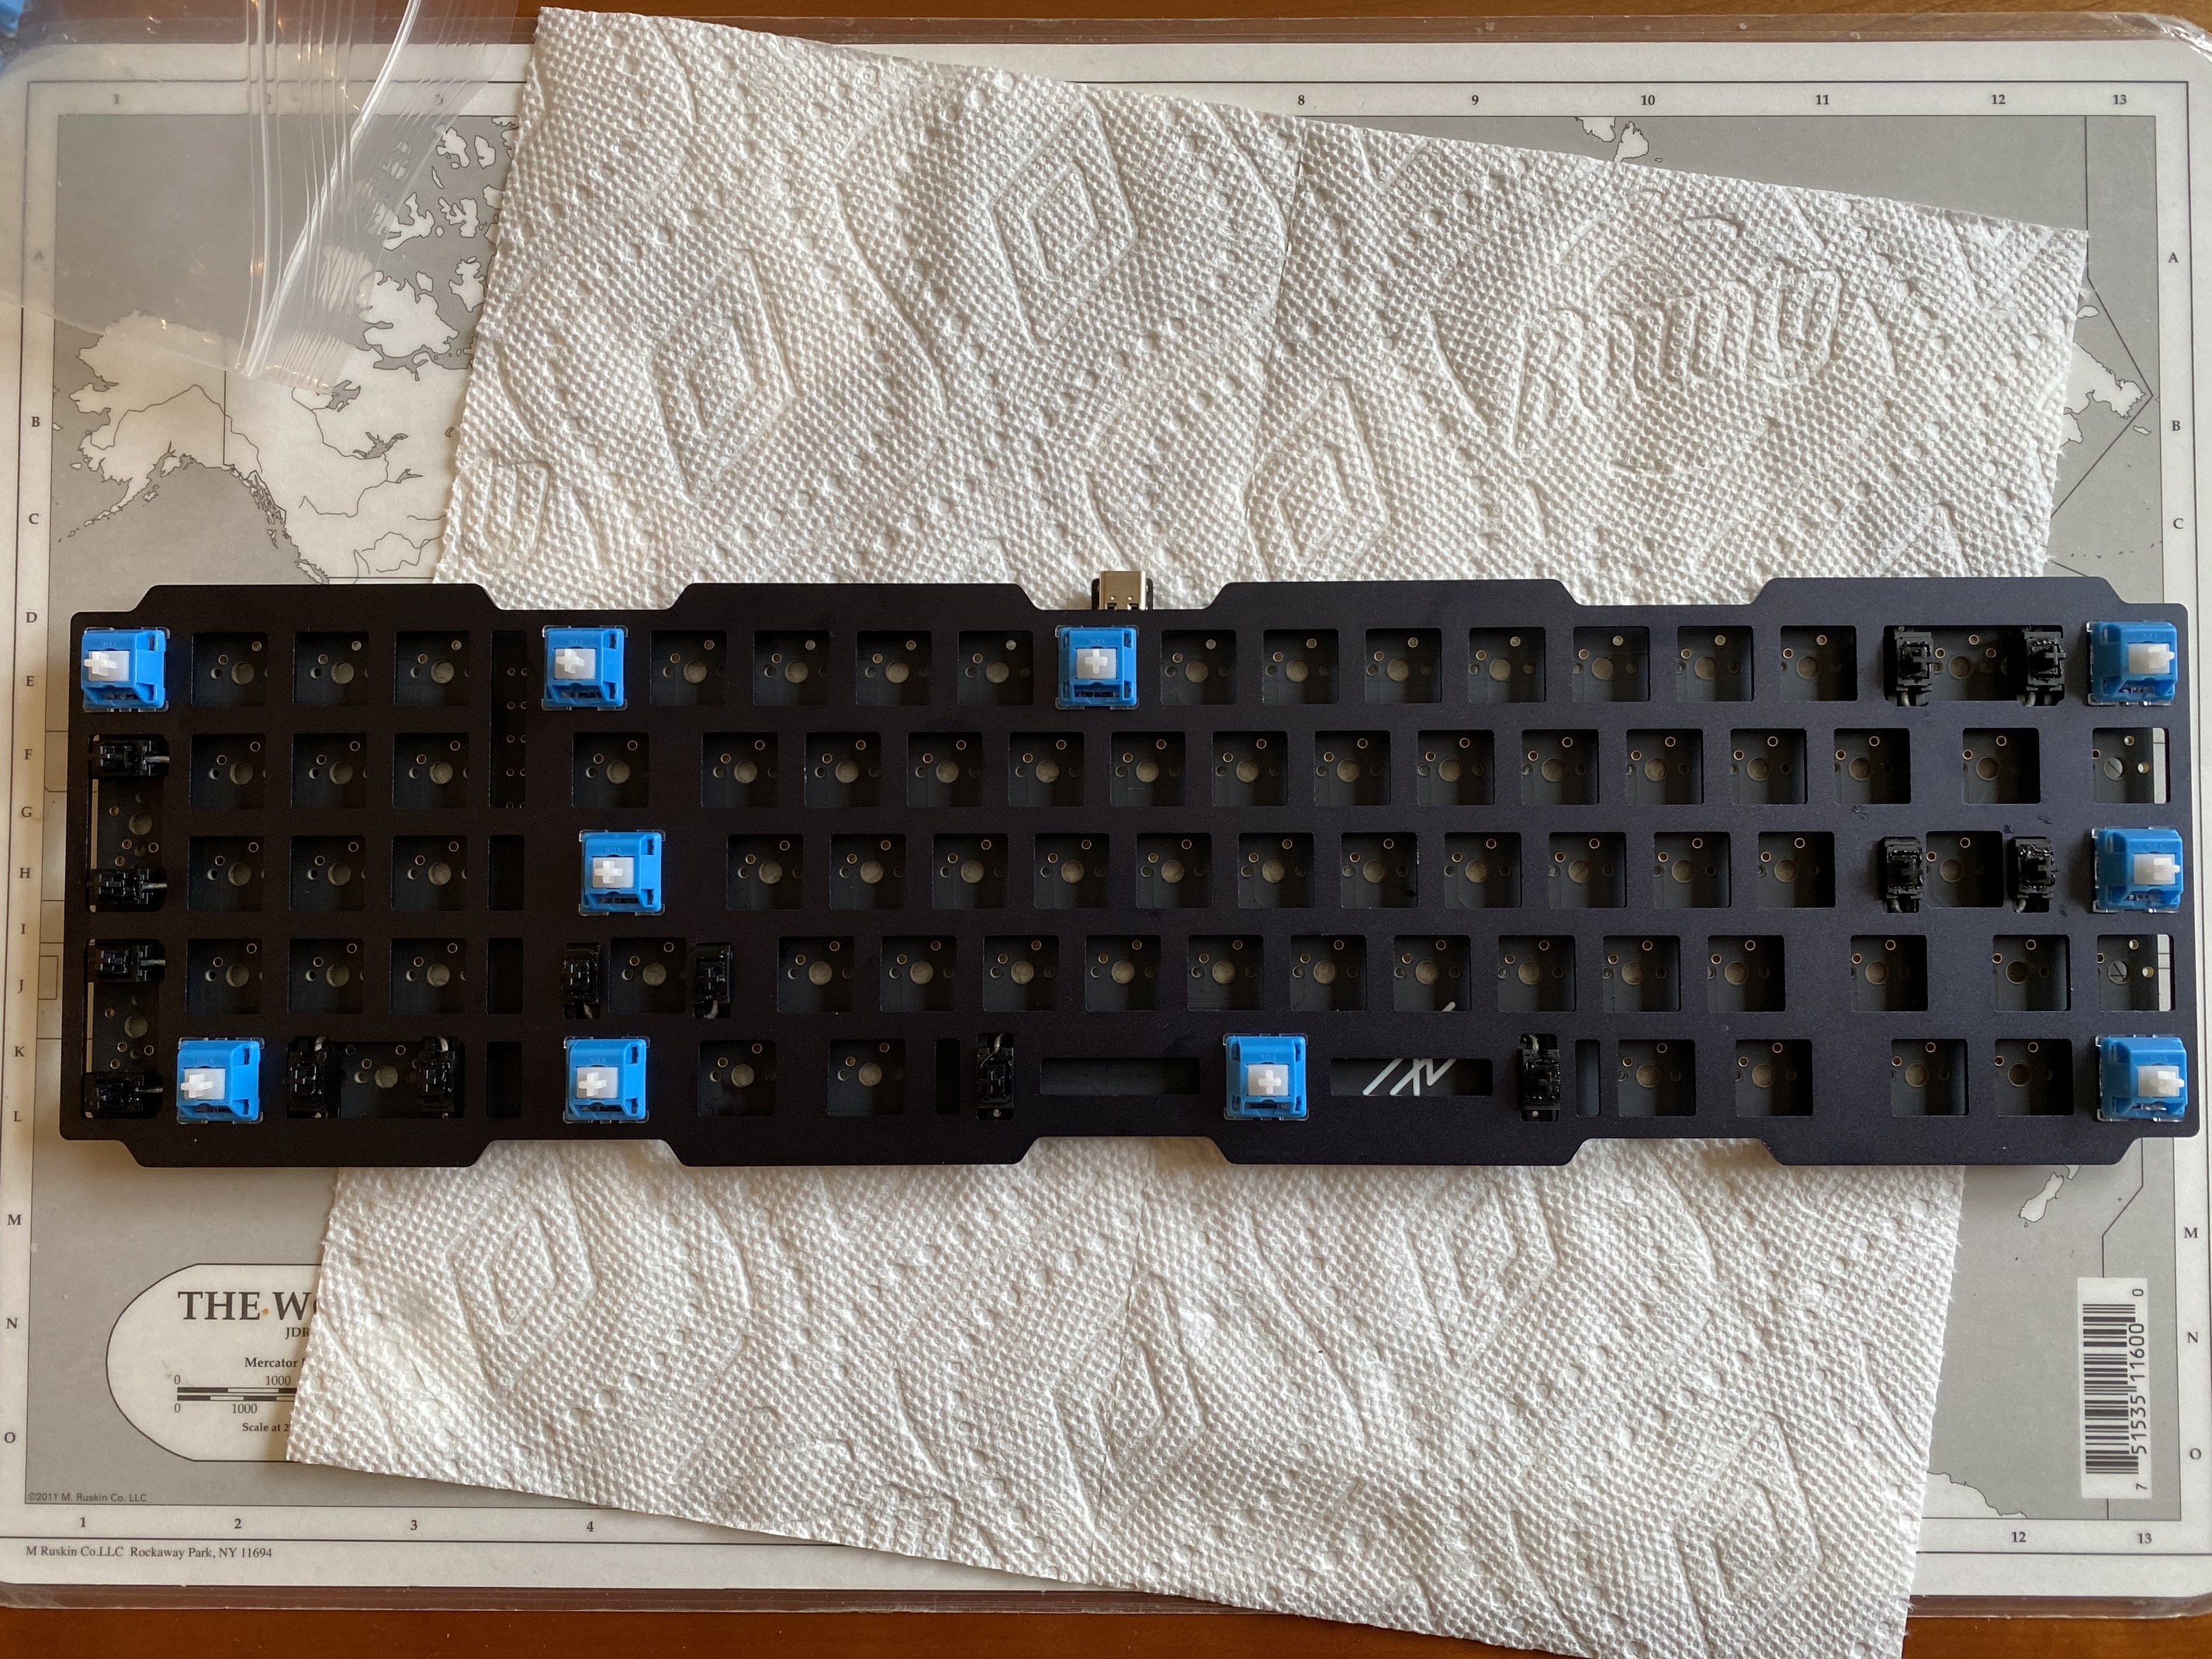
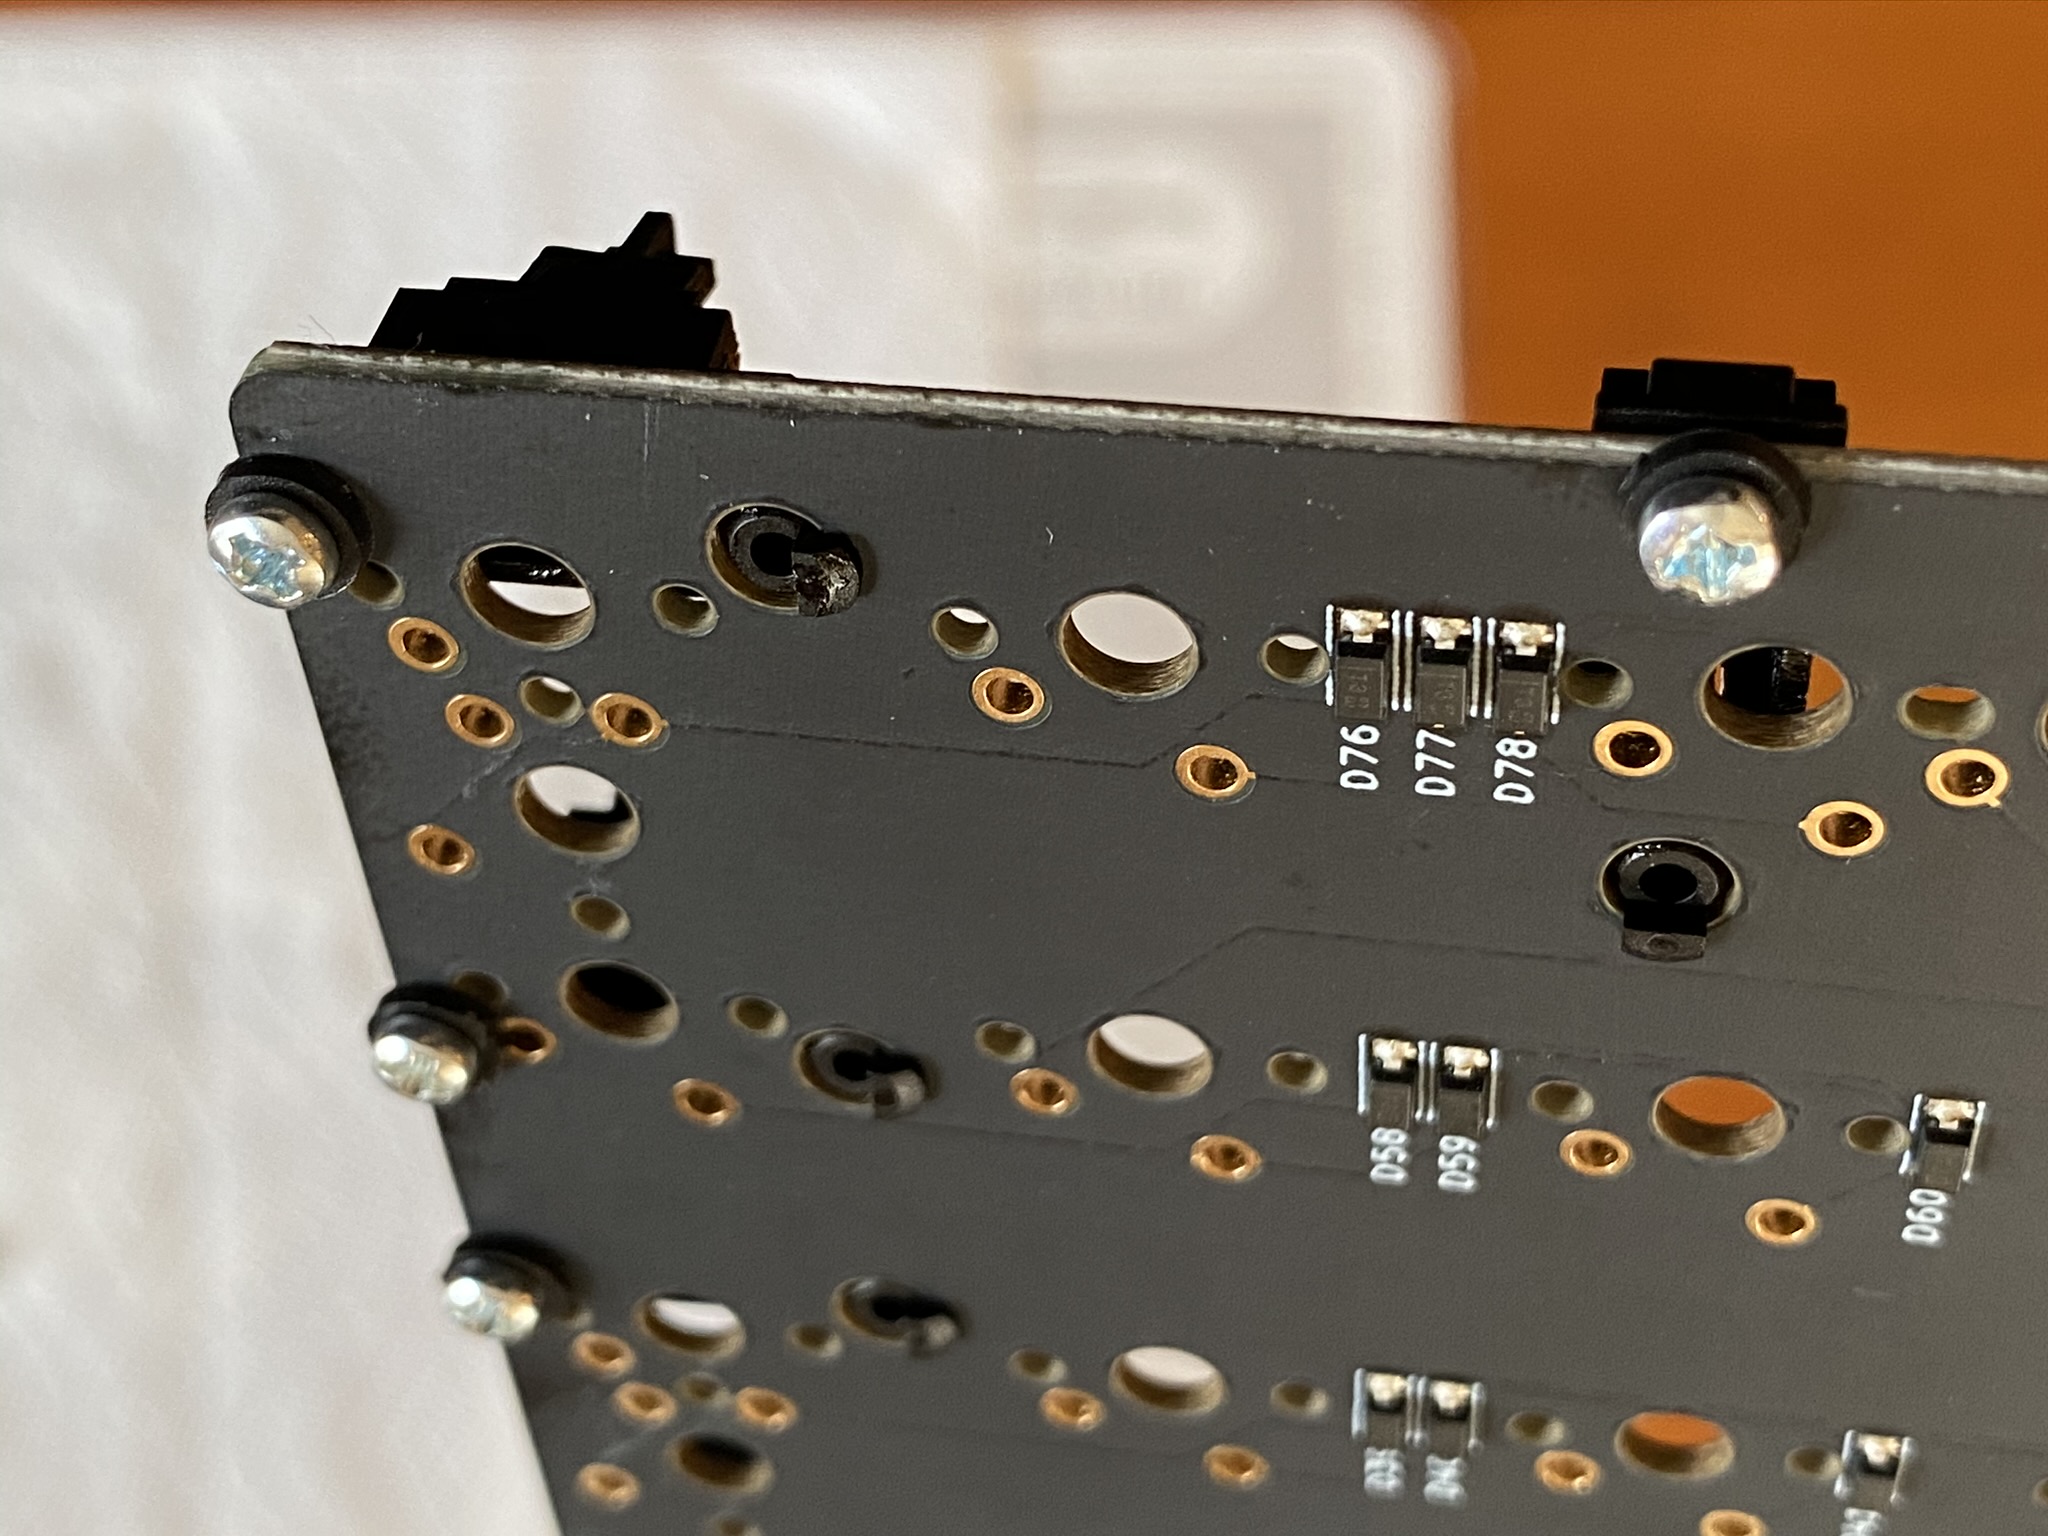
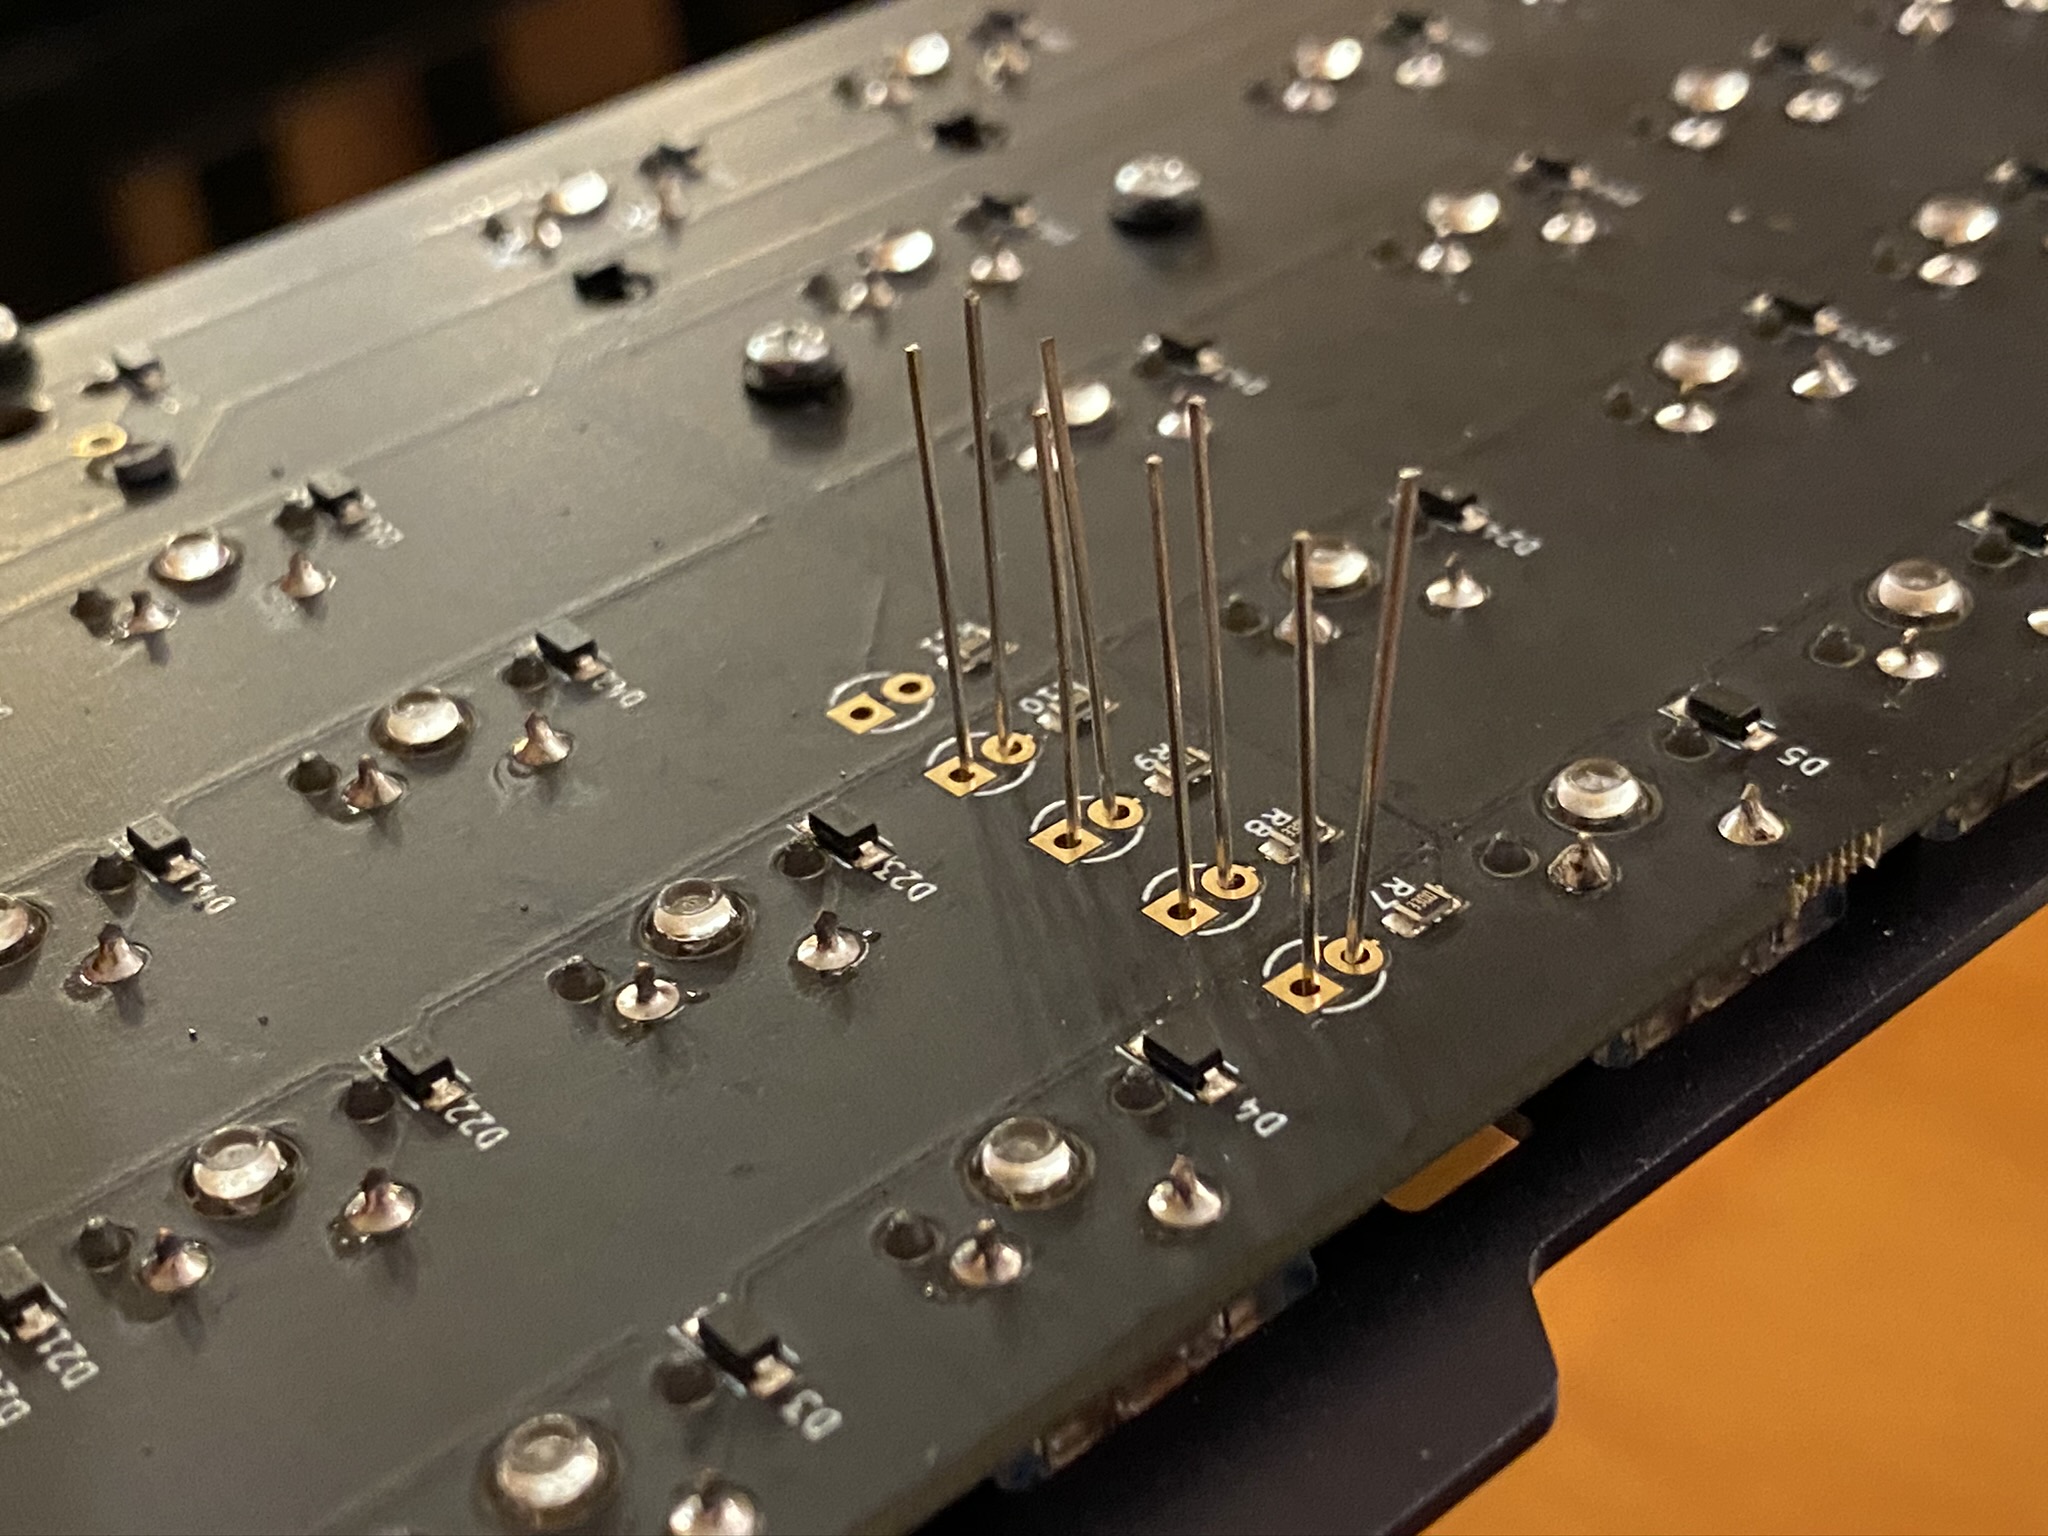
At this point, I want to come back to the leaf issue with Zykos. As I was pushing switches into the plate, and pushing switch pins through pad holes, I noticed that several pins were only partially protruding through the PCB pad holes, even though the switches appeared to be properly seated. Because the Zealio leaves are not backstopped by any pins in the YOK top, as they would have been with a Zealio top, the leaf is pushed upward when any resistance is encountered while mounting the switch. However, I also found that the leaf was not damaged - just pushed out of alignment. In every case, I was able to “pull” the short pin up with a pair of needlenose pliers, reseating the leaf in its proper position.

Having seen a lot of reports on the fragility of Zykos and the ease with which they can be damaged during installation, I spent a lot more time than I usually would making sure that each switch was properly aligned with pin holes before applying pressure. I suspect that’s why none of my switch leaves appeared to be bent, and hence a gentle tug on a switch pin with pliers was enough to reseat the leaf. I can easily imagine that if the switch wasn’t properly aligned from the beginning, it would be very easy to damage the leaf (and the switch) beyond repair. If you try Zykos, I strongly recommend making sure you properly align each switch with the plate hole and PCB holes before pressing down to mount the switch, and using needlenose pliers to tug a switch pin back into place, if necessary, after the switch has been mounted. Again, YMMV.

After a more arduous switch mounting process than usual, and after soldering the remaining switches, we have a complete PCB/plate assembly, at least as far as switches are concerned. Note that once you’ve got the Zykos soldered into place, and you’ve tested with Switch Hitter to make sure you don’t have chatter, you’re good.

We still have to install LEDs for NCS and Fn indicators. 1.8mm LEDs work fine here, but you will want to use the (included) spacers to make sure that the LEDS are inside cutouts on the case top, so that light won’t bleed from one indicator to another. I found it easiest to proceed in the following order - put the spacers on the LEDs, put the LEDs on the PCB, and then fit the case top to the board before soldering the LEDs in place, to ensure that the spacers are seated properly.

On this PCB, the long legs of your LEDs should go through the circular pads, not the square ones.

Our first look at the two halves of the EXT65 case. The “Aegis Navy” color is gorgeous, and the ano is very clean and smooth. This picture does not do it justice. Note that the EXT65 supports negative-typing angle, if you’re into that - just reverse the top during installation. I’ll try that at some point, but I’m 99% sure that won’t be my jam; I’m here for the layout (well, the cosmetics too).

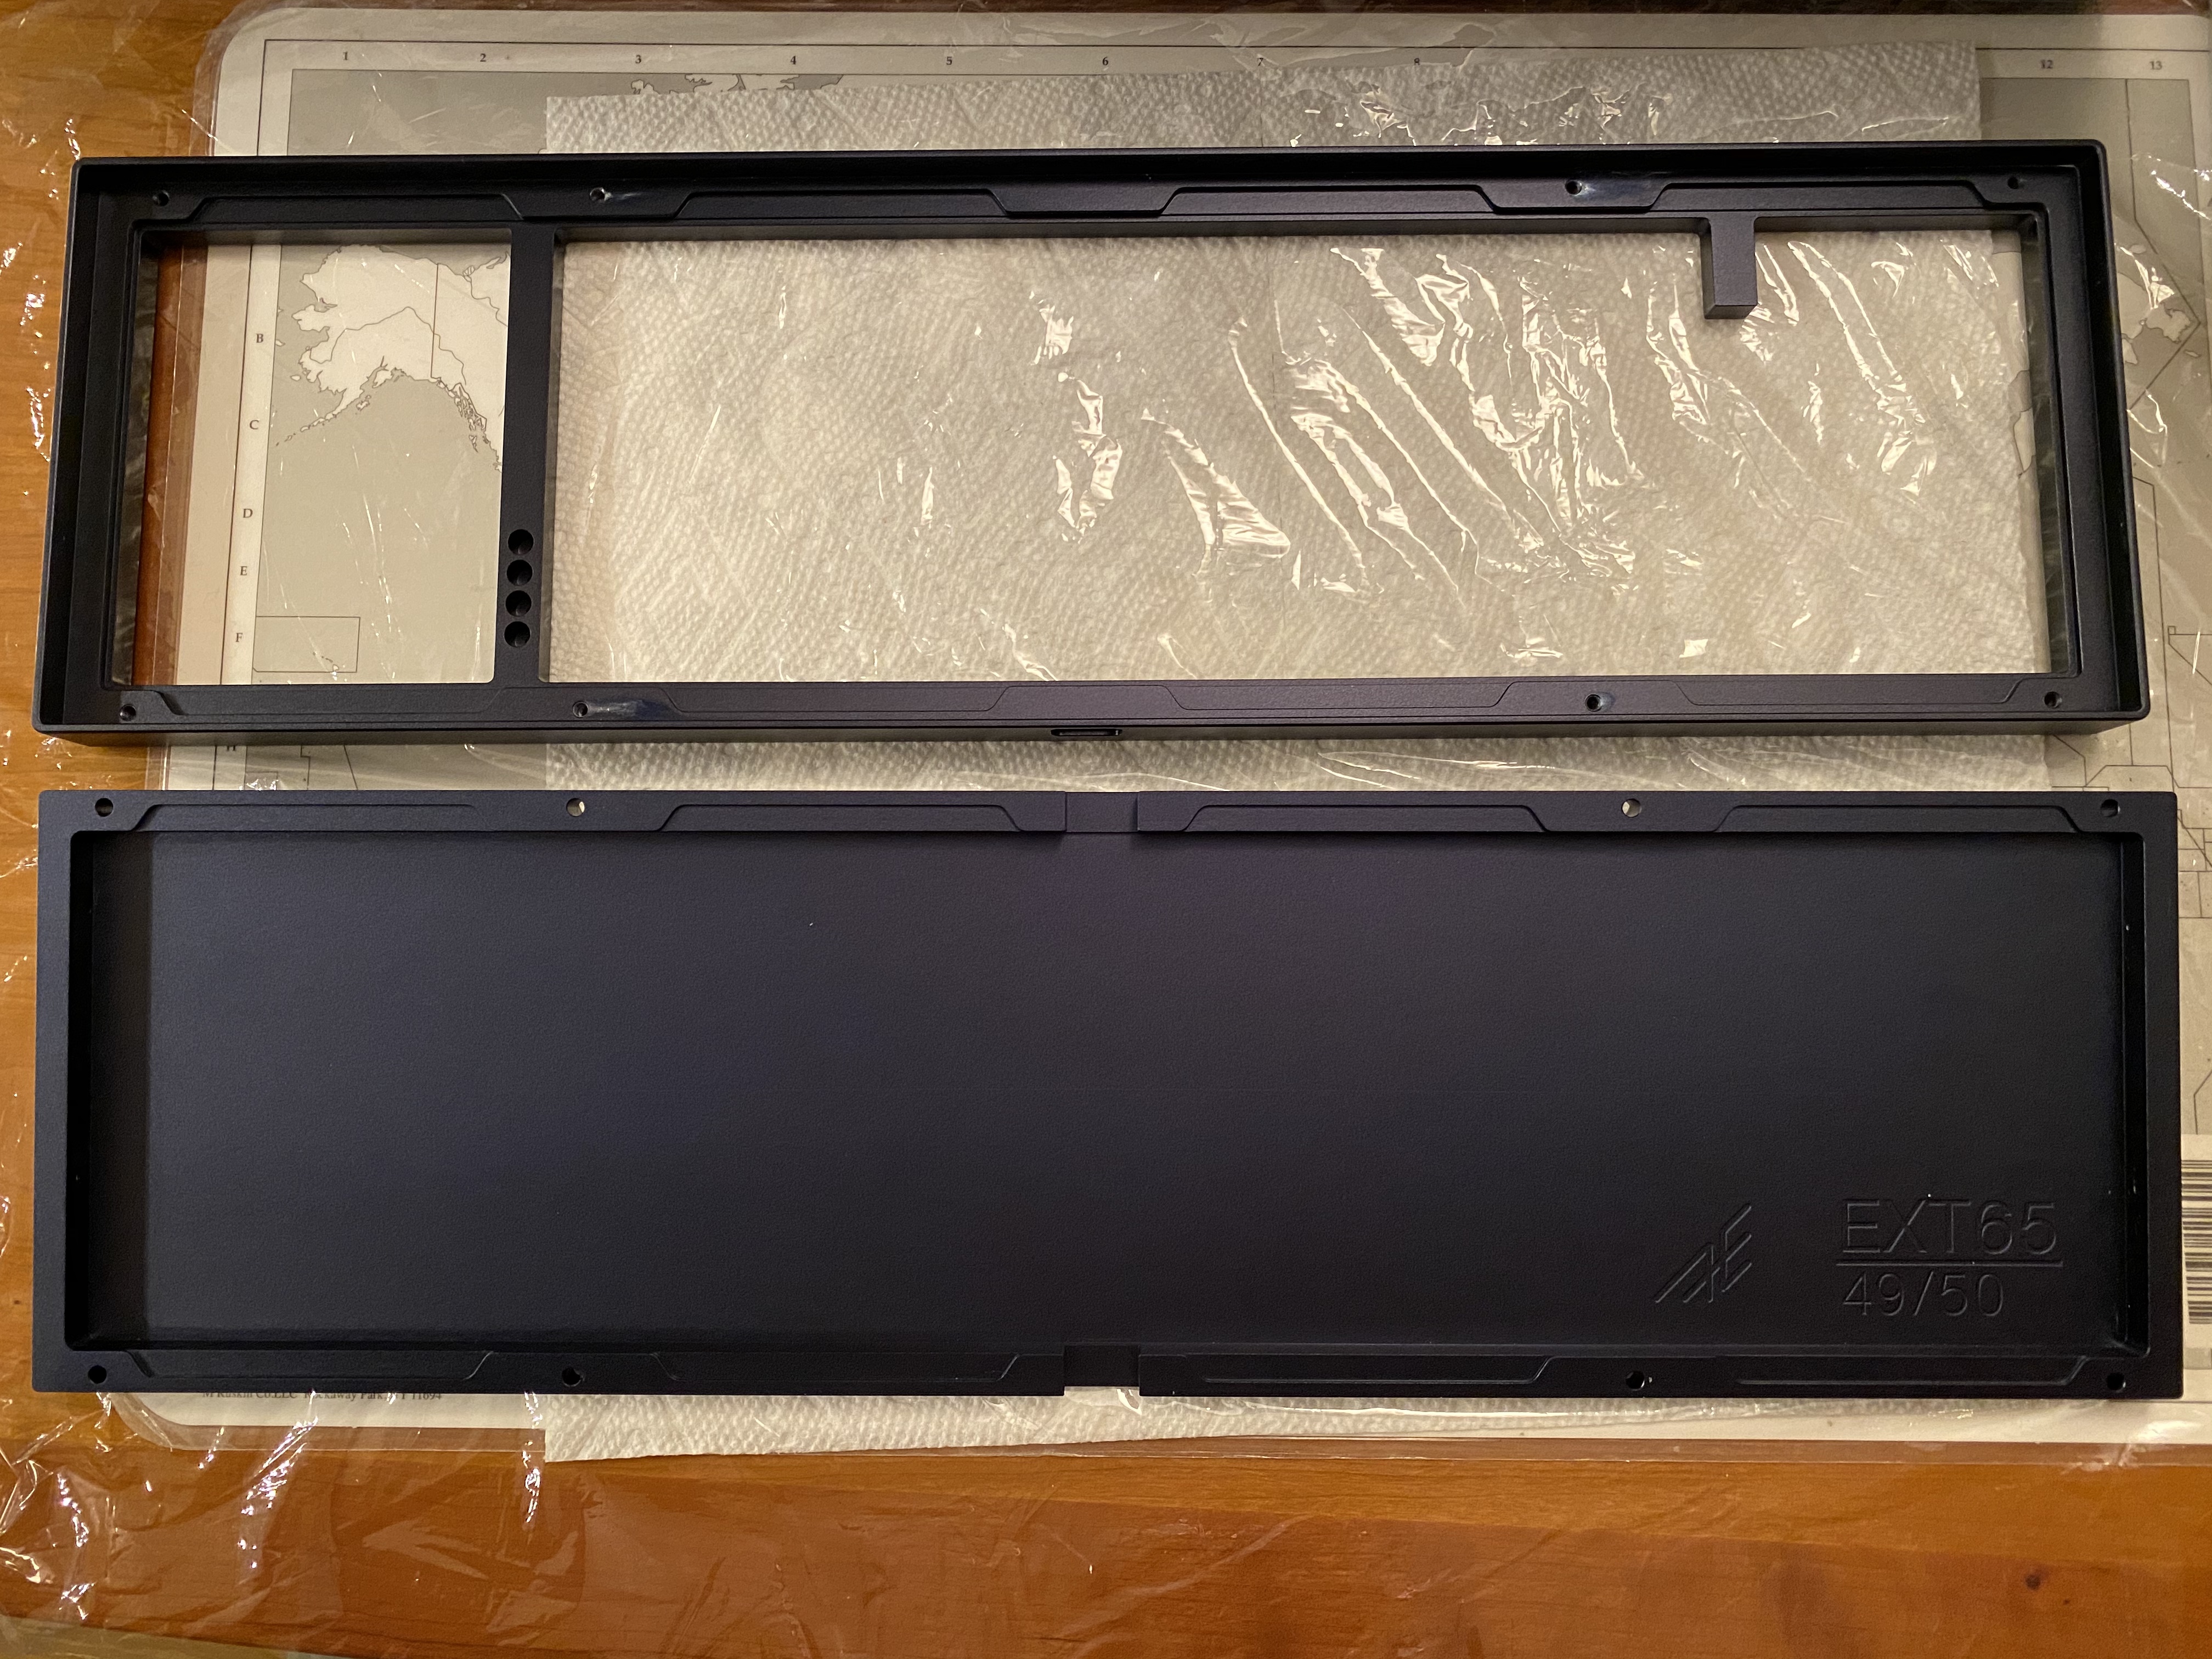
The EXT65 was a 50-board run (well, actually, 54, but more on that in a future build log). Here we see the EXT65’s gasket mounting solution - adhesive pads are placed in trapezoidal cutouts on the base, and the trapezoidal tabs of the plate rest on these pads. The entire PCB/plate assembly is held in place by compression once the two halves of the case are screwed together.

The EXT65 came with four sets of adhesive gasket pads, each of a different material - in decreasing order of hardness, rubber, silicone, Poron, and foam. I opted for Poron, as it seemed to have enough give to be interesting. I haven’t yet experimented with other gasket materials.

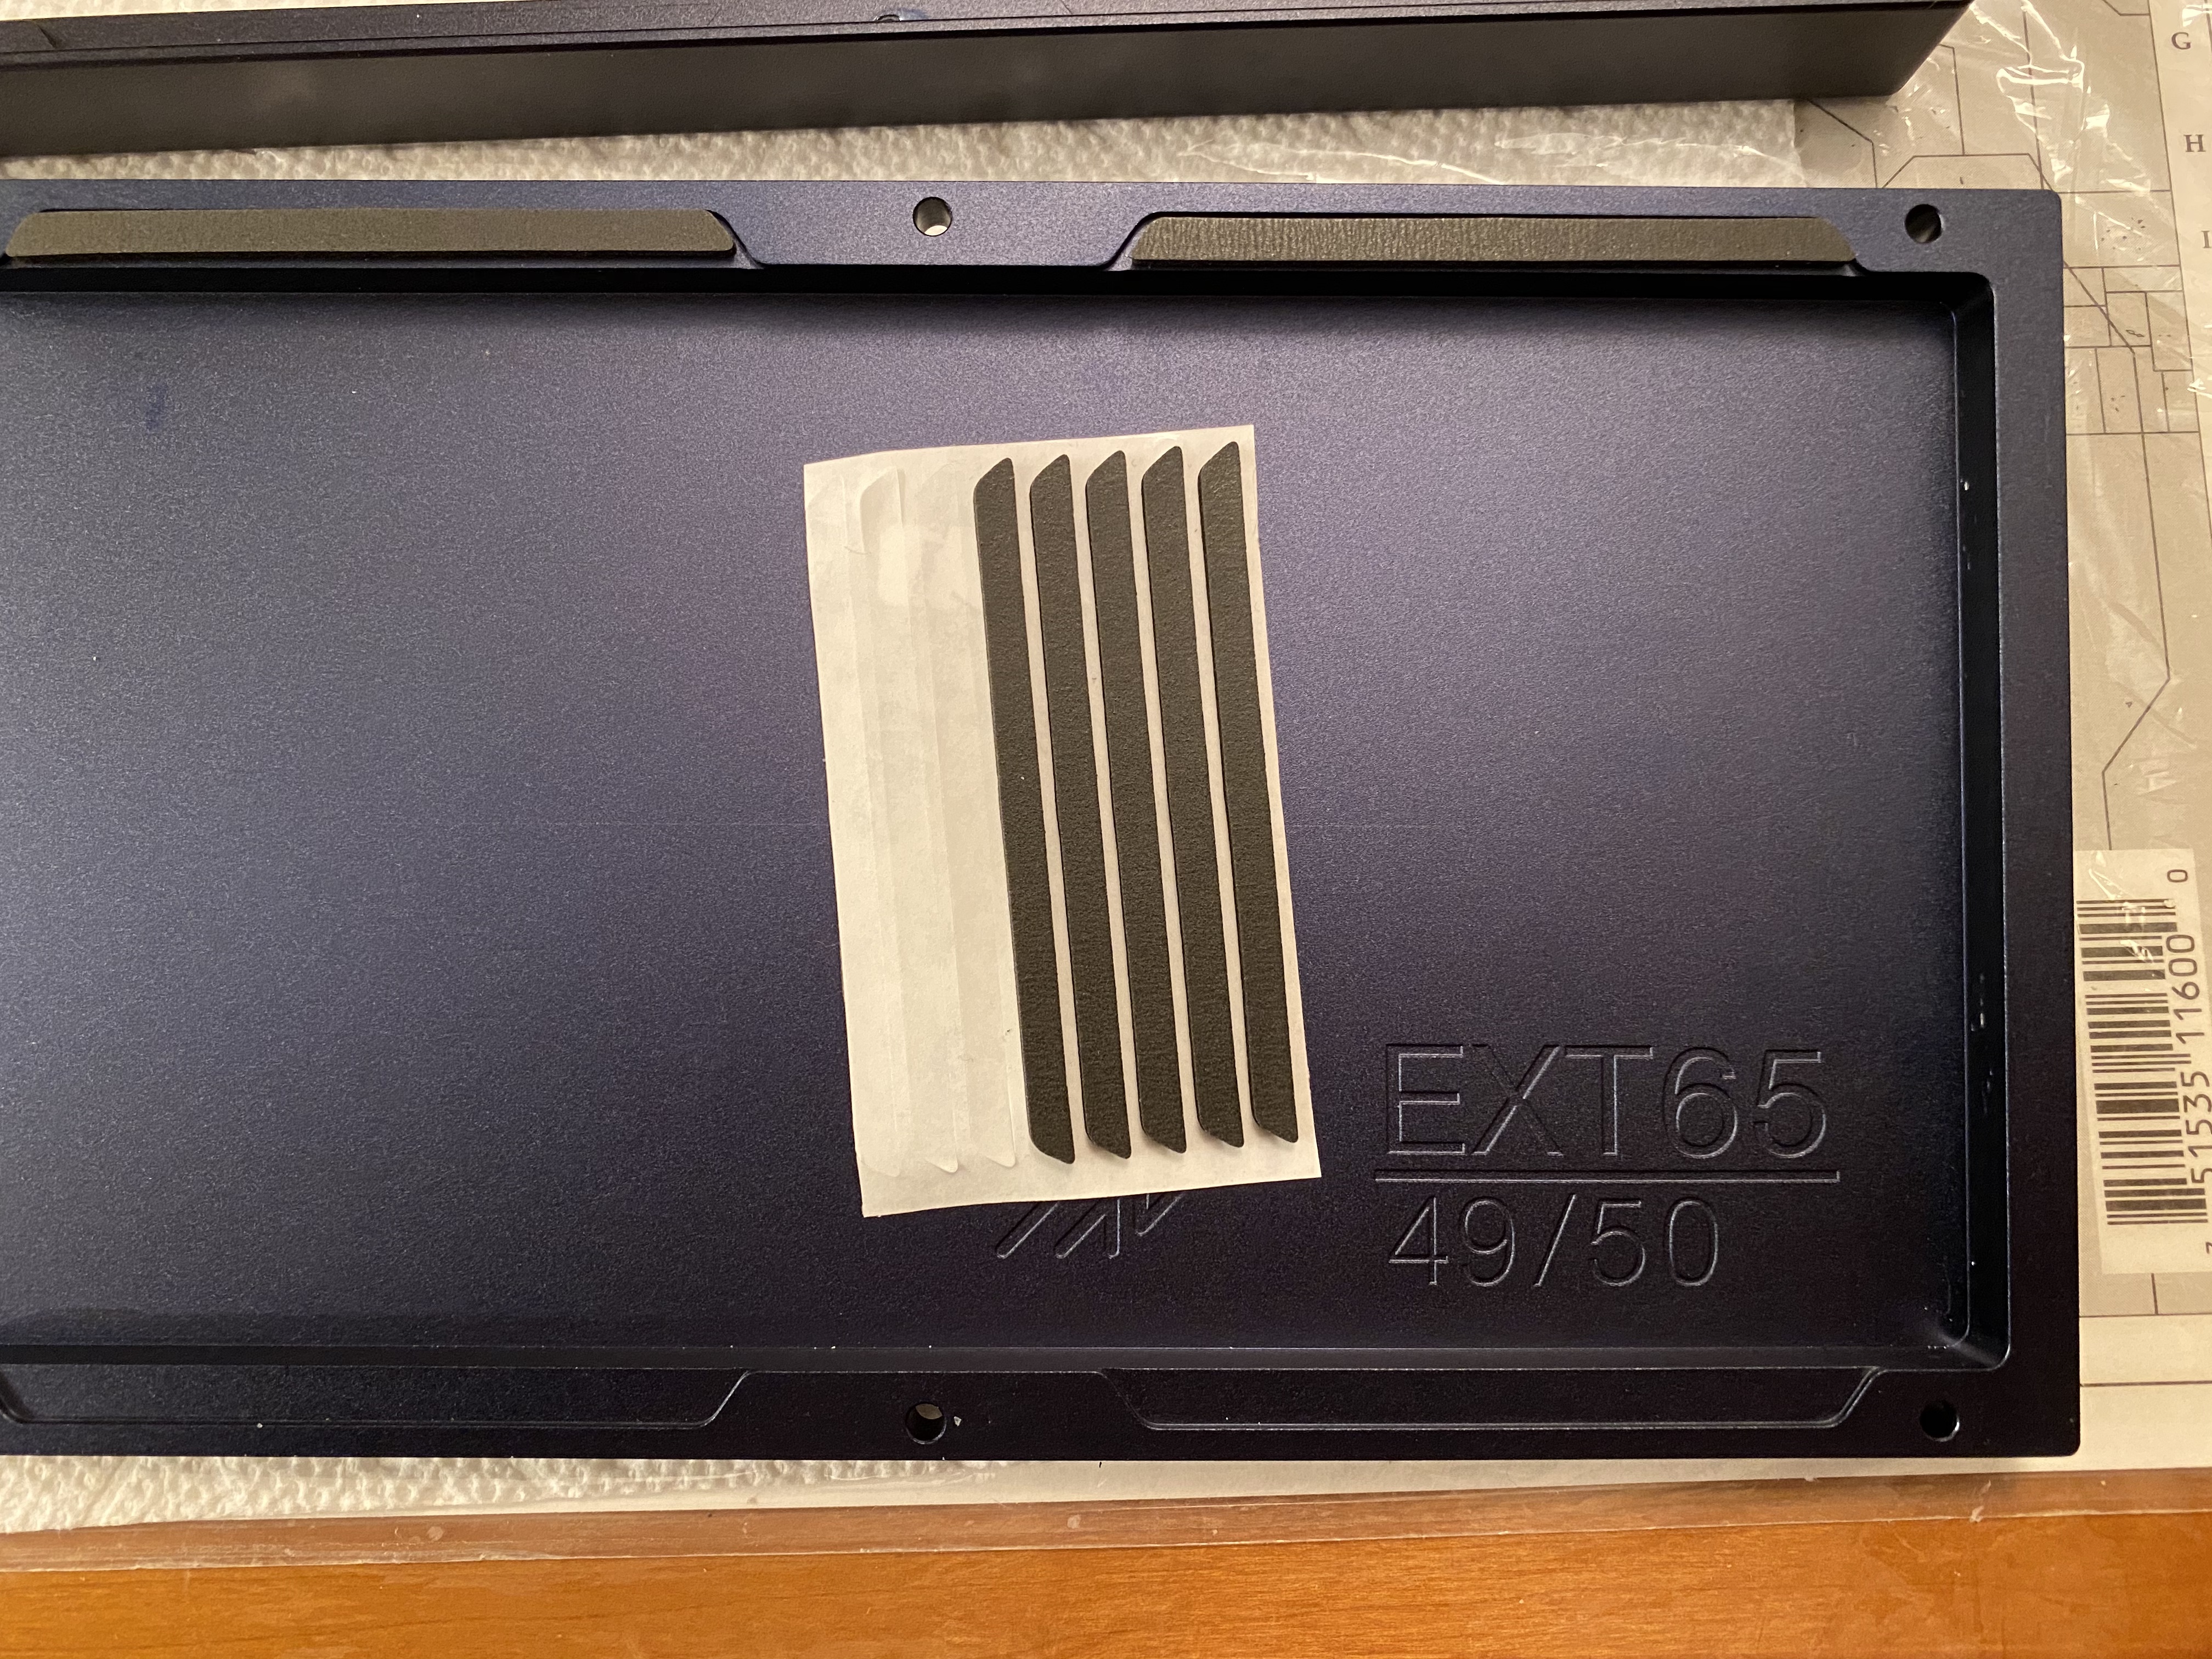
With eight Poron gaskets in place, we can screw the whole thing together. Here’s the completed board, sans keycaps:

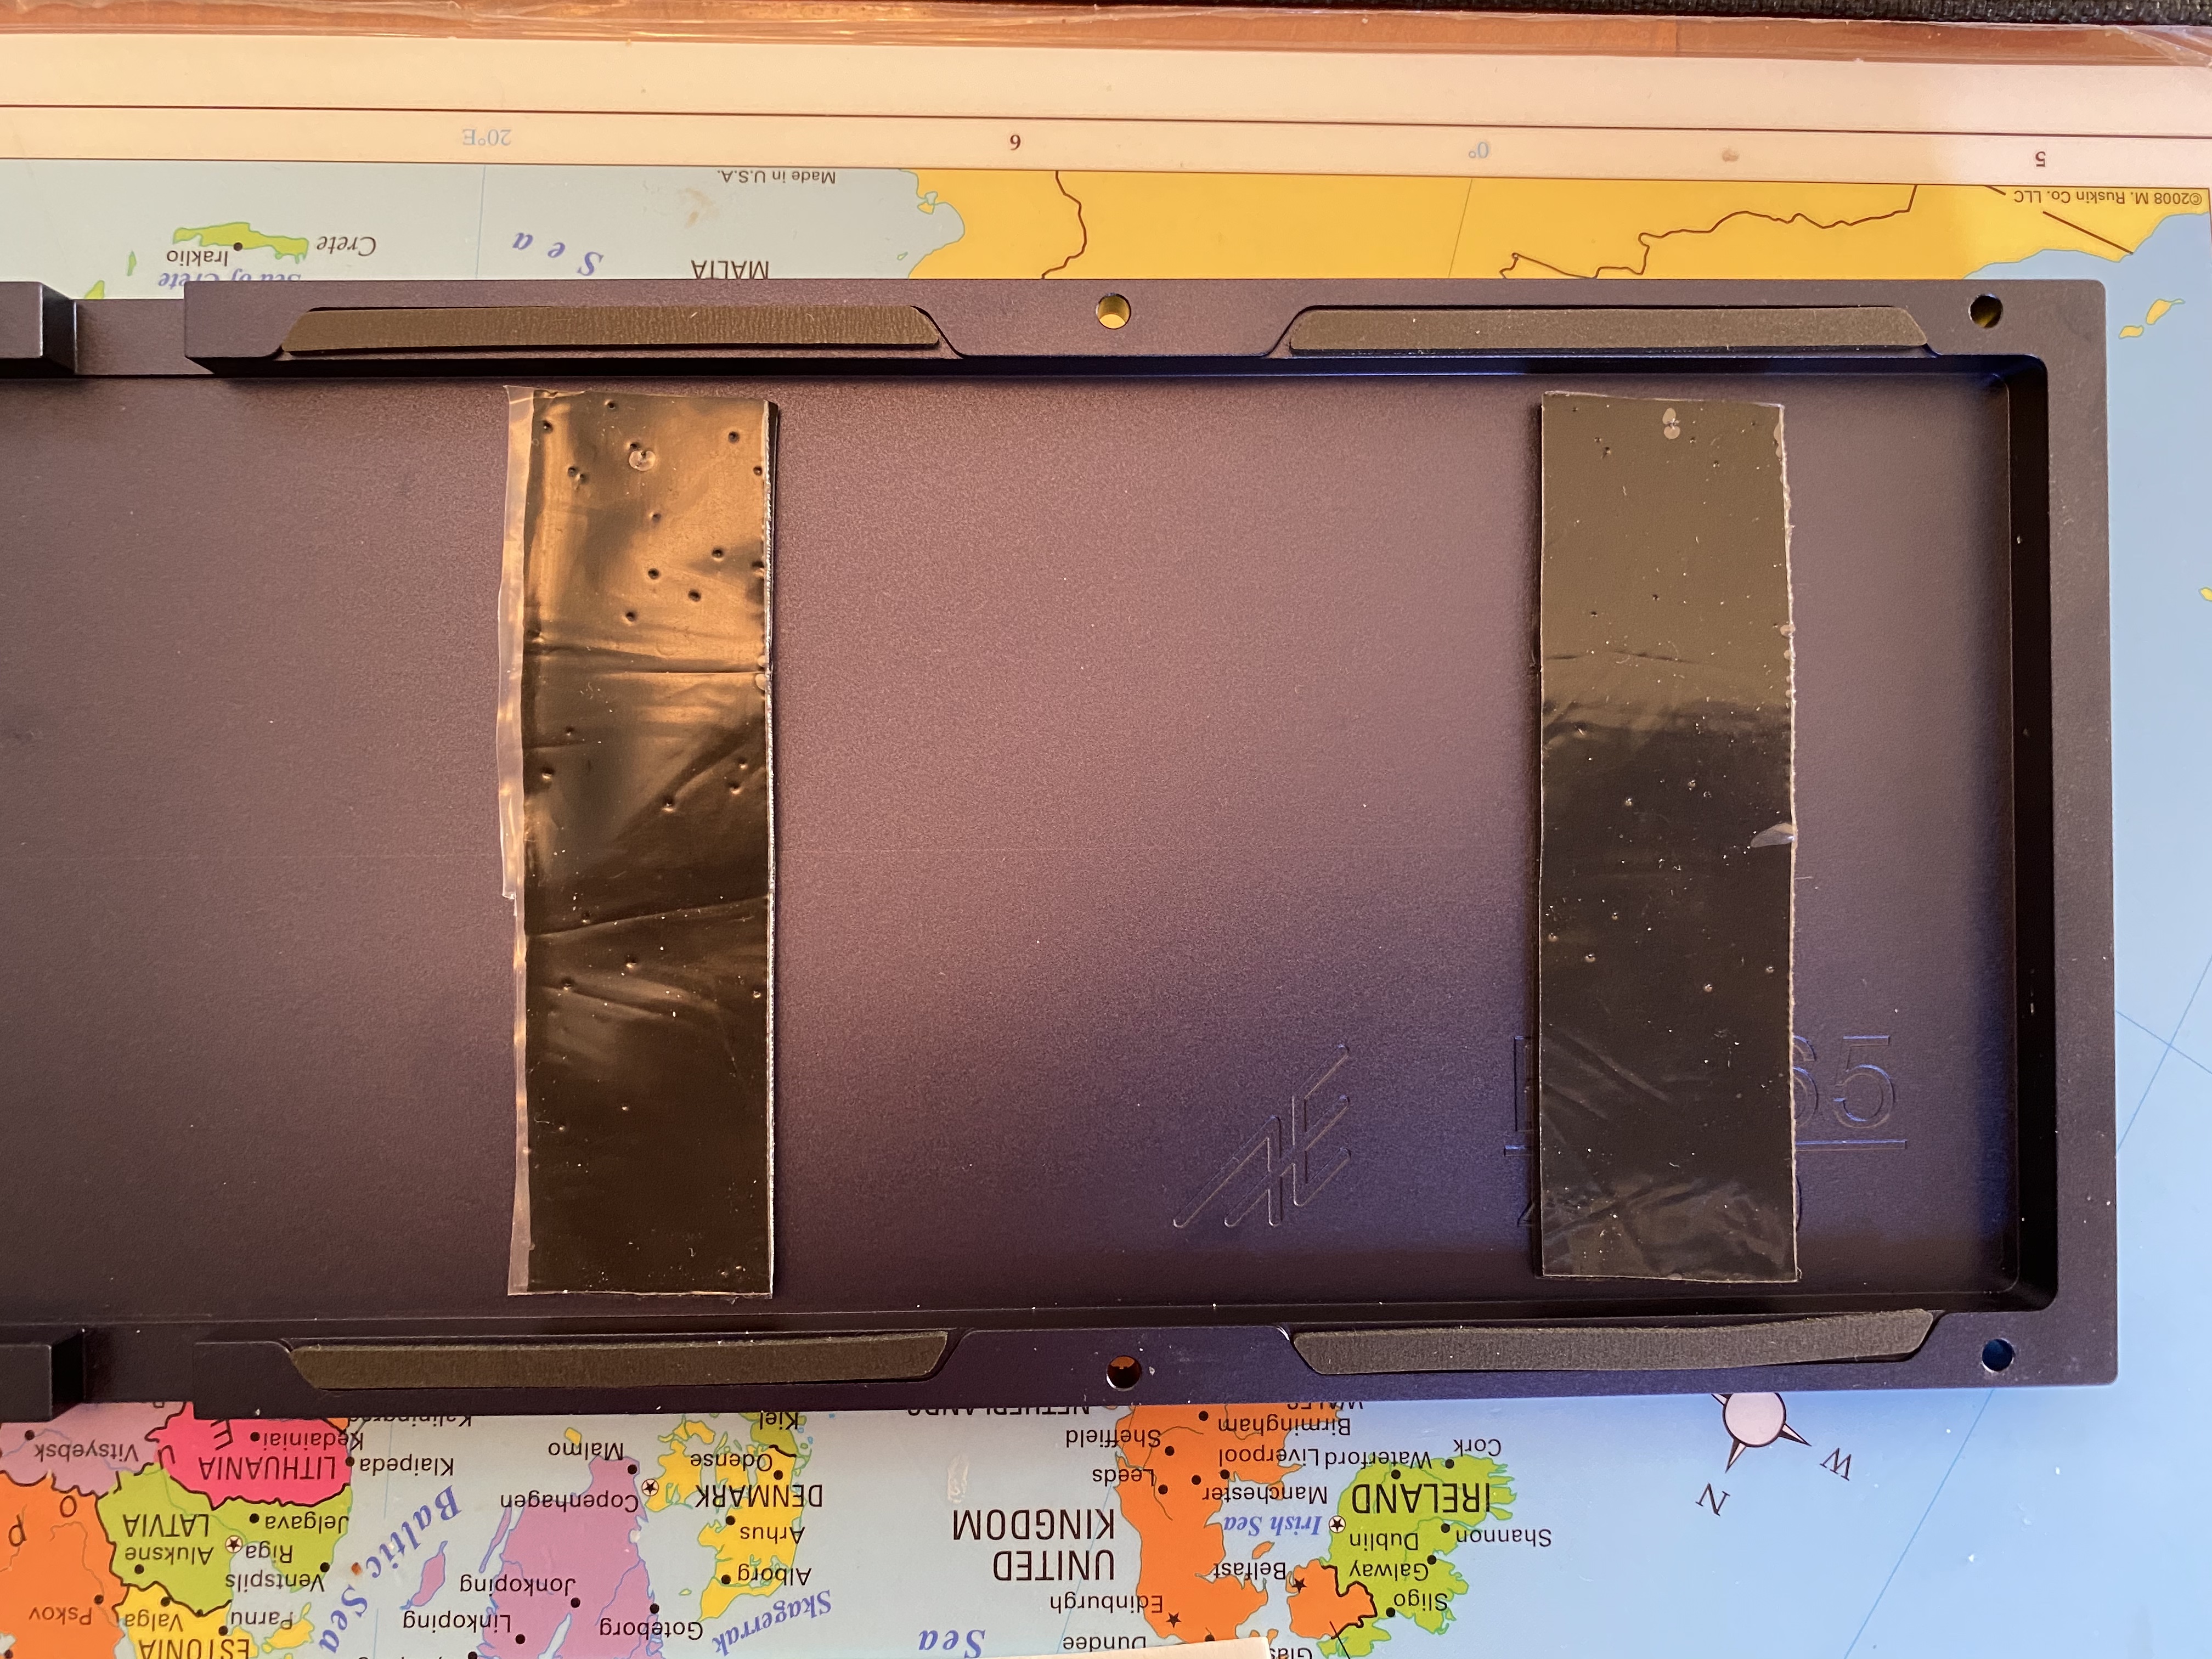
After a couple of days using the board, I found that the Zykos paired the immediate, rounded bump of a Zealio V2 with the clack of a Holy Panda, which, feel-wise, hits a very nice spot for my personal preferences. Sound was another matter; I expected a loud clack from the progeny of a Zealio V2 and Holy Panda, but I wasn’t expecting that much clack. These are loud switches. So, I ended up doing a quick Sorbothane treatment between the PCB and case to take the edge off of the clack. A few small pieces do the job, at least for me. I left the protective plastic on the Sorb to guard against staining that beautiful anodization, and after a quick test fit, we’re getting about the right level of compression on the switch pins.

Lessons learned

  • Left-handed boards are definitely worth right-handed attention. I’m still getting used to having the numpad on the left, but it really is a nice way to gain ergonomics without sacrificing functionality.
  • I was somewhat skeptical that gaskets on the bottom case only would be enough to eliminate metallic case sounds, but these gaskets do the job. Sorbothane struts between the PCB and plate might further attenuate the sound, but I don’t believe they would alter the tone substantially.
  • Zykos deliver a really nice rounded tactility with crisp response - I completely understand the appeal on the feel front. On the sound front, the jury is out. If you like that Holy Panda popcorn popper sound, these are for you. I think I’d like to try more aggressive lubing next time to dial back the sound a bit.

The anodization and “Aegis Navy” color on this board is gorgeous, but not at all easy to capture. Nevertheless, if you let your eye run along the bezels of the EXT65 in the photos below, I think you will have at least some idea…


Specifications

case: AEboards EXT65
- bead-blasted 6063 aluminum, "Aegis Navy" anodization
case dampening:
- eight Poron gaskets
- four strips of 1/10" 40 Duro Sorbothane between PCB and case
PCB: EXT65 (USB-C)
plate: 1.5mm "Aegis Navy" anodized aluminum
plate/PCB dampening: N/A
stabilizers: GMK PCB screw-in
- 1x6.25u, 6x2u
stabilizer mods: clipped and lubed with SuperLube
switches: 84x 67g Polar Zykos
- 84x 67g V2 Zealio bottoms/leaves
- 84x Halo Clear stems
- 84x YOK Polar Panda tops
switch mods:
- springs tub-lubed with Krytox GPL-104
- stems hand-lubed with Tribosys 3203
- no housing lube
keycaps:
- GMK Sky Modo alphas
- GMK White on Black mods
- AE x RAMA black aluminum with white infill
HxWxD (without caps or feet): 1.13" x 16.13" x 4.63"
HxWxD (without caps): 1.19" x 16.13" x 4.63"
HxWxD: 1.5" x 16.13" x 4.63"
assembled weight: 1.804 kg (3.98 lb)
13 Likes

Very nice build log as always :wink:

By reading your Franckenswitch experiment this is not something I would like to do myself given the hassle to solder them properly, also would like to experiment silent switches next time.

Having the numpad on the left is very clever, did you get used to it quickly?

This board allows to reverse the bottom part to have a negative slope angle, very nice design!

1 Like

So how you liking the Zykos? I did something similar with V1 Zealios (swapped leaves with Outemu Skies & swapped stems with Halos) which felt really really good, but took way too long & was way too tedious to be something I recommend doing. These Zykos look like a much easier way to accomplish that feel. BTW why the YOK tops, for the sound?

1 Like

I’m still getting used to the numpad on the left. I expect it will take a while, just because I don’t use the numpad that often. One thing I should have mentioned in the log is that the PCB supports 5x4 macropad and true southpaw numpad, but not a right-handed numpad - so if you were hoping to just keep the layout of a right-handed numpad and put it on the left, that’s not an option.

The biggest adjustment so far has surprised me a bit - I use an 1800 most of the time, and I didn’t realize how much I was using the numpad’s bottom row delete key in that layout. I keep reaching to the right to hit it, and…it’s not there. Haven’t decided if I want to change the right column of the 65 layout to put a Del there.

1 Like

It also took me a while to change my habits by switching from a full ISO keyboard to TK ANSI one, muscle memory is a hard thing to change, haha!

1 Like

As I understand it, Chewwy had the idea to put a YOK/Panda top on the board in an attempt to improve the sound, and it definitely does that. I’d also say that it tightens up the switch feel - to the extent that a Halo stem in a Zeal housing is mushy, switching the top cleans that up. But this stuff is so subjective…

1 Like

Yeah it really is, what I really like you may hate & vice versa, very subjective for sure. Although the sound is the one thing I would improve upon if could on those crazy modded V1s I did. I got a batch of 67g V2s I’m planning on rebuilding my acrylic Clueboard with & I got all the other necessary parts for Zykos. Gonna have to try some out before I get to lubing the switches, I might shift gears & make a batch of Zykos for it instead if I like them. Although I need to get a day off from puppy duty before I get into any of that, LOL! I’d like to do a proper build log on this one & there is no way I’ll be able to do that while also watching the puppy!

1 Like

I feel that, the delete key is always a must for me. Anymore even on 60% I put a split backspace and have delete and backspace. Awesome build btw

2 Likes

Has science gone too far?

All jokes aside, that’s a pretty damn amazing board. Hopefully I’ll actually have the money to make a full, fancy-pants custom with a lefty numpad like I’ve always dreamed.

2 Likes

I always set up my right column on 65%s as R1 - Delete, R2 - Pg Up, R3 - Pg Dn, R4-Fn, R5 - Right arrow when they a full column. If it’s 660 style I’ll usually go with R1 - Insert & R2 Delete. I’m sure it’s not the best setup for working on your board, but the only extent I need my keyboards to function for work is for them to be able type up estimates & emails to the customers. So I have my keymaps more oriented towards gaming & OCing with Delete being a huge need for me to get into my BIOS with F keys on a layer. Thankfully the first column mapping I talked about is supported by most high end aftermarket cap sets now!

There must be something there, that’s exactly the same as I do

1 Like

Ok & I know you use your boards for actual work, not just estimates/emails like I do. Agree there must be something helpful with that layout.

Debatable lol, I do a lot of both of those too. I do CAD but it’s mostly board schematics and I mostly just use a handful of key combos on my left hand and keep my right on the mouse, I do a little code here and there, but it’s not like I write a lot of code or something where I type all day.

I’d be curious what our buddy @jshufelt does there, I get the impression he types a lot.

2 Likes

Ok, puppy finally went to sleep for a bit so I made some Zykos real quick. Not lubed or anything like that, Just V2 Zealio bottom housings, YOK Red Panda top housings, Zealio 67g springs, & Halo clear stems. Even with a quick & dirty test like that I gotta say they rock! Zeal smoothness, HP tactility/bottom out sound, & a super thocky top out! Think I’m gonna go with Zykos in my Clueboard rebuild now, thanks for letting us know about these bud!

2 Likes

A LOT of typing. I’m primarily a CS guy - tons of coding. In the earlier part of my career, also a lot of research papers and funding proposals, which meant I was effectively doubling down on typing. I still code these days, albeit not at the same pace, but I’ve managed to fill the void with little typing projects like this one…

2 Likes