Hi, I'm jshufelt

I’d offer the Norbatouch build as a counterexample. In that build, when I put a few pieces of gaffer-tape wrapped Sorbothane between the PCB and case, all of the pinging and hollowness was effectively eliminated, in possibly the most dramatic before/after sound difference I’ve heard to date - yet roughly 2/3rds of that PCB/case volume remained open. I suspect that if the dampening material sufficiently attenuates vibration, then volume doesn’t matter, because the air isn’t being moved.

With that said, I’m very curious to hear your findings with a 3mm gap!

1 Like

Every time I reread your builds and writings, I remember the time invested in my boards and change my mind for the N’th time to sell them :slight_smile:

4 Likes

That is so true, I have a few boards just sitting collecting dust that I have thought about selling or trading numerous times. Then when I think on the time I invested in building them & the parts I could reuse if I wanted to I always end up backing off the ideal.

2 Likes

Same here except I’m not into selling stuff I built. Thankfully, I switched over to hot-swappable early so I only have a handful of soldered boards. When I know for certain soldered boards feel significantly better than hot-swappables, I’ll be able to justify getting desoldering equipments which will let me rebuild everything painlessly.

3 Likes

Oh!
This hobby always surprises us, like your Norbatouch build, haha!

I’ll tell you my finding, unfortunately the case design is not fully complete yet and Christmas Holidays are approaching :smiley:

1 Like

I do not really want to hijack this very nice thread, but you’ve asked: :wink:

Oh, yeah, and not only wanted, but actually did. And I was really pleased with the outcome:

  • I noticed that I can’t type on ortholinear keyboards (too much spoiled by QWERTY row offsets), but still wanted one, so I fell in love with the Zlant, basically a Planck layout, but with a uniform 0.25u stagger.
  • I discovered SA Vilebloom only during its hype when the first GB orders were sent out and hit Reddit.
  • I wanted to see how SA Vilebloom (and then also SA 1976) looks on the Zlant. But I couldn’t find any picture of these combinations on the Internet—neither with SA Vilebloom nor with SA 1976—despite they seemed an obvious fit.

So I ordered all required parts to do a Zlant built with SA Vilebloom. (The SA Vilebloom Ortholinear Set luckily wasn’t yet sold out. :slight_smile:) I also ordered the Ortho Set of SA 1976 for comparison.

And here’s the outcome:


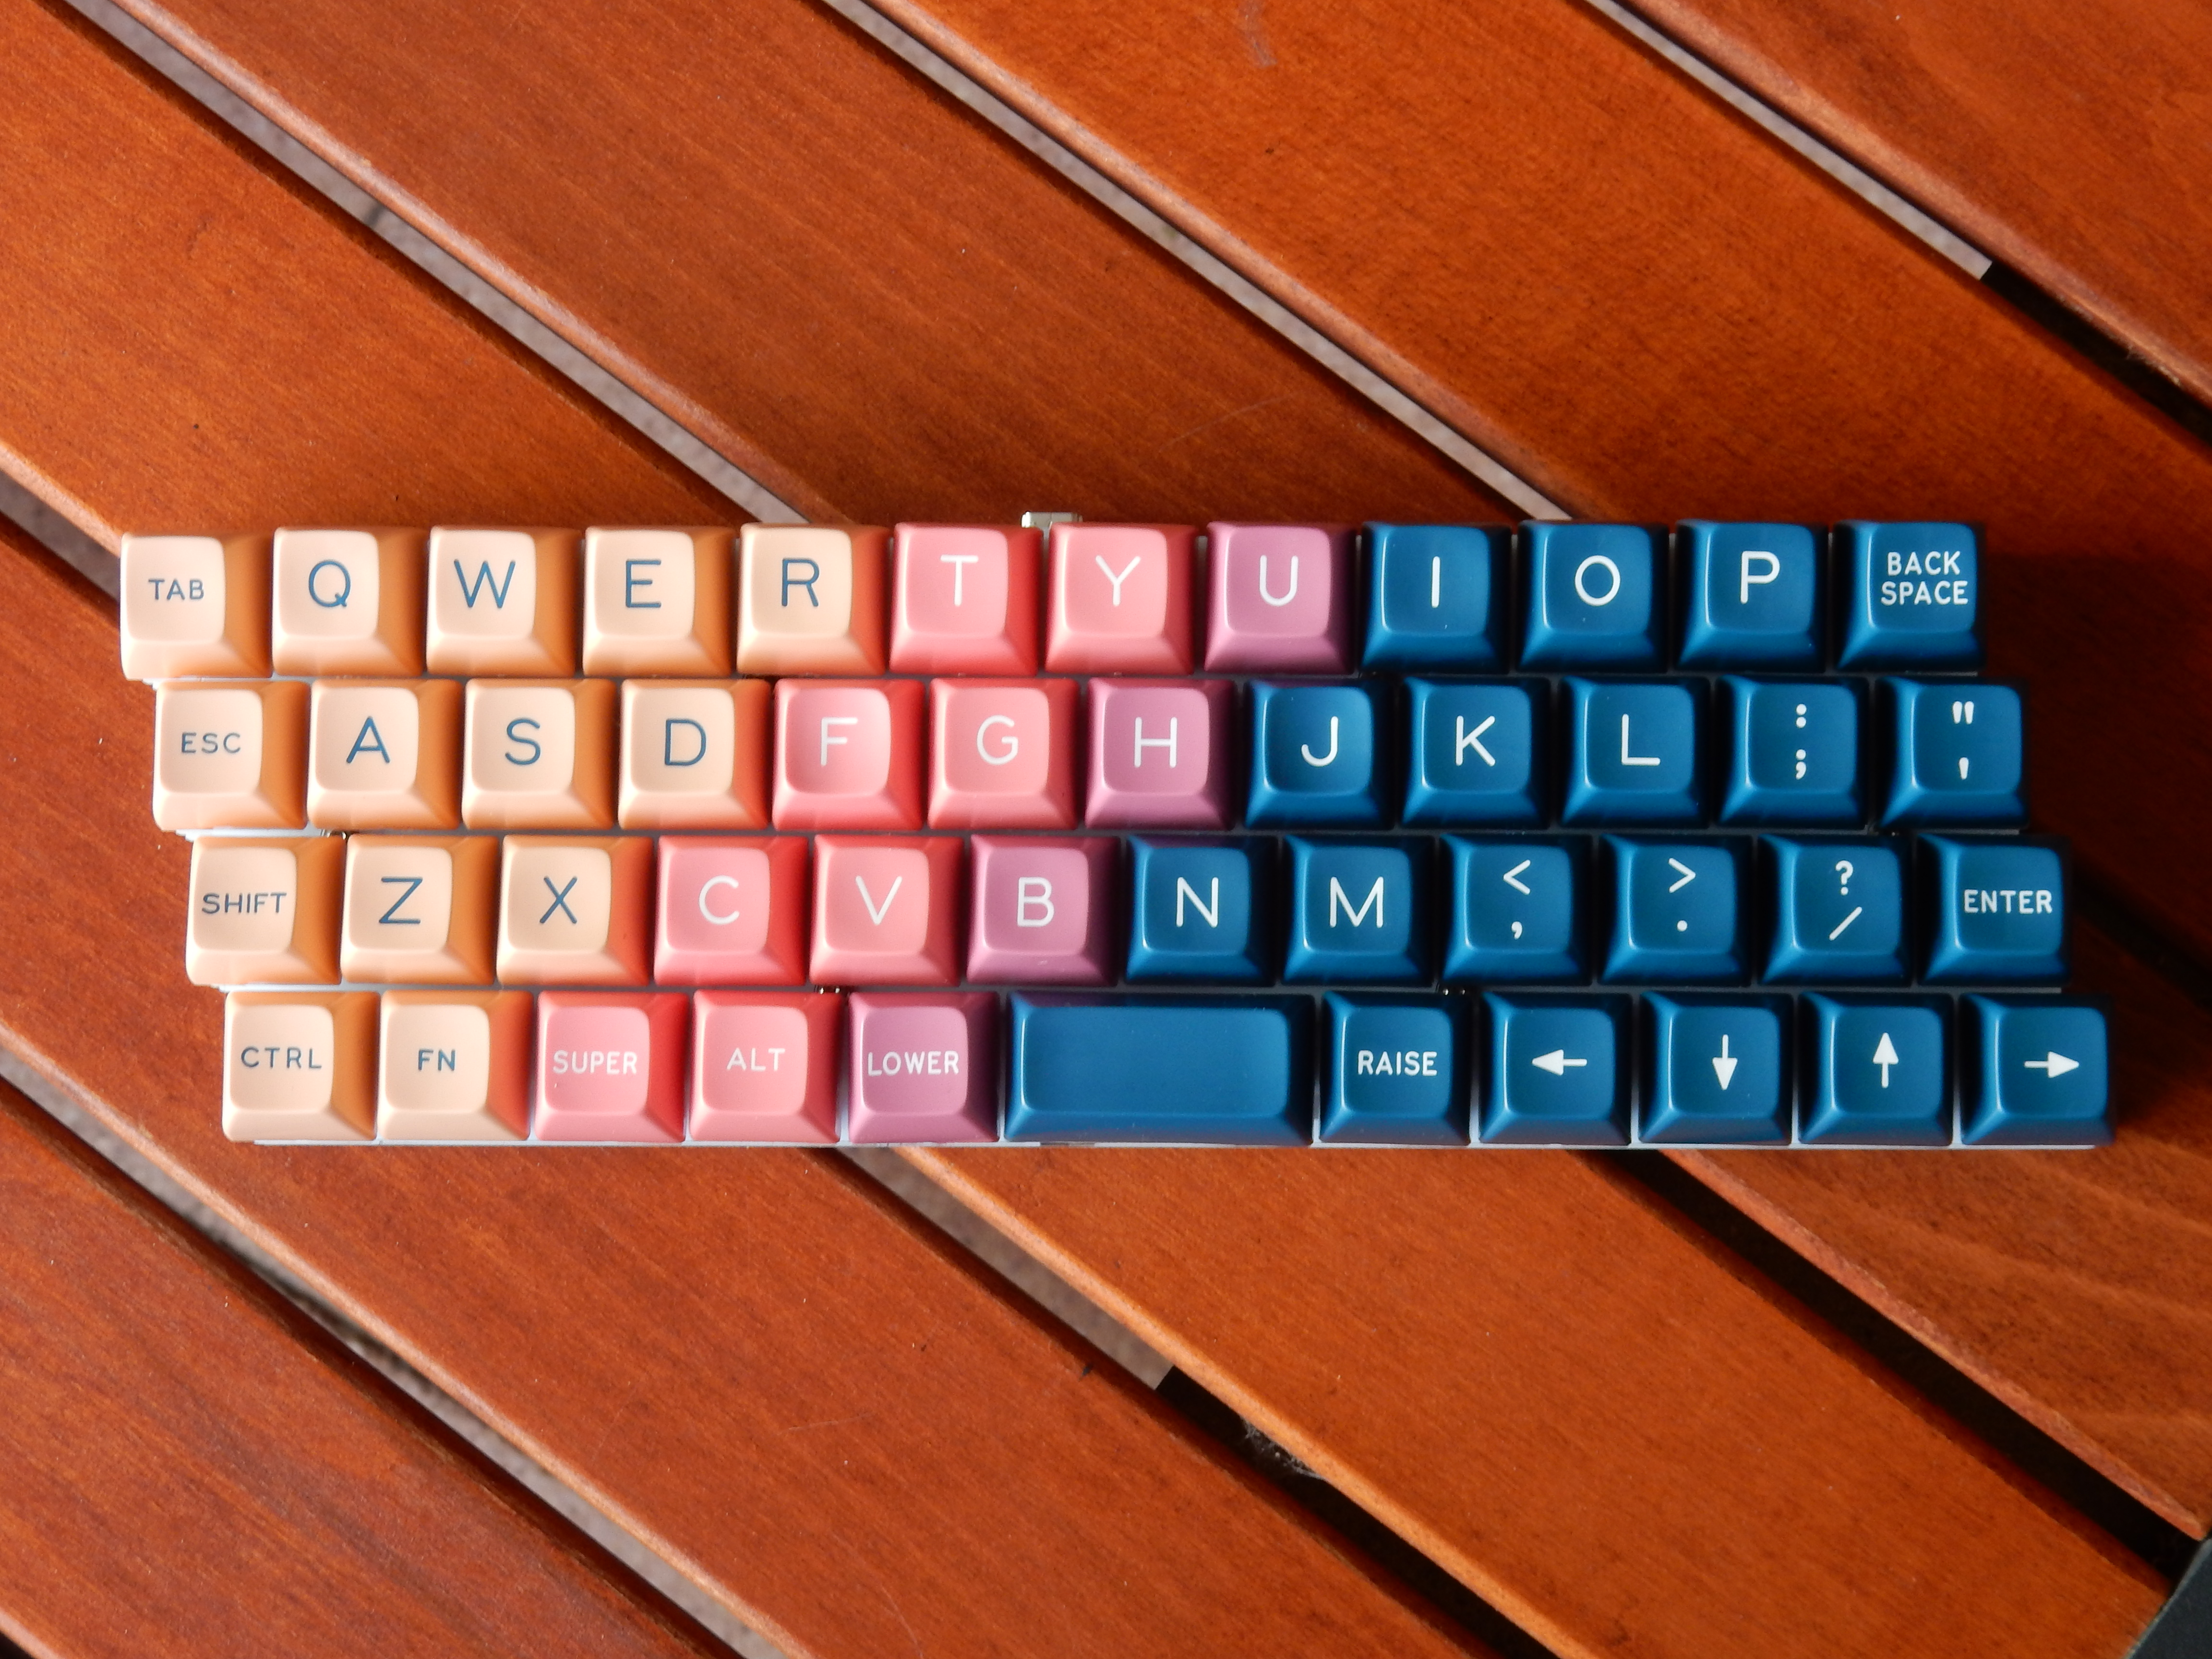
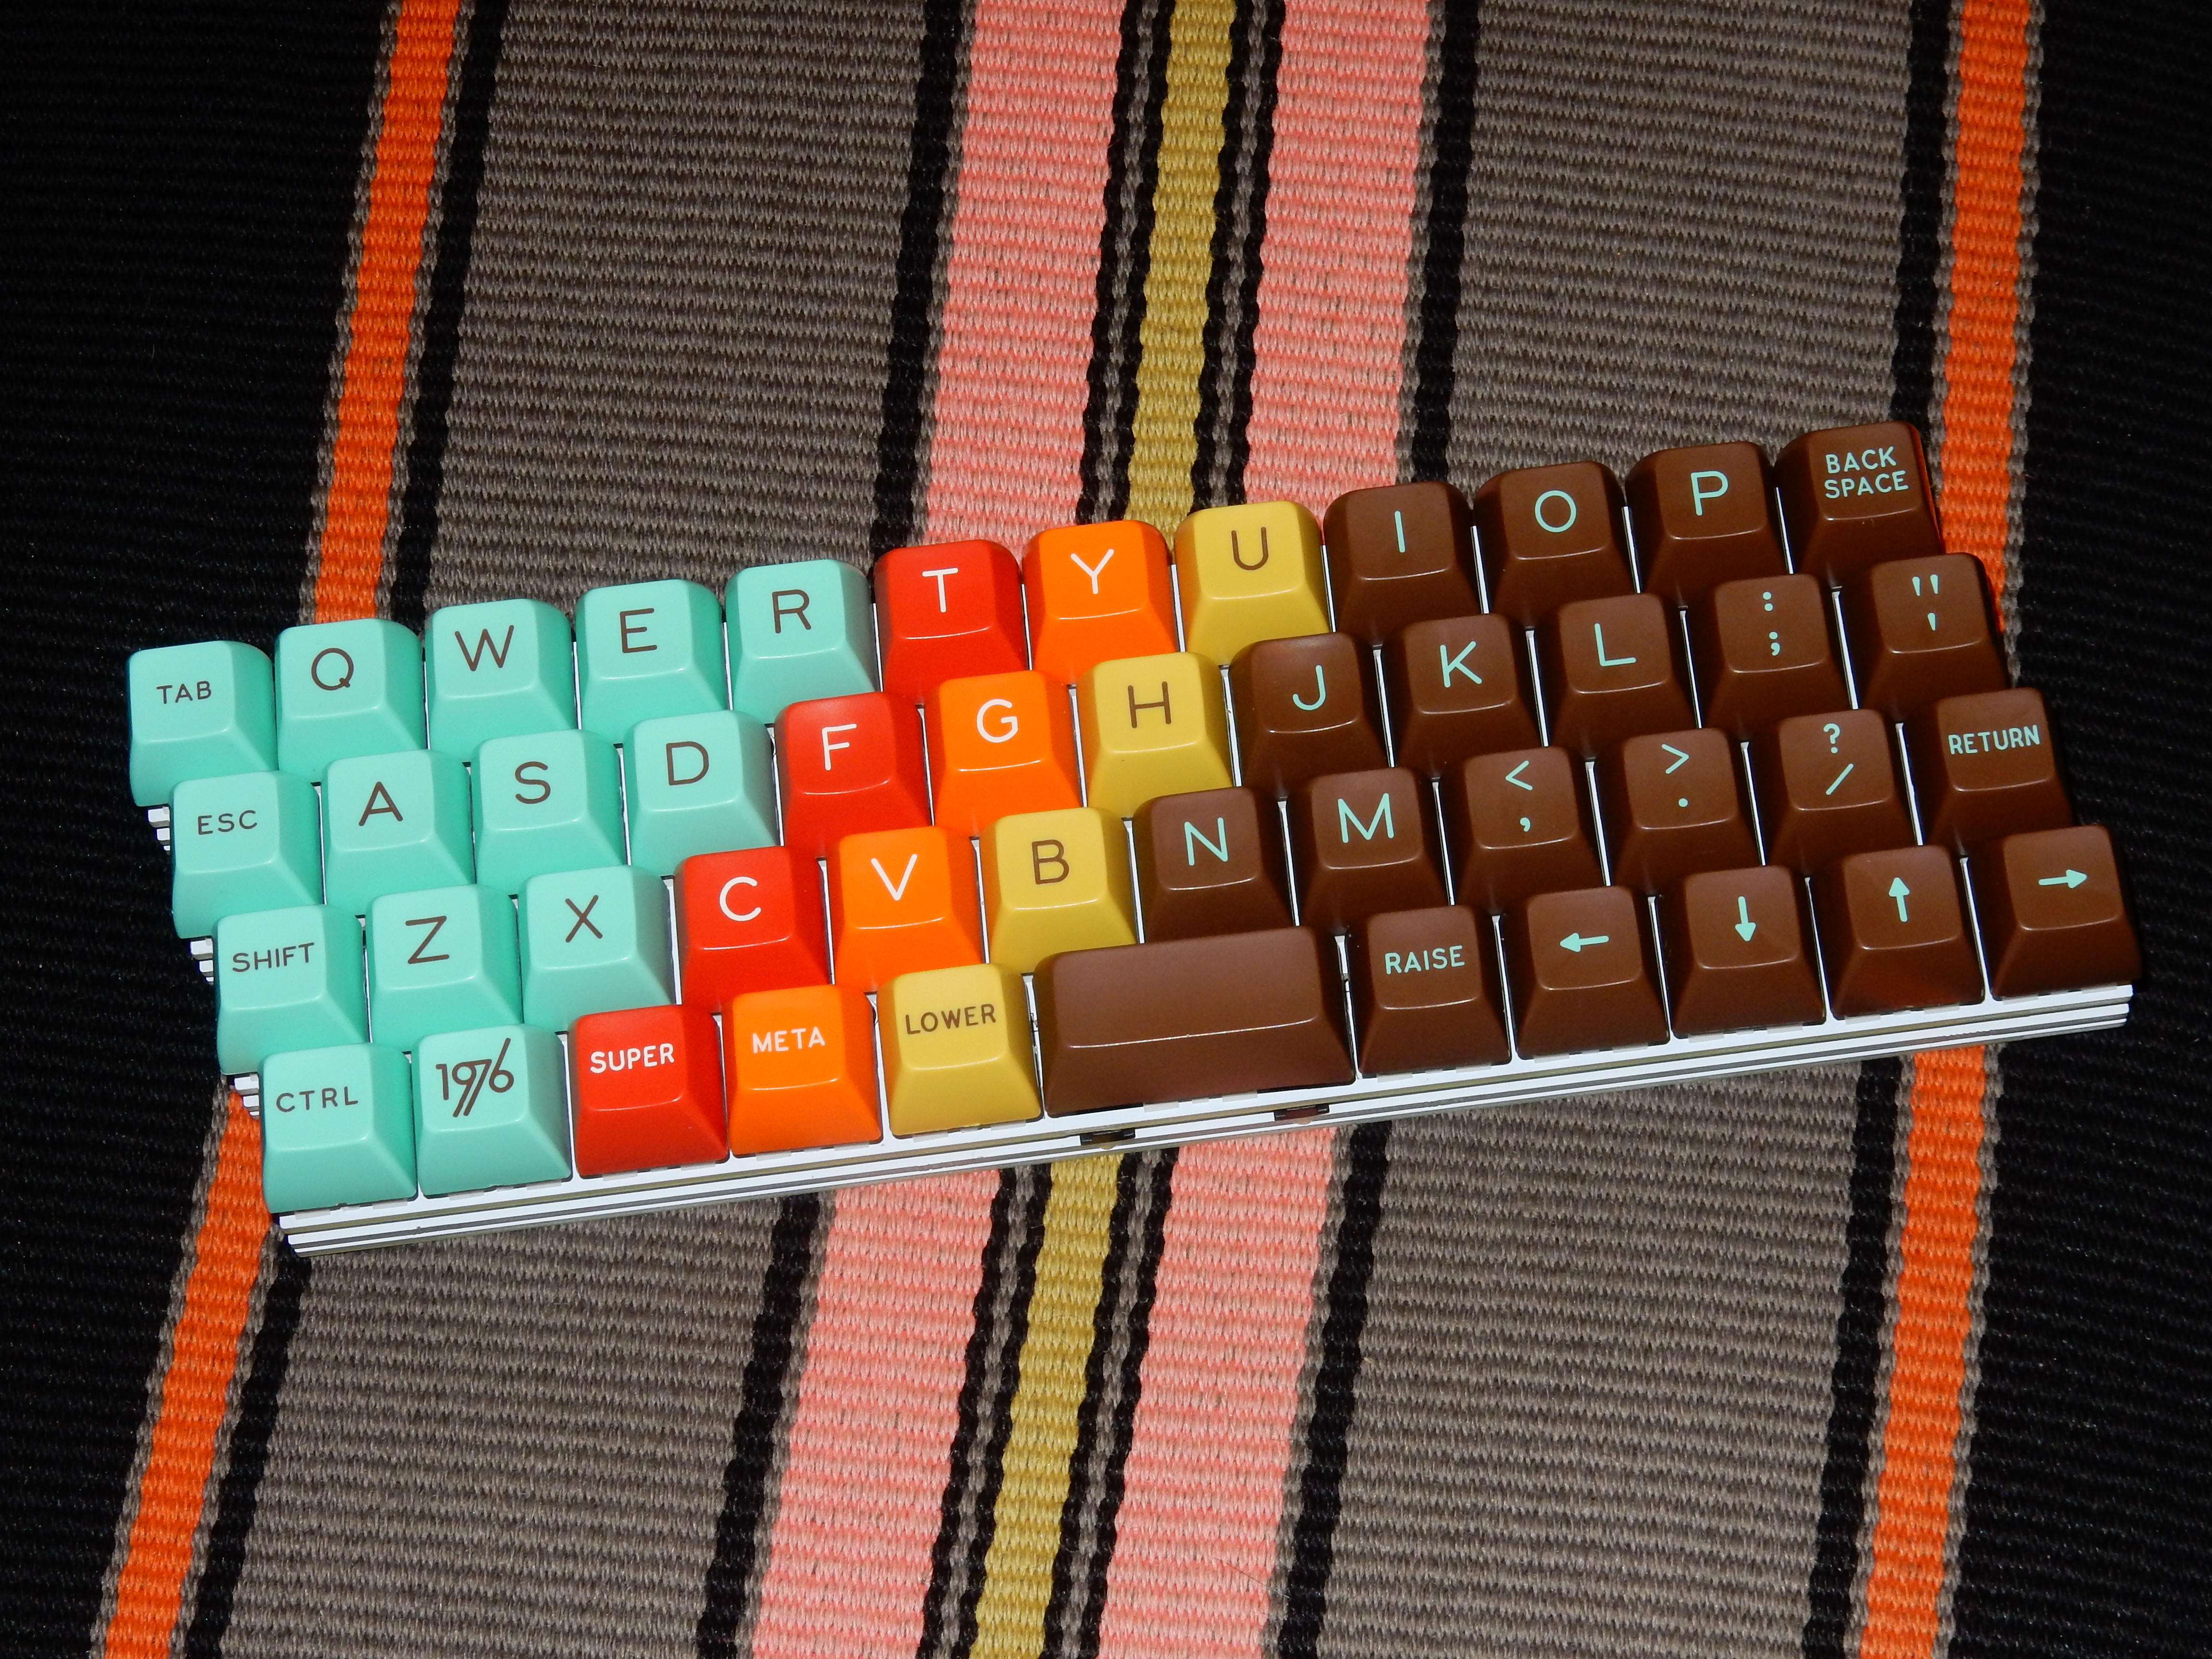
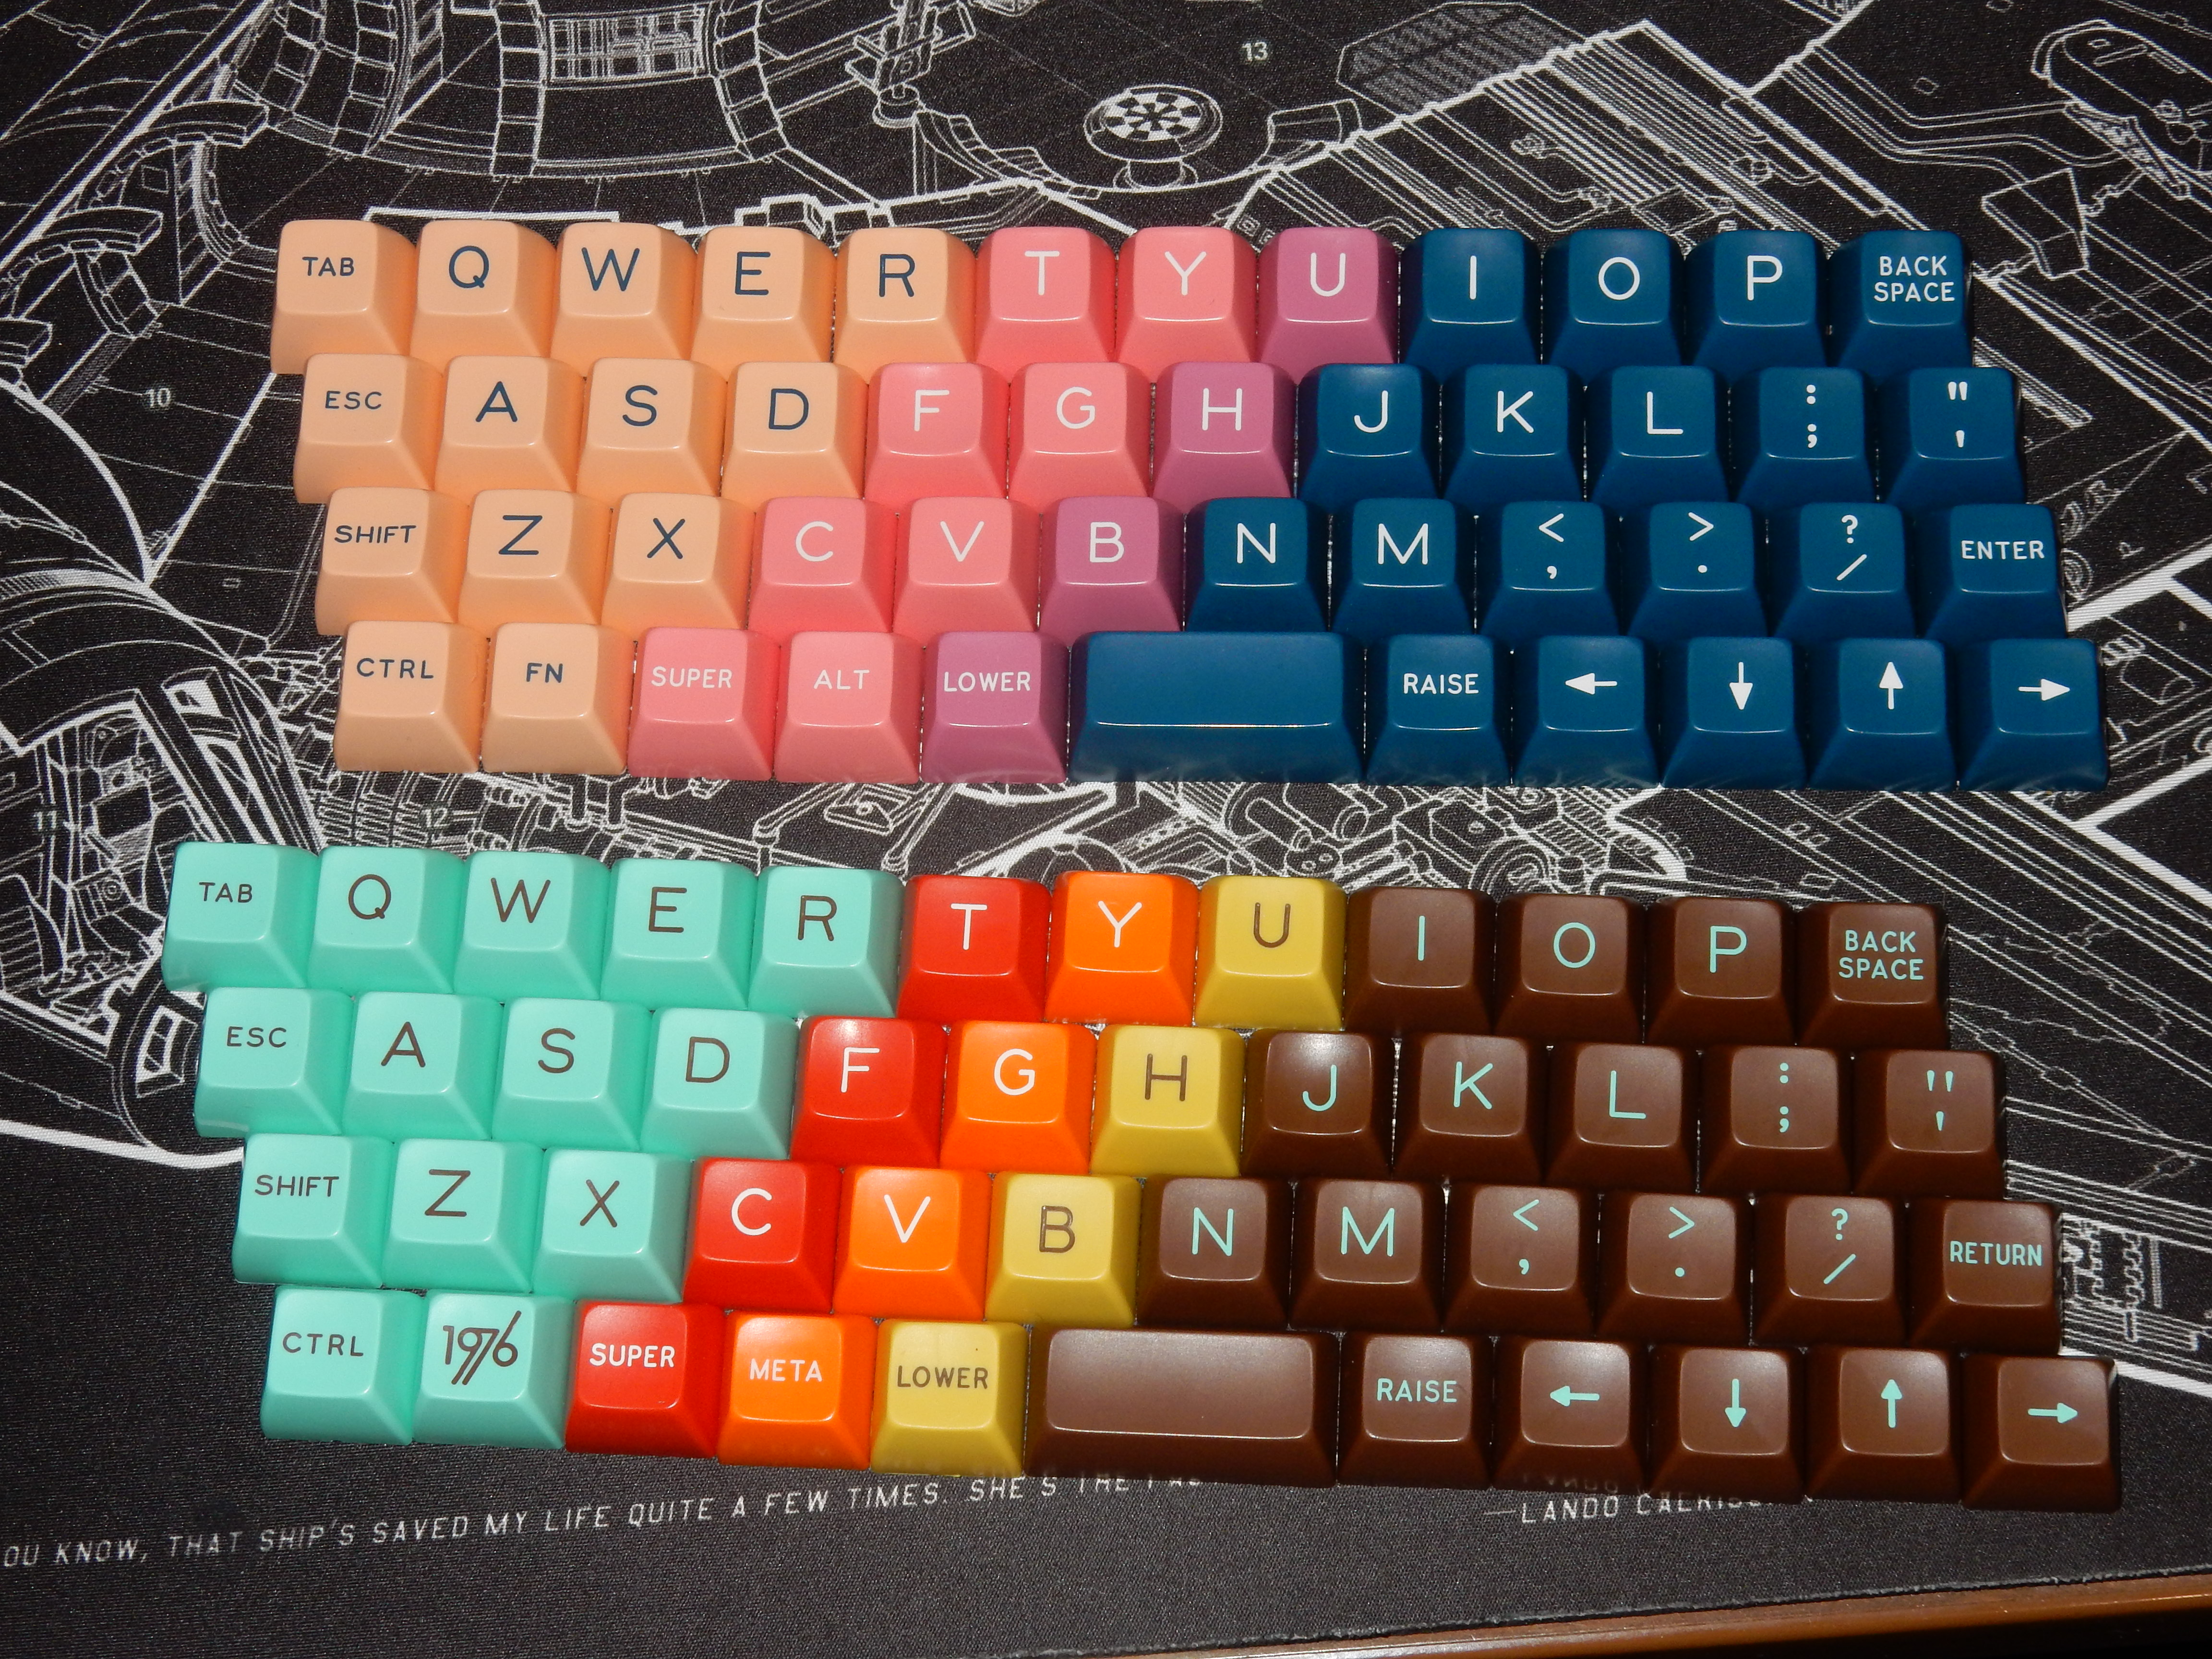
I definitely like SA Vilebloom on the Zlant more as the color jumps are less hard and hence more eye-pleasing, but also maybe because SA 1976 is “only” SA row 3 while SA Vilebloom is fully sculpted, i.e. R2, R3, R4, R3.

And even despite SA Vilebloom’s colors are not that much mine—but the overall design of it is gorgeous—this board (with Kailh Box Royal switches, leftovers from my first 40% build) became one of my favourite travel and (via a tiny in-plug USB OTG adapter) mobile/tablet keyboards—besides the MiniVan.

Yup, I’ve wanted to do the same thing with SA1976 on a TKL. Totally get it.

1 Like

Ask and you’ll receive. Not the best pics but I’m at the airport on the way out of town and they’re the best I got. It works pretty great with @norbauer’s retro refrigerator.

5 Likes

Yes, that! I think you preempted a future build log…or maybe not, because after seeing that, I may just have to do it too.

2 Likes

Oh you should totally still do it, it’s great, and uniform SA R3 is much nicer than sculpted SA imo

2 Likes

It’s funny. Remember the very first log? TADA with SA Abyss? For my first couple of months in the hobby, I didn’t fully get why people hated on SA so much - until I realized my first experience with SA was actually SA R3.

2 Likes

I do like SA, both sculpted and uniform R3 profiles.
It may very well due to the spherical tops.
Waiting for my first MT3 profile keycaps next year, with the hope it will be my jam as they have spherical tops also.

1 Like

It indeed does. Congrats to that build!

1 Like

Yeah, just R3 isn’t too bad. One of my buddies has abyss, it’s a pretty nice kit, I like that you can put it on almost anything and it will match pretty well. I went in on the danger zone re-release and can’t decide what to do now, it was always sort of one of my grail sets but I would really rather have uniform…

I think I’ve come to the conclusion that spherical tops are actually what I actively dislike. I don’t enjoy MT3 at all and I really wanted to like it. Same thing with DSS but to a lesser extent, the profile is like cherry but the spherical tops really put me off.

2 Likes

So you prefer having your fingers slide up and down freely like on cylindrical GMK tops.
SA and MT3 grabs your fingers, I do understand that some people can’t get used to that.

1 Like

SA and MT3 tries to grab your fingers and does a bad job at it. I think we can do better.

1 Like

Might I ask which adapter you use with your zlant?

I use this one called »USB OTG shim«:

I bought some at least once at Pimoroni, but I’ve seen it in other online shops as well, e.g. Reichelt.de also has them and they even have a USB-C variant:

2 Likes

Build #31 & #32: KBD8x MkII & KBDPAD MkII

Remember Build #3, that DZ60 with DSA Hana in a bamboo case? My wife started using that one shortly after I built it, and it’s been her daily driver for a year and a half. On the one hand, it’s cool that she’s gotten so much mileage out of it. On the other hand…unlubed switches, janky stabilizer “mods”, no sound tuning, flat case, quirky layout…I’d like to think, after thirty builds, I should be able to provide a significantly improved experience.

The idea for this build came about when three events coincided:

  • She expressed interest in returning to a more conventional layout, and liked the idea of a separate numpad to save desk space, since her need for a numpad is sporadic at best.
  • KBDfans ran a GB for a refresh of their KBD8x, the ai03-designed KBD8x MkII and KBDPAD MkII.
  • I managed to pick up an XDA Scrabble set. When the two of us sit down for a board game, it’s probably one of two games - Boggle or Scrabble. So this seemed like a nice touch. (I can already hear the catcalls from the cheap seats - XDA? Significantly better experience? Pipe down, she was fine with DSA, she’ll be fine with XDA).

Let’s kick things off with the numpad build. Here are the two case halves, with red anodization, and a sandblasted brass plate.

The numpad PCB is a relatively spartan black and gold USB-C affair, with stab cutouts on the edge. In addition to the core numpad functionality, it supports four function keys on the top row.

The PCB supports RGB underglow, if you’re into that sort of thing, although with this PCB and a solid numpad case, not much of that light would be visible.

We’ll need three 2u stabs for the numpad, which were conveniently provided with the numpad kit. While I don’t recall these being advertised as GMK snap-in stabs during the GB, I can’t see any difference, so I opted to use them.

After clipping and lubing, we snap 'em in.

At this point, I’d normally be thinking about placement of Sorbo struts between the PCB and plate, and on a numpad, the obvious location would be between the function row and the numeric block, but with the relief cut in the plate, there’s no room. So, we’ll forgo plate/PCB sound dampening. The numpad is top-mount, so after soldering switches into the PCB, we mount the plate/PCB assembly.

Note that there is no cutout for the reset button on the PCB, so you’ll want to get your QMK firmware squared away with a RESET binding if you don’t want to have to open up the case again. There is one minor gotcha here - the KBDpad uses an ATmega32U2 controller chip (less RAM and fewer I/O pins needed for this smaller board), so you’ll need to change that setting in QMK Toolbox before flashing.

And, because I’m me, even though I won’t use the backlighting on the numpad, I had to make sure I compiled in the QMK lighting controls. OCD is great.

From here, just screw the case halves together, and we’re ready for keycaps.

Or are we? We’ll come back to the numpad a bit later. For now, let’s turn our attention to the TKL. The KBD8x kit came with stabs as well, but these were screw-in. Both 6.25u and 7u wires were present, which makes me question whether these were truly GMK, but the sliders looked like originals, so let’s roll? 10 nylon washers were included for use with the stab screws, a nice touch.

Between the relief cuts in the PCB, the relief cuts in the plate, and the fact that it’s a half-plate, we won’t be doing any Sorbo strut mods on this board either. But imagine the flex!

Because we’re working with a half plate, I found it easiest to install switches in two phases. First, I installed and soldered the plate-mounted switches.

Second, we install all of the PCB-mounted switches, taking time to be sure that these switches were properly seated and level before soldering. Those relief cuts in the PCB made that a bit more interesting than I had anticipated with the flex, but still not too bad.

The KBD8x is a burger-mount board, and the kit includes 18 O-rings. At each of the 9 mount points for the plate, an O-ring sits under each plate screw-hole, and on top of each screw hole. Once you have O-rings placed on the holes in the case top, it’s easiest to thread another O-ring onto a screw, and then install that screw to achieve the burger mount. Here’s a closer view of one of those screw holes - note that the tolerances between the plate and the case are pretty good. In general, I found the machining tolerances to be pretty good throughout the kit.

Here’s the fully burger-mounted top, before we put the case together. If you look closely, you can see the O-rings underneath each screw head.

While the GB didn’t begin with any sound dampening options, midway through the GB a muting kit was offered. This kit consisted of a custom cut piece of foam to place in the bottom of the case, where it will be held in place by compression with the top of the case. The foam has cutouts for all of the underglow RGBs, as well as the reset button and various chips.

Note that there is no hole in the case for the reset button, so if you need to QMK up some RESET functionality, now’s the time. Flashing a new firmware with my usual set of key bindings went without incident. Note that this board is using the more common ATmega32U4 microcontroller.

Let’s take a look at the underside as we screw the case together. In general I tend to prefer blank weights or abstract logos, but if we must have text branding, this is reasonably clean.

And here we are, ready for keycaps. The TKL kit came with O-rings for burger mount, and had the muting foam available. As a result of both of these features, the KBD8x has a very nice sound with the (probably fake) Zealios, a “squishy” kind of sound without any case ping or hollowness, which I find quite pleasing. The muting pad is definitely being compressed; it feels a bit denser than craft foam, but not nearly as dense as something like 40 Duro Sorbothane. It is eliminating some of the flex from the half plate and the PCB relief cuts, but I’ll take that trade, as it is helping significantly with the sound. If you’re in the game for flex, YMMV with the foam.

But at this point, my OCD was triggered again. In comparison to the KBD8x, the KBDPAD sounded somewhat metallic and hollow, but that kit didn’t provide O-rings, or have a muting foam option. So, let’s return to the numpad and see if we can calm down my OCD by getting the numpad to sound like its big brother. For burger mount, I used these O-rings (which will also work for plate-mount upstroke stab silencing, if you want to amortize your build costs). Here’s the placement of an O-ring before dropping the plate on top:

And after completing the burger mount:

To approximate the 3mm KBD8x muting foam, I used 2mm craft foam for the numpad, roughing out holes for the underglow RGBs and the reset button.

Putting the numpad back together, the combination of burger mount and 2mm craft foam yielded a result quite similar to the KBD8x, close enough that I think most people would have a hard time telling the difference by sound alone. Success! OCD sated. Well, mostly, although I admit I’m still a little triggered by snap-in stabs on one board and screw-in stabs on the other. But that’s just part of the joy of being me.

Lessons learned

  • At least in my experience up to this point, most PCBs use the ATmega32U4 controller, but when it comes time to build and flash firmware for a new board, it’s worth remembering that there are other controllers. It took me a little while to realize that the KBDPAD was using a different controller.
  • ai03’s Mark II designs are on point. Clean lines, no frills, and good sound and feel. Yet another designer I need to follow.
  • While production and fulfillment of the MarkII boards has been protracted, I have no issues with the machining or anodization results on either of these boards. No obvious ano flaws, good color matching for case halves, and consistently tight tolerances.
  • I think I’m beginning to better appreciate the sonic advantages of top-mount vs tray-mount. It took me a while, but I do think more consistent key-to-key acoustics result from top-mount.
  • Similarly, I think burger or gasket mount boards provide additional sonic benefits, although for boards that don’t offer these features, I continue to think Sorbo struts between the PCB and plate will achieve essentially the same benefits.

Now I want to build another KBD MarkII setup for myself. Hmmm…if I draw the right tiles, can I play ANOTHER?

Specifications

case: KBD8x MkII
- red anodized aluminum
case dampening: 3mm muting kit foam
PCB: KBD8x MkII (ATmega32U4)
plate: sandblasted brass half plate 
plate/PCB dampening: N/A (relief cuts)
stabilizers: GMK PCB screw-in
- 1x6.25u, 4x2u
stabilizer mods:
- clipped and lubed with SuperLube
- nylon washers on screws
switches: 87x (probably fake) 65g R11 Zealios
switch mods:
- springs tub-lubed with Krytox GPL-104
- stems hand-lubed with Tribosys 3204
- no housing lube
keycaps: XDA Scrabble (alphas, modifiers, specialties)
HxWxD (without caps or feet): 1.31" x 14.06" x 5.25"
HxWxD (without caps): 1.38" x 14.06" x 5.25"
HxWxD: 1.63" x 14.06" x 5.25"
assembled weight: 2.58kg (5.69 lb)

case: KBDPAD MkII
- red anodized aluminum
case dampening: 2mm craft foam
PCB: KBDPAD MkII (ATmega32U2)
plate: sandblasted brass
plate/PCB dampening: N/A (relief cuts)
stabilizers: GMK PCB snap-in
- 3x2u
stabilizer mods:
- clipped and lubed with SuperLube
switches: 21x (probably fake) 65g R11 Zealios
switch mods:
- springs tub-lubed with Krytox GPL-104
- stems hand-lubed with Tribosys 3204
- no housing lube
keycaps: XDA Scrabble (numpad, novelties)
HxWxD (without caps or feet): 1.31" x 3.38" x 5.25"
HxWxD (without caps): 1.38" x 3.38" x 5.25"
HxWxD: 1.63" x 3.38" x 5.25"
assembled weight: 0.46kg (1.01 lb)
14 Likes

Thank you very much for this very nice build!

What do you think contribute the best to the sound (in term of pinging and hollowness), the o-rings were the top plates are attached or the foam that compresses the pcb ?
For example have you tried without the foam?

Didn’t know there was a Scrabble keyset, it is a nice one :wink:

1 Like