Hi, I'm jshufelt

Wow. That is one serious-business build log. I’ll be pointing people here for Norbatouch guidance from now on. :slight_smile:

Thanks so much for saying that, and for being such a kind supporter of my work in general! :smiley: I really appreciate it.

FWIW, on the Round 3.14 Norbatouches, I made the threads more coarse, which helps a bit with the issue you mentioned. And of course on subsequent designs I’ve gotten entirely away from risers that thread into the housing at all. I personally am not a huge fan of risers in general and continue to explore alternatives.

Also, note that on pre-round-3.14 housings, the flange screws that hold the plate in place only make assembly easier when you flip the bottom half of the housing over with the plate in place; they don’t screw all the way against the plate to hold it firmly in place. I changed this in Round 3.14 for those people who don’t want to use shelf liner; they now screw all the way in and tension the plate to keep it from moving around. This might have been part of your experience with some of the screws feeling tight or now screwing in all the way; those two don’t actually do so on that particular revision of the housing. FWIW.

5 Likes

Thanks for taking the time to look this over, especially during what appears to be an epic product shipment and release period!

Figures. I tend to like some angle to the case, especially with DSA, but I will be experimenting with other profiles on the 3.14s to see how I get on without risers.

Good to know. I probably should have been clearer in the build log, and I’ll go edit it - in this case, screwing them in helped to achieve contact with the Sorbothane packets underneath, and “dial in” the level of compression. If not the original purpose of these two screws, it at least ended up being a nice feature!

Yes, my proposal isn’t entirely to do away with case angles (even though I personally use my boards dead-flat). I’ve merely been thinking that something like a desk mat that lives under the keyboard might be a better approach than a small object attached to the rear over the case to impart an angle (leaving a big gap space at the rear). I tried to solve that a bit with the Norbaforce (concealing the gap). While an improvement, the result isn’t entirely satisfactory to me, purely as a matter of looks.

I’ve been exploring such mats with CNC-machined hardwood inserts that then get covered in leather. I think it would look much nicer, for one thing, and also provide a more cozy home at one’s work area. Still very much a WIP though.

1 Like

Anytime I see an update from you on your intro post I know I’m in for a real treat. This last build was amazing and so detailed! Thank you for all the effort.

1 Like

Oh yes :sunny:

This is awesome :slight_smile:

I have 2 : questions :slight_smile:

  1. How much wobble does the KBDfans slider has over the Novatouch sliders ? Could you add a little video wiggling 2 keys with different slider to see the comparision side by side ?

  2. After lubing, does the KBDfans slider vs stock novatouch still feel different ?

Thanks !

1 Like

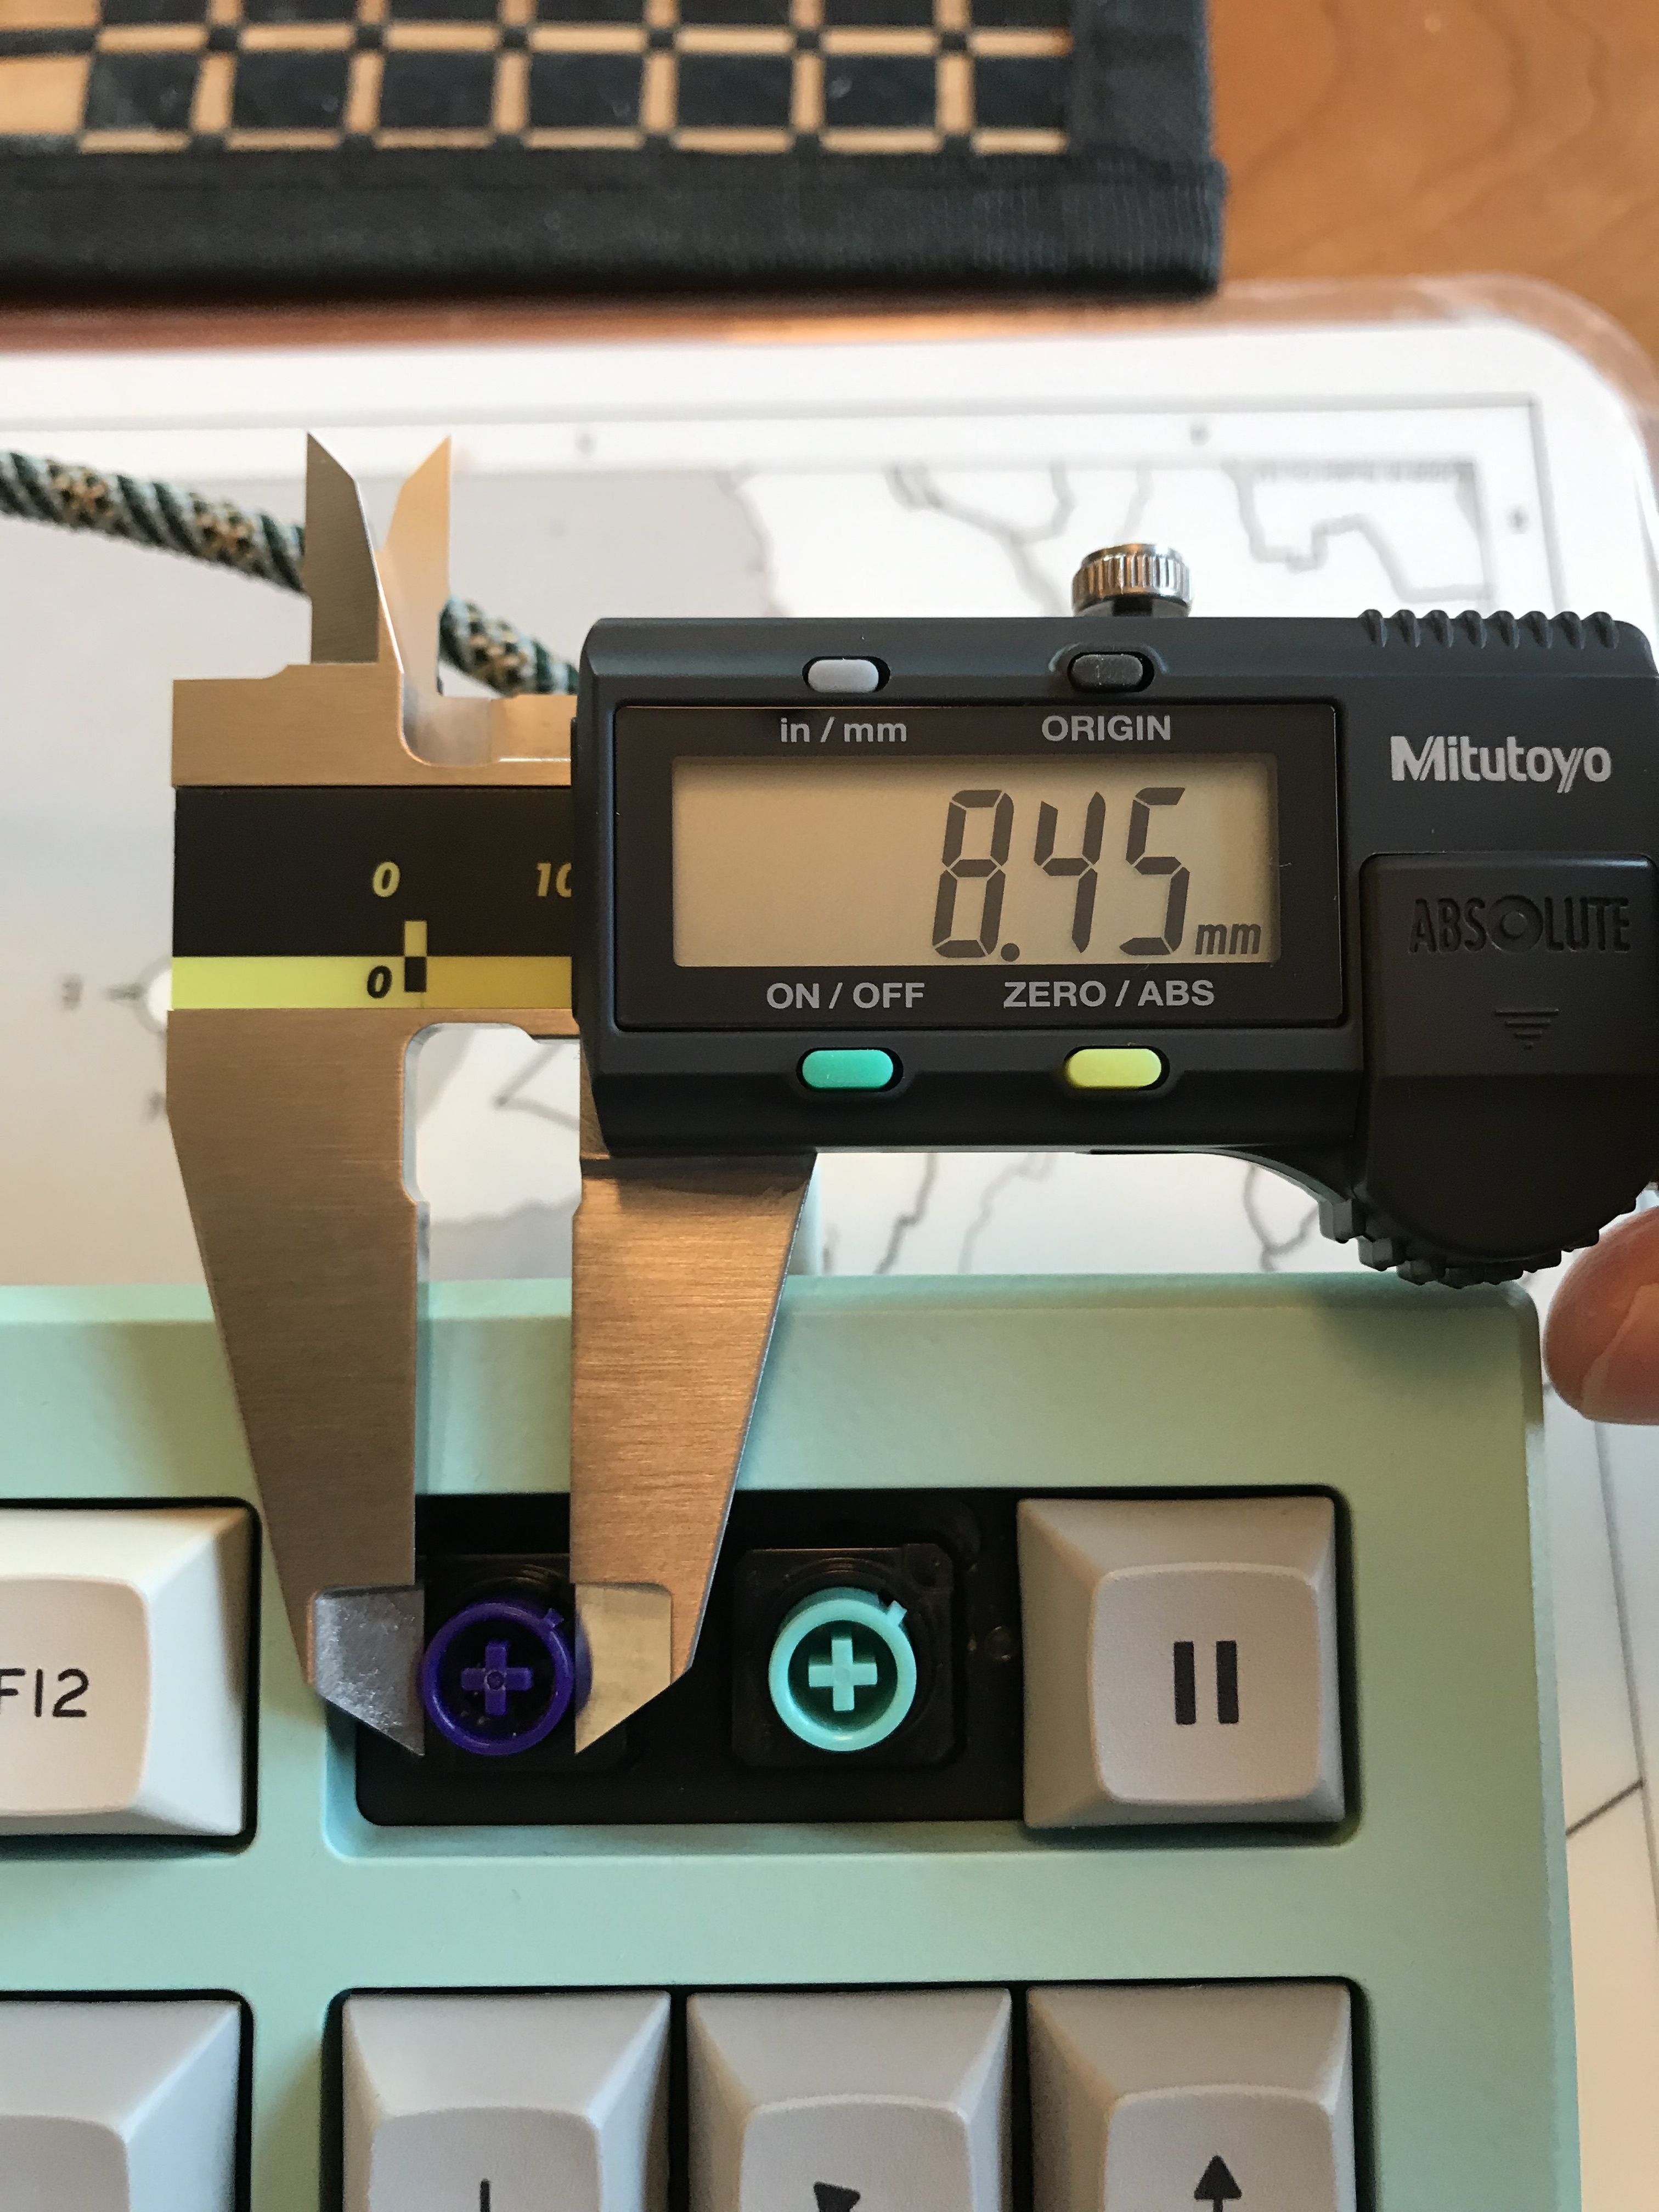
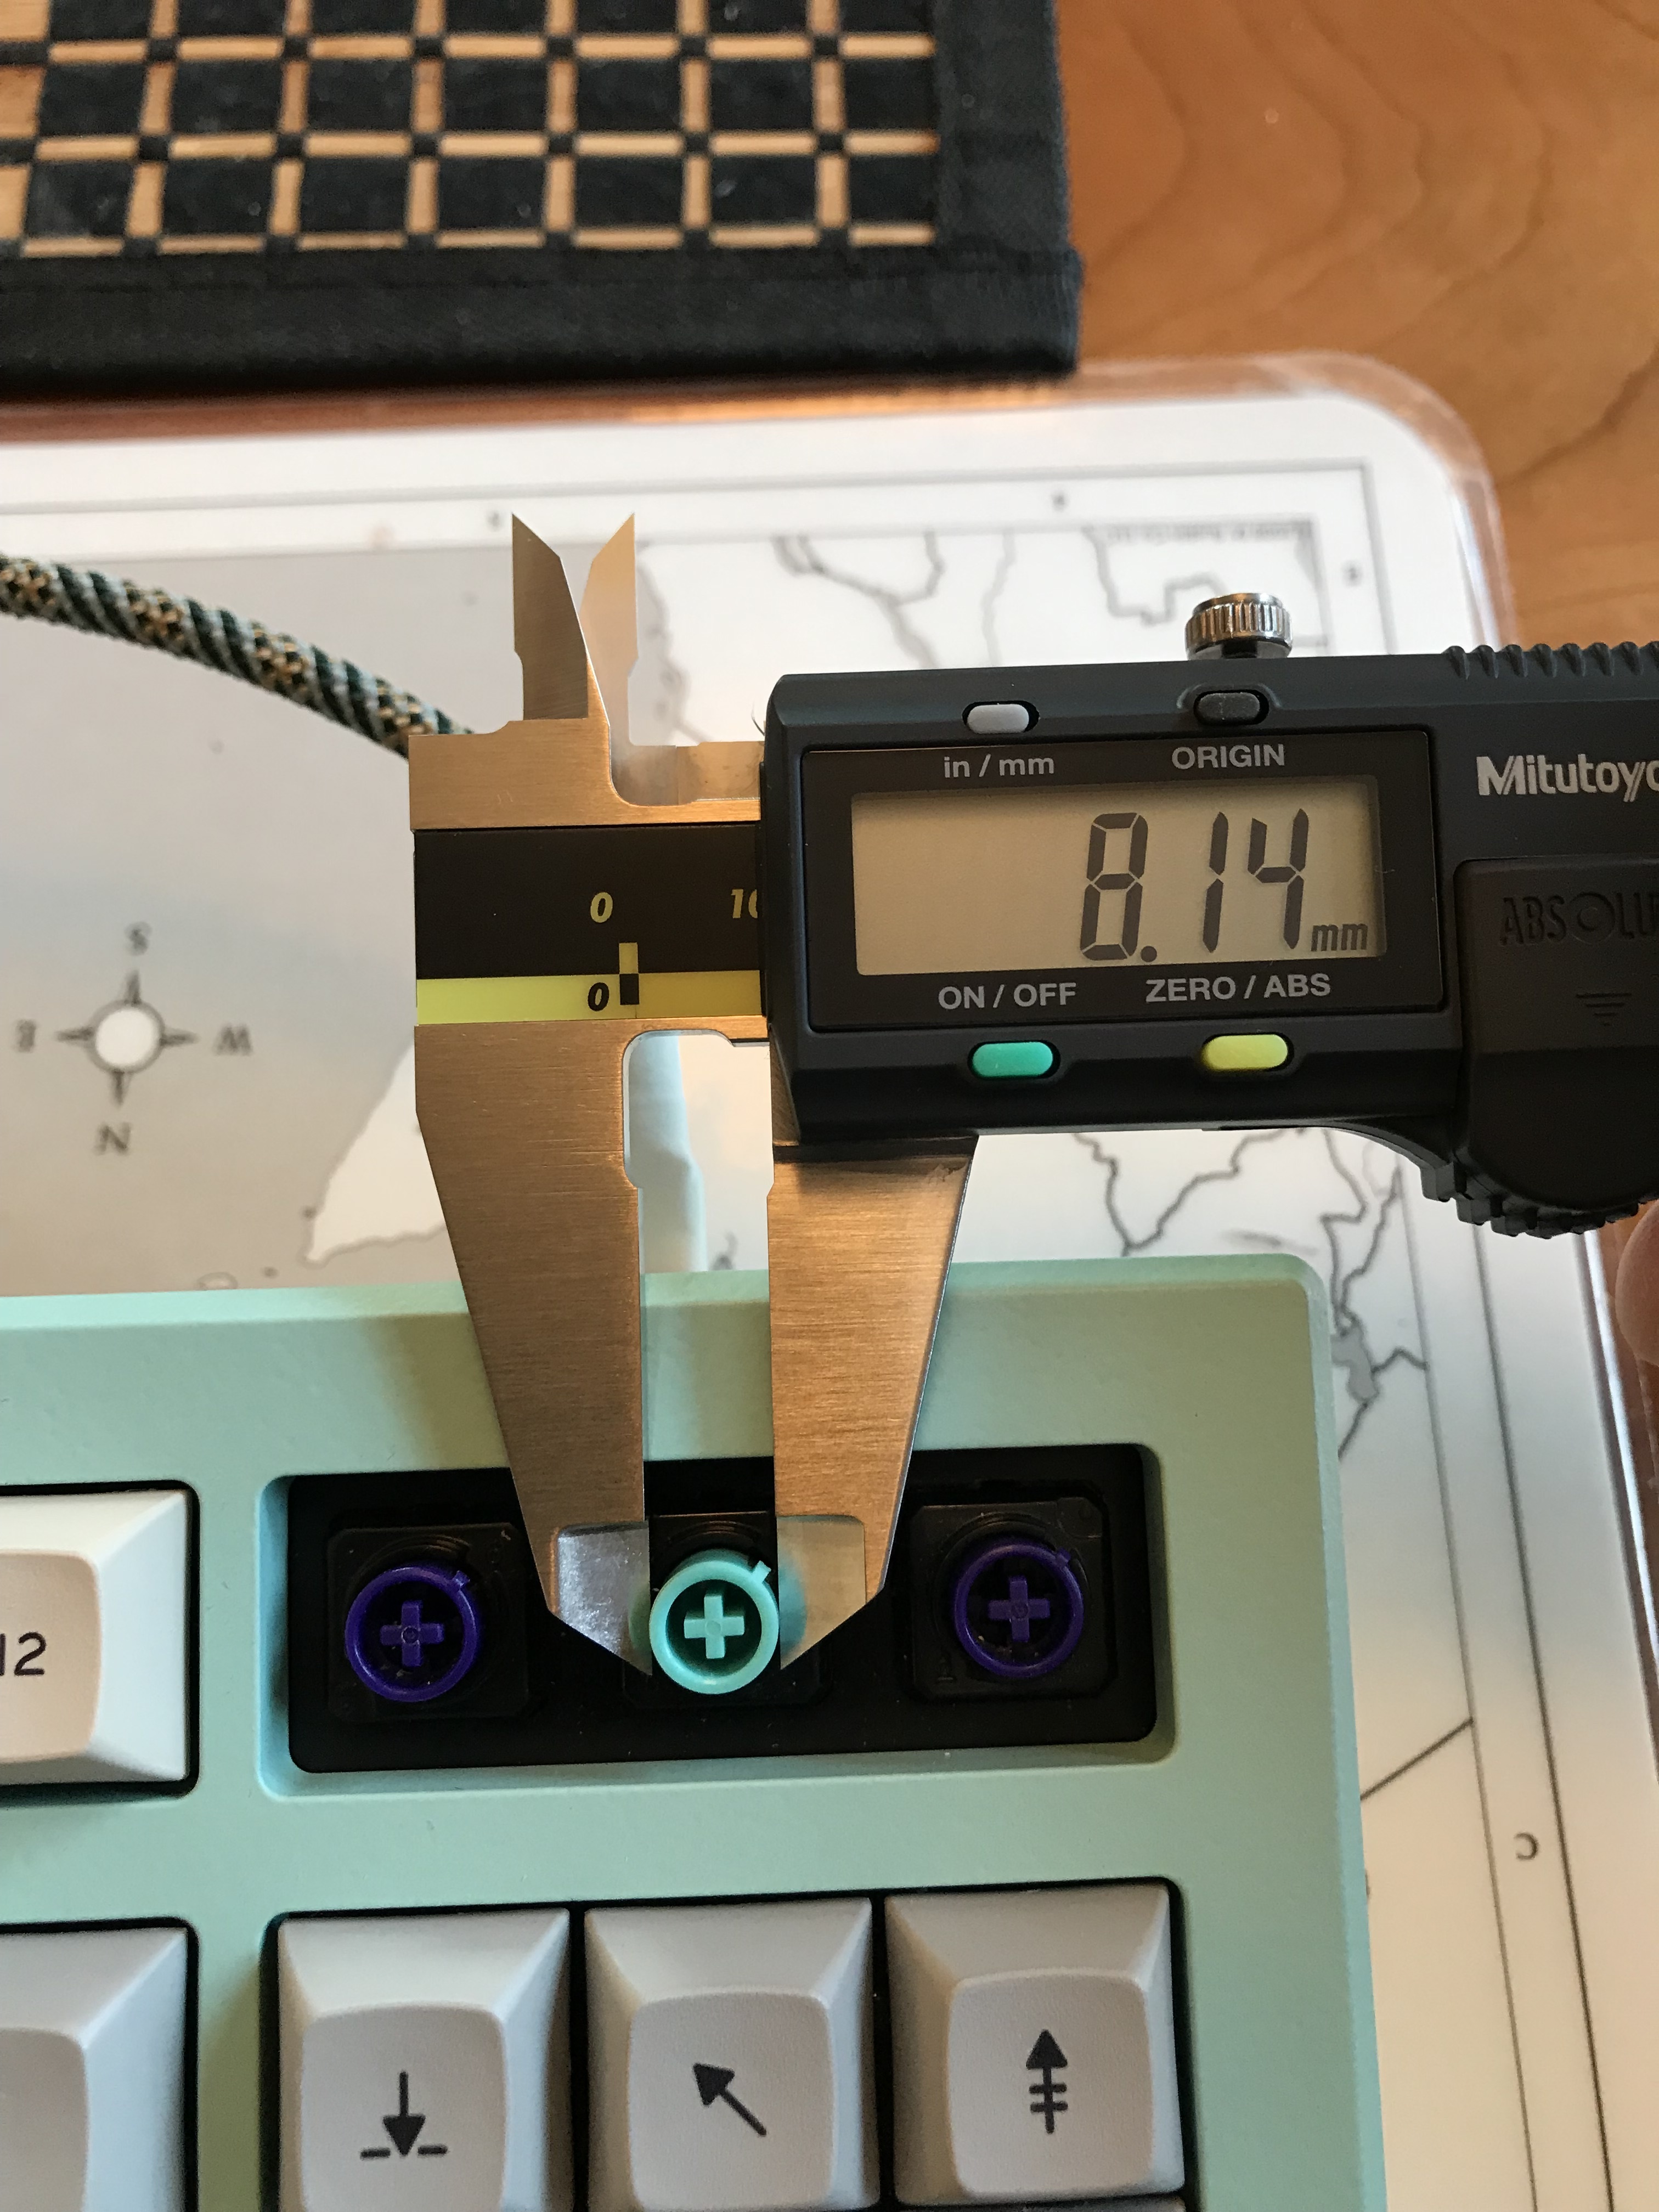
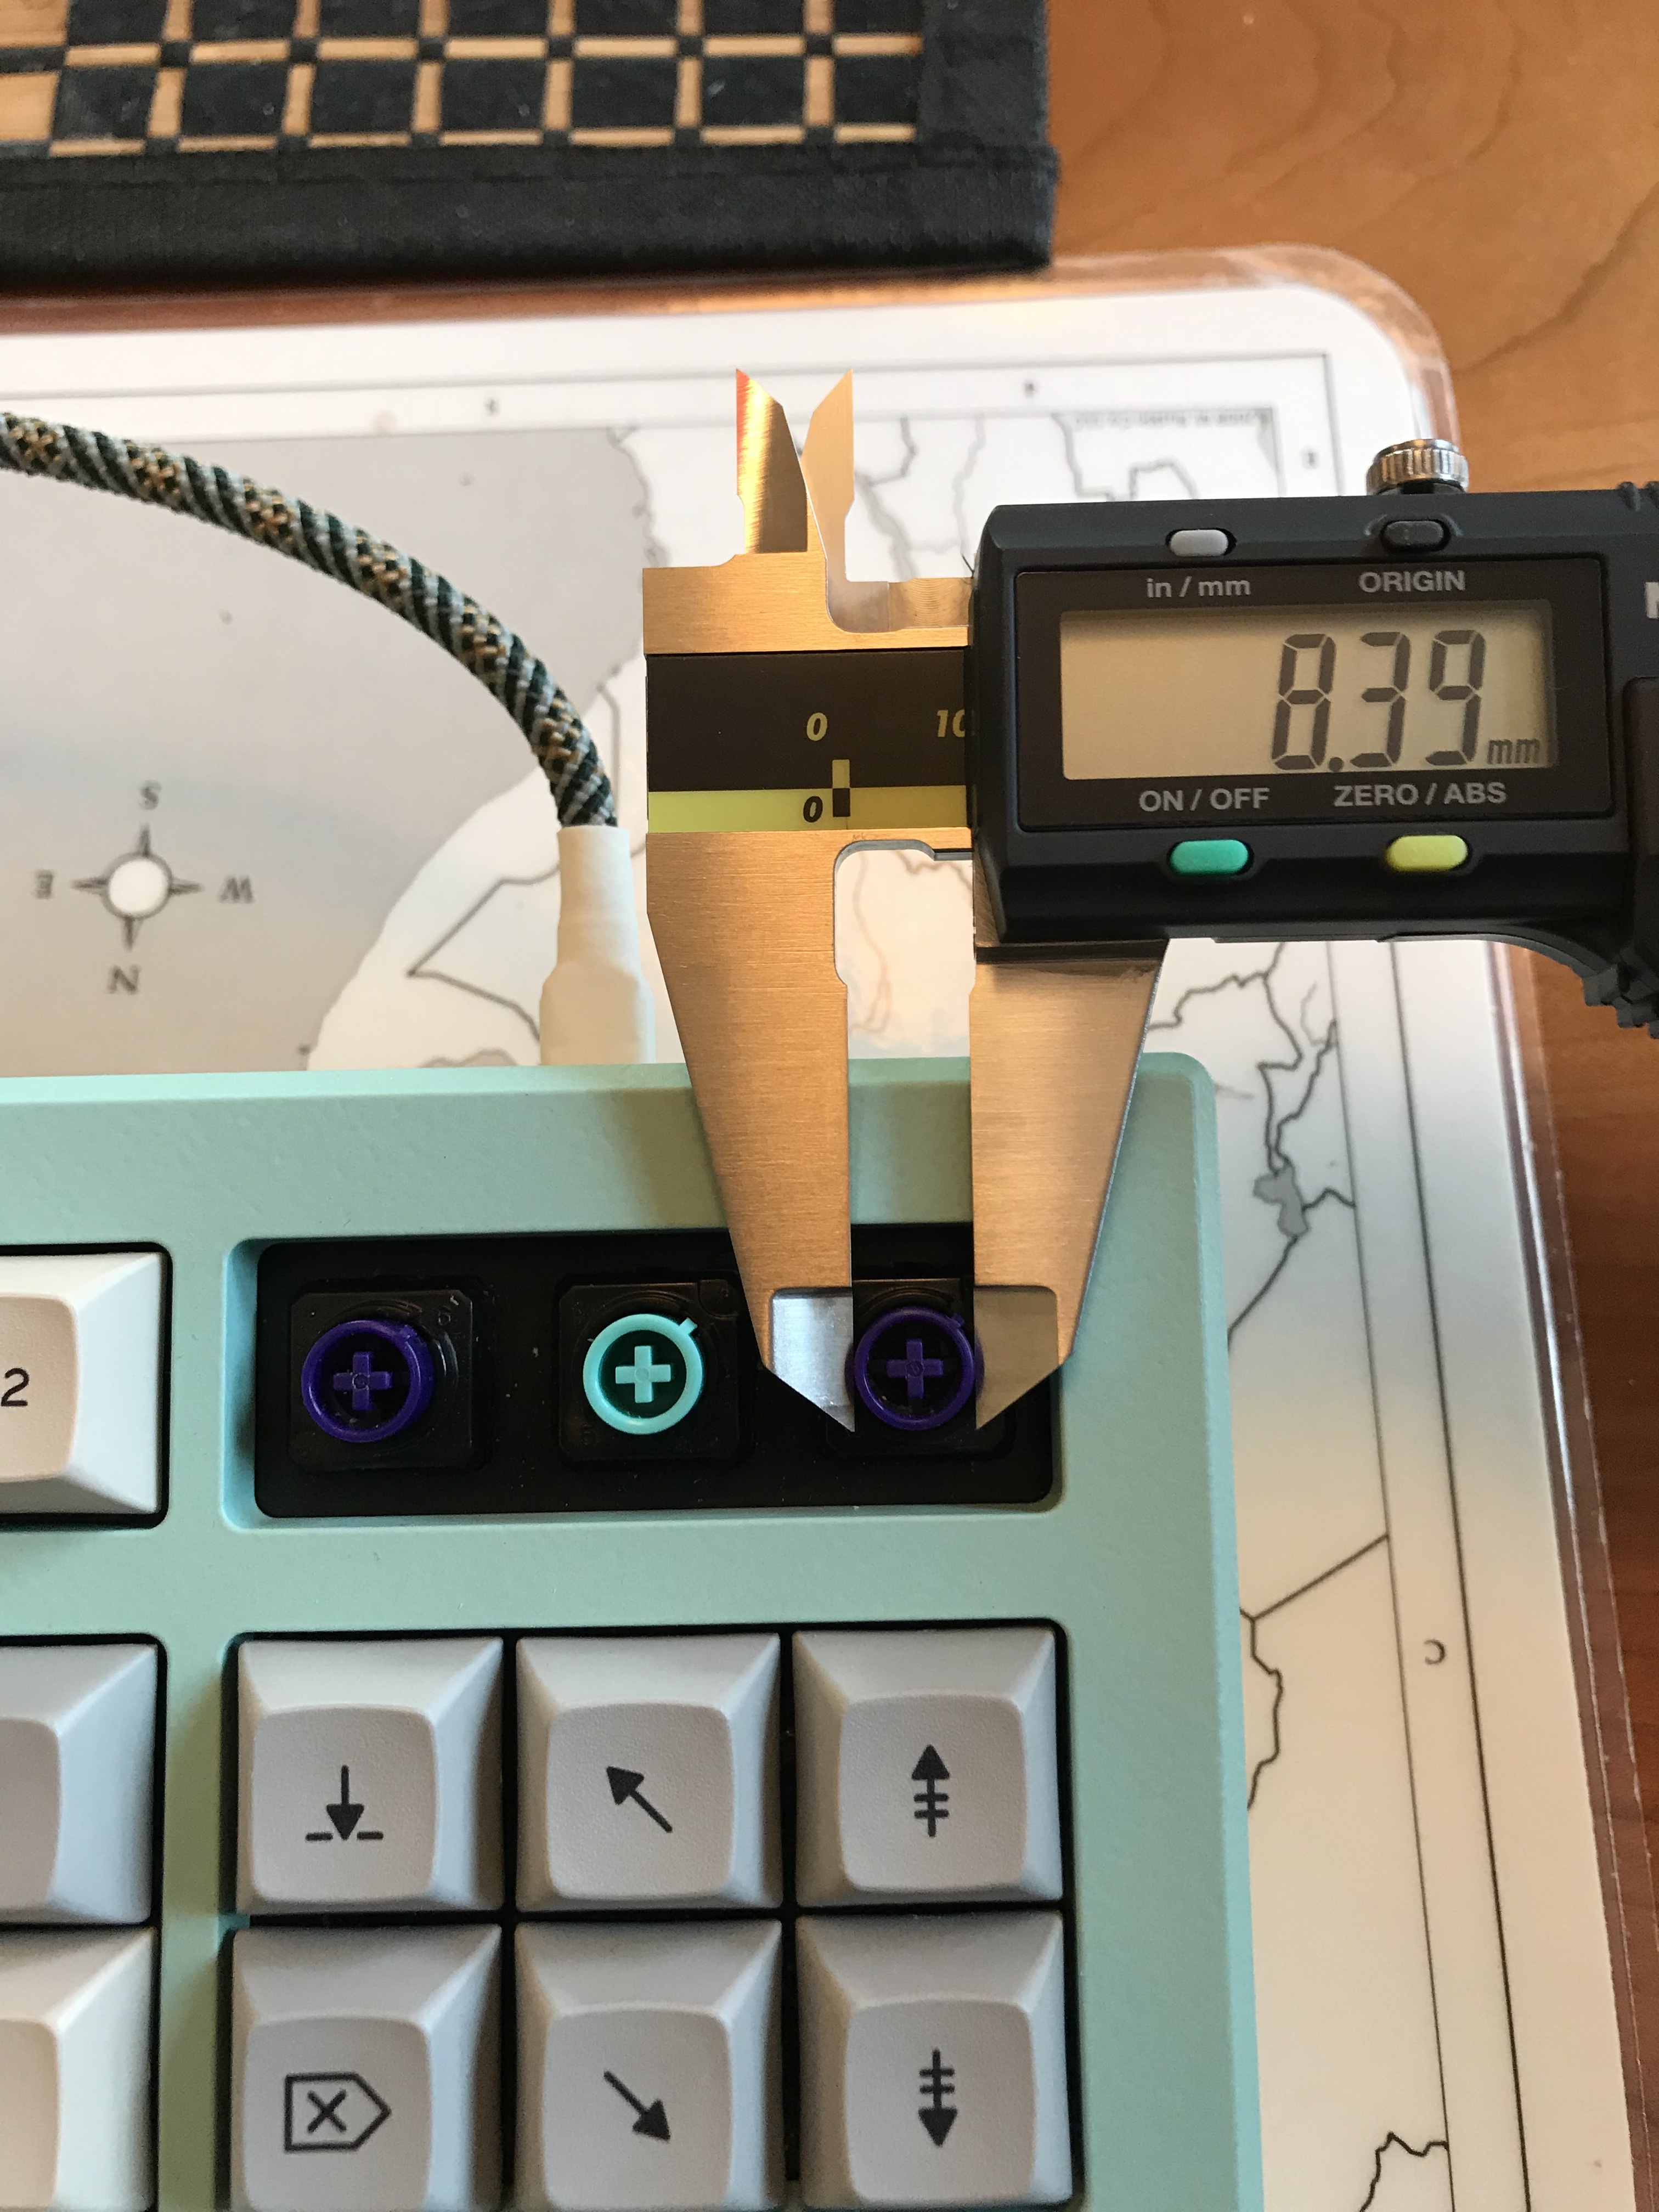
A little hard to show the effect in video, but perhaps these stills give an idea. Looks like approximately 0.3mm more play on the KBDfans slider than the Novatouch sliders flanking it:


After lubing, still different, but I’d say almost all of the difference is wobble; both from the slider stem, and the difference in keycap fit on the stem. In terms of smoothness of slider travel and sound, not a large difference.

2 Likes

I’ve never seen the issue with KBDFans sliders more clearly illustrated. That’s quite a difference. This widely reported issue is why I’ve never given them a try myself.

Also, good taste in calipers: I use the same model. :slight_smile:

3 Likes

Just to be sure I wasn’t measuring parts that were unrepresentative, I measured once more with a spare KBDfans slider and the broken Novatouch slider I mentioned in the build log (my reluctance to throw away perfectly good plastic pays off once in a while). Consistent results:


4 Likes

That’s awesome, thanks for the measurements !

1 Like

Oh and an extra question popped in my head !

Could you please measure the original topre slider dimension as well ? :slight_smile:

I know for sure that original topre slider has more wobble than the Novatouch ones, I had a stock board and a novatouched one side by side.

I’m curious how they are comparing with KBDFans mx sliders …

Geez, i wish i was a new member like you

3 Likes

I don’t have any original Topre sliders handy at the moment, but hope to rectify that soon. I’ll take measurements once I have them.

Seems that stock ones are 8.3mm in outer diameter, and the Niz ones 8.21

Someone on reddit did a wobble comparision on a realforce R1 vs a new Archon EX TKL with the improved sliders. It’s clearly visible for me that the wobble has been reduced as I’ve owned a Niz Plum75 and that one had pretty wobbly sliders !

https://photos.google.com/share/AF1QipP9m7SpfO1ywM07r4mB3_rSKk5EoGtzwLcCgBmMqjD9RCVe7Oc3kj33nzY10gcpAg/photo/AF1QipOUwsSdqxn8UZV0SekxlpIABAZ1d7o0uKMremt_?key=cFMtSW9JMldiR2cxZkNKQXJzZ3BXZjM0NkpfU1B3

Build #17: TX108se

As even relatively new members to the community can quickly ascertain, most of the action in the custom mechanical keyboard world takes place in the 60/65/75/TKL space, with the occasional foray into 1800-land. And there are good reasons for that - sacrificing unused blocks of keys is a good way to reclaim desk space, whether for reasons of aesthetics, ergonomics, or some combination of the two.

Sometimes, however, you just gotta go big. To find out for ourselves whether size matters, I decided to take a run at the tx108se, a full-size design from Kin of TX Keyboards. Before we get into the build, a quick look at the case, which seems well-constructed and durable - a good thing, given the hefty monster inside.

The first thing we’ll have to contend with is the PCB. As shipped, it has two extra strips of material attached to the top and bottom of the PCB. The top one effectively blocks the USB connector, which is your clue that it’s meant to be removed. I neglected to get a shot of the PCB with both strips attached, but here’s a look at the PCB with the bottom strip intact.

That seam doesn’t look like it’s cut deeply enough to permit the strip to snap off, and it doesn’t feel like it, either. But with enough force on the ends, it can be pried off manually, and once it’s begun to break away, removing the remainder of the strip becomes easier.

Once that was done, I tested the PCB (and a spare) with tweezers to make sure they were working.
Things I like about this PCB: clear labeling of all keys, LED polarities, and switch placements.
Granted, switch and stab placement aren’t exactly ambiguous on a full-size layout, but it’s still
nice.

Things I don’t like: we’re going to have to be careful with the GMK screw-in stabilizers to make sure we don’t short anything out with the screws. Take a look at the overlapping screw holes and pads.

This board actually supports a number of split layouts, to the degree that if I had opted to split backspace, both shifts, the spacebar, and the three 2u numpad keys, I would have needed only 3x2u stabs, for left and right space and enter. But in the end, I decided to keep things conventional, and so I needed 1x6.25u and 7x2u stabs. Here, I’ve just finished disassembling and clipping the stabs:

After lubing the stabs, here’s a look midway through installation. Looking at the numpad, we see white gaffer tape for the bandaid mod, and, above the PCB, the remaining stabs, screws, and the washers I use to prevent any possibility of shorts with the screws.

All done with the stabs.

Here’s the first look at the top of the tx108se case. The anodization is very nice, as is the finish on the brass plate. Less nice from a build perspective - the tight fit for switches, exacerbated here by the choice of Holy GSUS switches. I got about this far pressing switches into the plate before my thumbs demanded a break. Painful. To finish placing the switches, I ended up folding a paper towel into a thick square and using that to distribute the force a bit more evenly on my thumb.

A look at the reverse side of the case top, showing the screw mounts for the plate, as well as the 12 screw holes for joining the case halves.

With all of that brass, and the use of heavily tactile switches, we can expect significant ping, so it’s time to address acoustics. Before soldering, I placed a few strips of 4mm-thick Sorbothane on the plate, to be sandwiched between the plate and the PCB.

Normally, I wouldn’t seat all of the switches in the plate before soldering even a single switch into the PCB. However, two factors pushed me in this direction. First, the extremely tight fit of the switches in the plate, and the level of force needed to properly seat them, made me think it might be safer to fit the switches first to avoid any potential damage to the PCB. Second, a quick test of fit led me to believe that it wouldn’t be hard to drop the PCB into position (the absence of PCB mounting pins on the GSUS housings helps as well).

Because the gap between a 1.5mm plate and the PCB for an MX build is nominally 3.5mm, the 4mm Sorbothane will compress a little bit when the PCB is properly in place. With the Sorbothane placed on the plate before soldering, this can make it difficult to ensure that the switches are seated properly and making good contact with the PCB, since the Sorbothane compression is pushing the other way. It helps here to have a child willing to apply pressure while soldering takes place, although C-clamps would presumably be a much more cost-effective solution than having a child. Your call.

With the soldering done, more Sorbothane is laid in place on the PCB. There’s no particular reason for the gap between the sheets - I had two pieces of about the right size, and used them with the plastic backing left in place.

There is a polycarbonate diffuser for the RGB backlighting, which is sandwiched between the top and bottom pieces of the case and held in place by the case screws.

In case you’re wondering, the Sorbothane sheets do not block the RGB backlighting. The LEDs are triangular, mounted on the perimeter of the PCB, and illuminate directly outward. Here’s a close-up of one such LED, before the extra strip of material was snapped off of the PCB:

Big boi’s got back. I have to be honest; this is my least favorite part of the design. I’m not convinced by the grill work, nor by the color/texture combination of shiny brass and matte grey. On the other hand, the anodization is really good. This photo does not do it justice.

I note in passing that getting this screwed back together was a bit more work than I anticipated; the tolerances on the screw holes and screws were very tight, to the point that certain combinations of screws and screw holes would not work. I ended up playing whack-a-mole with the screws to figure out which ones would actually seat properly in each hole.

I particularly enjoy the new feature I’m pioneering with this board, which I call “top-mounted RGB”.

I kid, I kid. While we’re here, have a gander at the side view of the controversial new design feature Kin has introduced on the latest round of the TX lineup, the curved notches on the board sides. While I get that it’s a big change stylistically from previous rounds, and may not be everyone’s cup of tea, I will say this: I’m happy those finger grips are there when I have to move this beast.

With this board, Kin has moved away from Jigon to a new custom tool, but it is definitely a work in progress; I’ve been able to control lighting with it, but so far I’ve had zero luck configuring the keys. The good news, I suppose, is that the PCB came with all keys in a reasonable default configuration. At some point, I’m thinking of porting this to QMK with a spare suo108 PCB, but that’s a longer-term goal.

Lessons learned

  • It’s one of those little steps that’s easy to forget - be sure to check the stab holes for overlaps with pads, and in the event of overlap, place non-conductive washers to guard against shorts with screw-mount stabs.
  • Unfortunately, this build was completed before @donpark shared his approach for placing Sorbothane between the PCB and plate. I’ve since tried that approach; it works well, and it’s the way I will likely approach the mod going forward.
  • All of the sound dampening does a great job eliminating plate and case ping. With that said, this is still a loud boi, particularly the spacebar. Not unexpected, since I chose loud switches, but still.
  • This build was literally painful - bruised my thumbs getting all of the switches into that plate. It’s probably worth investing in a pair of heavy-duty work gloves if and when I have to deal with another plate like this.
  • Keep track of screw locations during disassembly, when the tolerances are as tight as they are on this board. It will be easier to reassemble if you put the screws in the same holes from which they were removed.
  • I generally associate increased heft with increased potential for improved acoustics, but somewhere between 5 and 9 pounds, increased heft is just increased heft.
  • The hype on TX finish and tolerances seems to be justified. Very smooth ano, and very clean seams.

Let’s wrap this up with another object lesson in lighting and color. GMK Dolch, particularly on this board, is a chameleon. Indoors, under incandescent lighting:

Indoors, under natural daylight through the window. A chameleon. An attractively plump 9.97-pound chameleon.

Specifications

case: TX108se anodized aluminum (grey)
case dampening: 0.1" 30 Duro Sorbothane sheets
PCB: suo108
plate: 1.5mm brass
LEDs: RGB underglow built into PCB
switches: Holy GSUS
- Bsun GSUS housing & springs
- Halo Clear stems
switch lubing:
- manually lubed housings/stems with Tribosys 3204
- tub lubed springs with Krytox GPL 104
keycaps:
- GMK Dolch
- 4x Rama Wave SEQ2 AL
stabilizers: GMK screw-in
stabilizer mods: clipped, lubed with SuperLube,
  bandaid-style mod with gaffer tape
plate/PCB dampening: 0.25" 50 Duro Sorbothane, ~4mm wide strips
HxWxD (without feet or caps): 1.63"x17.31"x5.63"
HxWxD (without caps): 1.69"x17.31"x5.63"
HxWxD: 2.0"x17.31"x5.63"
assembled weight: 9.97 lbs
8 Likes

Absolutely killer builds man! I love how informative your posts are, this really should become the new standard.

1 Like

I really appreciate the kind words. Putting all of those build details into a log takes me more time than I would like (I’m almost five boards behind at the moment!) so it always makes my day when someone notices. Thank you!

2 Likes

Build #18: Singa R2

When I originally came up with the idea for this build, it was really envisioned as an exercise in color pairing. I liked the idea of an orange case together with brown caps, to play off of the shared earth tones. And if this hobby wasn’t as group-buy driven as it is, that might have been the only thing to talk
about - here, look at the photos, colors, hooray. Next.

But those group buys, and the long waits that come with them, give the build time to grow. When I first imagined this build several months ago, a number of things weren’t, well, things: affordable Holy Panda components, easy availability of replacement plates using different materials, the use of scuba-gear lubricants for switches and stabilizers, and, perhaps most importantly, my experience with a few builds between then and now. Put all of that together, and this build became a lot more interesting (for me, at least). Let’s get to it.

The Singa R2 PCB supports a number of layouts, but if you’ve opted for the WKL top with blockers, your bottom row is going to have a 7u spacebar, 3 1.25u keys, and 3 1u keys, which you will be using as arrow keys. That, in turn, means you will have a 1.75u right shift to make room for the up-arrow key, which means you don’t need a stabilizer for right shift. Straightforward, right? Let’s get set up
for some stab work.

For this build, I wanted to try Christo-Lube 111 for stabilizers. While I’m more or less happy with SuperLube for stabs, and feel like I can achieve acceptable results with it, it can take a bit of tuning to avoid sluggishness on the stabilized keys. The word on the street indicated that 111 killed all the rattle
and noise without affecting travel. Coupled with the low cost of 111, that made it worth a try in my book. As far as consistency goes,111 is relatively stiff. It clings to the side of the jar and holds its shape, and while it’s not stiff enough to hold a dental applicator upright, it has enough grip to keep the applicator from sliding out of the jar. 111 is also noticeably less greasy to the touch than SuperLube, and less dense.

Because of the lighter density, I felt comfortable applying the lube more heavily, certainly more heavily than I would apply SuperLube or Permatex dielectric grease. It’s difficult to capture that in a photo, but hopefully the left stab housing on the 7u stab gives you an idea:

And, there we are, lubed stabs installed. All good. Wait, what?

I wish the “build log writing” me, the one that outlined layout considerations for you, had been present when the “keeb building” me blithely lubed that extra 2u stab and installed it on the right shift. Sigh. Let me just unscrew that and we’ll pretend that never happened. Look on the bright side - if 111 works out, I have one less 2u stab to lube for the next build!

In the previous build log for the tx108se, one of the least pleasant aspects of the build was insertion of switches, switches with Panda-style housings in particular, into the brass plate. Panda housings are known to be slightly wider than other MX switch housings, and the tolerances on the TX plates are known to be tight. I ended up bruising my thumbs pushing switches into the plate, and from what I had seen online regarding Singa builds, I was not looking forward to repeating that experience. Fortunately, by the time I got around to this build, an interesting option had emerged.

Rather than use the sandblasted brass plate that came with the Singa kit (which, granted, is lovely), I picked up a POM plate. In addition to being far easier on the fingers when mounting switches, this also gave me an opportunity to check out the sound signature of POM, something I’d been itching to try for a while. I’m also finding that I’m not a big fan of brass plates, as they feel too unforgiving for me. Feel is subjective, of course - YMMV. Tolerances were good, and stabilizer housings lined up cleanly with the cutouts.

81 Holy Red Pandas, ready for action…


…and soldered in place. I didn’t use either the bandaid mod for the stabs or any Sorbothane between the PCB and the plate, as I wanted to get a clean impression of POM’s sound, and I felt that with a top-mount board, if any sound dampening proved necessary, a bit of Sorbothane between the case and the PCB would be sufficient.

Top-mount installation is straightforward on the Singa; just screw the plate into the recessed screw holes on the underside of the top of the case.

Attaching the two case halves is also straightforward; the case bottom has eight screw holes through which the top can be attached to the bottom.

You can see the holes here, as well as the cutouts on the sides for lifting the board, but the real reason for showing you this view is clear - just look at that polished lion’s head weight. Gorgeous.

On initial assembly and testing, I found that there was some metallic case ping on key impact, so I opened the board back up and applied Sorbothane. Normally, I’d cut a few thin strips, peel the plastic backing, and wrap the strips in gaffer tape before placing them in the case, but when I realized I had spare sheets that more or less matched the case shape, I just went with it, and left the plastic backing on, to avoid getting any plasticizer on that lovely weight. You can see the pressure points in the center sheet where the switch pins are pressing down, and I’ve been finding that’s about the level of compression I like to see for best performance.

Finally, one last bit of work before the board is ready for prime time. While the Singa supports QMK, the PCB uses a ps2avr bootloader and an Atmega32a controller, so I couldn’t use the QMK Toolbox to install firmware in the usual way. Fortunately, the readme.md file in the keyboards/singa directory of QMK gives clear instructions for downloading and using the HIDBootFlash tool, and after building the firmware with the keymappings I prefer, flashing the resulting firmware proceeded exactly as described in the readme. Always a good thing.

From the moment I saw the burnt orange tone of the Singa, I thought Chocolatier would make an excellent pairing, capitalizing on those shared earth tones. The RAMA Golden Ticket artisan adds a nice accent, although I discovered that it’s heavy enough that keystroke feel is affected; much less pressure is necessary to cause the switch to trigger with this cap. My kitchen scale doesn’t have sub-gram precision, but a single GMK cap registers as 1g, while the RAMA cap registers as 12g - so even allowing for measurement error, it’s not surprising that this would happen. Easy enough to fix, if I can decide which way to go with the modifiers…

Lessons learned

  • I’m enjoying the POM plate - nice, crisp sound (and way easier on the fingers than the brass plate, although I will grant you that the brass plate looks better with the color scheme. Sometimes, there are unavoidable tradeoffs to be made).
  • Holy Pandas on POM - this is a nice combination. While I wouldn’t say there was really much flex on the Singa, typing feels noticeably more forgiving on bottom-out than the Pandas did on the brass plate in the tx108se.
  • At least for this build, I’m not missing the bandaid mod, nor the usual dampening I would apply between the plate and PCB. I don’t have enough experience with top-mount to know if this result will generalize to all top-mount boards, but it’s something to evaluate further.
  • Stab lubing with 111 - I like it quite a bit, enough that it is a serious contender to replace SuperLube as my stab lube of choice. Eliminates all rattle and undesirable noise, but stab motion is not sluggish in any way. The sound and feel of the non-spacebar stabilized keys is quite consistent with other keys, probably the most consistent I’ve observed in any build. I’ll be trying this again soon.
  • WKL blockers: the aesthetics vs functionality tradeoff is real. The bulk of my time is spent in front of Windows, and not having a Win key is like missing a finger. Yes, I know we can remap keys, and I’ve done so here, but decades of muscle memory make this a difficult proposition.
  • I don’t use artisans often, but when I do, I need to check the artisan weight and adjust spring weight in the appropriate switch if the artisan is substantially heavier than a normal keycap.

So what would you pick here to set off GMK Chocolatier - the RAMA golden ticket cap…

…or the yellow accents? Choices, choices…

Specifications

case: Singa R2 anodized aluminum (burnt orange)
case dampening: 0.1" 40 Duro Sorbothane sheets
PCB: Singa/TGR PCB (ps2avr)
plate: POM
LEDs: n/a
switches: Holy Red Pandas
- YOK Red Panda housing & springs
- Halo Clear stems
switch lubing:
- manually lubed housings/stems with Tribosys 3204
- tub lubed springs with Krytox GPL 104
keycaps:
- GMK Chocolatier
- Rama Golden Ticket
stabilizers: GMK screw-in (1x7u, 3x2u)
stabilizer mods: clipped, lubed with Christo-Lube MCG 111
plate/PCB dampening: n/a
HxWxD (without caps): 1.38"x12.25"x5.13"
HxWxD: 1.69"x12.25"x5.13"
assembled weight: 4.78 lb
5 Likes

Very nice as always!

I like how you think out your builds so far into the future. I do the same and often they evolve as new GBs emerge.

I’m curious as you use this more, how you like the stabs with MCG111? I’m finding it hard to balance lubing enough to cut out the rattle while not getting too sluggish.

1 Like

It’s still early, but I’m really liking 111 on the stabs. It doesn’t have the stickiness or density that Permatex or SuperLube have, to the point that I’m tempted to try filling a syringe with 111 and just filling the stab housings that way, rather than painting the lube on. I think that approach would be a complete failure with dielectric grease, but with 111, I think there’s a decent chance it would work well.

But that lack of density and stickiness does lead me to wonder how well it will wear over time - if 111 ends up not working for stabs, I think it will be because it wears off of the contact points more quickly and/or to a greater degree than other greases would. Time will tell.

1 Like