Hi, I'm jshufelt

Hi, I’m jshufelt. My default Internet behavior is compulsive lurking, but I’m going to try something different here.

I’ve been coding and writing for a long time. My first board was a VIC-20, followed shortly thereafter by a C64. 38911 bytes! What more do you need? For just about all of that time, I’d use whatever keyboard was placed in front of me - just get on with it, you know? This attitude might have continued indefinitely, if not for a friend posting a shot of his new custom board (a TADA68 + MiTo GMK Laser + Gateron Browns). After seeing that and doing a manic deep-dive through the web for a couple days, I put all of the pieces together:

  • In just about any other endeavor, I am a big believer in using the best tools available.
  • It is possible, and has been possible for quite some time, to build boards that are superior in every way to the boards I’ve been using for years.
  • I am an idiot.
  • I am about to start shoveling money into an endless pit.
  • I am still an idiot.

I get excited by “functional art” - objects that combine aesthetic appeal with hands-on utility. Up until now, that excitement has manifested in a couple of my other hobbies, boutique acoustic guitars and mechanical wristwatches. Based on what I’ve seen and experienced over the past couple of months as I’ve set up shop in a corner of the garage and done a few builds, mechanical keyboards seem likely to join them as a third obsession.

I’ve been keeping build logs for each build as a way to learn, and as soon as I have a chance to properly write them up, I’m hoping to share them here (suggestions for the appropriate category are welcome!)

In the meantime: cheers!

35 Likes

Welcome jshufelt! Can’t wait to see your build logs! What boards did you build so far? My first build was a Planck.

2 Likes

A TADA68, a Clueboard, and a couple of DZ60s. Parts for a few more DZ60s and a Preonic are inbound - I’m learning that a surprising amount of time in this hobby is spent waiting on trucks with boxes…

2 Likes

I built a TADA68 for my coworker and built a Clueboard for myself (made a big mistake that will force me to de-solder the entire board - make sure you test the fitting of your bottom row layout before you start to solder!)

I just sold my Preonic, I couldn’t switch between ortho and staggered. I love the look of ortho boards though.

Let me know what you think of DZ60s - I decided not to build those.

1 Like

So far, minor problems and issues with every build, but nothing that either couldn’t be fixed relatively easily, or substantial enough that I cared to correct it. I still don’t think I have stab lubing dialed in, but it seems like I’m far from alone on that front…

One of the nice things about the DZ60 from a “best practices” perspective is that it supports so many layouts and has so many mounting points that you have no choice but to fit switches and caps before you ever start soldering! I made a similar mistake with the Clueboard, but fortunately I hadn’t soldered yet, so it was just a matter of reseating a bunch of switches.

I think it’s highly likely that an ortho layout will drive me nuts, but I was curious. Worst case, I’ll just turn it into an enormous macro pad.

Before the first build

In my introductory post, I mentioned seeing a photo of a friend’s build and becoming sufficiently intrigued to start poking around the web to understand just what I was seeing. The video that really pushed me past the event horizon, though, was this one:

Whoa. I’m not entirely sure what I’m seeing, but whatever it is, I need it in my life. Thus began a couple of days of intense googling and forum catch-up. Sound familiar?

The first order was a Vortex Race 3. I just had to get my hands on a mechanical right away, to try one out, pop off caps, inspect the thing, and just generally get worked up into a frenzy. New hobbies are the best. First impressions: love the heft of this thing, love the reduced footprint on my desk, but not at all sure about those Cherry clears - the tactility is nice, but typing for a while became wearisome. Are all switches this stiff…

The second order? A big-ass switch tester. Need to sort out what this linear/tactile/clicky business is all about. As others have noted, no one can tell you what your preferences are, and no amount of back-and-forth about switch characteristics could ever be an acceptable substitute for trying them out. That didn’t stop me from reading all of the switch descriptions I could find, however, and soon I realized that if I kept this up, I was going to be biased by other people’s opinions, rather than letting my own fingers decide. So, I decided to do blind evaluation when the tester arrived - I would not look at the switches while testing, instead working across the tester by touch while looking away, and making note of the happy sounds and feels as they presented themselves.

And, at least in my case, when the tester arrived and I began my blind test, it was apparent immediately: I’m a tactile guy. And, shortly after working my way through all of the tactile switches, yes, it’s true: Zealios are the way to my feelios. This is as close as I’ve come to a keyboard I experienced in the computer clusters back in college, an IBM board circa 1986 (no, not the Model M), non-clicky, with a similar level of smooth tactile response. That board remains my favorite typing experience ever; unfortunately, I have yet to figure out which model it was, let alone track one down. In any case - Zealios will do just fine.

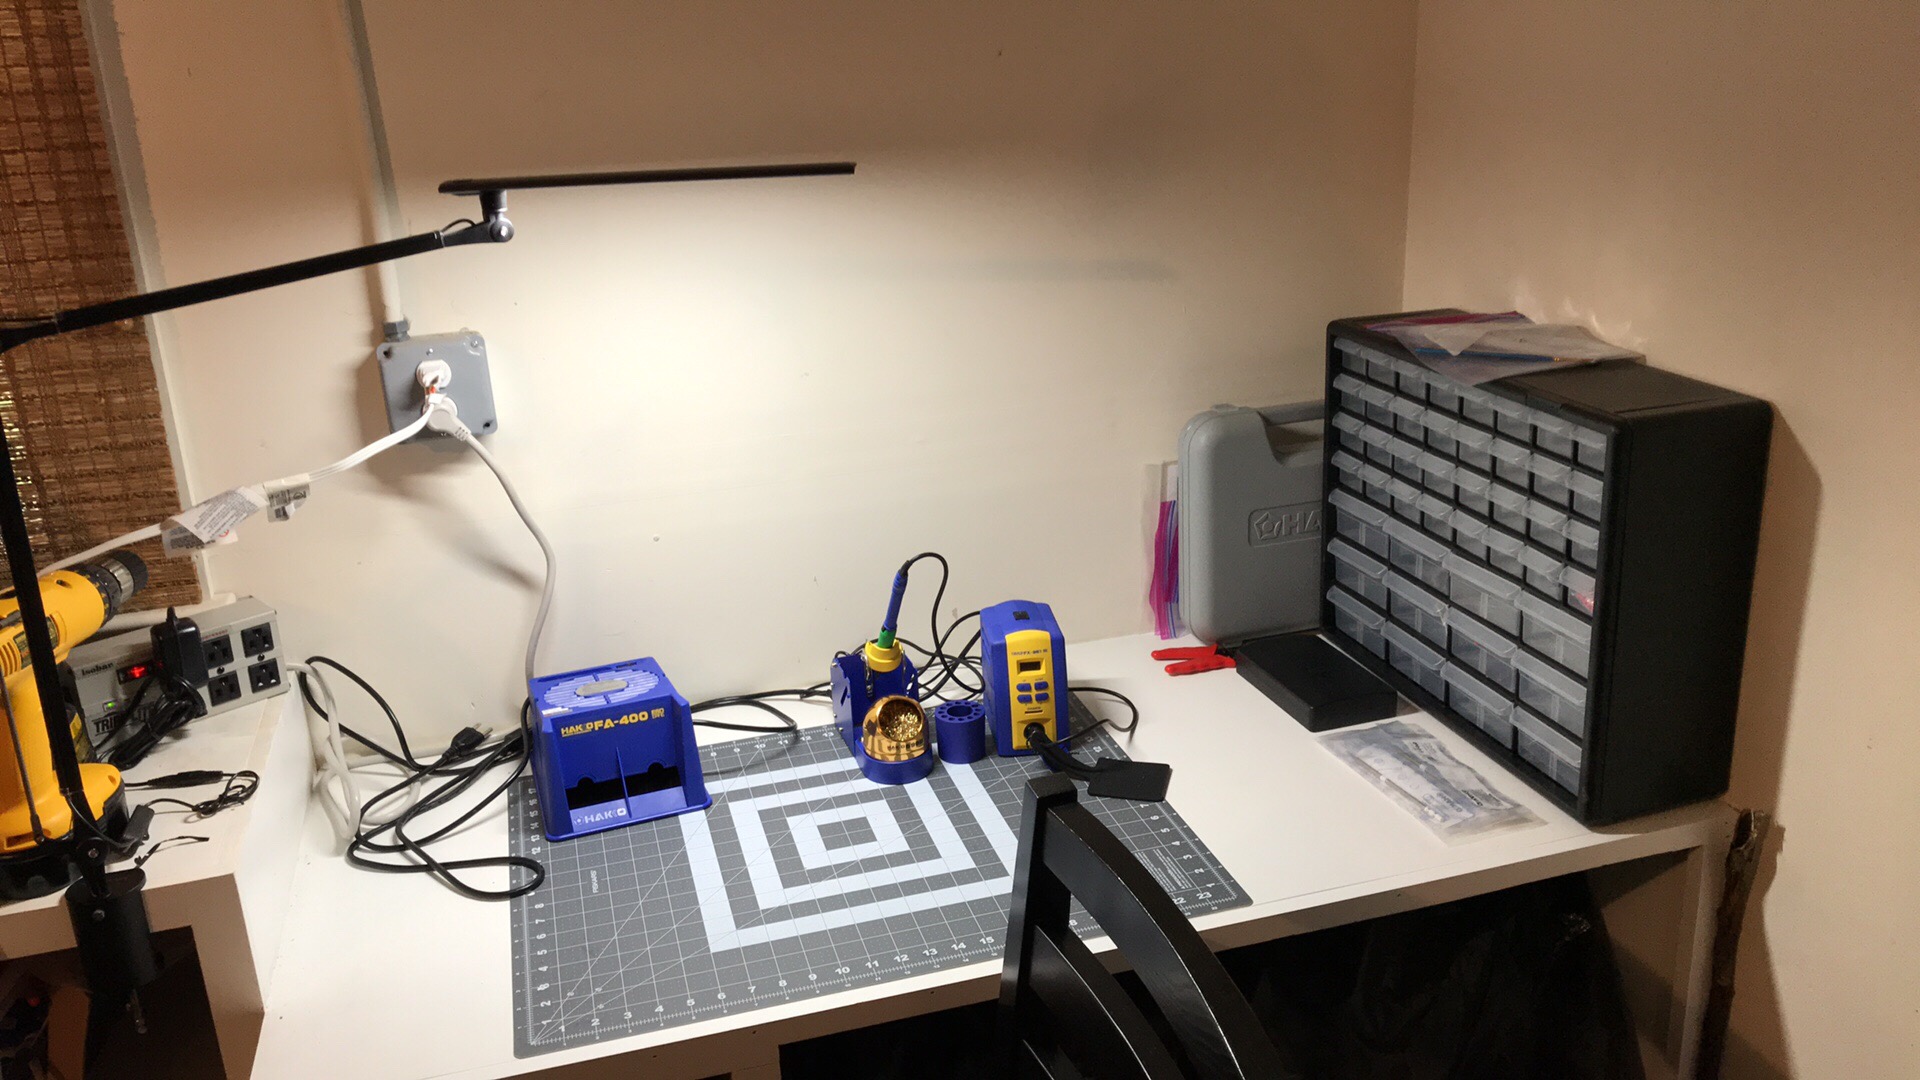
Time to tool up, but where to begin? I hadn’t soldered anything in a very long time, not since electronics classes in high school, and aside from getting good soldering equipment, it seemed as though people were using several other specific tools and materials for their builds, for purposes that weren’t entirely clear. Fortunately, just I was beginning to become a bit daunted by the prospect of sorting all of this out, Gio’s excellent post appeared:

And not too long after that, a little corner of the garage was reclaimed for its
true calling.

At about this point in the run-up to my first build, one of my sons saw me going full OCD into keyboards, and shortly thereafter became infected with the sickness as well. Cool, now I have a lab partner. We agree it makes sense to get some practice with the tools before using them “in production”, so we picked up a little practice soldering kit and worked through it together.

https://www.amazon.com/Elenco-Practical-Soldering-Project-Kit/dp/B0002LUAL6/ref=sr_1_1_sspa?ie=UTF8&qid=1536858000&sr=8-1-spons&keywords=elenco+practical+soldering+project+kit&psc=1

I’d recommend this to anyone just getting into the game; it’s a great confidence builder to learn (or re-learn) basic soldering technique on a cheap throwaway project before proceeding to a first keyboard build.

Full disclosure - before I begin posting the logs for my builds - the very first build done with these tools was not one of my boards, but my son’s (a KBD75 with 67g Zealios, GMK stabs, and DSA 2049 caps). I largely stayed out of his way, if for no other reason than that I don’t know what I’m doing any more than he does! His build had a couple of rough spots; a bad solder joint which took a little time to track down and fix, and an initially misaligned placement of the acrylic spacer which prevented the USB cable from being able to fully seat in the connector. He worked through these issues with a nice result at the end, which was a huge confidence builder for him, and which made me jealous and quite eager to start my first build! Next up…

11 Likes

Oh boy, you are going to have a good time when checking this thread Post Your Kustom!

1 Like

Oh yes, indeed. It’s like going to a really good museum; my reactions run the gamut from a deep cringe to “how can I get the guards to look the other way for a moment while I smuggle that home?”

I love your workspace set up! I wish I had a clean tidy area like yours hehe. What light is that? I like how thin it is and it looks like it has some great swivel action going on.

2 Likes

Thanks! I feel compelled to note that it’s actually being redone as we speak - I wanted to get some of that stuff on the side up on the wall, out of the way, and the desktop is kind of thin crappy plywood. I have plans…

Here’s the light. The lower two joints have only 1 DOF, so it’s not quite as swivelful as it looks, but the top joint has more freedom, so I can mostly make it work. I also feel like I might want a second one - the light is diffuse, but not enough, and I get some annoying shadows when I’m hunched over the desk soldering. With all that said, I’d still recommend it:

1 Like

Build #1: TADA68

In Kitchen Confidential, the late great Anthony Bourdain’s memoir of the chef’s life, the following advice is offered for selecting good cookware:

A proper sauté pan, for instance, should cause serious head injury if brought down hard against
someone’s skull. If you have any doubts about which will dent - the victim’s head or your pan - then
throw that pan right in the trash.

In my view, this advice is applicable not just to the kitchen, but to life, and after some investigation on the forums, I settle on the TADA68 in aluminum for my first go. In addition to its status as a well-regarded kit for a first build, the aluminum case can absolutely be used for self-defense in a pinch. It is heavy. It rests on your desk with intent. It means something.

When I started this build, I was very much ready to do some soldering, but I didn’t really understand the whole stabilizer modding universe, and so I did what I usually do when I’m trying to do a bunch of new things and an inconvenient pile of related information arrives which I’m not ready to process: I ignored it. We’ll come back to that decision a little later.

First, I plugged in the PCB and used a pair of tweezers and an online keyboard tester to make sure the PCB was functional. Everything seemed good, so after a bit of overlaying parts on one another to determine where everything goes, I seated all of the Zealios in the plate and on the PCB, and did a quick eyeball check to make sure everything looked good, no switches seated incorrectly, that sort of thing.

Seemed good to me, so I soldered them in. This took about 20 minutes, working carefully and methodically.
Hmm, this iron is light years away from what I remember using years ago - consistent temperature across multiple joints makes it easy to get into a rhythm. Iron on pin for 2-3 seconds, flow solder onto the pin for a second or so, up and away, on to the next pin, clean the iron every few pins. Satisfying. Just to be clear - I’m not saying that I have particularly good soldering technique, just that it was easy to get consistent results. It would have been even easier if I had bothered to get new eyeglasses with my recently updated prescription for progressive lenses. Sigh.

I’m not sure what I think about LEDs, but given that they’re cheap and I can always turn them off, I decided to go ahead and install a set of white LEDs on the board as well. For the newbs: long pin goes through the hole marked positive (+)! Also, since I wasn’t entirely sure how this worked until the build - there are two cutout holes in the Zealios, so you thread the LED pins through the Zealio and then through the board. Seating the LEDs was made somewhat easier by a soft detent, whether on the switch housing or the LED I couldn’t tell, but either way, you feel the LED gently “snap” into place when it’s seated correctly. I ended up soldering a row at a time and then clipping the extra pin lengths from each row before proceeding to the next row. I feel like there must be a more efficient or easier way to do this, but so it goes. Here we are before starting the fourth row, please enjoy my partially denuded TADA porcupine:

And, before we go any further, time to plug in the PCB again and test the LEDs. We are go for illumination!
Another tweezer test while depressing switches revealed no issues either, so we’re in pretty good shape.

At this point, most of the work was done; it was just a matter of screwing the PCB/plate assembly to the board, and mounting keycaps. Initially, I used the caps that came with the TADA kit, but once the SA Abyss set arrived, I did a test swap which quickly became permanent. The SA caps were so much more satisfying to touch, and the sound was dramatically better. I was surprised by this - most of the commentary on the forums seems to revolve around sound changes involving stabilizer mods, but I haven’t seen much discussion of the sonic impact of switching to different styles and materials for keycaps, so I wasn’t anticipating this degree of change.

However, not all was well in paradise. As you might have guessed, the stabilized keys sounded rattly and felt mushy, and really suffered in comparison to the non-stabilized keys. Sigh. OK, let’s try to lube without desoldering. I removed all of the caps, and using a small artist’s paintbrush to apply lube and a pair of tweezers to hold the stabilizers in various positions, I was able to coat the sides of the stems, the wires at their contact points with the plastic stabilizer housings, and then inside the housings where the stabilizer wires would make contact internally. This was time-consuming and annoying; there aren’t really any good angles to get to the stabilizer internals with the plate in the way.

Eventually, the lube application suffering ends, the board is all back together with keycaps, and whoa! Different board. No rattle, nice hollow-sounding thock. There is still some ping, but that seems to be from me bottoming out, since it happens on impact, and it happens with non-stabilized keys. Even then, the ping is minor at best, and the overall tactility and sound is totally working for me. I could get used to this.

Lessons learned

  • When it comes to soldering, don’t skimp on tools. In this case, the Hakko FX-951 isn’t cheap, but your time and the quality of your experience is worth something too, right? Fast warmup, good temperature setting features, and the ability to hold a stable temperature really do make a difference in the speed with which you can solder a lot of pins, and the quality of the solder joints you obtain.
  • Keycaps can make a large sonic and tactile difference. Compared to the brittle click created by the caps that came with the TADA kit, the SA caps yield a very satisfying, dense thock. These particular caps from Keyboard Therapy have a softer bottom-out feeling as well; even when I’m bottoming out a lot, I don’t feel quite as much shock.
  • As a lazy newb, I was hoping that I could avoid all this stab lubing business, but hey, guess what? It really is essential for both sound and feel - and it would have been a lot easier to do it before stabilizer installation! Being a contrarian by nature is not always a good thing.
  • My first experience with a 65% board is positive. I’m still getting used to the new regime for function keys, delete, backquote/tilde, and so forth, but it’s not as bothersome as I initially imagined it might be. I’m finding that I use the END key a lot more often than I thought I did, though.
  • Given that I have no prior build experience (other than providing moral support for my son’s first build), it’s clearly premature to say this one is quite nice. But you know what? It is quite nice! I’m very pleased with this result, and so far, it remains my daily driver. There, that should add a nice sense of tension and unresolved drama for the next few build posts…

Specifications

case: TADA68 aluminum, gray
PCB: TADA68
LEDs: per-key white
switches: R11 67g Zealios
switch lubing: N/A
layout: TADA default
keycaps: SA Abyss
stabilizers: included with TADA kit
stabilizer mods: post-assembly lubing w/ Permatex Dielectric Grease
case dampening: N/A
HxWxD (without caps): 1.25"x12.25"x4.25"
HxWxD (with caps): 1.75"x12.25"x4.25"
assembled weight: 3.26 lb
8 Likes

Build #2: Clueboard

With my first build complete, what next? There are a lot of things I want to try, but there is only so much time (and only so much discretionary income). In an ideal world, I’d be able to explore the effects of changing one aspect of the build while holding everything else constant, but that just doesn’t seem practical in the keyboard space, at least not when you’re starting out and trying to quickly get a handle on things you love or hate.

So, for me, that means each of the next few builds will be changing multiple options at once, with the hope that something useful can be gleaned from hopping all over the “endgame solution space”. There’s also the possibility that this will hopelessly confuse matters, but what the hell - at the end of the day, it’s a keyboard. We’ll somehow find a way to struggle onward.

It was a near thing between the 62g and 67g Zealios for the first build - I found them to be quite similar, and with 67s chosen for the TADA build, I wanted to use the 62g variants for this one. I also wanted to look at a different case and PCB, and the intriguing idea of an integrated case/plate combo led me to the Clueboard.
Finally, having learned my lesson about stabilizer treatments with the first build, I wanted to do a better job with stabs on the second build. With all those changes, however, it’s still a kit build. So this should be pretty straightforward. Right. Right?

This build wasted no time in fighting back. Out of the box, only half of the underglow RGBs lit up when the PCB was plugged in - whatever this PCB was supposed to do when it was first plugged in, I’m willing to bet that wasn’t it? Fortunately, Clueboard was quick about replacing the PCB, and after a little return/replace postal cycle, the second one fully lit up and passed the tweezer keyboard test. The kit comes with two sets of rubber feet, a thin and a thick set - I liked the thick feet, so I stuck those on before going further.

Stabilizer mod time! First up, clipping. The idea of taking a perfectly good piece of molded plastic and cutting pieces off of it to “improve it” seemed a little deranged at first read, but after finding a couple of videos online, the concept made more sense. And it’s super easy with flat cutters; after popping the wire out of each stab and removing the stems from the housings, clipping the two “bent” legs from each stem takes all of ten seconds.

Next up, lubing. This time, before mounting the stabs! I applied Permatex dielectric grease relatively liberally to the ends of the stabilizer wire and the clips where the wire snaps into the housing, as well as the sides of the stems, and inside the housing where the wire ends move up and down. This felt like a generous amount of lube, but the stems seemed to move freely in the housings after the stabilizers were reassembled, so let’s run with it.

Time for the build to fight me again. I took the time to place switches and keycaps on the modifiers, as a sanity check prior to soldering, and that turned out to be a good idea - I had mounted the spacebar in the wrong set of holes on the PCB. Sigh. A little annoying to undo all of this and remount the spacebar, but better to discover the issue now, when the fix is more straightforward. The PCB with stabs mounted:

And, more fighting. The backspace stabilizer seemed to fit cleanly in a notch on the integrated plate, and I spent a somewhat embarrassing amount of time trying to figure out why the spacebar stab wouldn’t fit in a notch before it finally dawned that there wasn’t one. If I haven’t previously told you that I’m not exactly the most mechanically inclined person in the world, now seems like a good time for sharing and caring. Once I figured that out, switch placement proceeded apace. Enjoy a plateful of Zealios:

After soldering and testing the PCB again, I peeled off the protective paper from the acrylic spacer (carefully, it’s quite flexible), and then lined up the bottom case, the spacer, and the top case to get everything screwed together. The first time around, this yielded a build that felt a little loose, as though something wasn’t quite seated properly. One last punch at your master, eh, Clueboard? I ended up having to unscrew the pieces and realign them. Thankfully, that did the trick. Much more solid.

Initially, I put a set of Tai-Hao lavender caps on the board, but after a little time, I swapped those out for an SP SA Lime set, and as with the first build, the sound and feel of the board was noticeably improved. Regardless of keyset, it’s worth mentioning that the stab feel is quite nice on this board - no surprise to this community, but clipping and lubing really make a difference. No mush, no rattle, just nice and crisp, if not as bass-driven as the typing sounds from the TADA68.

Regardless of keyset choice, the most noticeable aspect of this board was the typing experience with the 62g Zealios. My hunt-and-peck has evolved over the years into something not too far removed from proper touch typing, but I do tend to use a bit more force on the keys, and on these switches, I found that while this light, fluid tactility was quite pleasant, I really had to back off on the amount of force I was applying - it was almost too easy to type quickly, bottom out frequently, and make more mistakes. I think the 67g Zealios on the TADA68 were a better fit for me, force-wise.

Lessons learned

  • Clipping stabs is easy (with the flat cutters) and also a good idea for sound and feel - and again, a lot easier to do it before installation!
  • It’s worth taking the time to place keycaps and stabs before soldering - we discovered the spacebar stabs were in the wrong set of holes, and as annoying as it was to remove everything and start over, it would have been that much worse if we had soldered!
  • I’m thinking about writing a little tool to match keyboards with keysets. This was my first experience with non-standard key sizes (2x2.25u shift keys), and it would be quite nice to run a script that would, for example, take “Clueboard” and “SA Lime” as input and return: “yes!”
  • My initial impressions were that the TADA68 build was more solid than the Clueboard initially, but after unscrewing and realigning the top, acrylic, and bottom, it’s now feeling solid. Still nearly a pound lighter than the TADA, but depending on your viewpoint, that could be either good or bad!
  • 62g Zealios are very light…more so than the switch tester revealed, at least to my fingers.
  • The Tai-Hao Lavender ABS caps purchased with this kit were flimsy feeling and sounding - and the rough texture wasn’t great either. The SP SA Lime set was a significant upgrade in all aspects, which I suppose is to be expected given the price difference.

Specifications

case: Clueboard 66% V3/V4 (3mm frosted white spacer, thick feet)
PCB: Clueboard 2.9
switches: 62g Zealios
switch lubing: N/A
layout: Clueboard default
keycaps: SP SA Lime
stabilizers: GMK
stabilizer mods: clipped and lubed with Permatex Dielectric Grease
case dampening: N/A
HxWxD (without caps): 1.25"x12.9"x4.3"
HxWxD (with caps): 1.9"x12.9"x4.3"
assembled weight: 2.43 lb
4 Likes

Nice write ups, definitely enjoyable reads! I also feel you on some of those learnings. Clueboard did me nasty. Space bar alignment, arghhh!

2 Likes

Build #3: DZ60 in bamboo

So #3 started as an unabashed attempt to mimic this build, which is not mine, and which I think is lovely
(if you’re here, thanks for the inspiration, u/reywood):

Aside from the aesthetics, I was eager to keep pushing towards smaller board sizes, after generally positive experiences with the TADA68 and Clueboard. I haven’t been missing the numpad at all, which hasn’t been a surprise, and I haven’t really been missing the function keys either, which was a small surprise. I was also thinking it was about time to get my feet wet with QMK - it’s referenced all over the community, but for me, it was still a black box.

After tracking down the case (KBDfans) and the keyset (DSA Hana, from PMK), the next step was to decide on a board. I can’t say a huge amount of thought went into this; hey, a DZ60 will fit in that case, supports a bunch of layouts, and it does QMK, so let’s run with it. It will be fun to try flashing a board. Right. Right?

We start this build by clipping and lubing stabs. At this point, feeling a warm surge of newb confidence, I’m thinking I’ve got the stabilizer lubing dialed in. After all, in build #1 I was able to make it work post-assembly without desoldering everything, and in build #2, it worked well in the usual pre-assembly way, so what could possibly go wrong? I aggressively apply lube to all of the stabs, reassemble them, and mount them on the PCB, and with that task done, mounting and soldering switches is straightforward.

No issues observable in the keyboard tester, so I screw the PCB/plate assembly into the case, install the DSA Hana caps, and give the board a run. And initially, there are no problems.

But a few hours later, the backspace key begins to stick. After a press down, it doesn’t return to its normal position, and instead remains stuck down. It’s possible to pull it back into its normal position, which, coupled with the initial happy period before the problem’s appearance, makes me think the issue is not a purely mechanical one, but one of lube; namely, way too much inside the stabilizer stem housings. I attempted to use tweezers and a long wooden skewer to remove some of the excess lube, but this had little effect. What to do now? As I saw it, there were two options.

  1. Desolder the board, remove the stab, attempt a more thorough cleaning, reassemble the stab, mount it, and remount and resolder the switches.
  2. It’s the backspace key, so arguably we can get by without a stab. Pop the cap, destructively remove the over-lubed stab, extract the detritus, put the cap back on, and pretend nothing happened.

Remember that part in an earlier build where I referred to myself as a lazy newb? Yes, you’ve guessed correctly. Just think of it as extremely aggressive stab clipping…imagine how little noise it will make when it doesn’t exist! Please enjoy this post-build shot of the stabless life:

I was a bit worried that I was going to have to go with option #1 anyway, but as it turned out, the backspace key performance was and remains just fine, no wobble whatsoever. Perhaps at some point later on, the absence of that stab will make itself known and I’ll still have to desolder everything to install a new stab, but for now, so far so good.

This was my first experience with DSA caps, and I’m not sure what I think. Prior to trying a few different profiles, I would have guessed that I’d prefer flat, even profiles like DSA or XDA, but for this build, my experience has been the opposite. The DSA caps seem a little shallow, and something about that is throwing off my faux touch typing. Not badly, but it is noticeable. Visually, no complaints - I chose slightly different novelties to populate the board than the reference build, but it looks nice to my eye.

Finally, I started digging into the QMK tools to figure out how to flash the board to fully support the chosen layout. There was a bit of a learning curve here - it took me a while to figure out how to use qmkeyboard.cn to properly define the wiring, pins, and keymap for the DZ60; a while longer to figure out that I needed to install QMK Toolbox to do the flashing; and a little while longer after that to determine that I needed to install FLIP from www.microchip.com to get the correct Atmel drivers as a side effect; and a bit more time after that to work out how to use QMK Toolbox to flash the layout on a DZ60 R2 (with QMK Toolbox running, hold down space + ‘B’ before plugging in the keyboard - the toolbox will recognize the board if the Atmel drivers are present, and then you can load and flash the hex file you built with qmkeyboard.cn). None of this was overly painful, but it does strike me as a complicated process that could do with a bit more automation. Reserving judgment for a few more builds, though.

The bamboo case top that doubles as a hand rest is a nice visual touch, even if it is also flat, and hence tweaks my angle-loving sensibilities.

Lessons learned

  • It is in fact possible to apply too much lube to a stabilizer, as I found out with the backspace key. More builds will be needed to find the happy medium.
  • RShift needs to be at least 1.75u for my fingers - the 1u RShift is violating my muscle memory in a big way.
  • The small leftward shift of Row 4, to accommodate the unusual key layout, is also throwing me for a bit of a loop.
  • I didn’t fully internalize the fact that the bamboo case was not angled. I definitely prefer a slight angle. This is likely contributing to my initial impressions of DSA caps. With all that said, this seems like something easy enough to fix with strategic placement of adhesive rubber feet.
  • I had thought that the use of a bamboo case would significantly alter the typing sounds, but at the end of the day, they weren’t wildly different from those on the previous aluminum case builds. In retrospect, this could make sense - the mechanical energy is going through the cap, switch, plate/PCB, and mounting screws before it ever reaches the case, so any sonic impact the case might have would be attenuated. Or so I hypothesize. The finished bamboo and aluminum are also both hard, sonically reflective materials. Perhaps an unfinished, softer wood might yield different behavior?
  • Bamboo is substantially lighter as a case material, as expected, and the final build weight reflects that.
  • After a somewhat steep learning curve, qmkeyboard.cn + QMK Toolbox (+ Flip for Atmel drivers) seems to more or less work.
  • Again, 62g Zealios are just a bit too light, so it doesn’t appear that my impressions of the 62g weighting from build #2 were specific to that build.

Specifications

case: bamboo case w/ case top/wrist rest
PCB: DZ60 R2, aluminum Plate-A (2u Lshift) frame
LEDs: per-key white
switches: 62g Zealios
switch lubing: N/A
layout: R1-3 standard ANSI layout
	    R4 - 1x2u, 13x1u
	    R5 - 3x1.25u, 6.25u, 5x1u
(From the Plate-A DZ docs: R1-R3=default layout, R4=layout 7+8, R5=layout 15)
keycaps: DSA Hana
stabilizers: OEM
stabilizer mods: clipped and lubed with Permatex Dielectric Grease
case dampening: N/A
HxWxD (without caps): 0.75"x11.8"x4.25"
HxWxD (with caps): 1.55"x11.8"x4.25"
HxWxD (with case top): 1.75"x11.8"x4.25"
assembled weight: 1.17 lbs
assembled weight (including case top): 1.56 lbs
4 Likes

Thanks for the write-ups! Appreciate your efforts and contributions :slight_smile:

1 Like

Build #4: DZ60 1965

When I first saw the SA 1965 set, I fell in love with the colorway immediately - particularly the cream colored alphas and the old school orange. But something about the photo bothered me, and I couldn’t quite place it at first. Beatles? Fine. Les Paul back there in the corner? Check. Tweed amp? Sure. Keyboard case? Aluminum. Wait, what? There’s the problem. CNC milled aluminum is a few decades too early for the vibe this set intends to deliver. But what is the right backdrop for this set?

My first thought was a wooden case, to evoke the feeling of that old turntable your grandma used to use (arguably that was more 40’s and 50’s than 60’s, but just roll with me for a bit). Wood always brings warmth and a natural feel to the proceedings, whatever the proceedings are. Here, a more reddish wood would be just the thing to accent those orange caps.

But there’s something else. If you’ve ever played electric guitar or bass through an old tube amplifier, cranked up, then you can’t help but notice that warm orange glow radiating from the filaments. Vintage, nostalgia, whatever you want to call it - to me, that oversaturated tube glow means a good time. It seems to me that with underglow and the correct LEDs, we ought to be able bring that good time vibe to this board. And with the DZ60, we have the option of a brass plate, which is right on point for the colorway. Perfect!

In build #3, I learned that the non-standard layout bugged me, so for this one, we’re going back to the standard ANSI layout. That means a 2.25u Lshift, which for the DZ60 R2 means plate B. We’re also going to go back to 67g Zealios, after a couple of tries with the 62s - for the moment, that’s where my feelios live.

This build went pretty smoothly from stab mods through switch mounting to soldering, up until the point I did the per-key orange LEDs. I thought I had seated all of the LEDs in the switches, and so I tested the PCB, mounted the plate/PCB assembly in the case, and began installing keycaps, at which point I noticed the problem. One LED had slipped out of its notch in the switch, and was about 0.2" higher than it should have been, just enough to prevent the keycap from fitting properly. Unfortunately, at this stage of the build, there was no choice but to remove the plate/PCB from the board, desolder the LED, remount it, resolder, and remount the plate/PCB in the case. So it goes.

My first impressions were pretty positive - as I’ve noticed in my previous builds, those SA caps just yield a nice satisfying sound, and the look of this build is basically what I was after. But as I work with the board for a while, I notice some pinging. At first I wanted to blame the stabs, which are rapidly becoming my least favorite part of every build, until I realized that the sound could also be created with the alphas. Since it occurs on bottom-out, I assume it’s originating from the brass plate, and while I’m not certain that it isn’t switch spring noise, I would have thought that noise would be audible before bottom-out. So, time to explore case dampening.

A sorbothane interlude

Sorbothane! First time working with this material, and I’m a little unclear on exactly how to use it in a build, but as with all of my other builds so far, it’s about learning by doing. I begin by cutting a piece of cardboard in the shape and dimensions of the bottom of the wood case, to use as a template for cutting the sorbothane sheet. I originally thought I would use a drill to cut holes in the sheet for clearance for the PCB screw mounts, but due to the squishy plasticity of sorbothane, that was about as useful as a urinal in a convent. On to plan B: cut rectangular strips in from the edge to the screw mounts, and then cut enough of each strip away to leave room for the mount, manually putting the strip back in place, kind of like a black Mondrian jigsaw puzzle.
Not pretty, but maybe enough to get the job done?

As it turns out, not really, and I think that’s because I didn’t entirely understand the point of using sorbothane. If you read up on sorbothane, you find that successful installs in industrial machining applications and audio-sensitive environments revolve around allowing the sorbothane to make contact with the noise-making (vibrating) element and absorb its vibrations, essentially converting that mechanical energy to a very small amount of heat, rather than converting it to vibrations in the air.

My sorbothane sheets were 0.1" thick, but the distance from the bottom of this wooden case to the underside of the mounted PCB was roughly twice that, so no direct contact with the sorbothane was being made. If the handwaving analysis above is correct, this means that little mechanical energy from the switches/plate/PCB is being absorbed by the sheet, and hence very little sound is being attenuated. What to try now?

  • One strategy would be to try some other material. But I didn’t want to do that; sorbothane is dense, and a nice side effect of putting a sheet in the case is that the whole board now has a pleasant heft.
  • A second strategy would be to put in another layer of sorbothane, stacking until contact is made with the underside of the PCB. While this is doable, it will start to get expensive fairly rapidly.
  • A third option would be to cut small squares from the leftovers of the sheet I used for this build, and then put these little squares between the full sorbothane sheet at the bottom of the case and the PCB, with the idea of giving those noise-making vibrations a way to disperse through these squares into the sheet underneath.

I gave option #3 a go, and while the difference wasn’t huge, this did actually have some effect on the sound; while the pinging is still noticeable, I had to hold the board up to my ear while pressing keys to detect it clearly. More experimentation is needed, but I feel that there has to be a better way to deploy this material cost-effectively. I’m particularly intrigued by the idea of putting a laser-cut sheet of sorbothane between the
PCB and plate - again, if the analysis above pans out, then this should be a very effective way to squash the high-frequency vibrational transients (i.e., pings). Very interested to see where this IC/GB goes…

Lessons learned

  • Best practices: always double-check LED positioning before soldering!
  • I had DSA Penumbra on this board for a while before SA 1965 arrived, and once again, SA caps yield a much more satisfying sound than DSA to my ears. Give me the thunk.
  • The SA 1965 spacebar was slipping off of the stabilizer stems, but the solution turned out to be easy: place a tiny little square of scotch tape on the top of each stab stem, then push spacebar down into place. That little bit of tape provides enough material between the stab stem and the keycap to keep it firmly together.
  • Sorbothane needs more experimentation to determine how to best deploy it for sonic reduction.
  • I do like the additional weight that the sorbothane is adding. Heft is good.

And oh, yes, crank up your tubes.

Specifications

case: rosewood 60% case
PCB: DZ60 R2, brass Plate-B (2.25u Lshift)
LEDs: per-key orange
switches: R11 67g Zealios
switch lubing: N/A
layout: ANSI
keycaps: SA 1965
stabilizers: OEM
stabilizer mods: clipped and lubed with Permatex Dielectric Grease
case dampening: Sorbothane 0.1" sheet, 50 duro;
    1 full layer at base, 8 small squares between that layer and PCB
HxWxD (without caps): 1.25"x12"x4.5"
HxWxD (with caps): 2"x12"x4.5"
assembled weight (board only): 2.15 lbs
assembled weight (board + wrist rest): 2.90 lbs
5 Likes

I wonder what’ll be next. UT47? Minivan?

Can’t wait to find out :smile:

2 Likes

Glad you’re enjoying it. I’m having a good time going back through my notes and reconstructing the builds. Rest assured there will be more, although perhaps with a slight delay; doing a bit of retooling and workspace reorganization as we speak…

Great build write up! It’d be awesome to see more of these :slight_smile:

1 Like

Build #5: Preonic

I’ve fallen pretty hard into the mech keyboard gravity well, and once I decided I was willfully going to go past the event horizon on tooling and workspace organization, it was just a matter of time before the builds came to a brief pause and another round of workspace renovation ensued.

Now we’re talking!

To kick off work in the new space, I wanted to tackle an ortholinear board. I was fully expecting to dislike the completed result - I have decades of investment in muscle memory for staggered layout QWERTY, and while I don’t have formal touch typing training, my self-taught kind-of-like-touch-typing-but-with-extra-fails gets the job done. But all the same, the layout still intrigued me.

For this first foray into ortholinear, I picked up a Preonic kit. The Preonic seemed like a least-commitment approach to ortholinear, and the kit looked like a relatively straightforward build. In addition, after playing with the components a bit, I realized this would be a great testing ground for some sound dampening experiments.
The Preonic case from this kit was a thin aluminum case, which gave off a ringing sound when tapped with a knuckle. Whether typing on the complete build would yield any ringing sounds was an open question, but I wanted to know if we could nip those sounds in the bud before it even got to that point.

The first step in this Preonic build was installing eight brass spacers on the PCB, to allow it to sit above the bottom of the case, and provide mount points for flathead screws to attach through the case underside. The spacers were only very slightly wider than the diameter of the PCB holes, which made it a little tricky to install them so that they were vertical, instead of leaning slightly into the hole and slanting. Here’s a close-up of me getting it a little wrong on the first try (look at the brass spacer in the foreground).

Next up, the stabilizer - just a 2u Cherry stab for the space bar. The instructions indicated that this was optional, but I needed practice lubing stabs. This time around, I used Permatex Dielectric Grease on the plastic/metal contact points, but I used teflon grease on the plastic/plastic contacts. I didn’t like the teflon grease; it didn’t seem to do much in terms of eliminating the scratchy feel of this stab. I ended up redoing the stab lightly with SuperLube, which took care of the scratch.

Dampening between the plate and PCB

In Build #4, I mentioned my desire to try putting Sorbothane between the plate and PCB, as a way to significantly attenuate plate pinging. I haven’t found a good way to make fine, detailed, precise cuts in Sorbothane due to its stickiness and squishiness, but a decent pair of non-stick scissors at least allow for longer relatively straight cuts. So, if we can keep strips of Sorbothane thin enough, we could lay them on sections of the plate between screw holes, like this:

While that might absorb a modest amount of plate vibration, it would be ideal if the Sorbothane could make contact with PCB. With just this one strip, we don’t make contact at all. This side shot of the plate/PCB assembly shows the gap between the Sorbothane strips and the PCB:

What if we stack layers of Sorbothane here to force contact? Well, at least with the 50 duro 0.1" thick Sorbothane I was using, thickness matters. I tried a little crosshatch like your grandma’s apple pie, if grandma had been hitting the hooch pretty hard before rolling that dough…

…and while that was only a little thicker than the usual space between the plate and PCB, that was still more than enough to prevent the plate from seating properly. It probably could have been clamped down and soldered that way, and the solder joints might have held, but I didn’t want to risk it. So, I popped the plate off, and went back to just the single strips. For plate/sorbothane/PCB sandwiches, the 0.188" sheets that sometimes appear on Amazon might be a better choice, although I’m not sure whether that’s thin enough to avoid the same problem. Also worth reiterating that these were 50 duro sheets, which is the only duro rating I have experience with (but soon I will try a softer 30 duro, thanks to @manofinterests, and you can too if you hurry to the GB…)

Dampening between the PCB and case

Back to the case-dampening portion of the program. The height of the brass spacers for the PCB are only slightly thicker than 0.1", so dropping a rectangle of Sorbothane between the spacers seemed reasonable. I installed and soldered switches in the usual way, and after testing the switches, I seated the board in the case.
The PCB was definitely making contact with the Sorbothane - I was able to (carefully) invert the case and the Sorbothane’s stickiness held the plate/PCB assembly in place. Thumping the case with my knuckle as before, I received a much duller, bassy thump. It’s all about that bass.

In the event you were waiting to hear about my ascendance to the ortho promised land - well, you’re going to be waiting a while. Please make yourself comfortable. Of course I haven’t invested anything like the kind of time that would be necessary to learn this layout, so any commentary at this point has questionable utility at best. But, yes, it was painful :laughing:. I kind of want to turn the Preonic into a super-size macro pad, if one of my kids doesn’t beat me to it first.

Tried 65g Zealios in a build for the first time here, and they are almost a contradiction to my fingers - the tactile bump is there on every keypress, but somehow it is so shallow that I feel like I’m bottoming out on every keypress as well. Also not sure how I feel about XDA; going in, I would have thought I’d be more or less at home on this profile, but the lack of sculpting of any kind seems to be throwing me off a bit. Of course, that could just be because the I is where the O is supposed to be. Kill me now.

Finally, the sound is not bad on this board - not much in the way of high-frequency pinging, although if you hold the board to your ear and type, you can hear a pinging. But I’m not at all sure what I’m hearing is the board any more; it may well be the switch springs. Switch lubing, I hear your siren song. I know you await me.

Lessons learned

  • 0.031" solder is good for switch pads - 0.020" is good for LED pads. If you do LEDs, it’s worth having
    both on hand. I didn’t discuss this before, but yes.
  • Given that other people have had good results with teflon lube for plastic-to-plastic contact within stabilizers, I need to explore my poor result a bit further, most likely by trying again with a different stab.
  • At least for 50 duro Sorbothane, thickness matters - we want contact, but just enough to absorb vibration, and not so much that component fit starts to become compromised by that dense rubbery Sorbothane pushing back.
  • I like the sound change that Sorbothane dampening brings - lower pitched, and a bit more full bodied.
  • 65g Zealios might be the tactile switch for the linear lovers in your home. Can’t imagine this is a surprise to anyone here, but it’s always nice to confirm received wisdom.
  • Coming from staggered layouts, ortholinear requires commitment. It’s not you, babe, it’s me. No, don’t cry. Have an orange. Keeps the scurvy away.

Specifications

case: Preonic orange aluminum
PCB: Preonic R2
LEDs: per-key white
switches: R11 65g Zealios
switch lubing: N/A
layout: default Preonic
keycaps: XDA Canvas
stabilizer: OEM
stabilizer mods: clipped and lubed with SuperLube Synthetic Grease; silicone pads for band-aid mod
plate dampening: 0.1" 50 duro Sorbothane strips on plate between screw holes
case dampening: 0.1" 50 duro Sorbothane sheet in case
HxWxD (without caps): 0.69"x9.31"x4.19"
HxWxD (with caps): 1.0"x9.31"x4.19"
assembled weight: 1.38 lbs
7 Likes