My first tear down, and roadblocks

Hi everyone! I wanted to share my current progress exploring with my first and only board so far. My goal is to explore more switches and key sets. I’m more interested in looks and feel than sound. (Altho that could change as I learn more). I’d like to collect a few other boards too, but that’s seeming much harder to do. I did enter my first GB recently. I’ll see it next year, maybe.

Just recently got a set of gateron blacks, lubed and filmed from someone on Twitter. My plan was to change my switches out and see how they felt. This would be my first time doing that so I was excited. I so new, I don’t know what I’m missing yet!

What I’m working with:
Prebuilt KBD75v2 (prebuilt because it’s my first)
Brass plate and weight
Cherry red switches (I believe they were lubed with the build service)
SA laser keys

:construction: 
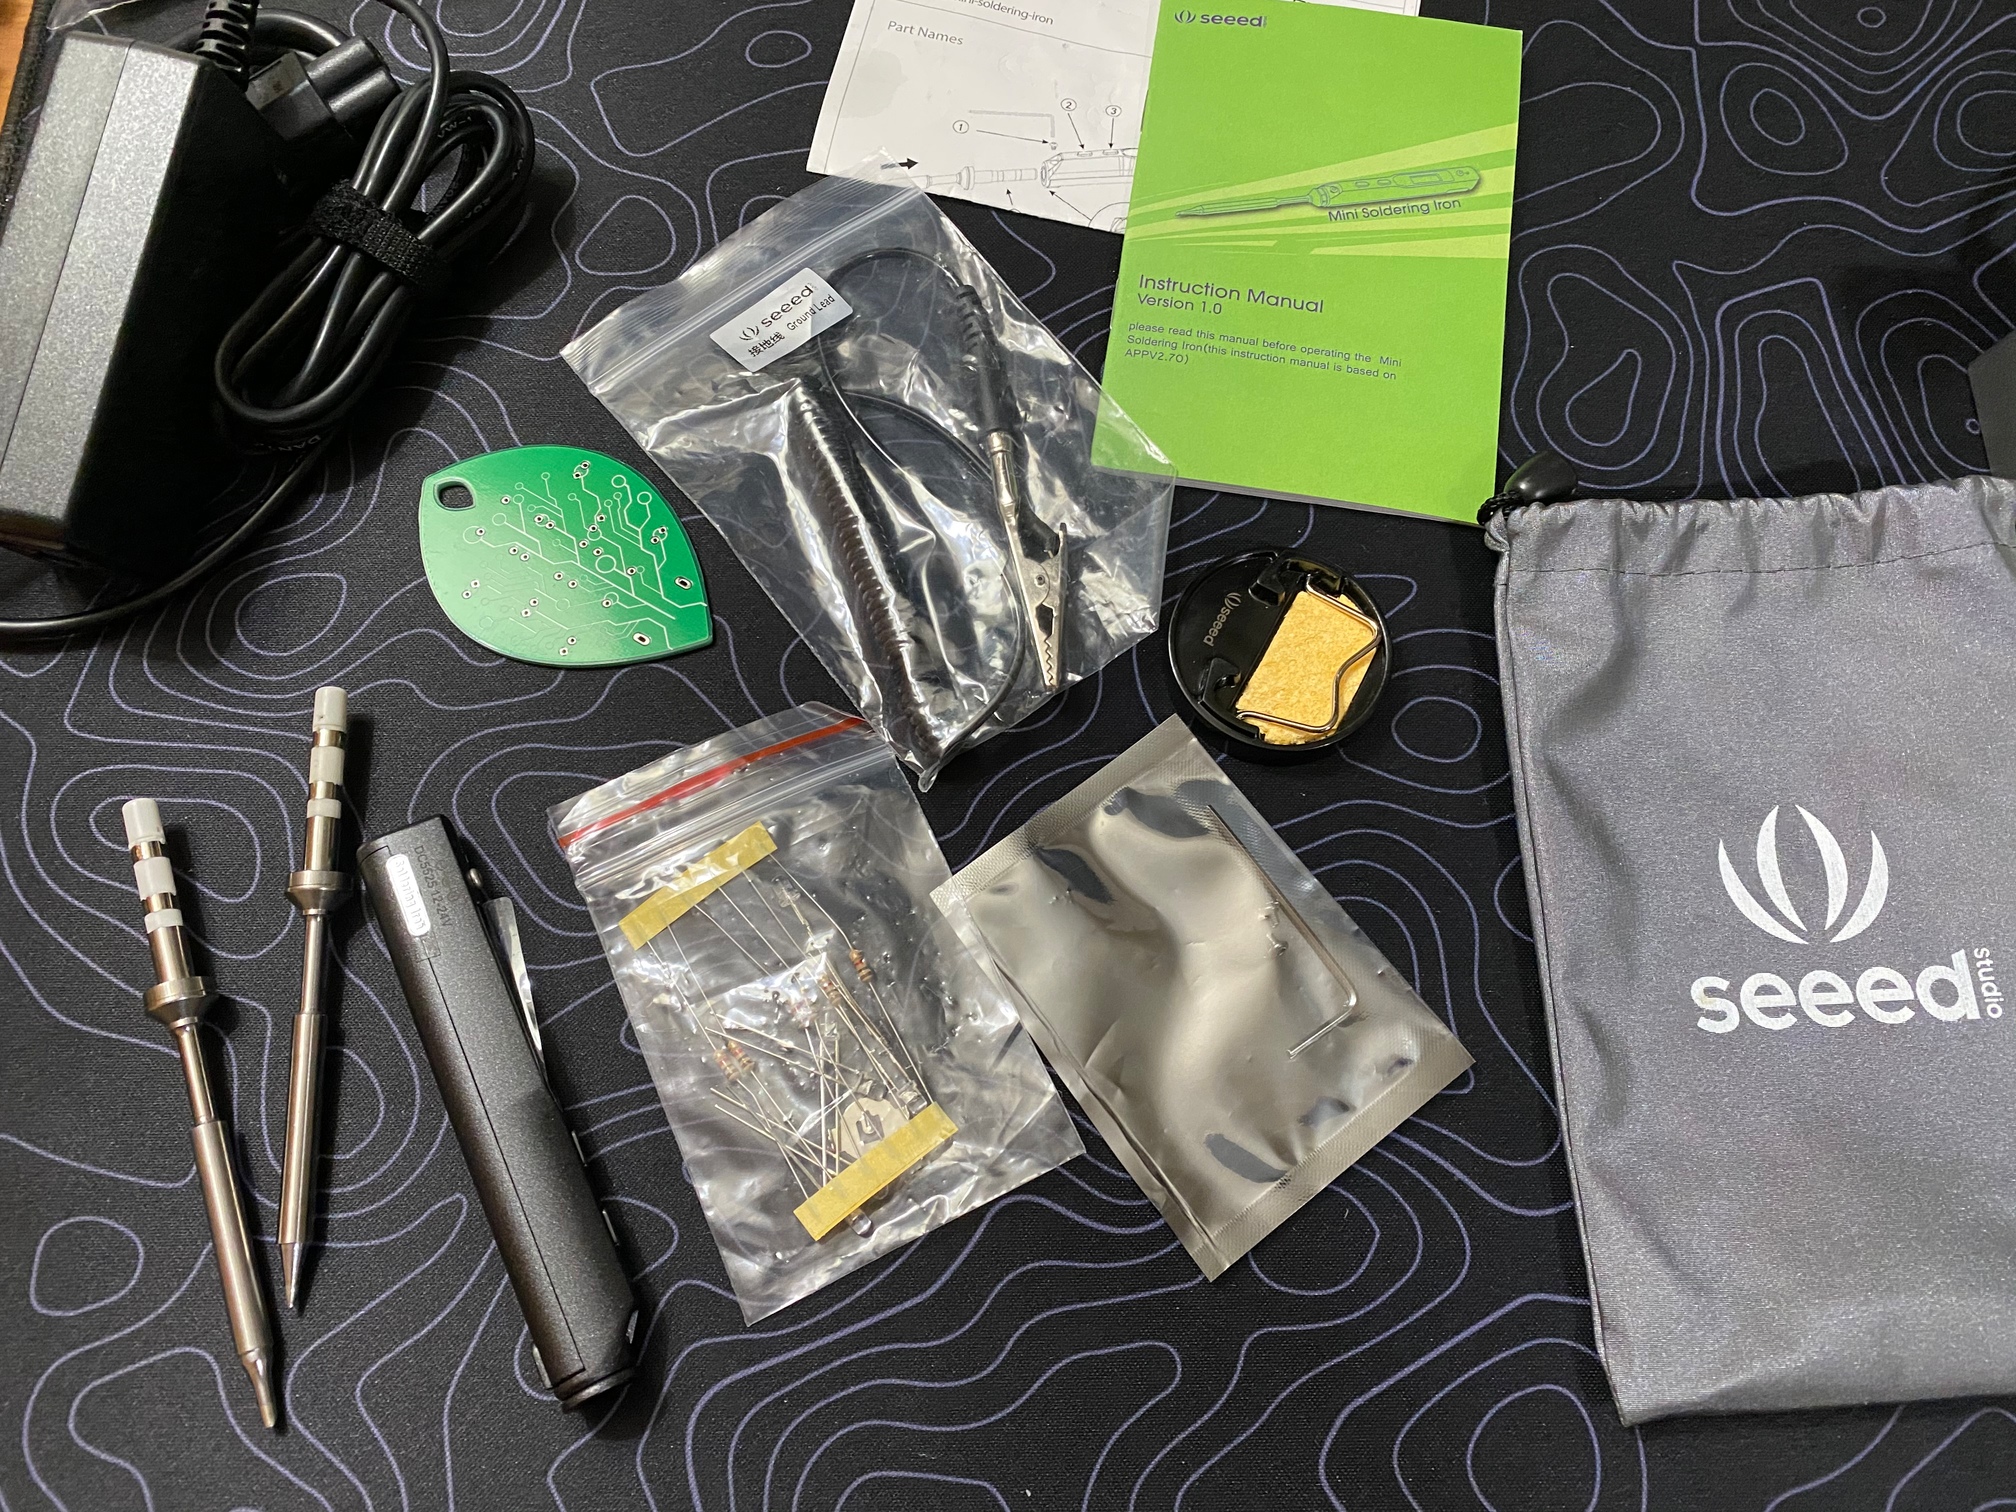
First road block: no tools. I didn’t have a switch puller, or precision screwdrivers. Got those ordered…

(A week or two later) I have tools in now, and got to take my board apart for the first time tonight. It was cool to see how it all fit together.

:construction: 
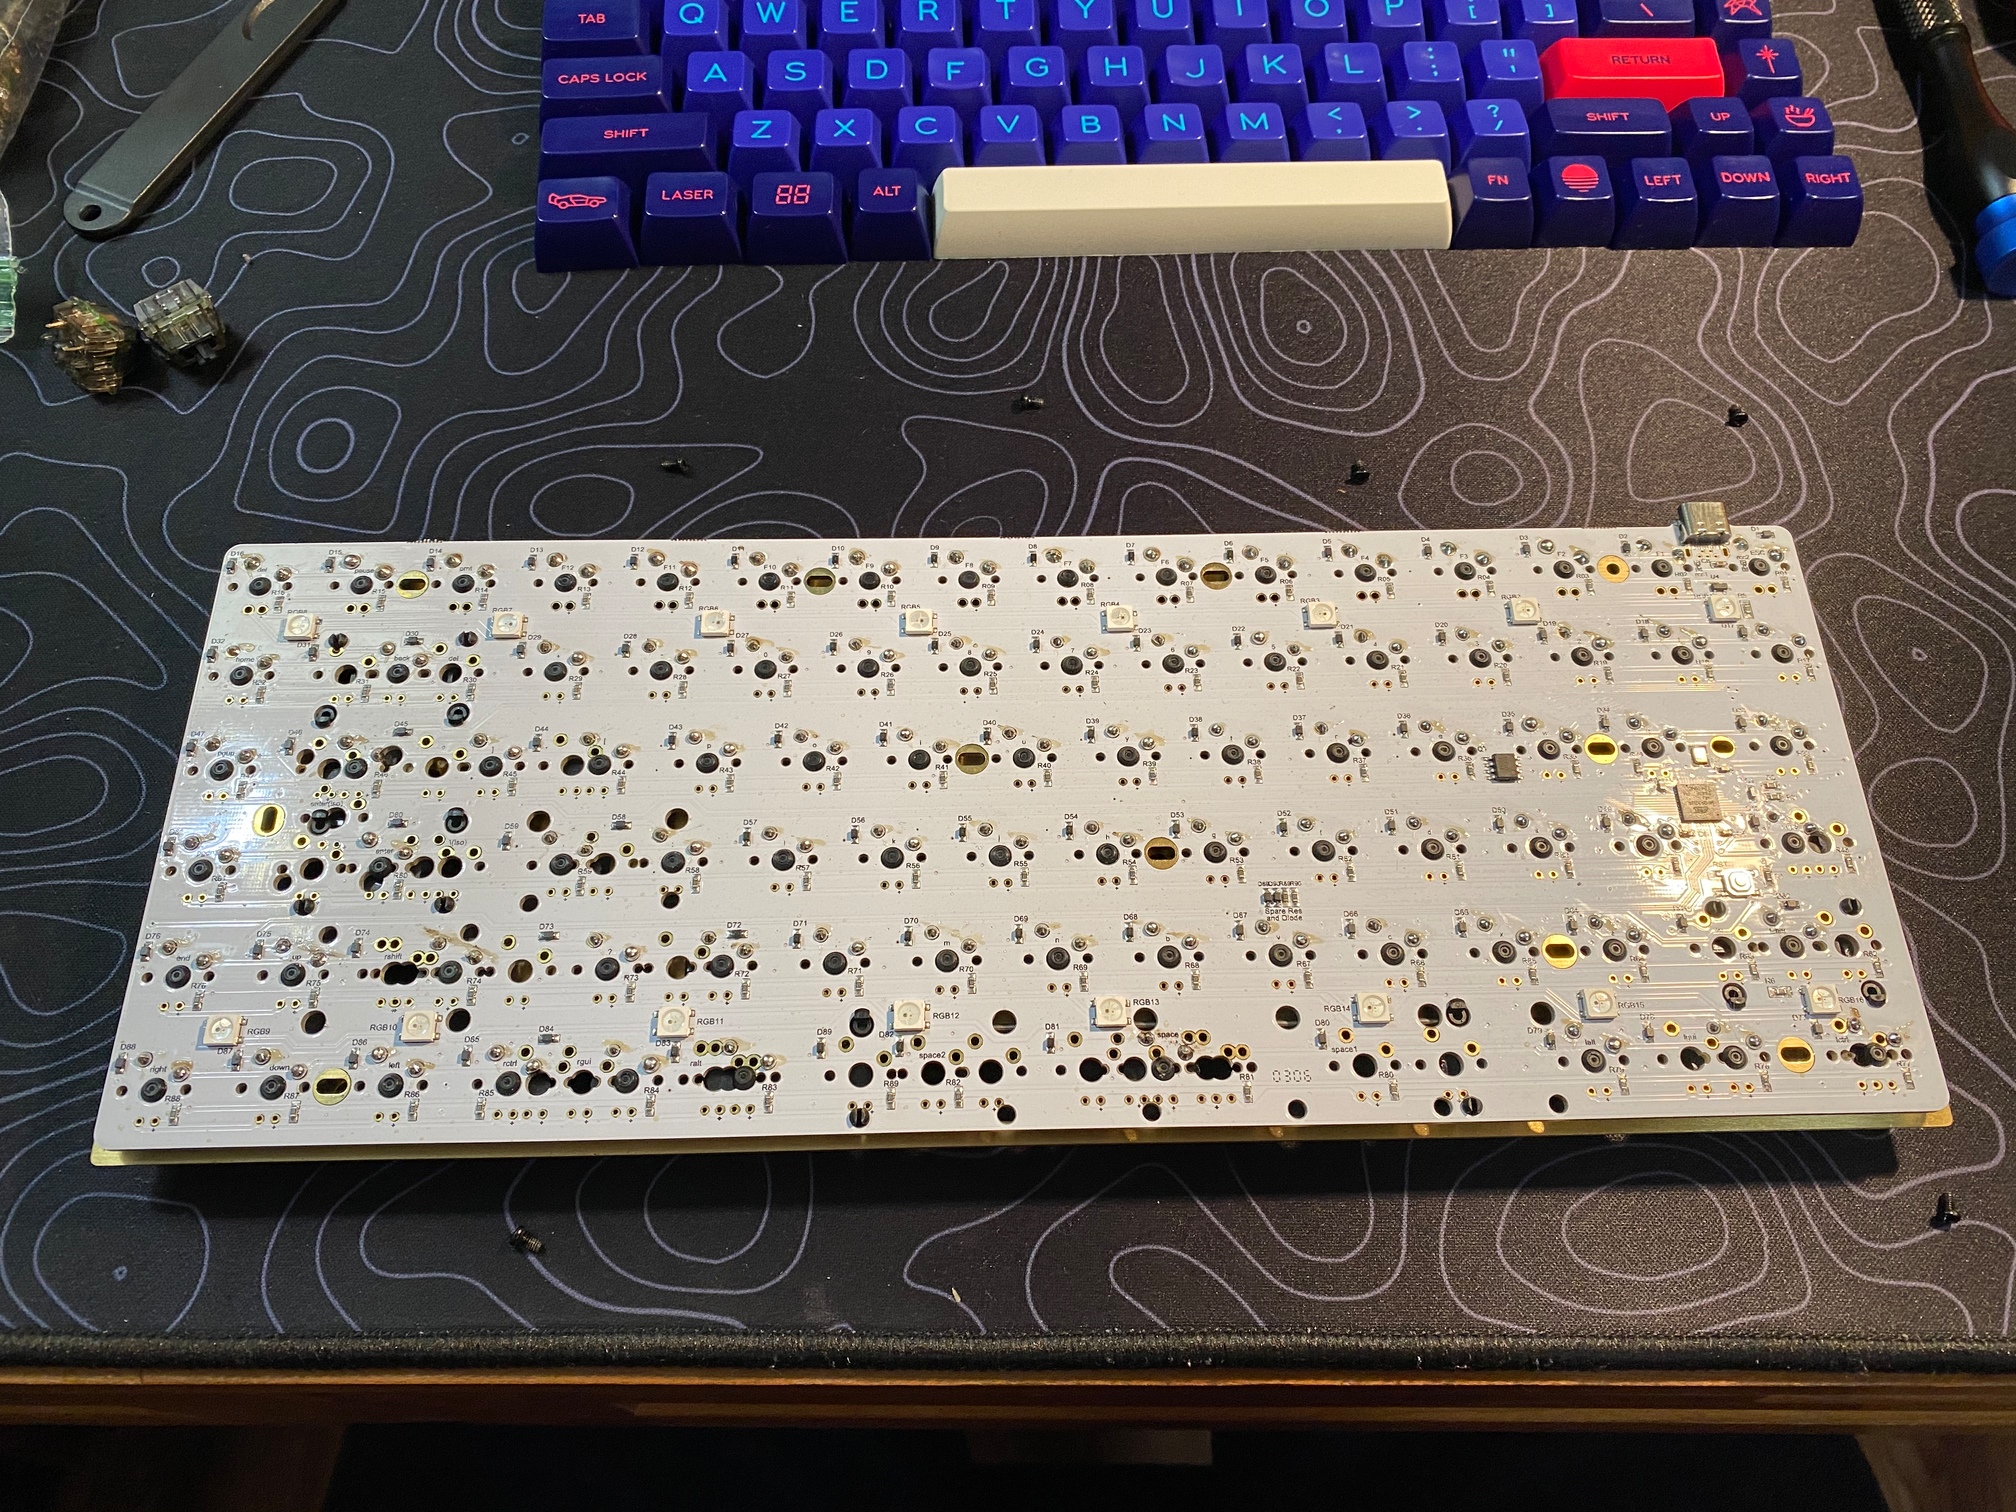
Second roadblock: discovered that my switches are soldered on. Yes… I should have known that, I know… but it’s my first board. I didn’t really know what I was ordering. Lol cut me some slack.

So looks like I won’t be trying out new switches for a minute. I guess I either need to order a solder sucker and learn how to desolder and solder next. Or my other option is to find a hot swap pcb to put in my board, that I could switch out parts on? Or order a whole other keyboard that I can play with switches on?

Here’s some pics if anyone likes to see.

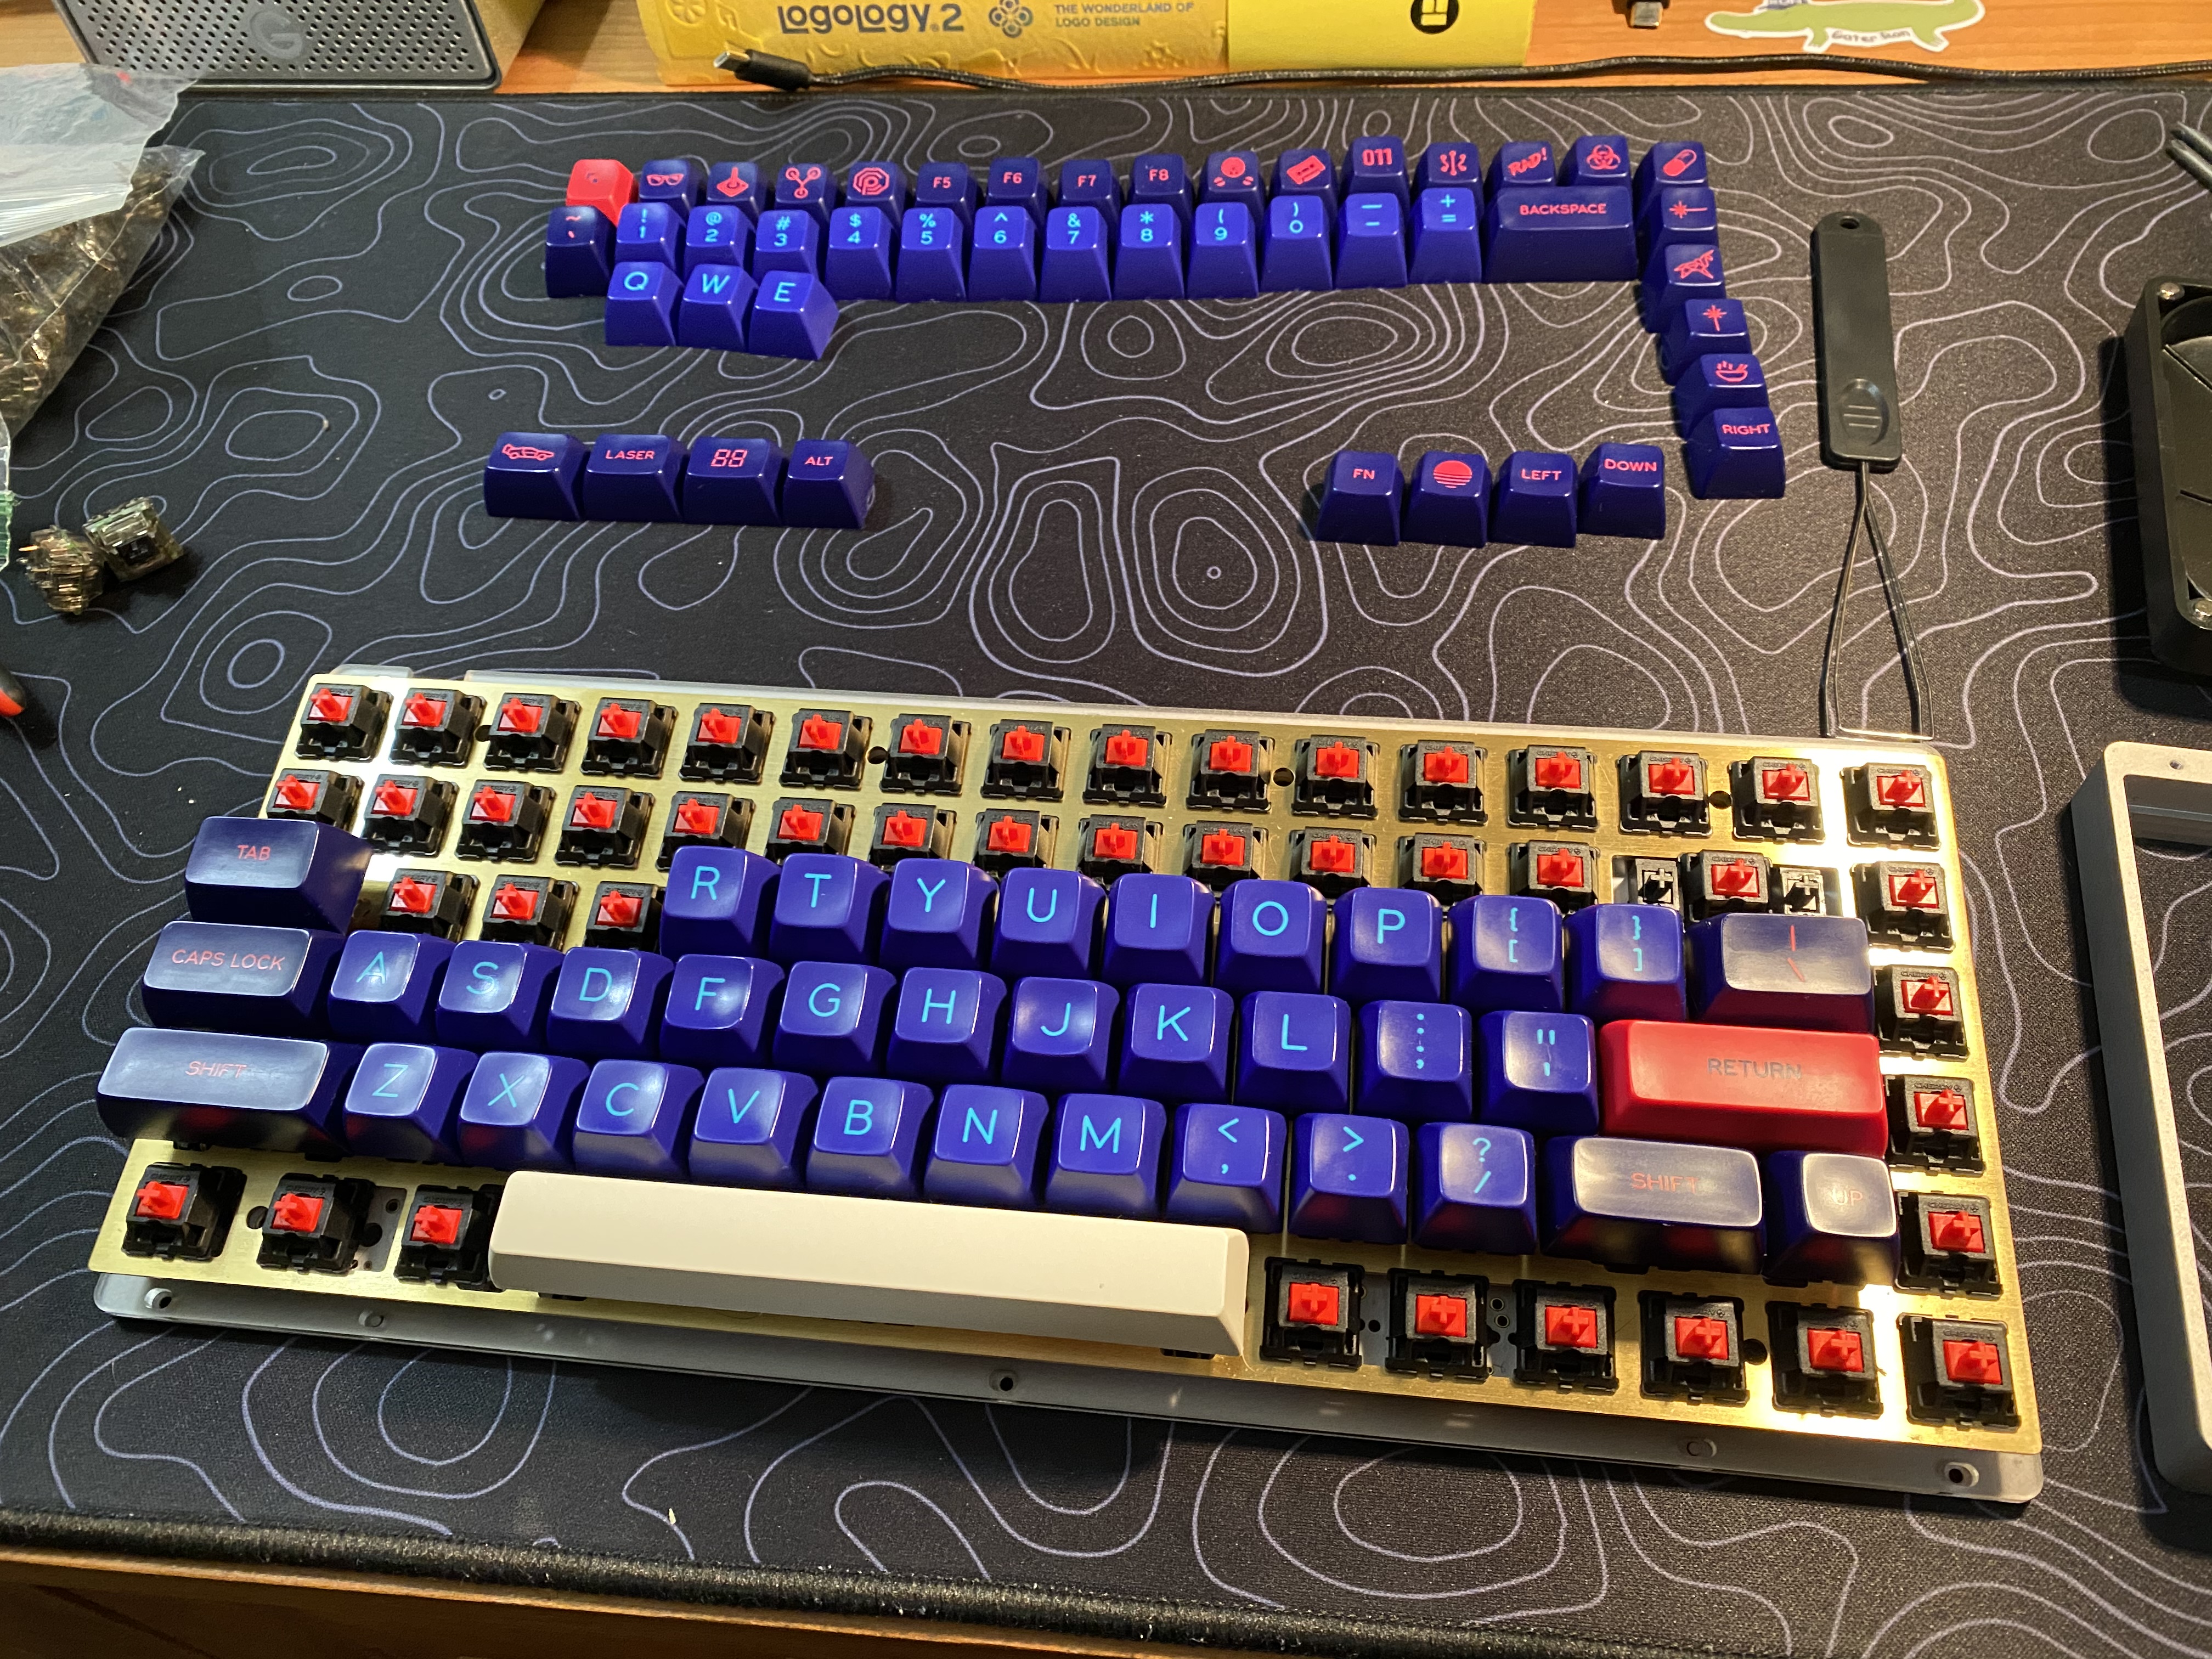
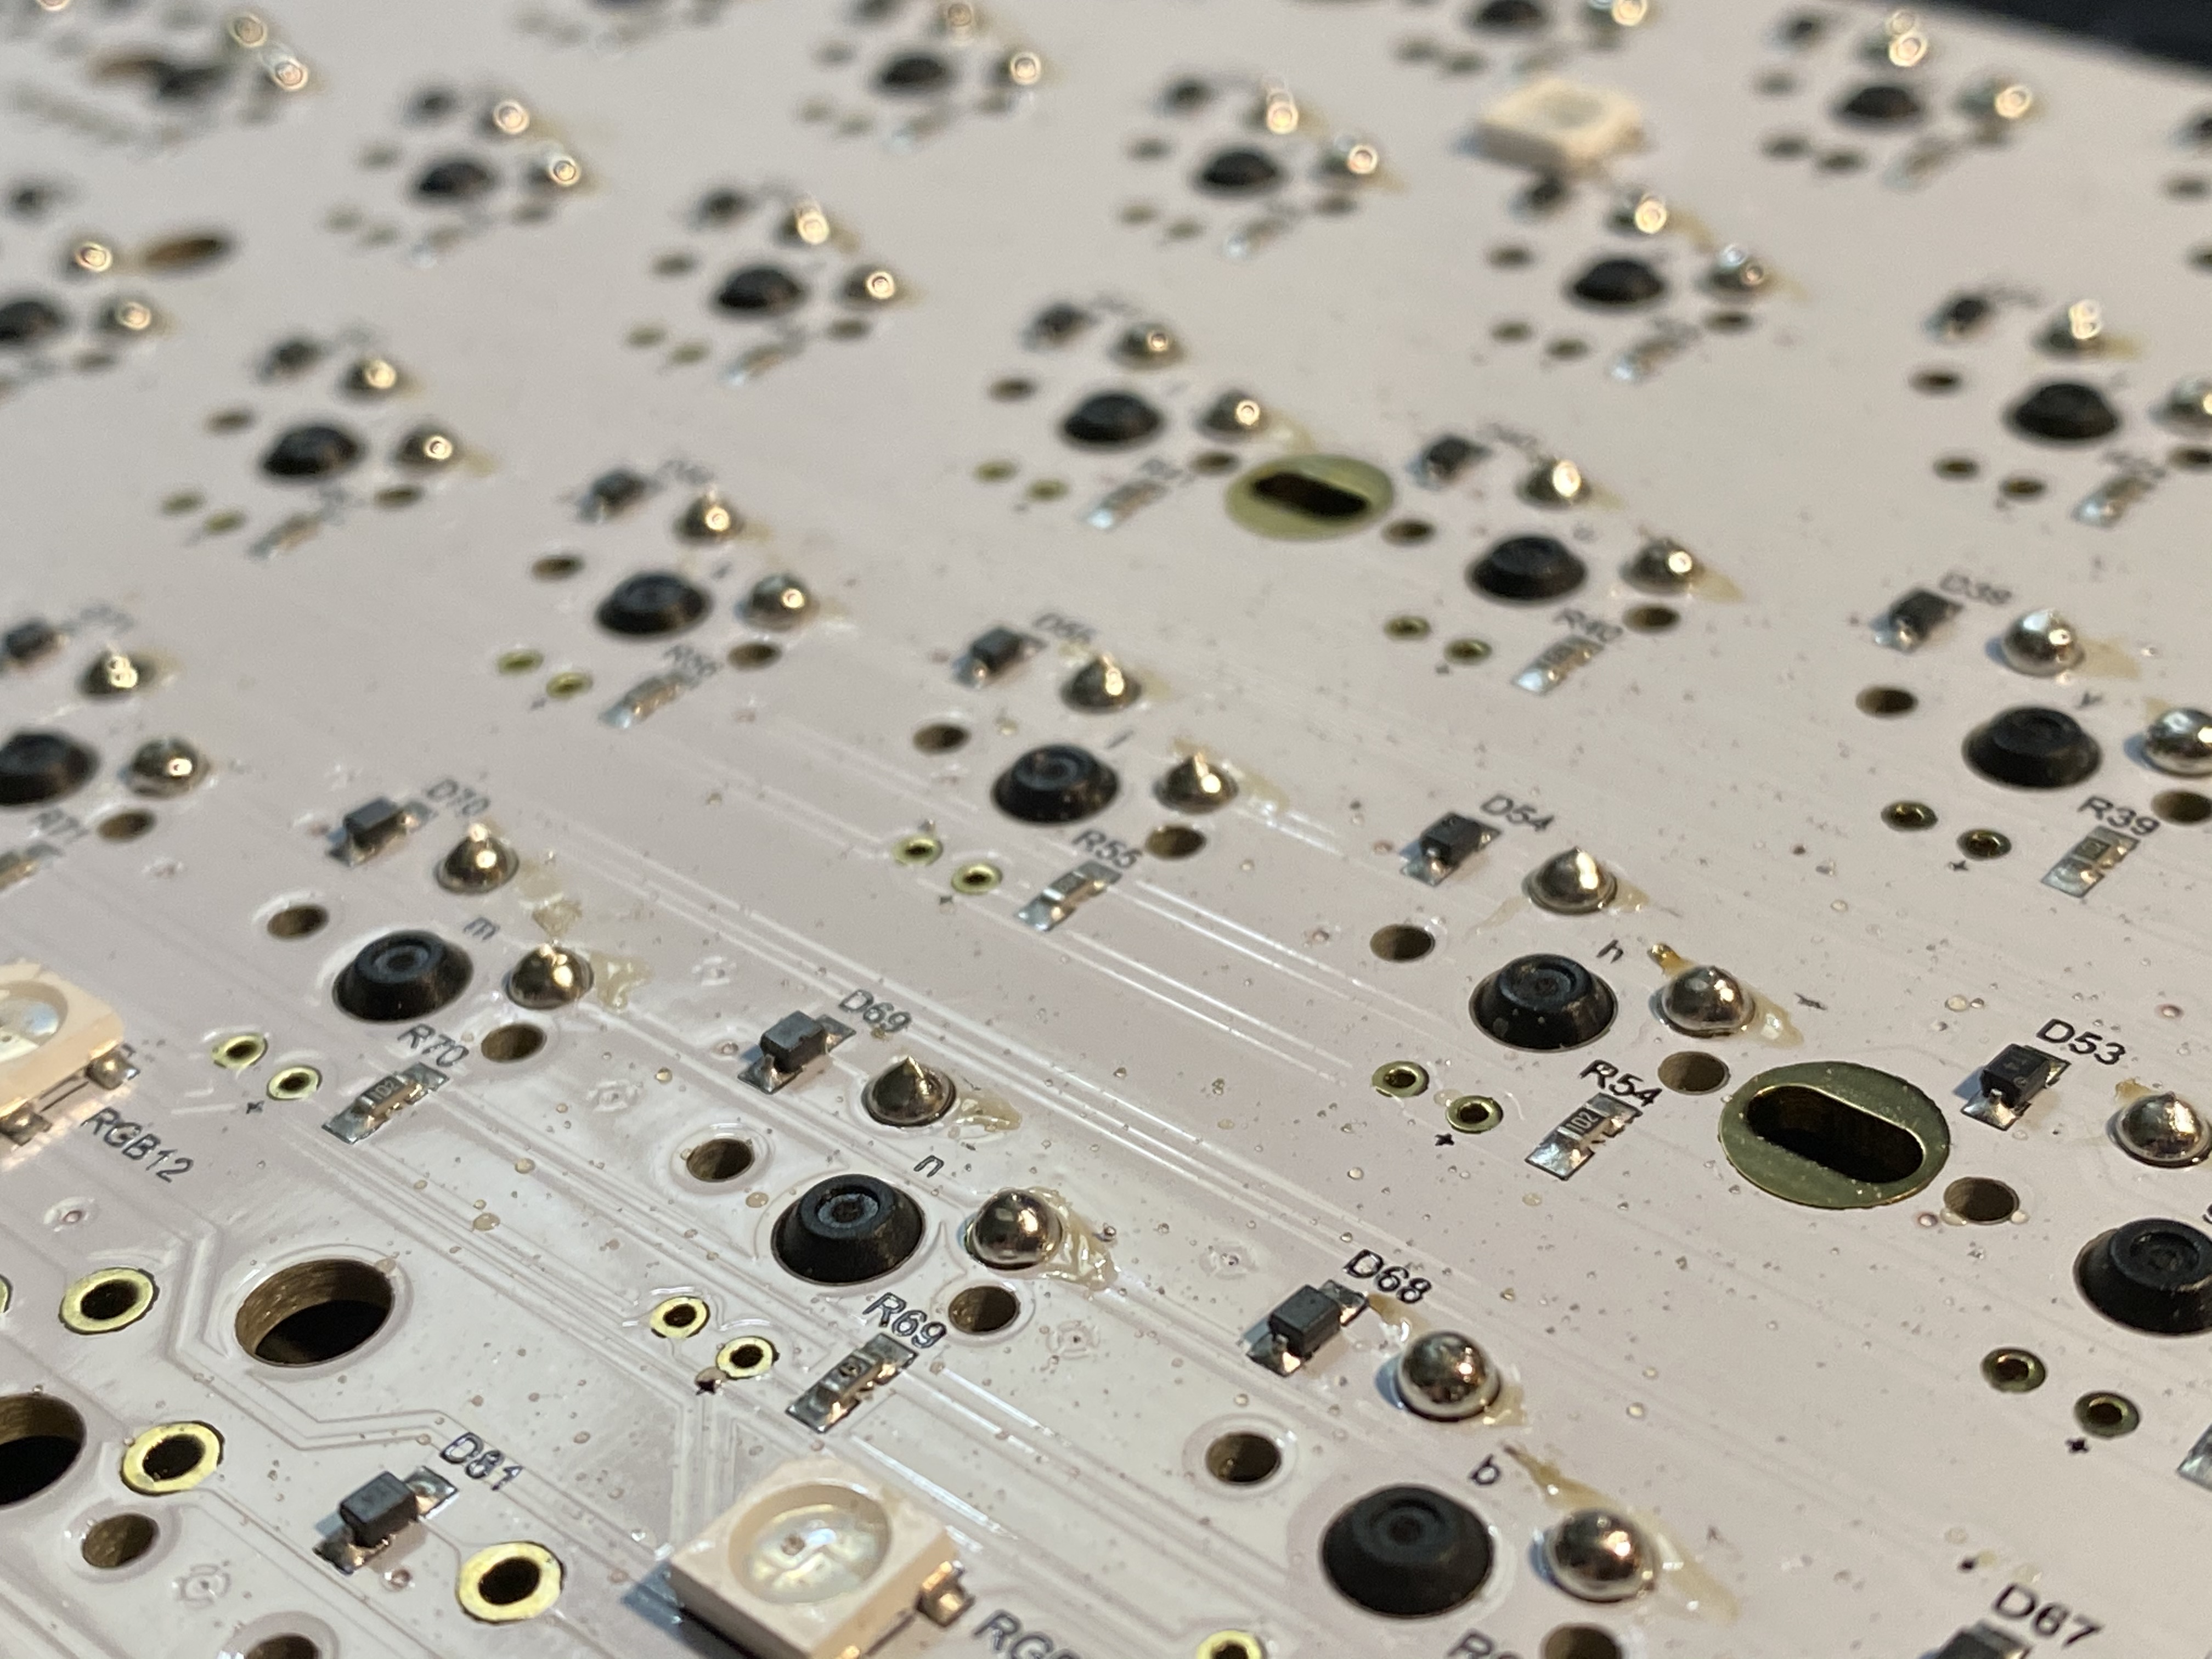
Got the case and switches off. Do these come out or not?

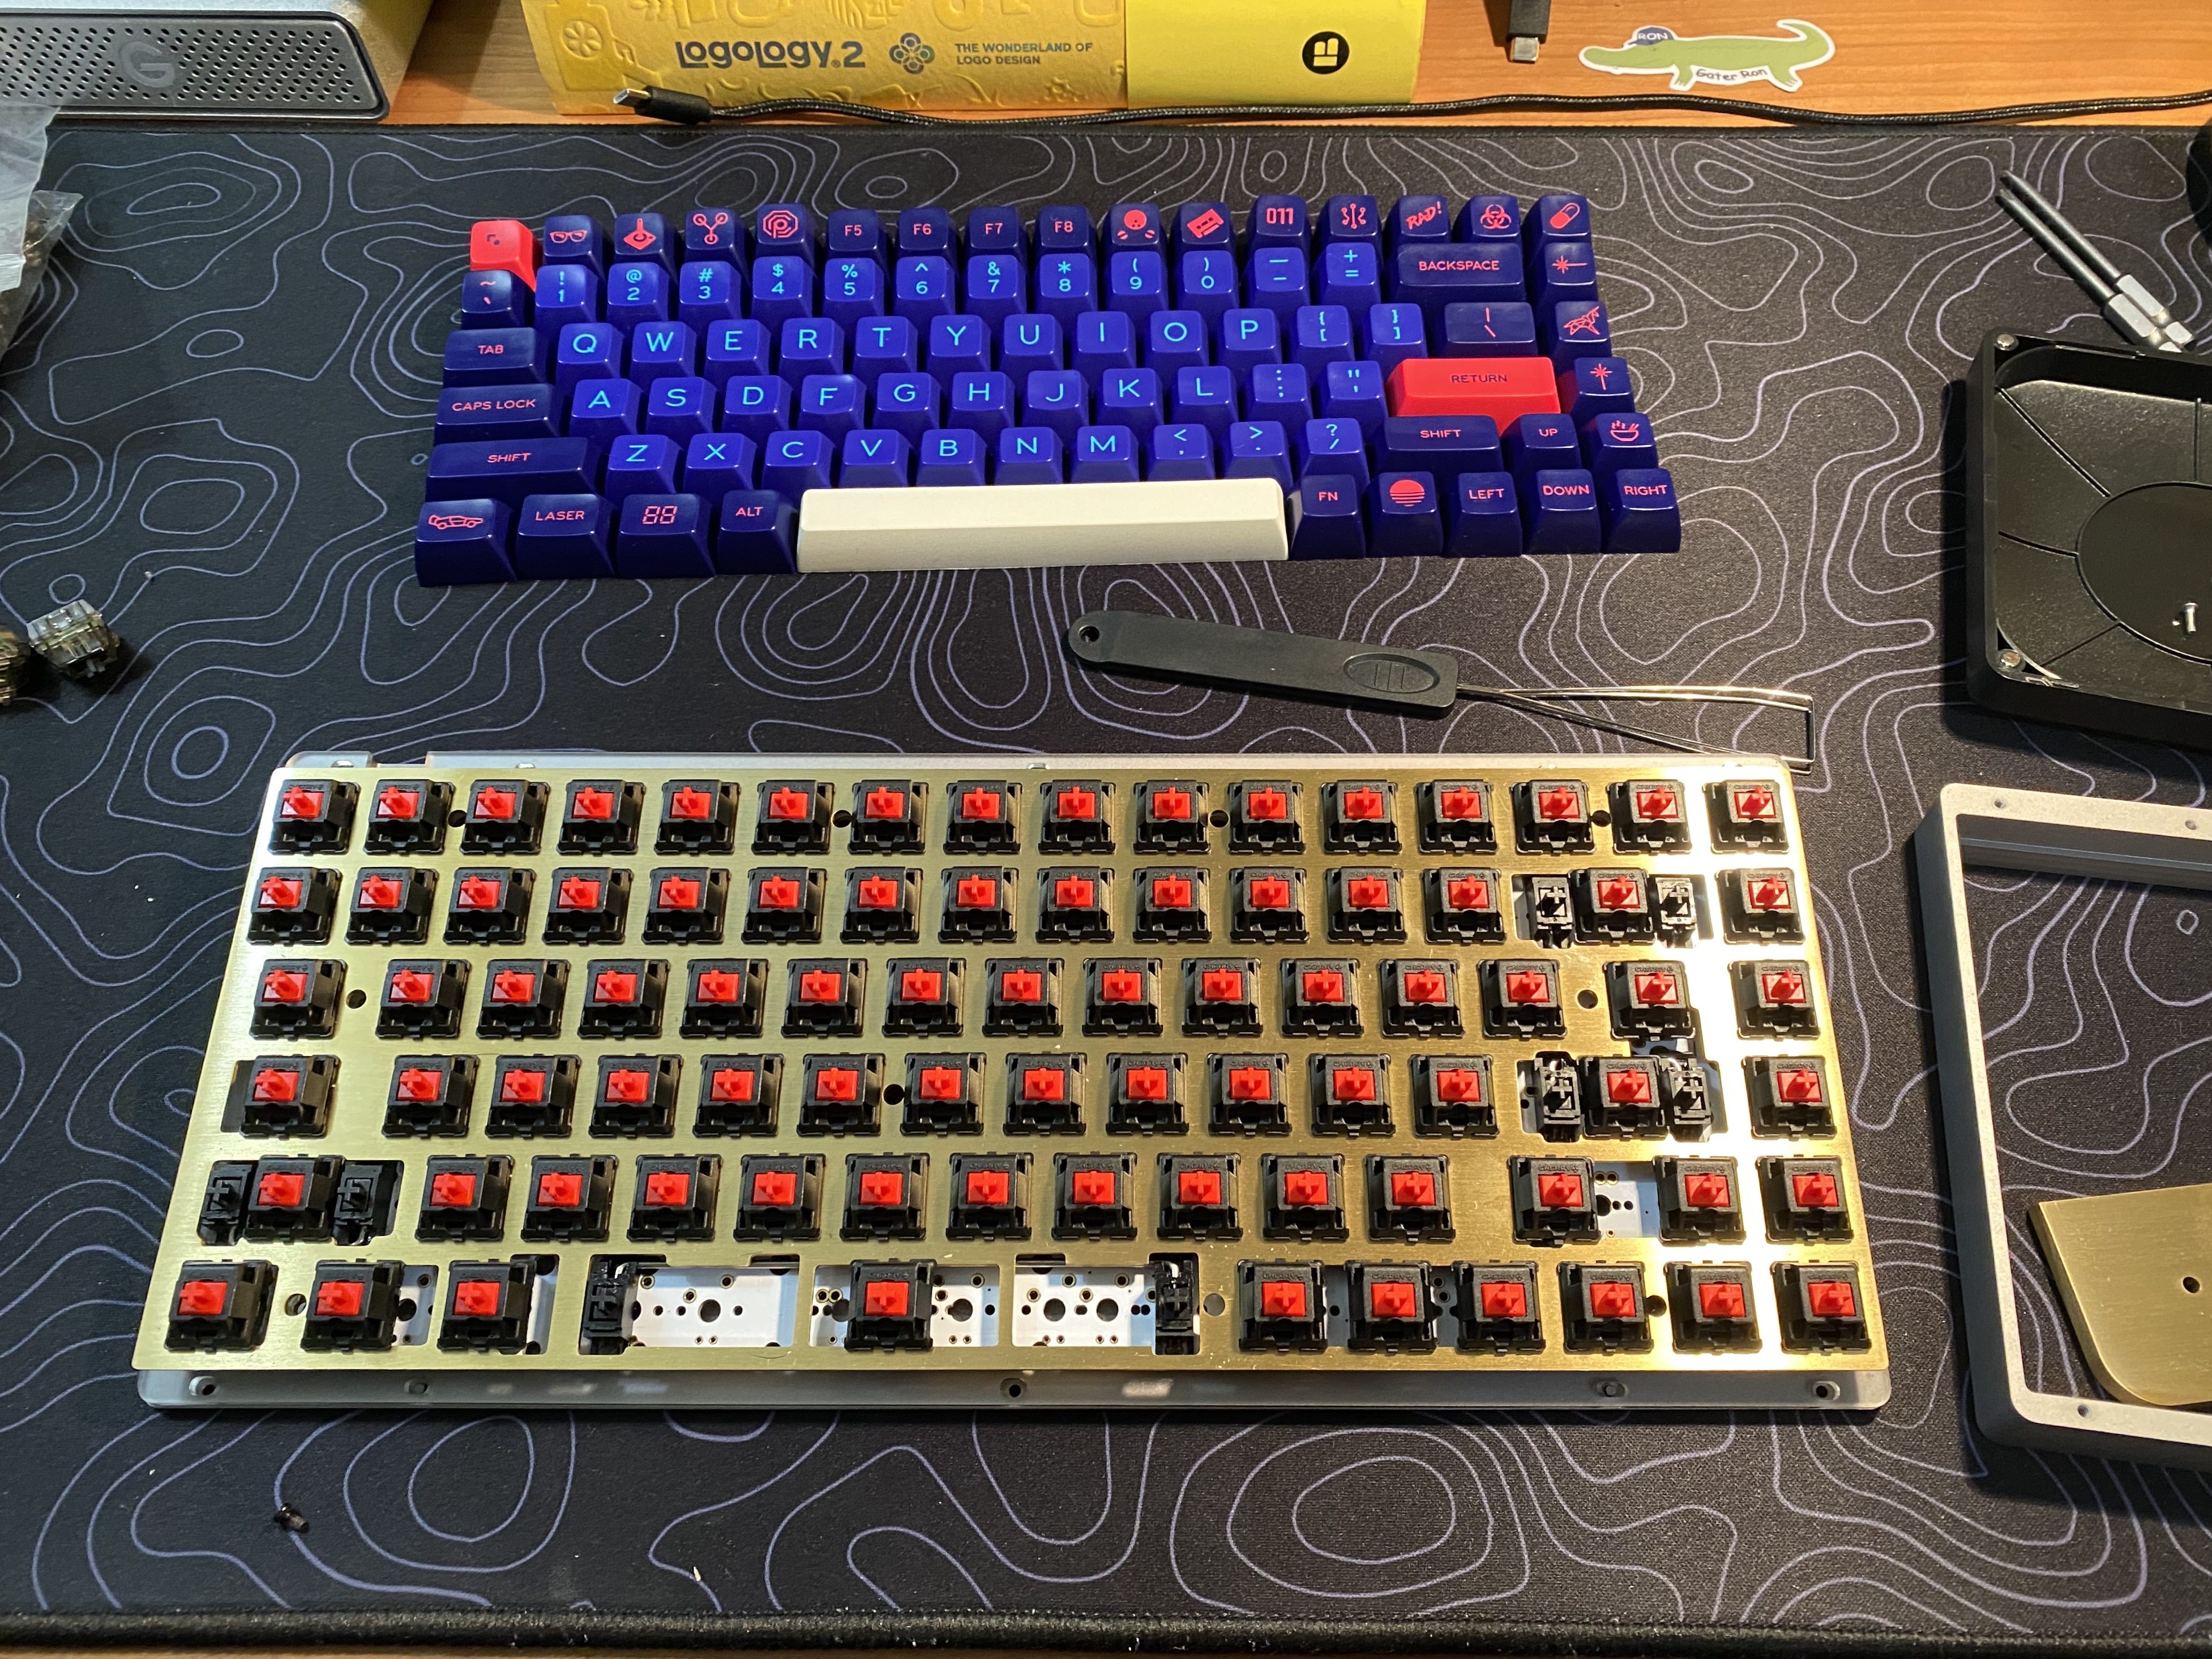
Turn it over, and… I see they are soldered.

Yep those are soldered.

5 Likes

Man, I’ve been doing this for years now and I still have a derp moment - I did just today:

I let a client choose a thick PBT Cherry profile keyset knowing they’d already chosen a North-facing platform and switches with standard housings.

It was only a few weeks ago that I even learned that was a problem at all - that is, when switches are oriented so that the LED is on the side facing away from the user (like for RGB), most Cherry profile caps won’t play nice - so I had to call the client and present them with possible options to avoid the issue.

By “won’t play nice” I mean they feel very crap indeed, with the angled underside of the cap striking a curved piece of plastic housing… awful mush city. When I finally learned / realized why all my GMK sets felt like mush I felt pretty silly.

Anyway - say all that to say, it happens to all of us, and you gotta learn somehow. Ha!

Here’s my recommendation for your keeb:

Yes on the soldering iron.

I’ve seen a post or two about hot-swap KBD75s, but I wonder if those might be millmax sockets (installed aftermarket), because the only PCB I see for this on KBDfans’ website is the one in your board.

Were I in your shoes, I might consider getting a small hot-swap board to try your Gat blacks and maybe a few other things on before you do the soldering - not because it’s hard (it isn’t), but because it’s time-consuming - and it would suck a lot to find out you don’t like switch x after soldering it onto a nice keeb.

I avoided disappointing another client today by testing their chosen switches on a cheap hotswap platform. Turns out they look great and are kind of crap in most other areas - which would have sucked to find out from the customer instead of the customer finding out from me. Since I was able to quickly and easily test them, we’ve already selected a replacement I have experience with and didn’t really miss a beat overall.

The GK61 / 64 series of boards are really cheap but they have 5-pin hot-swap support, which is strangely unusual. If you want to use a board as a test bed, 5-pin support is kind of a must - otherwise you’ll be cutting off all the mounting pins on your nice switches!

Back to soldering. It can be kind of intimidating to approach it for the first time, but if I can salvage my coffee-spilled 65% (and by spilled I mean a tsunami of sugary mcdiabetes slurry filling the entire tray and gumming up almost every switch in the board) only using a cheap rando kit, zero experience, and a youtube video - so can you.

A good soldering iron will last you a long time if you treat it well - which I did not learn how to do until after I’d melted three perfectly good tips by not cleaning and tinning them often enough… so I’m glad I did that to a cheapo kit and not a nice one. : p Still - that kit came with everything I needed to completely fix that one keyboard and then build a macro pad or two before needing to re-up on consumables.

Definitely de and re-solder in a well-ventilated area and use safety glasses. You can buy good extraction fans, or even rig-up your own with a decently strong salvaged component fan and a carbon fish tank filter.

Let me know if you have any questions and I’ll be happy to try and help out.

6 Likes

Desoldering can be frustrating without a super fancy desoldering iron but it can be done! I’d recommend an iron for sure. I dunno how far down the road you want to go but if you buy a hakko now you won’t need to buy one in the future :wink:. A solder sucker can work alongside copper braid to get those switches out as clean as possible.

3 Likes

About the north facing switches & thick cherry, there is a fix : North-Facing Keyswitch Washers – OLKB

1 Like

Oh hey - awesome. I’d heard about these, but back when I did no one had them in stock and I’d assumed they’d gone out to pasture. Def gonna grab some of those - thanks for the heads up.

A side note - I know of two types of mx-compatible switch that will work with GMK North-facing; Box Silents, and the much more obscure Artbox Switches - which I only know about thanks to :3ildcat’s videos. Apparently a Korean company mods and sells them, but not totally sure.

1 Like

I’ve never used a desoldering iron pump but, like many, bought the SS-02 solder suck from Engineer and once you get into the groove it goes real fast. Only limiting factor the time it takes to empty the chamber of solder every other switch.

1 Like

I would recommend a solder sucker in combination with solder wick to get off what the sucker isn’t able to remove. I’ve desoldered a board like that once, and although everything turned out fine, I decided to never start a project like that again without also getting a proper (expensive!) desoldering iron.

1 Like

Did not know about those, very good info, thanks a lot ! The knowledge just keeps stacking :))

Well, I do have a soldering iron now. I won it in fact! Not a hakko, but it’s something. I still do not have a desoldering pump. Might spend my time learning to solder then. I wanted to eventually.

I’ll have to see if there’s any starter/burner kits out there for learning soldering. I’ll leave my board be for now. Especially since it’s my only one right now. I’d hate to ruin it.

@ggggggg thanks for the link. That looks, like a good one. Know of any US vendors that might have this?

I think I’ll learn and practice soldering on other things to build up that skill first. I’ll just find another board or PCB to play on with new switches in the meantime. No rush.

It’s encouraging to know even the old pros make mistakes. It’s almost like every board, set, or whatever, has its own set of “gotchas”. Thanks for the tips and the offer to help. Genuinely appreciate it!

1 Like

Since you’ve already got an iron, I don’t think you’ll need a beater one to learn on - just grab a few extra tips.

They’re interchangeable, and are the only parts I actually damaged on my cheapo one.

1 Like

I meant like starter circuit boards or parts to practice soldering on (not the iron). Basically, stuff that would be safe to mess up or practice on.

Ah, I gotcha. I remember thinking I could practice on a broken generic game controller only to find they use a much higher-temperature solder that my iron couldn’t melt - so I just ended up diving right in on my broken keeb. That said, an inexpensive macro pad or something similar would probably make for great practice, and not be too big of a loss if you bork it.

This one from mountainblocks is $16, and has joints of a few different difficulty levels on it;

  • Super Easy - the switches
  • Normal - the diodes
  • Lvl 1 boss - the controller board

Whenever someone asks me for a keeb-related thing to get their feet wet with, that’s usually what I point them to.

Edit: derp - didn’t notice that macro pad was out of stock again. Here’s some from 1up Keyboards that are in stock.

1 Like

Oh great, now I have a Sweet 16 macropad on order. :rofl: Thanks @Deadeye
Guess I’m going to have to decide on a soldering iron to get now too…

2 Likes

Me too! I’m replacing the fire hazard I’ve been using and packing it away as a backup. My workstation is pretty cramped, so I went with a TS100 - but I used advice from this guide from Keebio to make some of my other choices.

1 Like

This is the soldering iron I won (pic below). It actually looks like it came with a practice circuit thing-a-ma-jig and some pieces for it. Need to find some time to sit down and learn and practice. Won’t have that until next week. (Cc: @Deadeye)

I still need to order a few missing items tho: Solder sucker, and a tip cleaner. Someone said wick might be needed for desoldering?

Ha, yep - that’s the one.

So from what I’ve seen so far, there are 3-ish types of solder sucker; a stand-alone manual spring-loaded pump thing, one of those but with its own heat, and then one of those but with a full vacuum system and a reservoir. I got by so far with one of the cheap spring pumps, but it’s hit or miss. A quality one with a strong spring and replaceable tips would perform better. I decided to try one of those with a melting iron and see how that goes, with the full intention of getting a vacuum one when I’ve done a few more projects to support it - those are pretty expensive.

IIRC my pops uses a combo of the brass shavings and a wet sponge, though I’m not sure which would be preferable when or why. So far I’ve gotten by with a wee sponge but I did snag one with the shavings in.

I hadn’t tried wick yet because my dad seemed to think it was super tough - but after watching a Louis Rossmann review of that iron, I’m wondering if he just had the wrong tip. I’m sure pros make it look easy but it really did look easy - the solder wick wicks the solder when you put the heat on it.

1 Like

Wait, are you saying the iron I just got is the same as the one you’re replacing? Lol the “irony”

1 Like

Ha! No no - the iron you just got is the same one I just ordered. The one I’m replacing is the kind of thing you’d find crammed between a couple bins at Harbor Freight - I think I’ve seen them for $15 on Amazon. You still get a point for the bad pun. :stuck_out_tongue:

1 Like