My layouts for minimal keyboards

We get to see a lot of very nice minimal keyboards, but we rarely get to actually see what key does what — this is because at best the legends only show the default layer, and often not even that, if they use blank key caps. There is of course no surprise in that — you can’t expect there to be key caps with legends for crazy small layouts, with five different legend on each key.

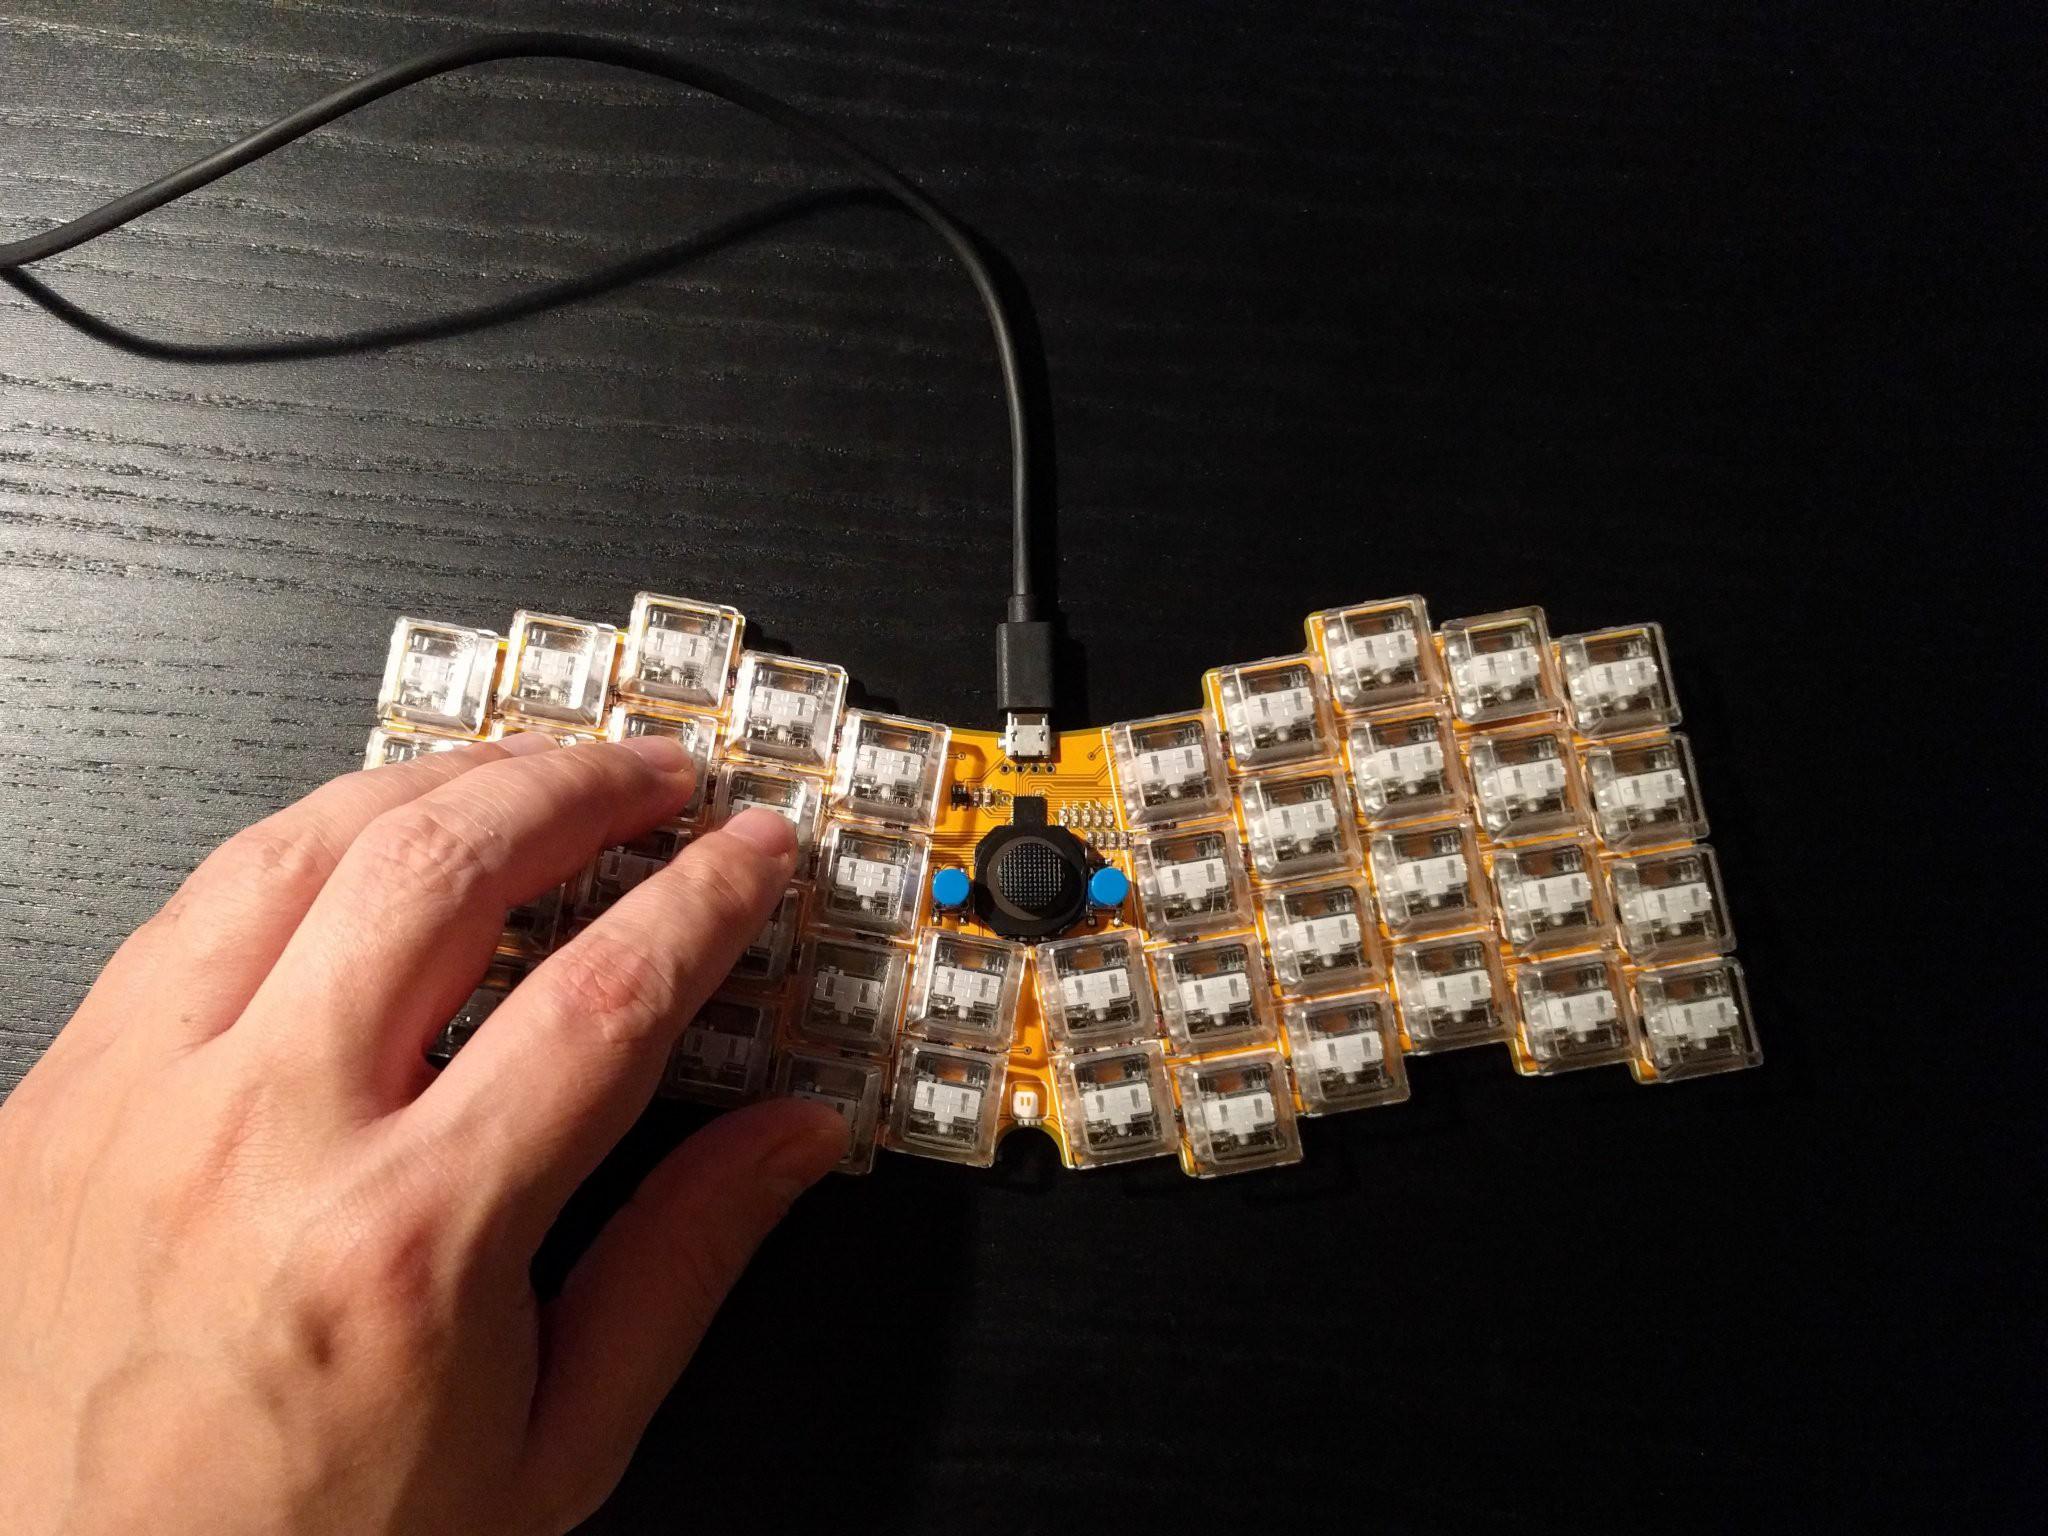
But I think that our community suffers because of that, because there is little information sharing and evolution as a result of that. This is why I want to try and show the layout I use for my Planck-like keyboard, together with the reasoning behind it.

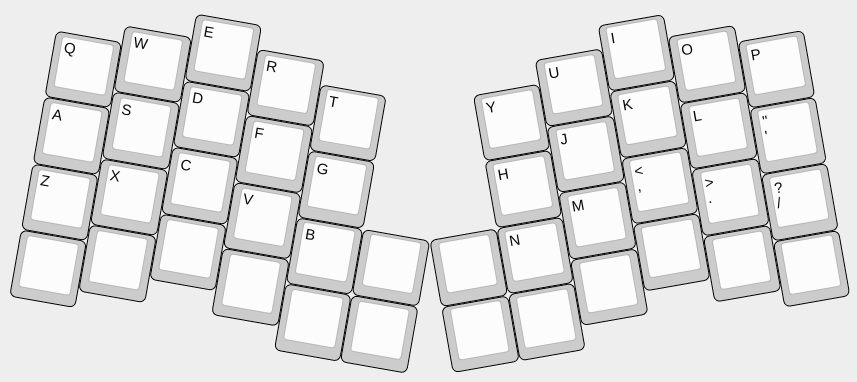
First a few words about my goals. This is not the only keyboard I use, and not even the most often used one, so my main concern is the ease of memorizing which key does what. It’s regular QWERTY, and I have tried to keep the relative positions of the keys as close to a standard 101 keys keyboard as possible. I also tried to make each key work the same way with modifiers as it does on a standard keyboard — so, for example, if a given combination sends a “1”, then that combination with a Shift pressed will send a “!”.

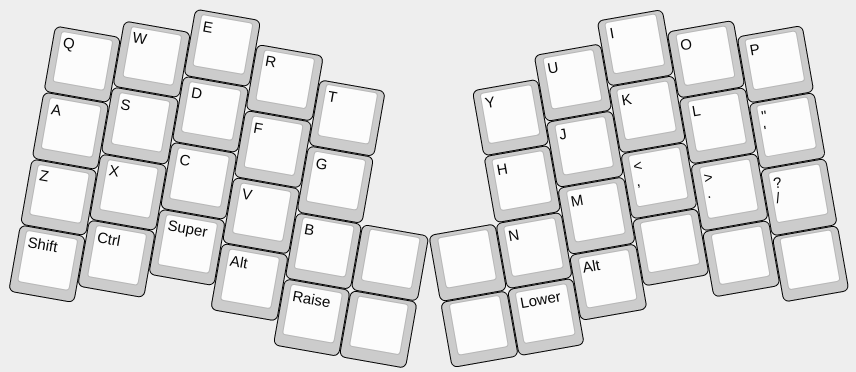
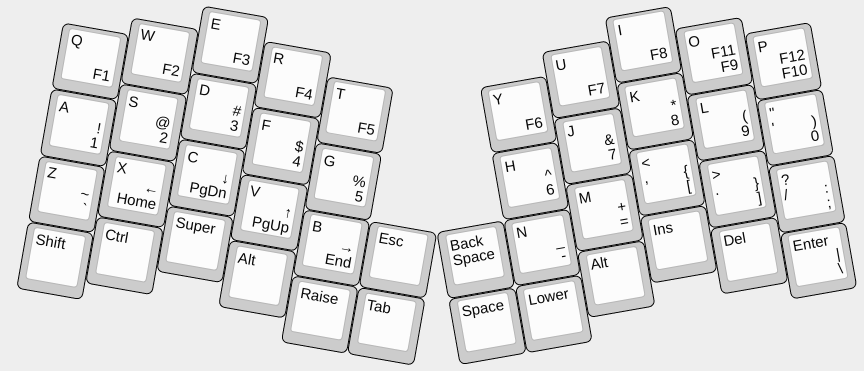
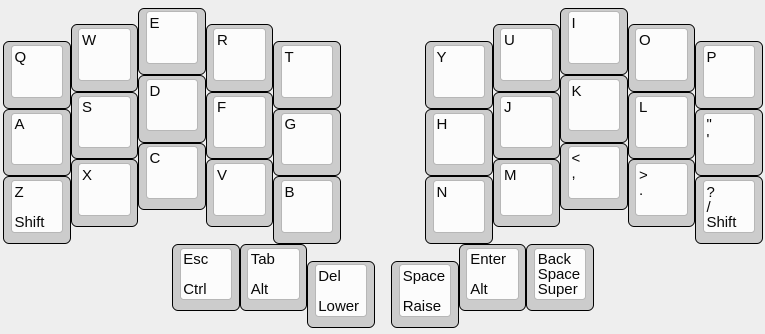
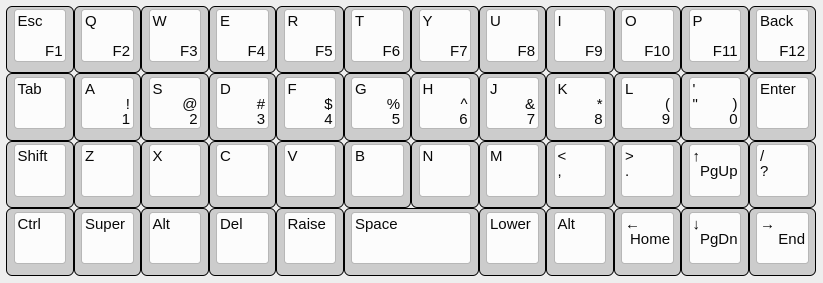
Let’s start with the default layer. It’s pretty straightforward:

If you compare it with a default Planck layout, you will notice several differences:

  • the Esc and Tab keys are swapped, to make them retain the relative positions
  • the arrow key block is T-shaped instead of one row, for the same reason
  • the “/?” key had to be moved to make room for the up arrow, and Enter got pushed to its normal position
  • the modifier keys are moved to their normal positions, and a Del key is added
  • a right Alt key is added, because I need it to write Polish accented characters
  • the semicolon/colon key is replaced with the quote key, because I use the single quote a lot when writing English, and colon is not used as often.
  • raise/lower are swapped, so that I can type digits 1-5 using only my left hand — this is useful in games

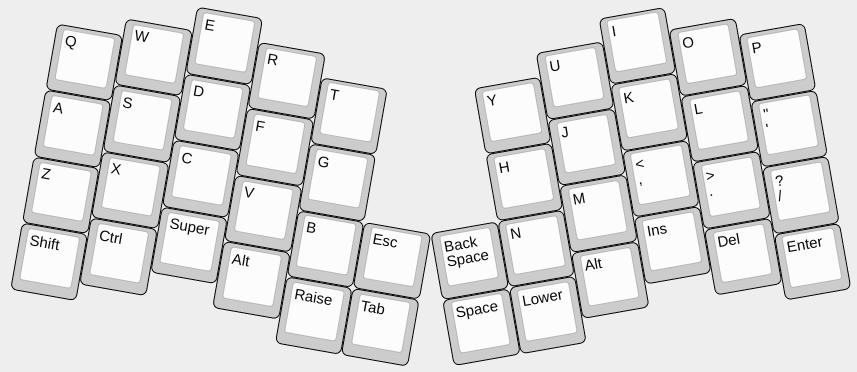
Obviously the Del key is out of place here, but I really need it (together with Ins this is how I cut/copy/paste text), and since it’s the default layer, it gets a legend, so it’s easy to find.

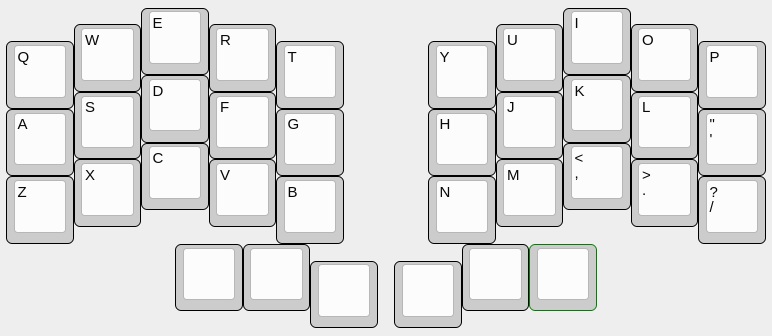
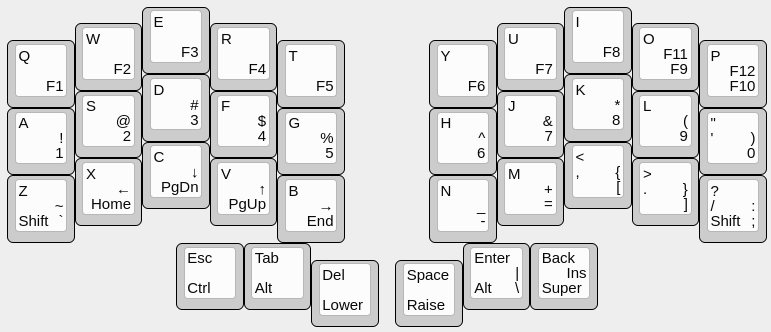
Next, let’s look at the digits, function keys and cursor movement keys:

I decided to put the digits on the home row. This has several advantages. First, it lets me use the entire top row for the function keys, without having to wrap them or do some other strange things with them. Second, it makes the digits and symbols really easy to type, which is important for a programmer like me. The cursor movement keys are placed the same as on most laptops — it’s not ideal, but it’s easy to remember.

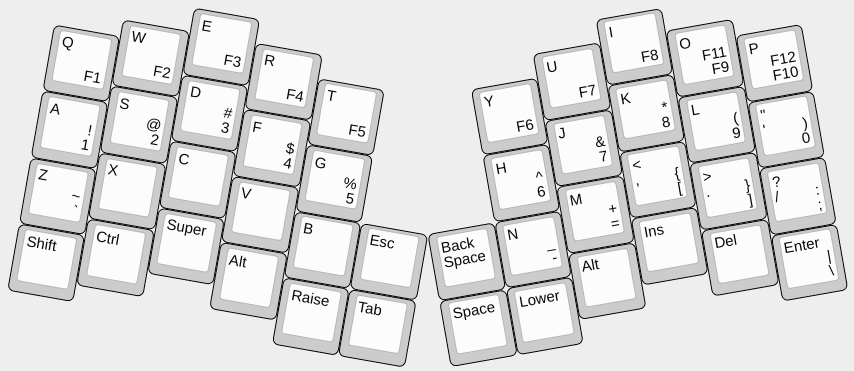
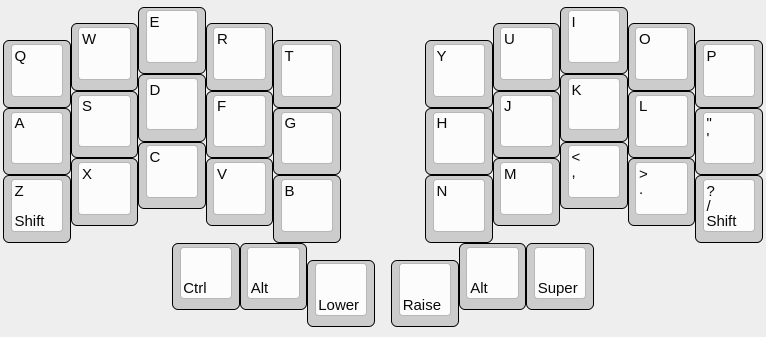
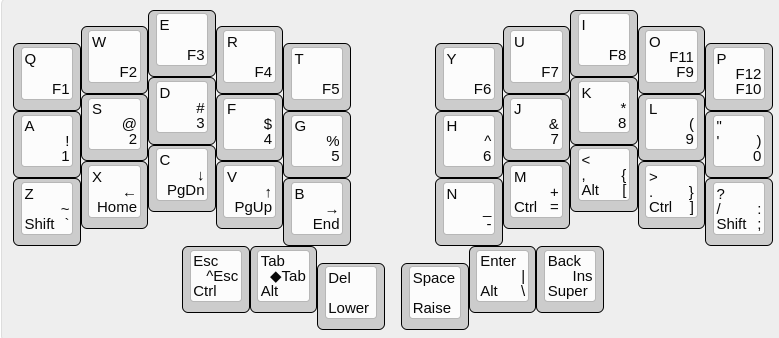
Now, let’s place all the missing symbol keys:

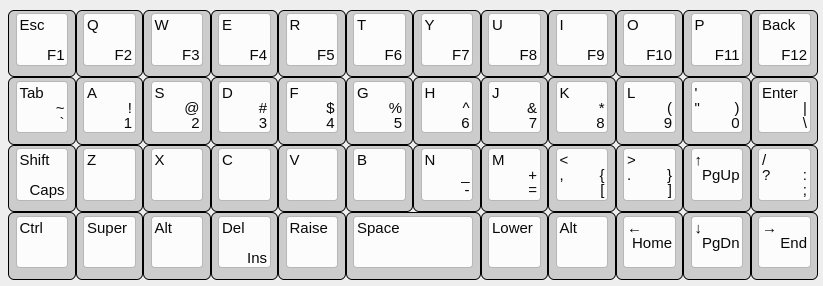
Again, I tried to place the keys as close to their normal position as possible. There is an exception for the minus and equals keys, which are in a “wrapped” position from their usual place, but this is common in all Planck keyboards. Also, the braces are on the same keys as angle brackets, so that they are easy to remember.

The CapsLock key is on the Shift, which I think is logical, and the Ins key is on Del, because they make a pair.

Finally, I have the ZXCVB keys free for any media keys or special functions I might want, as well as the lowered versions of the function keys. Usually I would put Alt+F4 on the F4, for example.

If there is interest, I can post a similar reasoning for my 40% keyboard as well.

10 Likes

Nice work, I share some of those in my layout, too. Esc, Cursors, etc. I use raise Space for underscore.

Having recently gone the VIA route I found that Enter on tab and shift on hold quite useful.

Cool!

You convinced me I could use a 40% layout with a bit of patience :wink:

3 Likes

Totally agree. I think this is going to work. I can do this. @deshipu huge thanks for sharing!

1 Like

Thanks everyone for the kind words. Let’s do an Atreus next. It’s a very cute little split keyboard, but even though it has only one key less than the Planck, its layout makes it a little bit harder to use a “standard” key layout. This is why I’m going to move all the special keys like Esc and Enter to the bottom row, and move the arrow cluster to a layer.

Let’s start with the letters:

Nothing special here. Once again I prefer to retain the quote key over the semicolon key, as I use it much more often when typing English. Semicolon will go on a layer.

Now let’s add modifier keys:

Since we don’t have the extra columns on the sides, I had to move the Shift key to the corner. The rest of modifiers are in standard places. Again, I need the right Alt key for typing Polish, but your own needs might be different. Let’s finish the default layer:

I’m not super happy about the center cluster here — normally I would have backspace and space on the bottom center keys, but in this case I tried to preserve the hands that press each of the keys, and this is the only way I could think of doing it. On the other hand, removing the arrow cluster gave us room to have the luxury of a separate Ins key. People who prefer to have a second Shift instead can move Enter and do that — I’m one of those barbarians who ever only use one Shift.

With the default layer done, we can do the digits, symbols and function keys now:

No surprises here. We do the same trick with the digits on the home row. The function keys now need to wrap around a bit, since we don’t have 12 columns anymore. Backslash is always an odd one, I decided to put it on the Enter key same as the last time.

Finally, let’s look into the arrow and navigation keys:

There wasn’t really much room for them — they are arranged in the good old HJKL line, but on the left hand instead of right. The arrows are used with the Lower key, and the navigation with Raise, so that you can hold down Lower with your right hand and move around with arrows.

And that’s it. I didn’t place CapsLock this time, but you can again put it on the Shift key. There are also many keys with empty Raise/Lower layers, where you can put media keys, combinations and so on.

I don’t actually use this particular layout on my Flatreus — I created it for this article to show off the reasoning. The layout I use is more compact, because it makes use of the hold/tap mechanism, which I will explain when we get to the next keyboard — a 36-key split.

5 Likes

A fellow swede made his own version.
Ätreus

1 Like

Flatreus:

5 Likes

I still love that PSP joystick and little buttons in the middle!

1 Like

Today we are going to go to the extreme, and try to create a layout for a 36-key keyboard. We will start with this:

We still want to only have two layers (Planck-like Lower/Raise), so we are going to need to cheat a little bit, and introduce the Hold/Tap mechanism. The idea is simple: you can have the same key act as a modifier key (if it is held down and another key is pressed), or it can act as a regular key (if it’s pressed and released without pressing any other keys). I will put the legend for Hold/Tap modifier keys on the lower left:

Note that we need two Shift keys now, because we want to be able to type capital “Z” and “?” — we can do that by using the Shift on the opposite side. Next, let’s place the rest of the default layer:

I had some doubts about the Back Space and Del keys. It’s traditional to have Back Space next to Space in such layouts, but then it would be on the wrong hand, and we are trying to be as close to the “normal” layout as possible. They could be easily swapped.

The rest is pretty much the same as in the previous keyboards:

It seems we are done, but there is a little tiny detail that we still need to address. Right now it’s impossible to type Alt+Tab or Ctrl+Esc. There are two ways we can solve that: like with Shift, we could add additional modifier keys somewhere, for instance on the “<” and “>” keys, or we can put those combinations on separate layers:

I generally avoid putting Hold/Tap on letter keys, because it has one huge downside — it makes it impossible to hold down the key to repeat the character. It’s a trade off.

5 Likes

I couldn’t agree more. I am new to the world of mechanical keyboards (particularly 40%) and I appreciate any chance I have to see how others are configuring their setup.

I’ve been lurking here for a few weeks and I just registered to thank you for posting these layouts. I hope I’ll be using some of this on my first keeb.

2 Likes

It’s been a few years since I posted this, and my “optimal” layout has evolved further. I’m generally following the same guidelines, trying to keep the keys close to their positions on a traditional keyboard, so that they are easier to remember, but one innovation in particular allowed me to improve my layout: separating the digits from the symbols.

As you can see, I still use home-row digits, but the symbols have been moved to the top row, and to the Lower layer. That frees the home row on the Raise layer for navigation keys, including the traditional hjkl for arrows. And that in turn frees the bottom row on the Raise layer for some extra functionality, like volume control.

I also reverted to having most of the mod keys (except the Ctrl and Alt) on the thumb keys, so I can easily hold them down while typing.

My current keyboard also has the Q and P keys moved to the sides, so that they are easier to reach, and has an additional block of arrow keys, for gaming, but that is entirely optional.

3 Likes