Revised guide as of 2022/05/05
Easter of 2021, when the Norbauer U&O sale went up, I finally bit the bullet and ordered one for my FC660C. That could have been the end, but product photos of the case with RGB caught my eye, and lead me to @r4bbl3d4bbl3’s MX PCB for the Heavy-6. While I love the idea, I am not looking to return to MX any time soon, and the post inspired me to see if I could add RGB functionality to my FC660C. If for no other reason than to say I could. The short answer is, yes, it can be done.
Step 1 - The Wiring
First things first, we need to get an electrical connection for the LEDs.
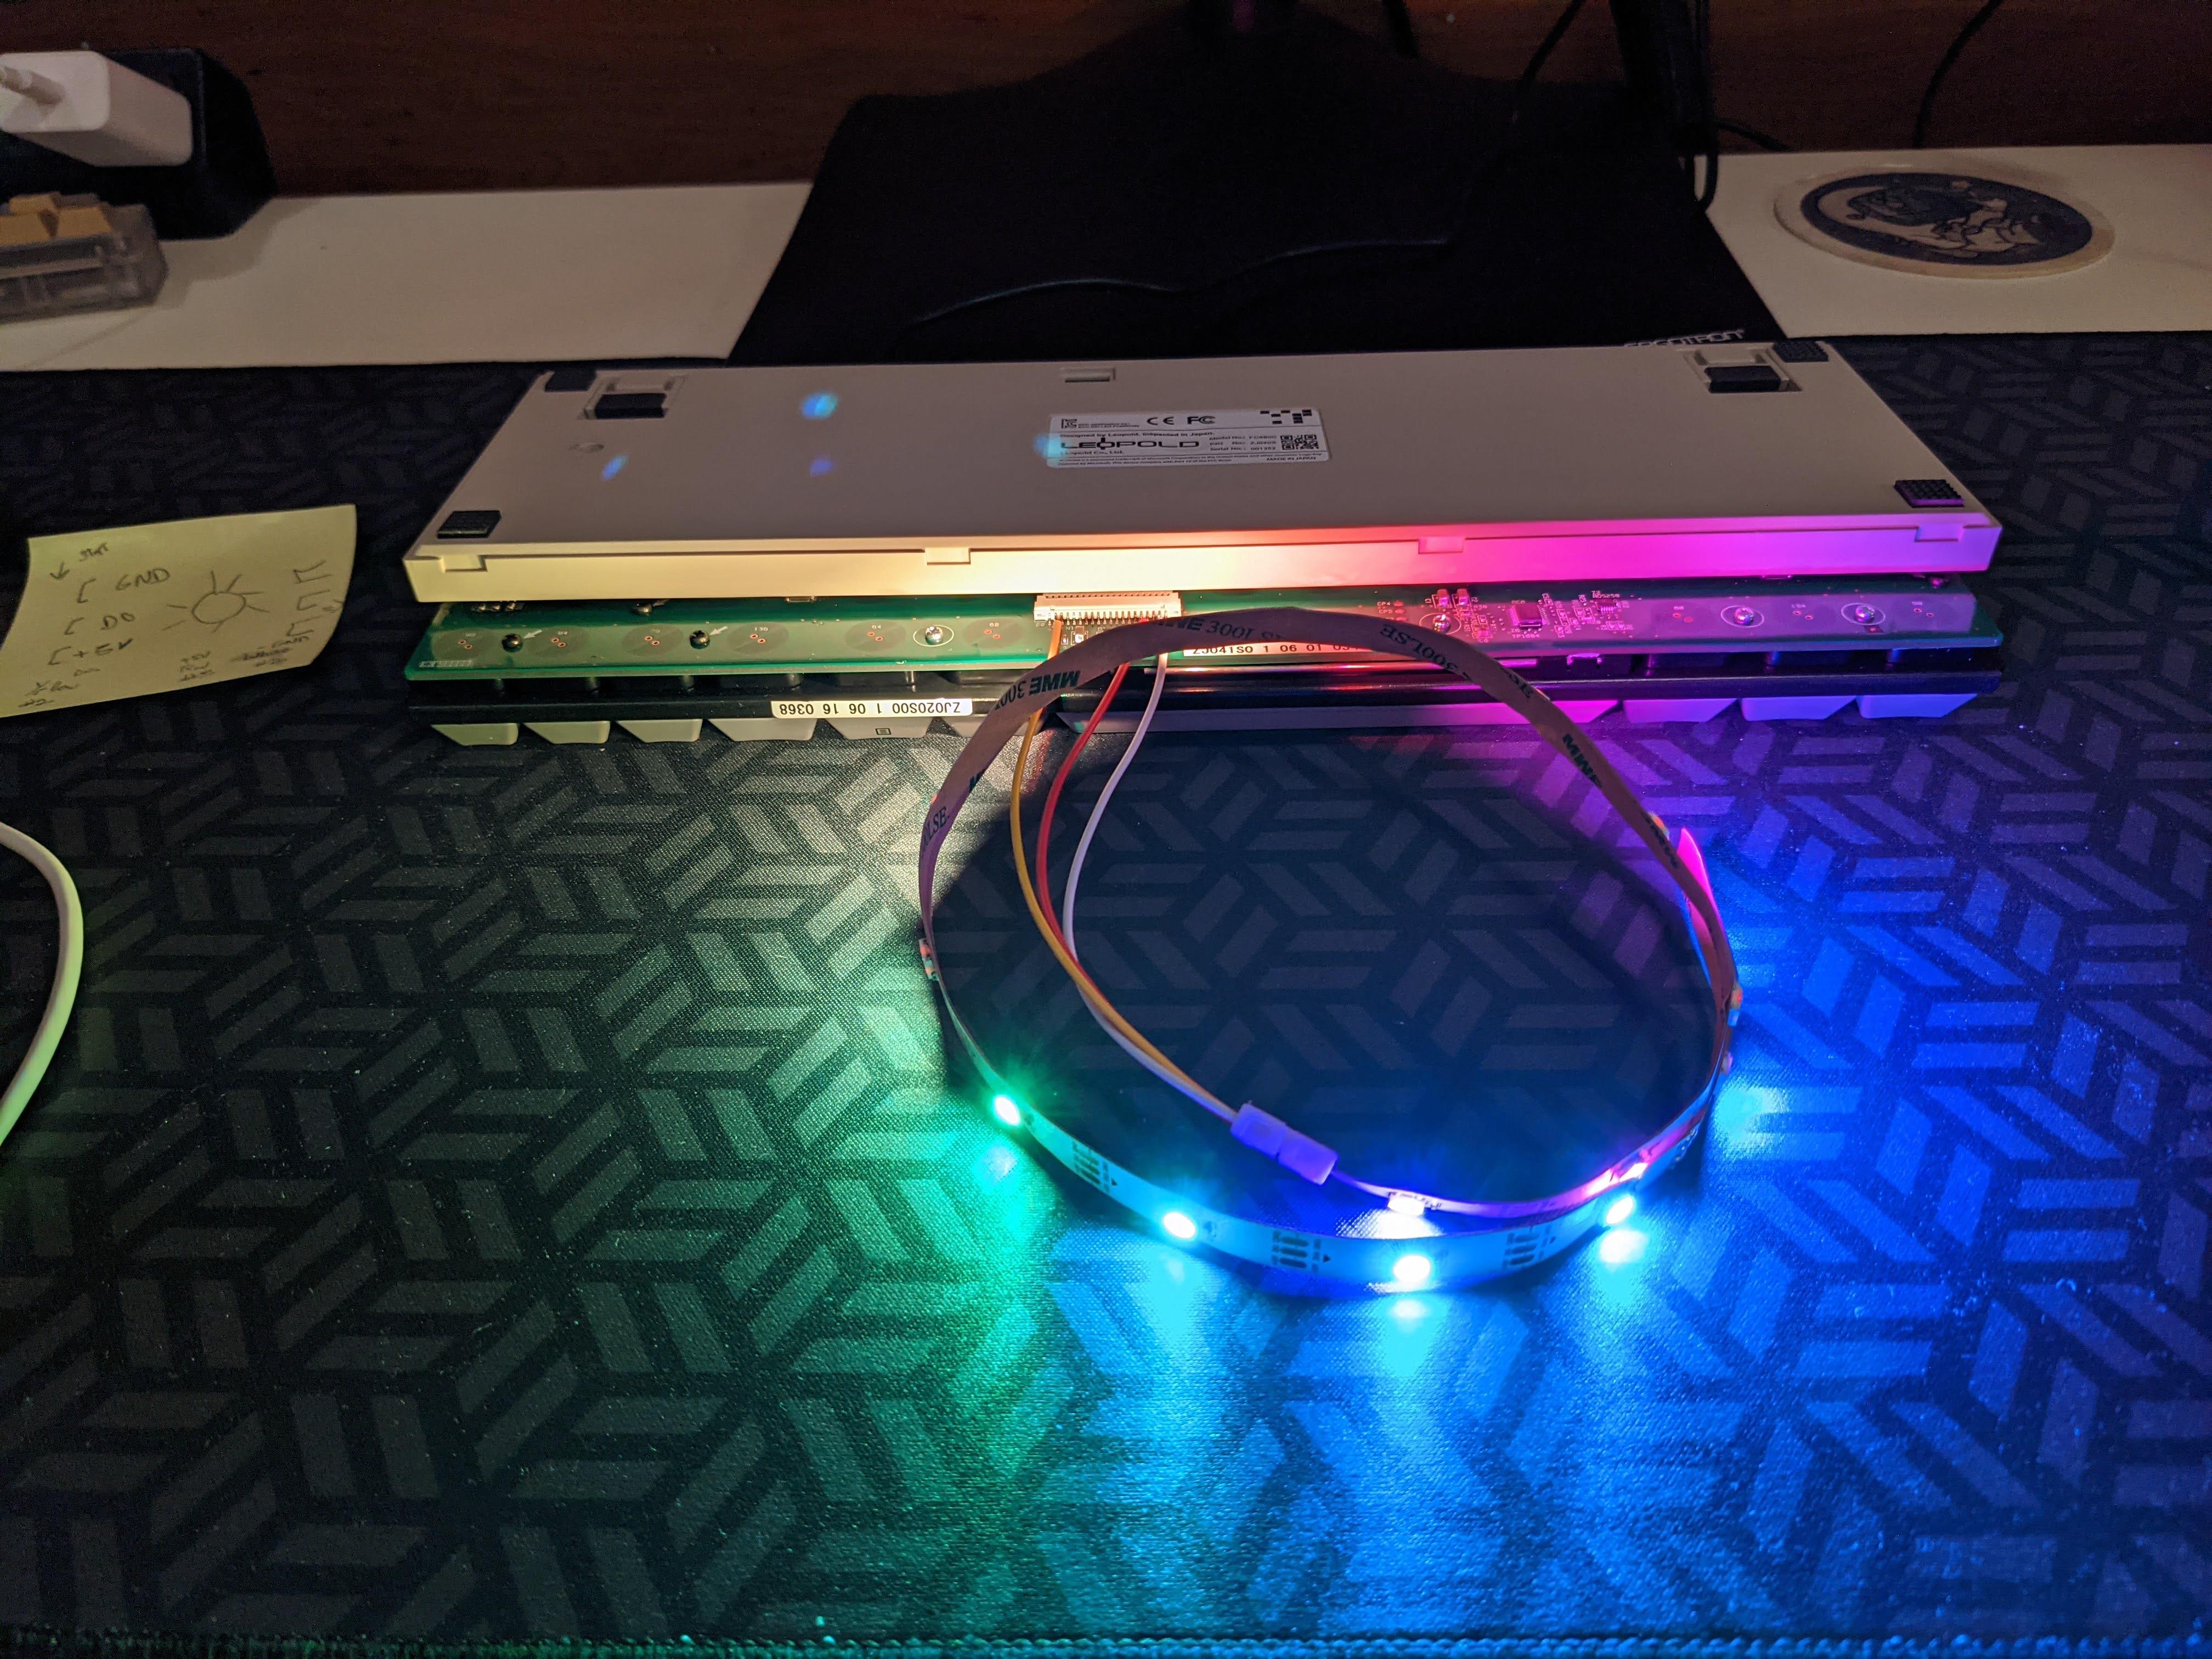
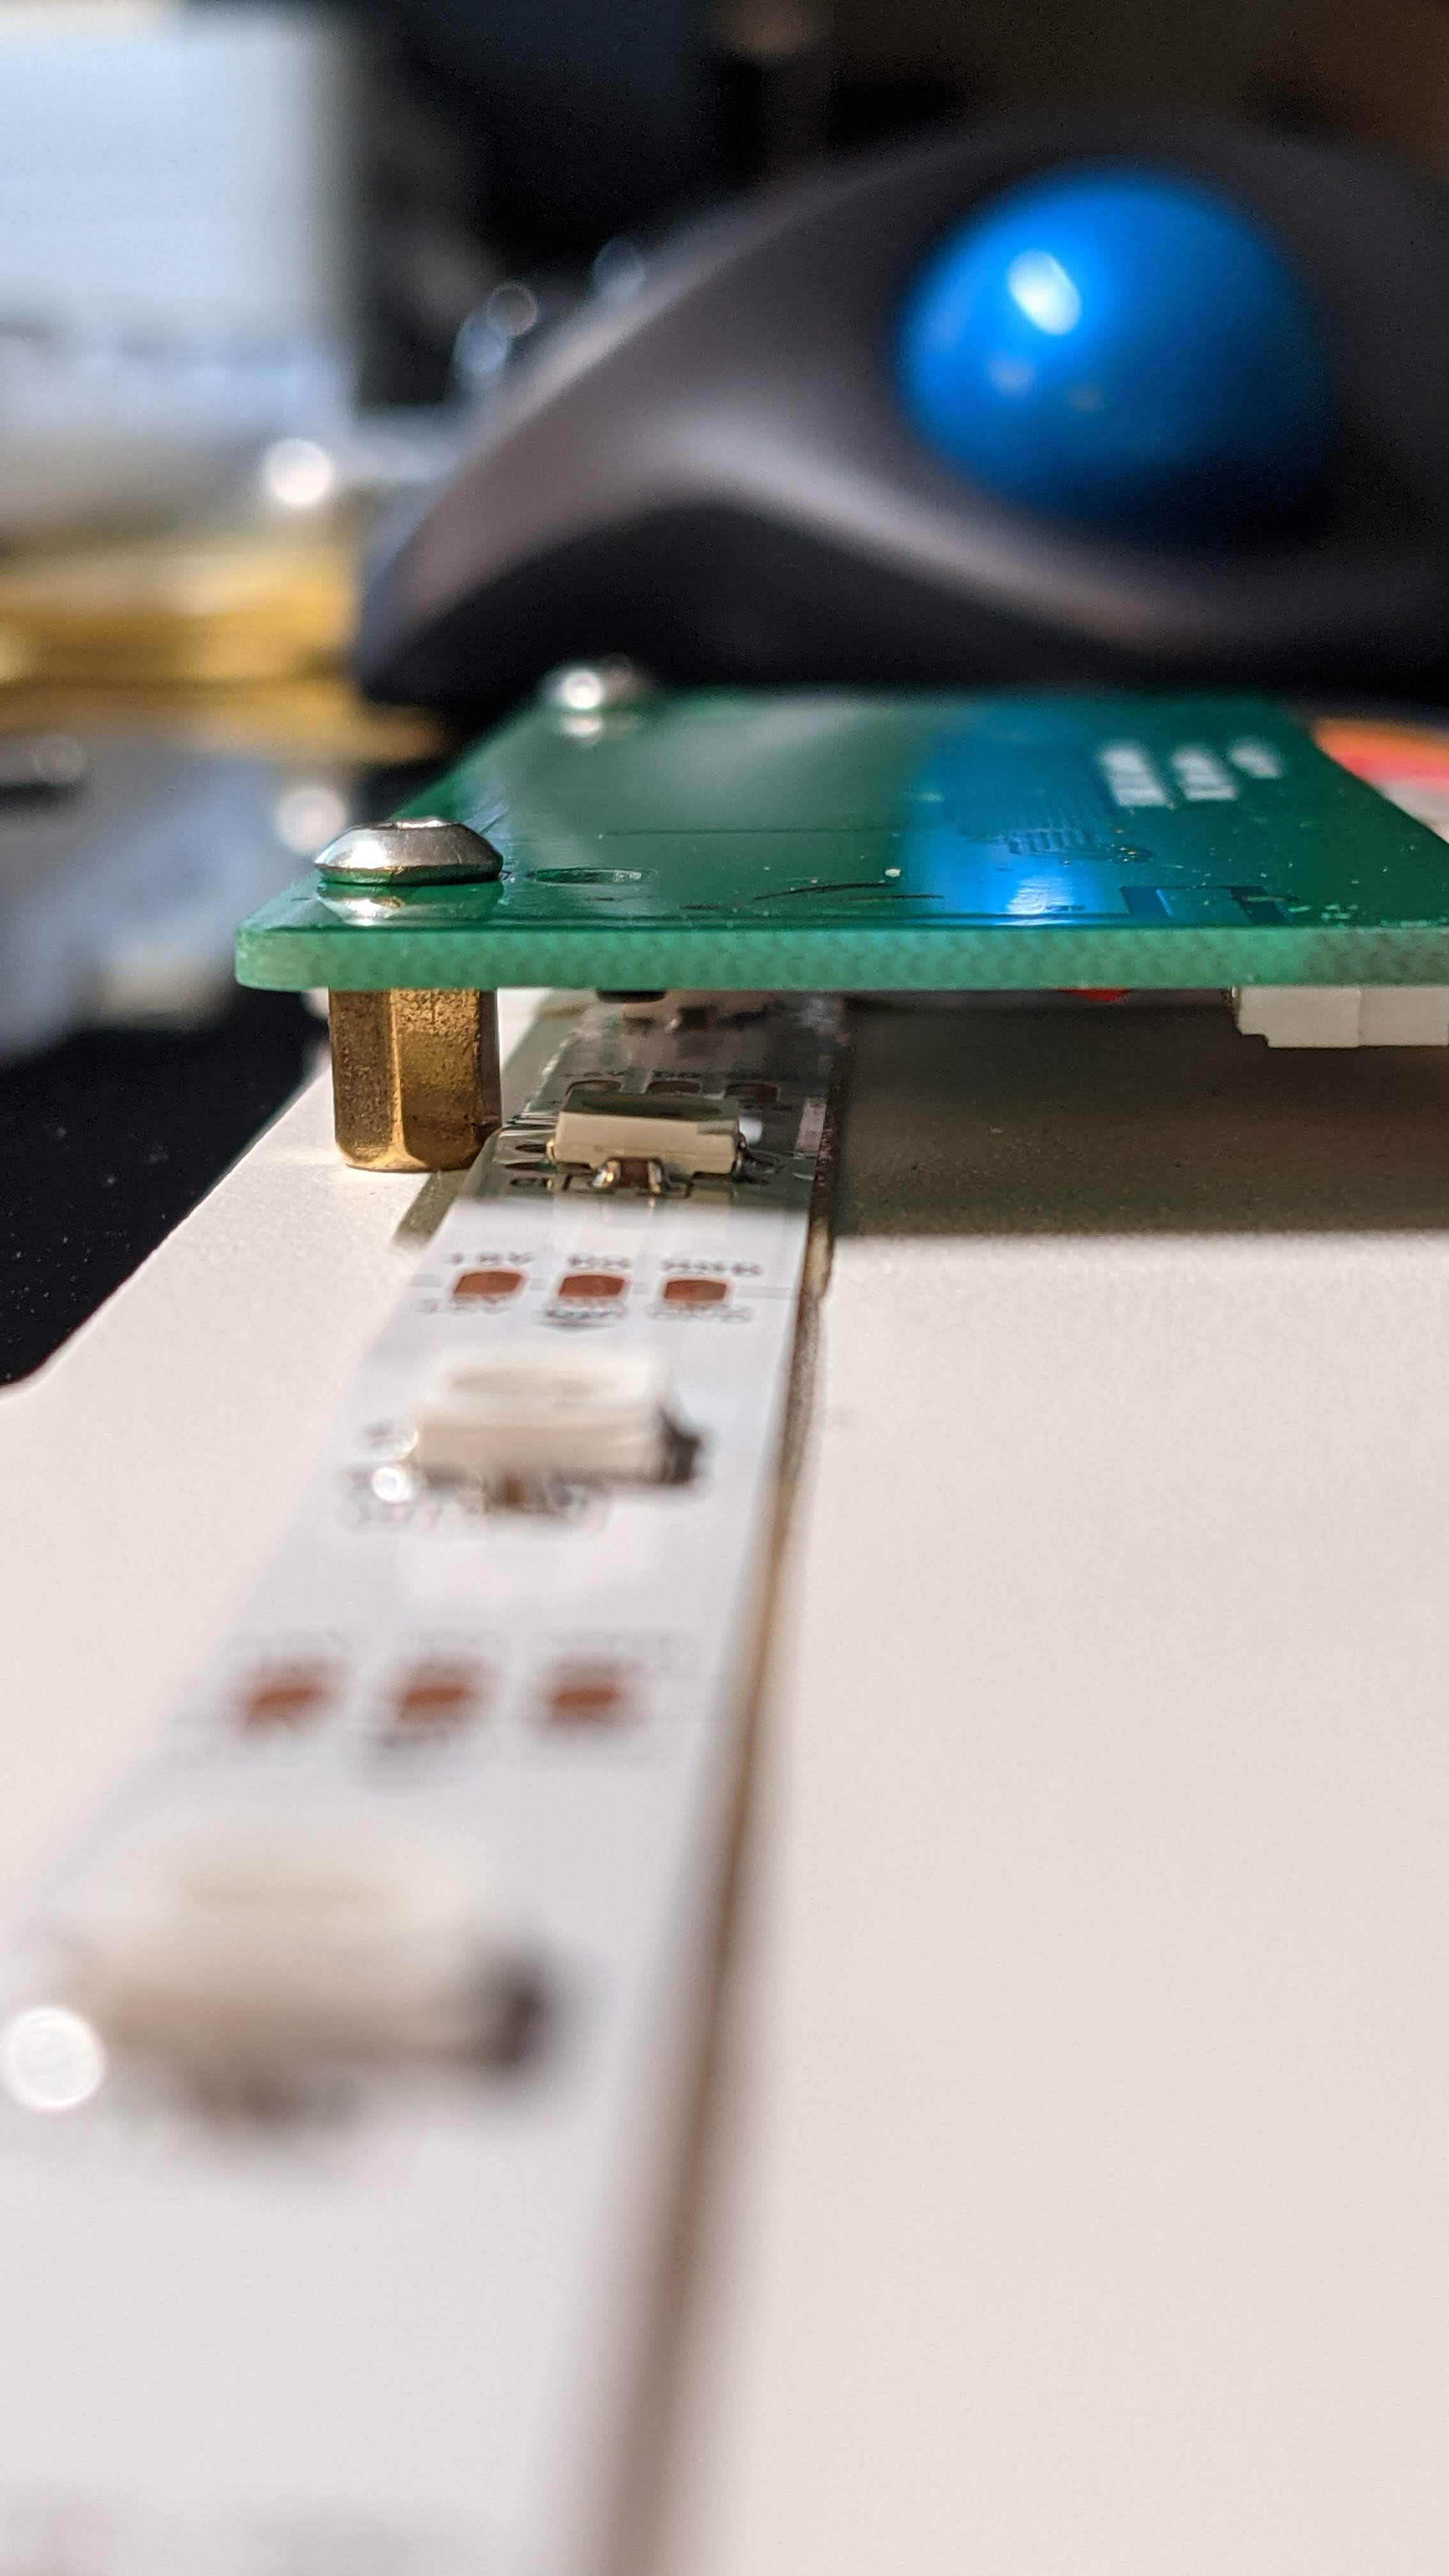
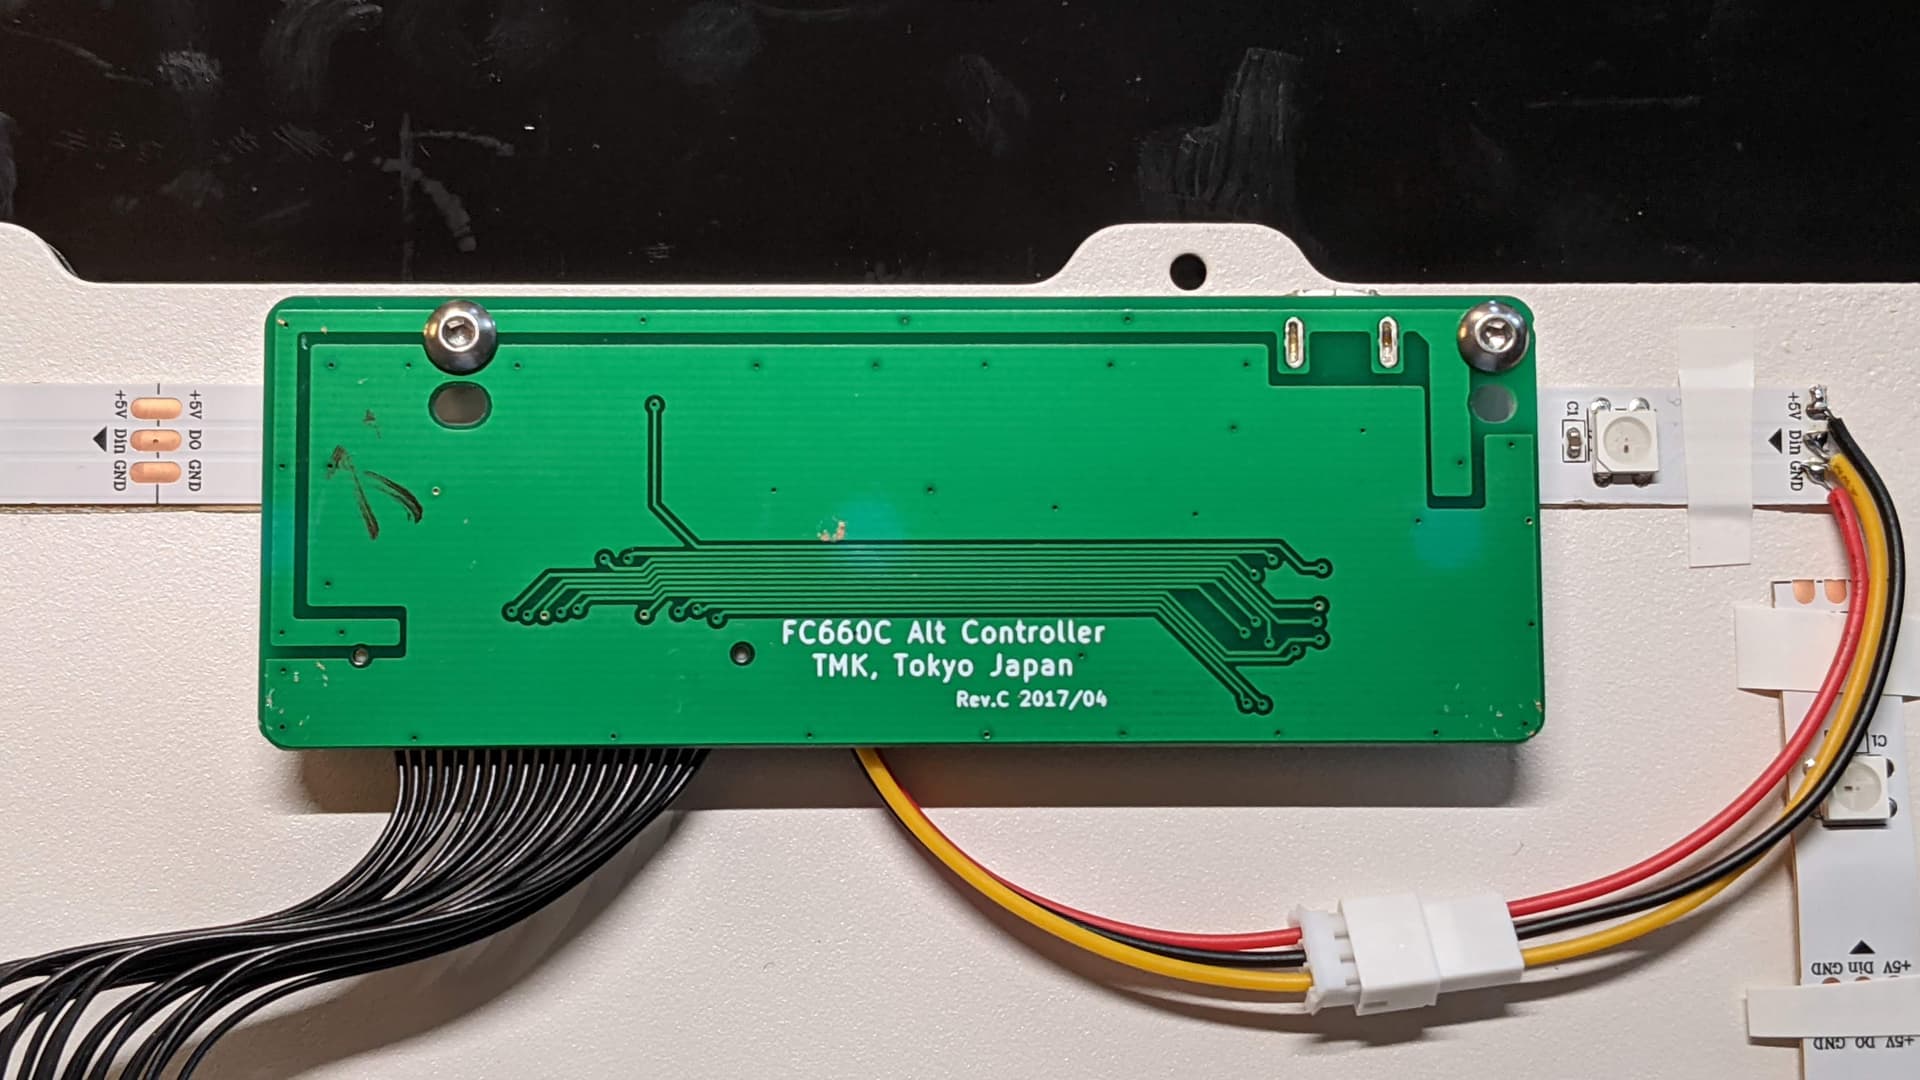
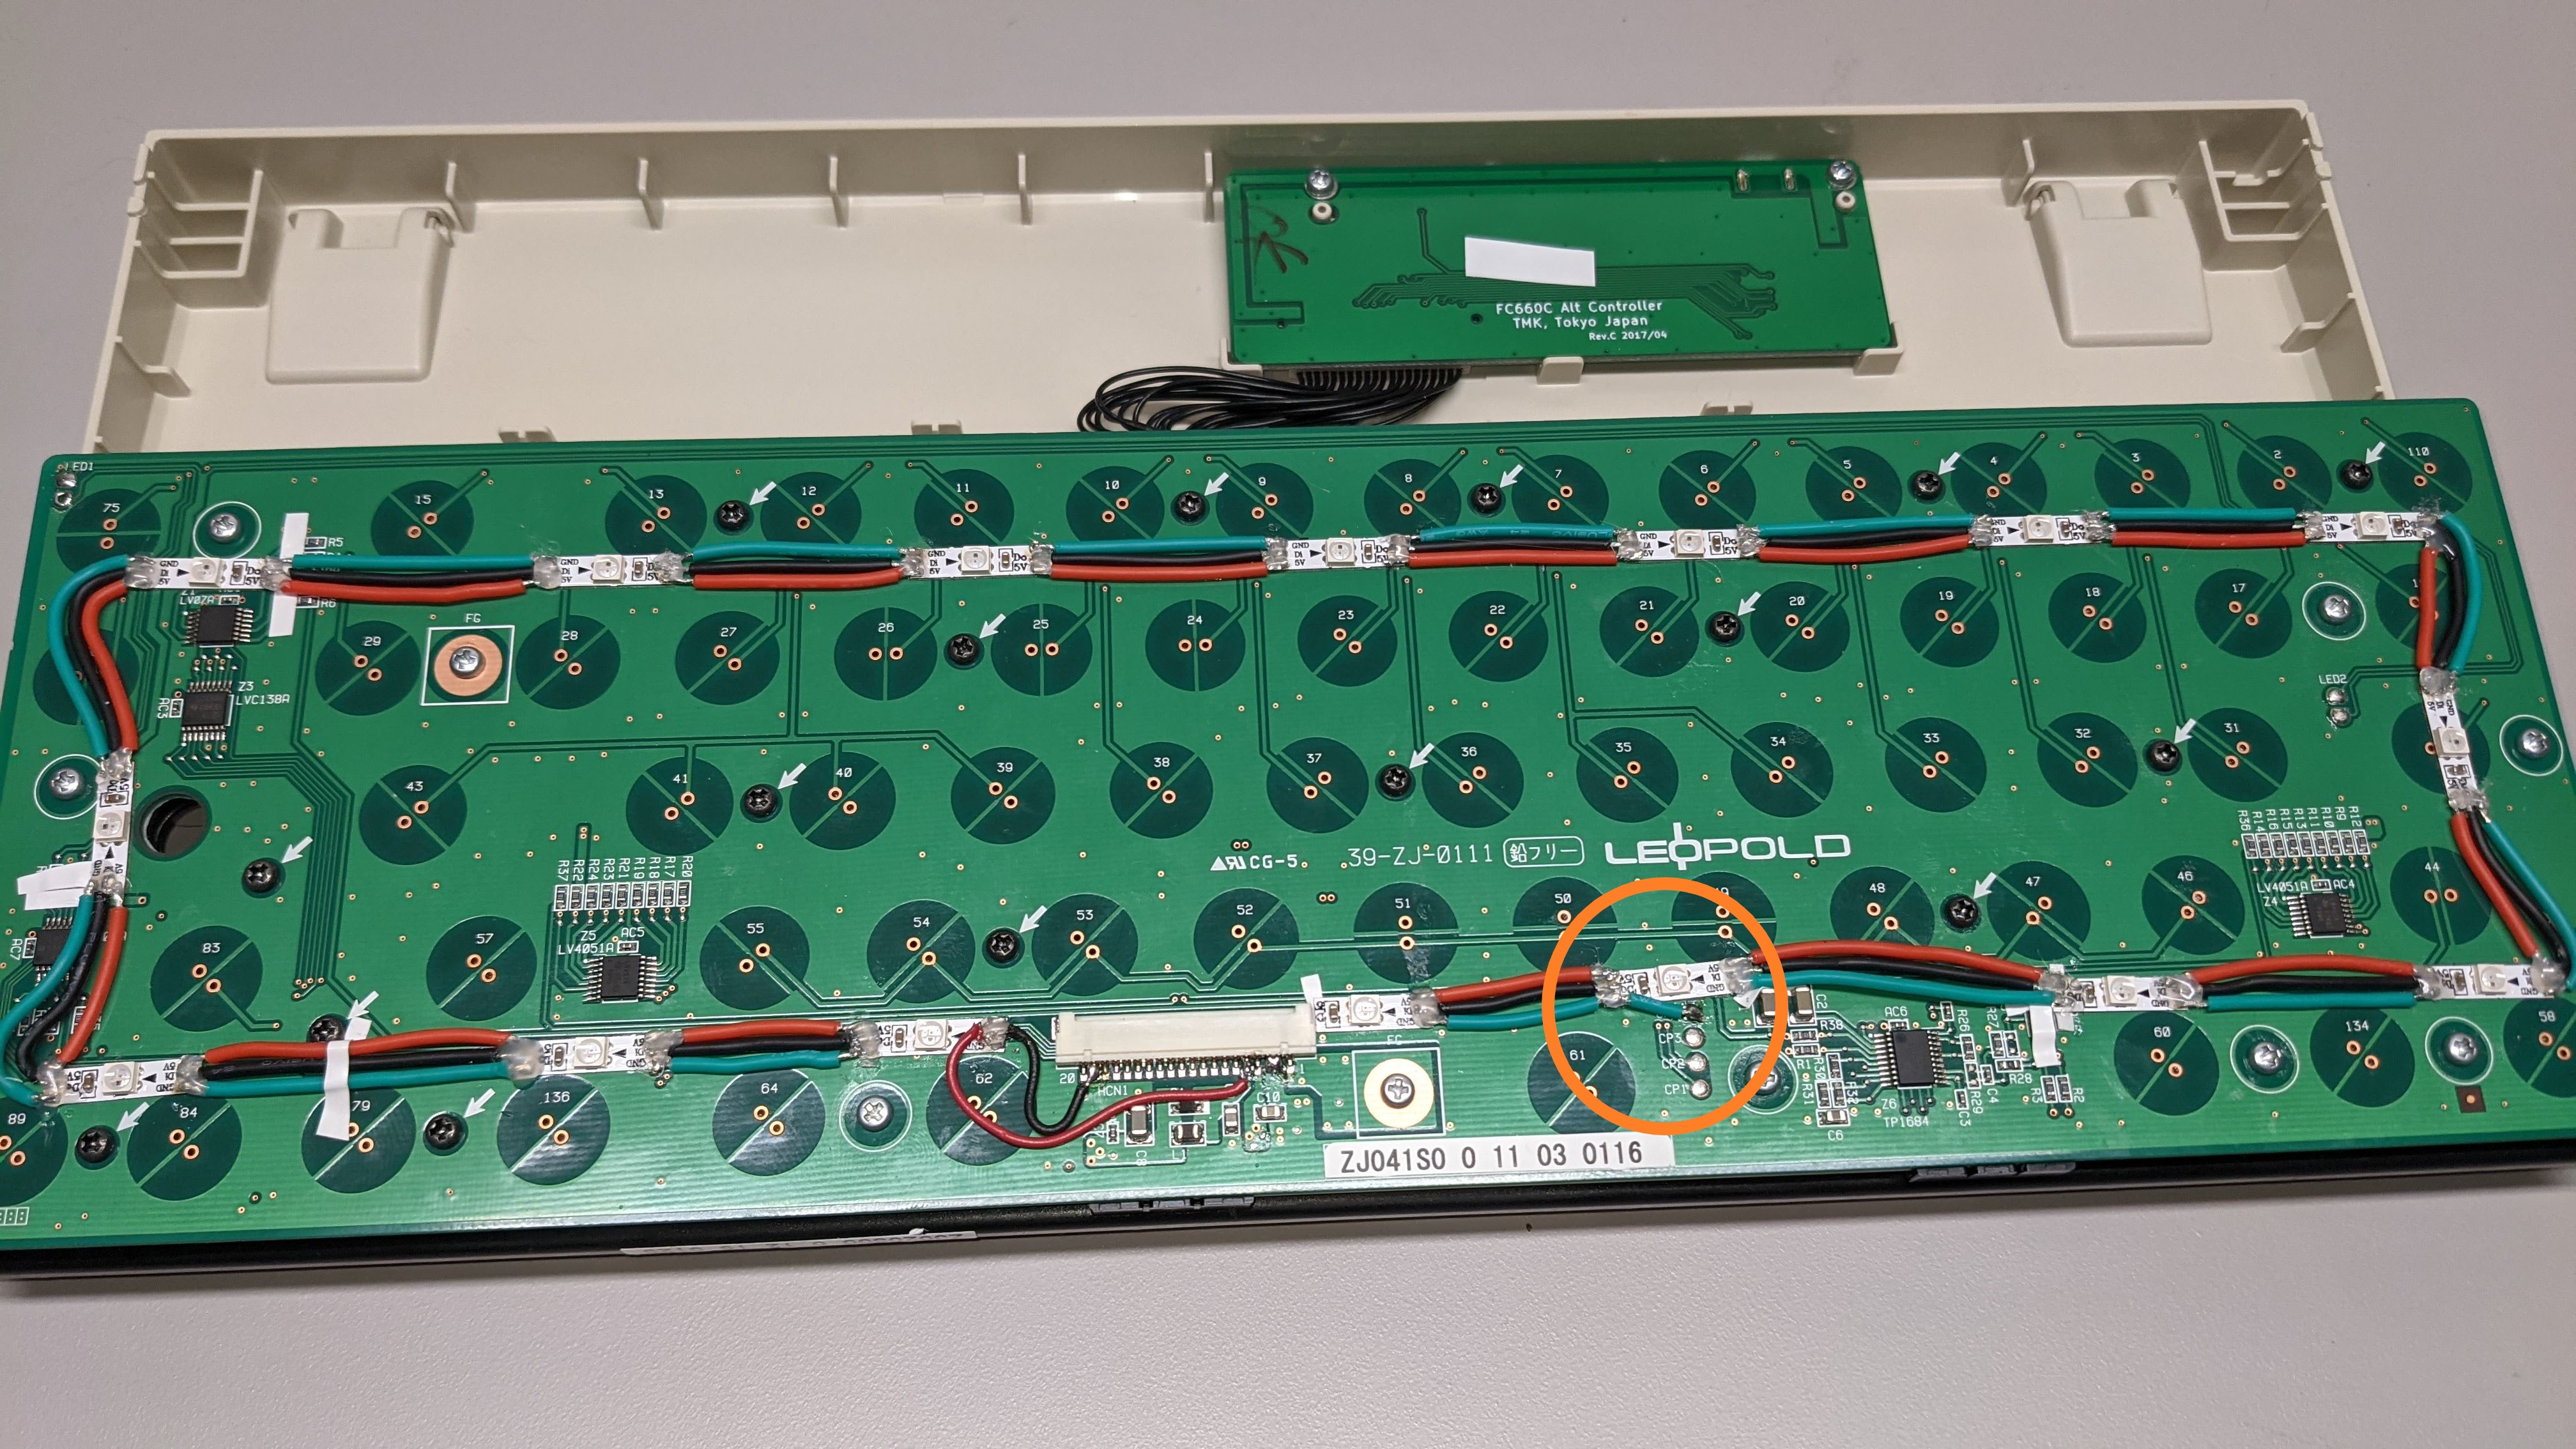
My first attempt at implementing the mod involved attaching the LEDs to the bottom of the main PCB and wiring them to the 20 pin connector, but ran into problems with not having enough clearance between the two PCBs to run LEDs. In light of this, I pivoted, instead mounting the LEDs on the backplate and wiring directly to the 20-pin connector on the HASU.
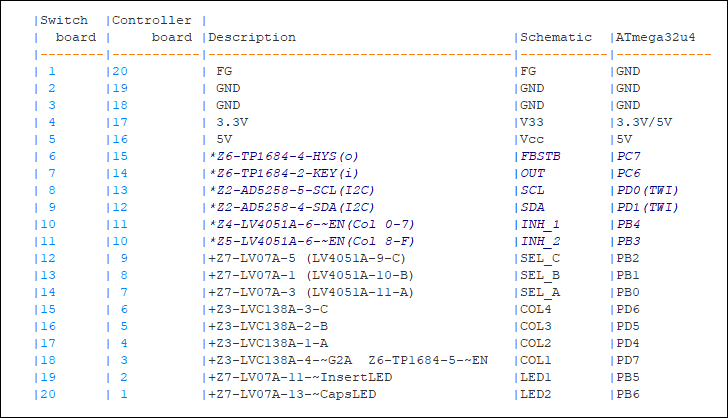
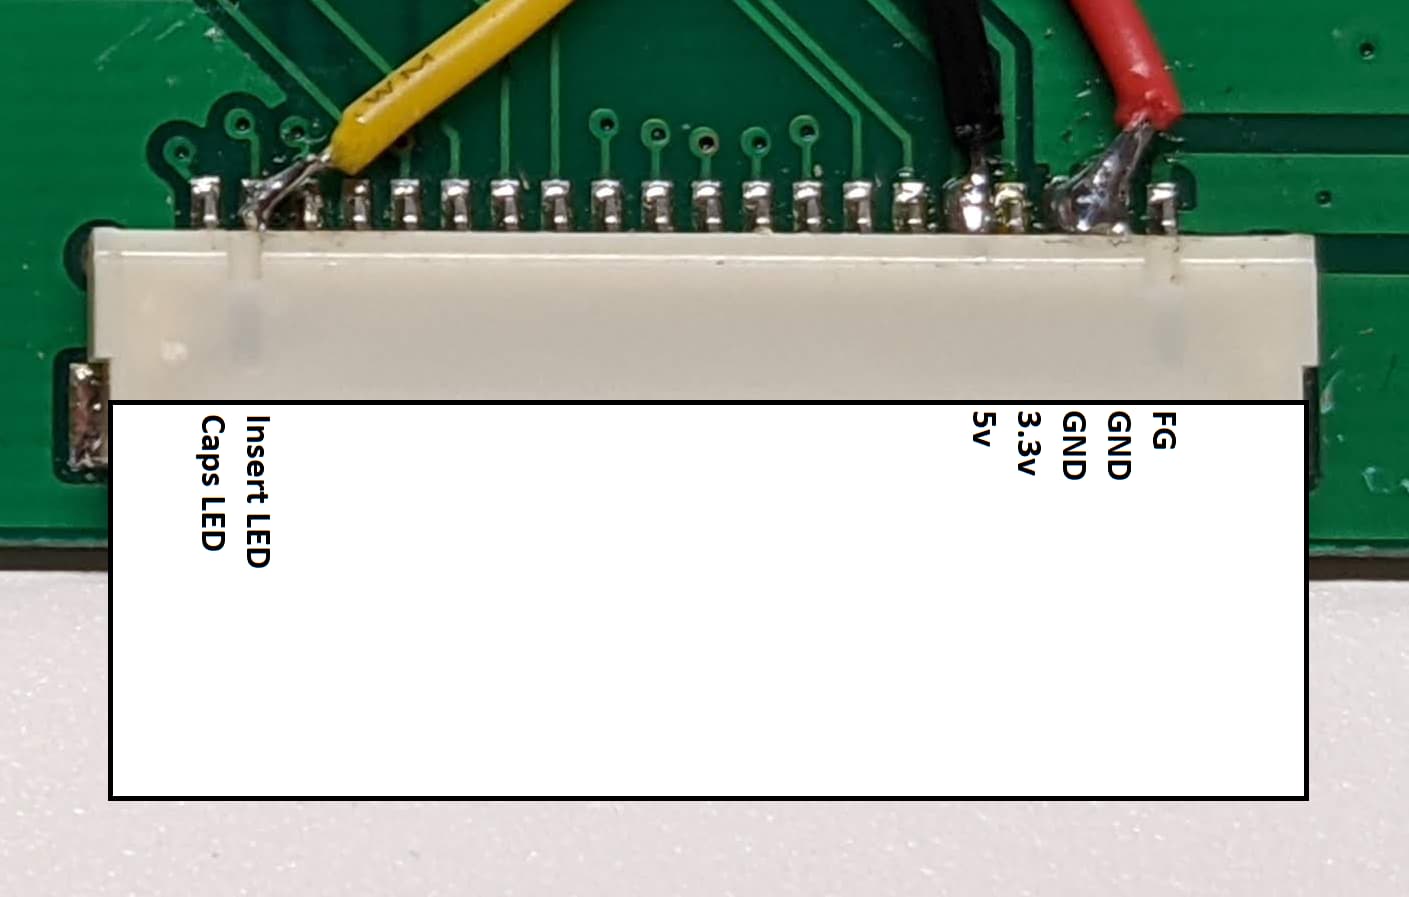
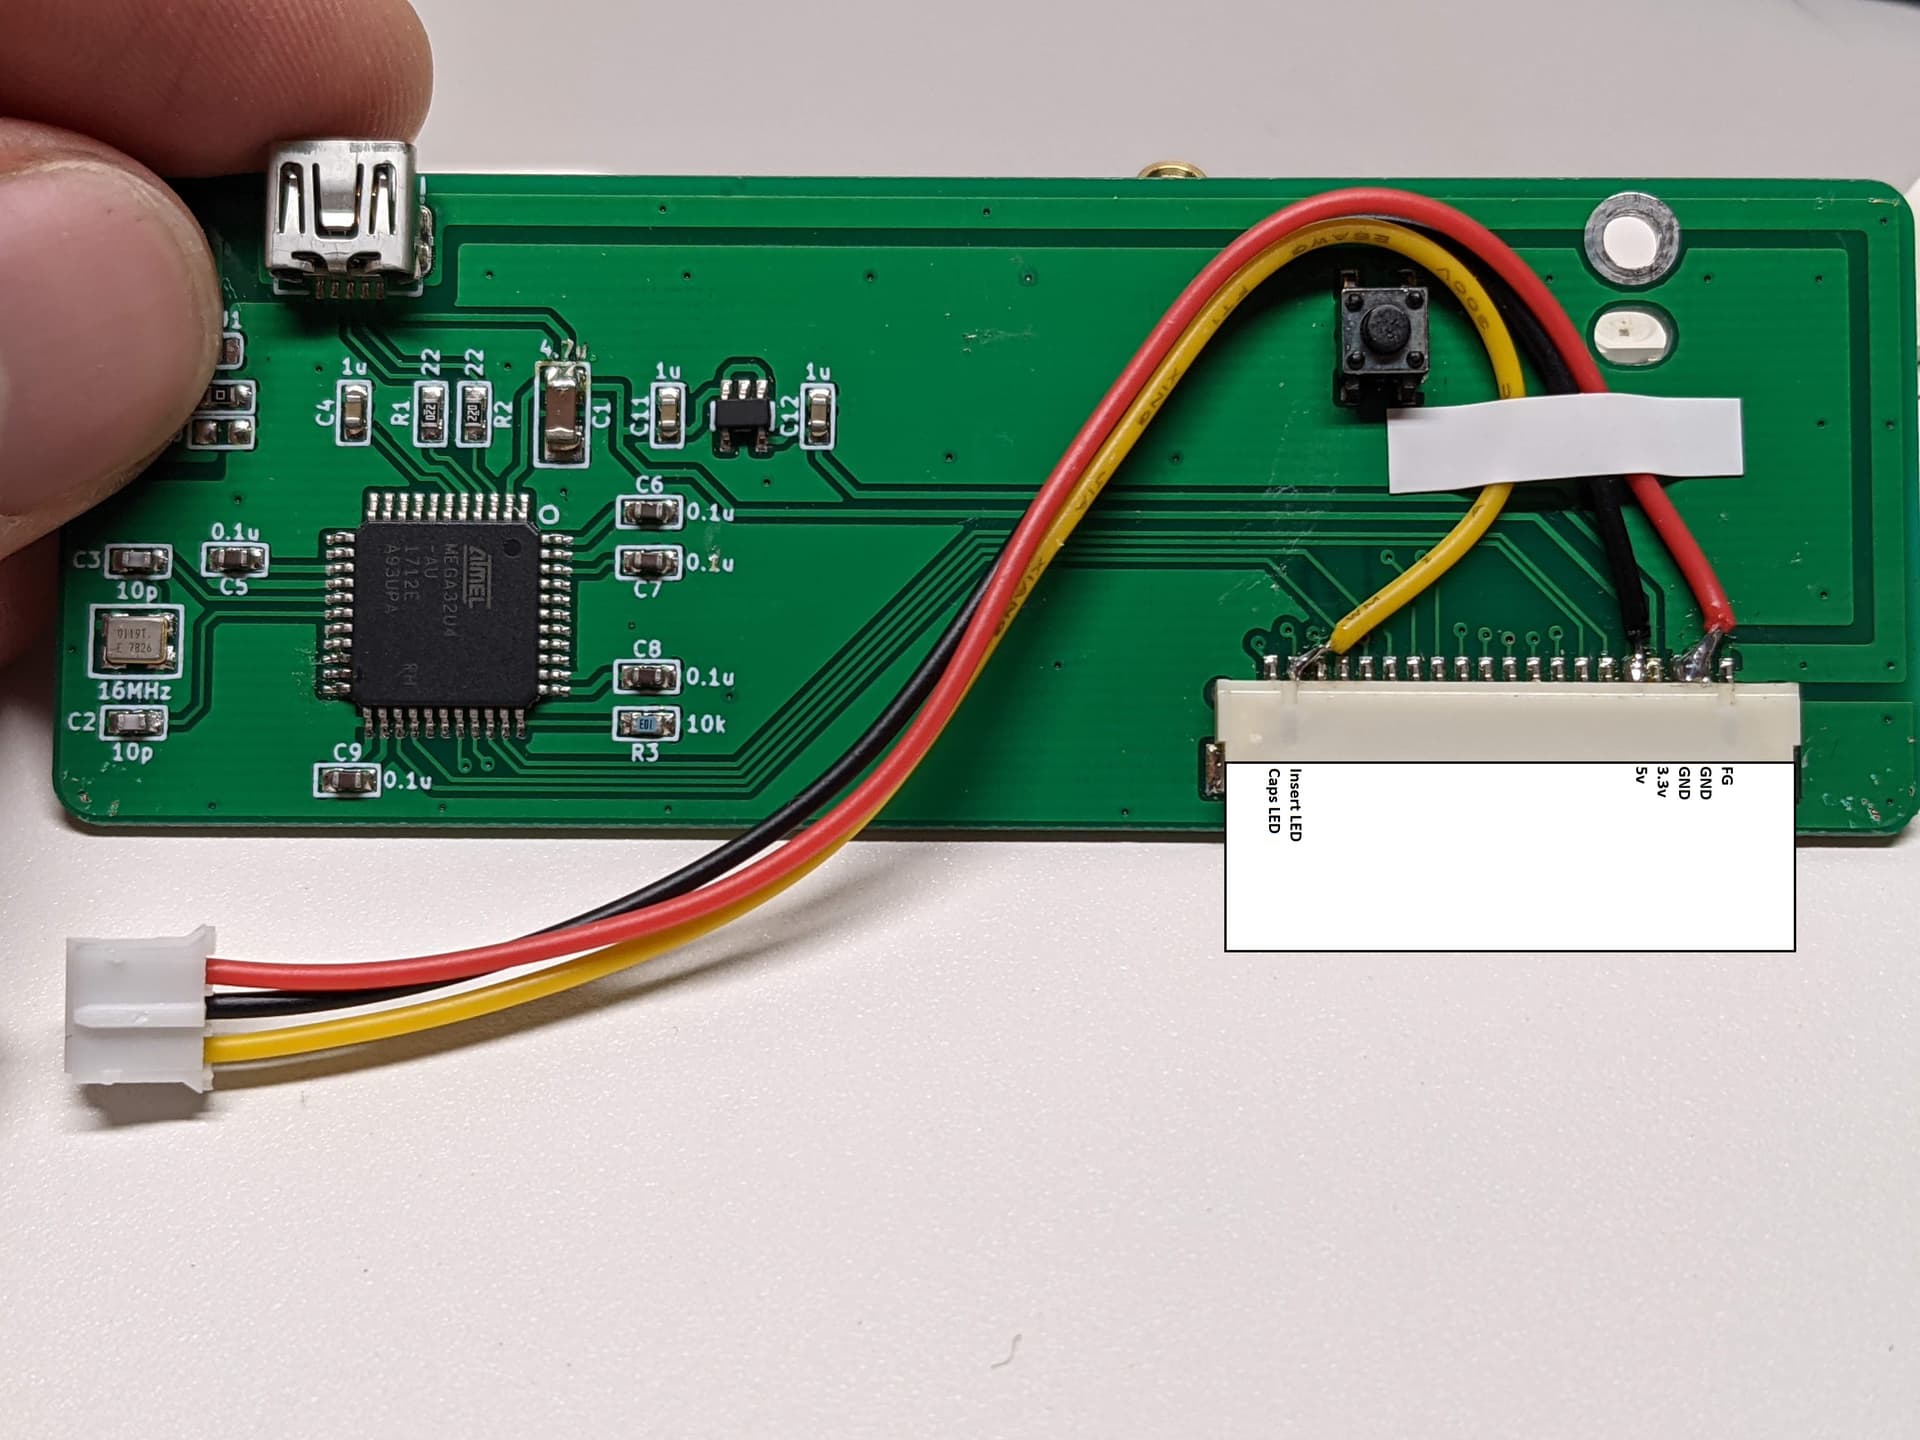
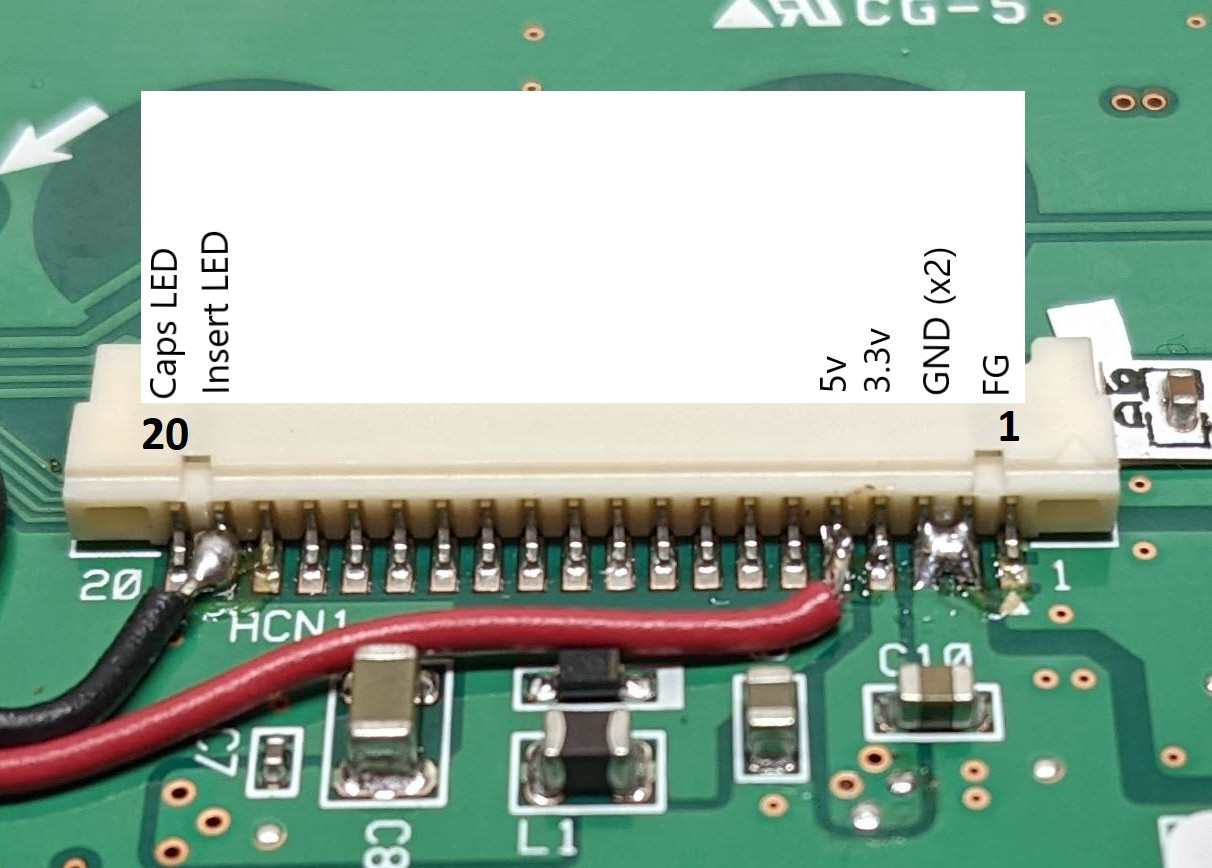
From the HASU documentation we see that pin 2 is the insert LED, which we will repurpose to drive the LEDs, and we will also pick up 5v and GND. I landed a small connector pigtail on my board to make the process of modifying easier.
Step 2 - The LEDs
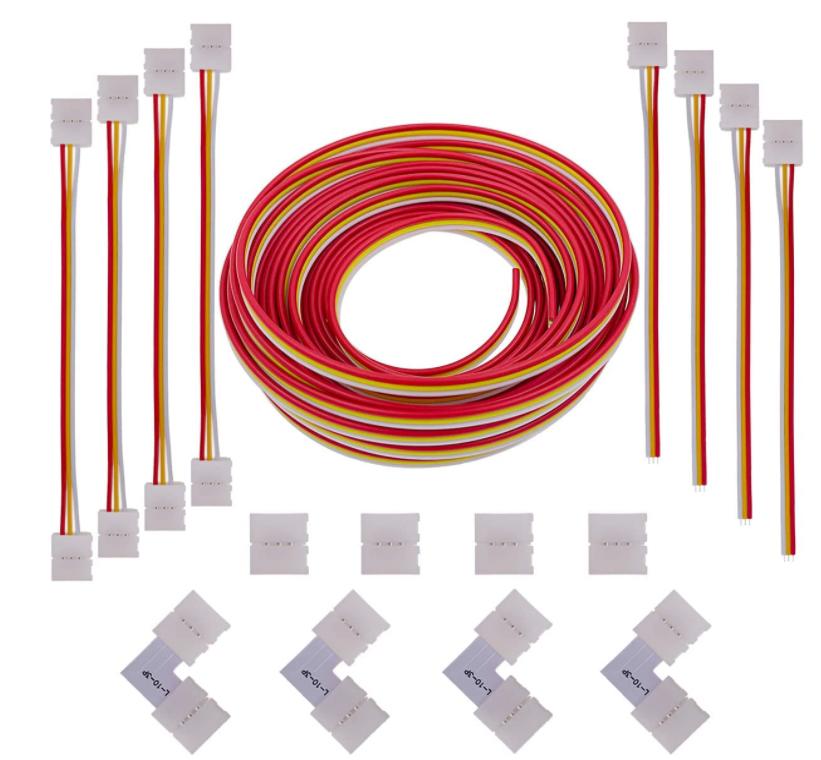
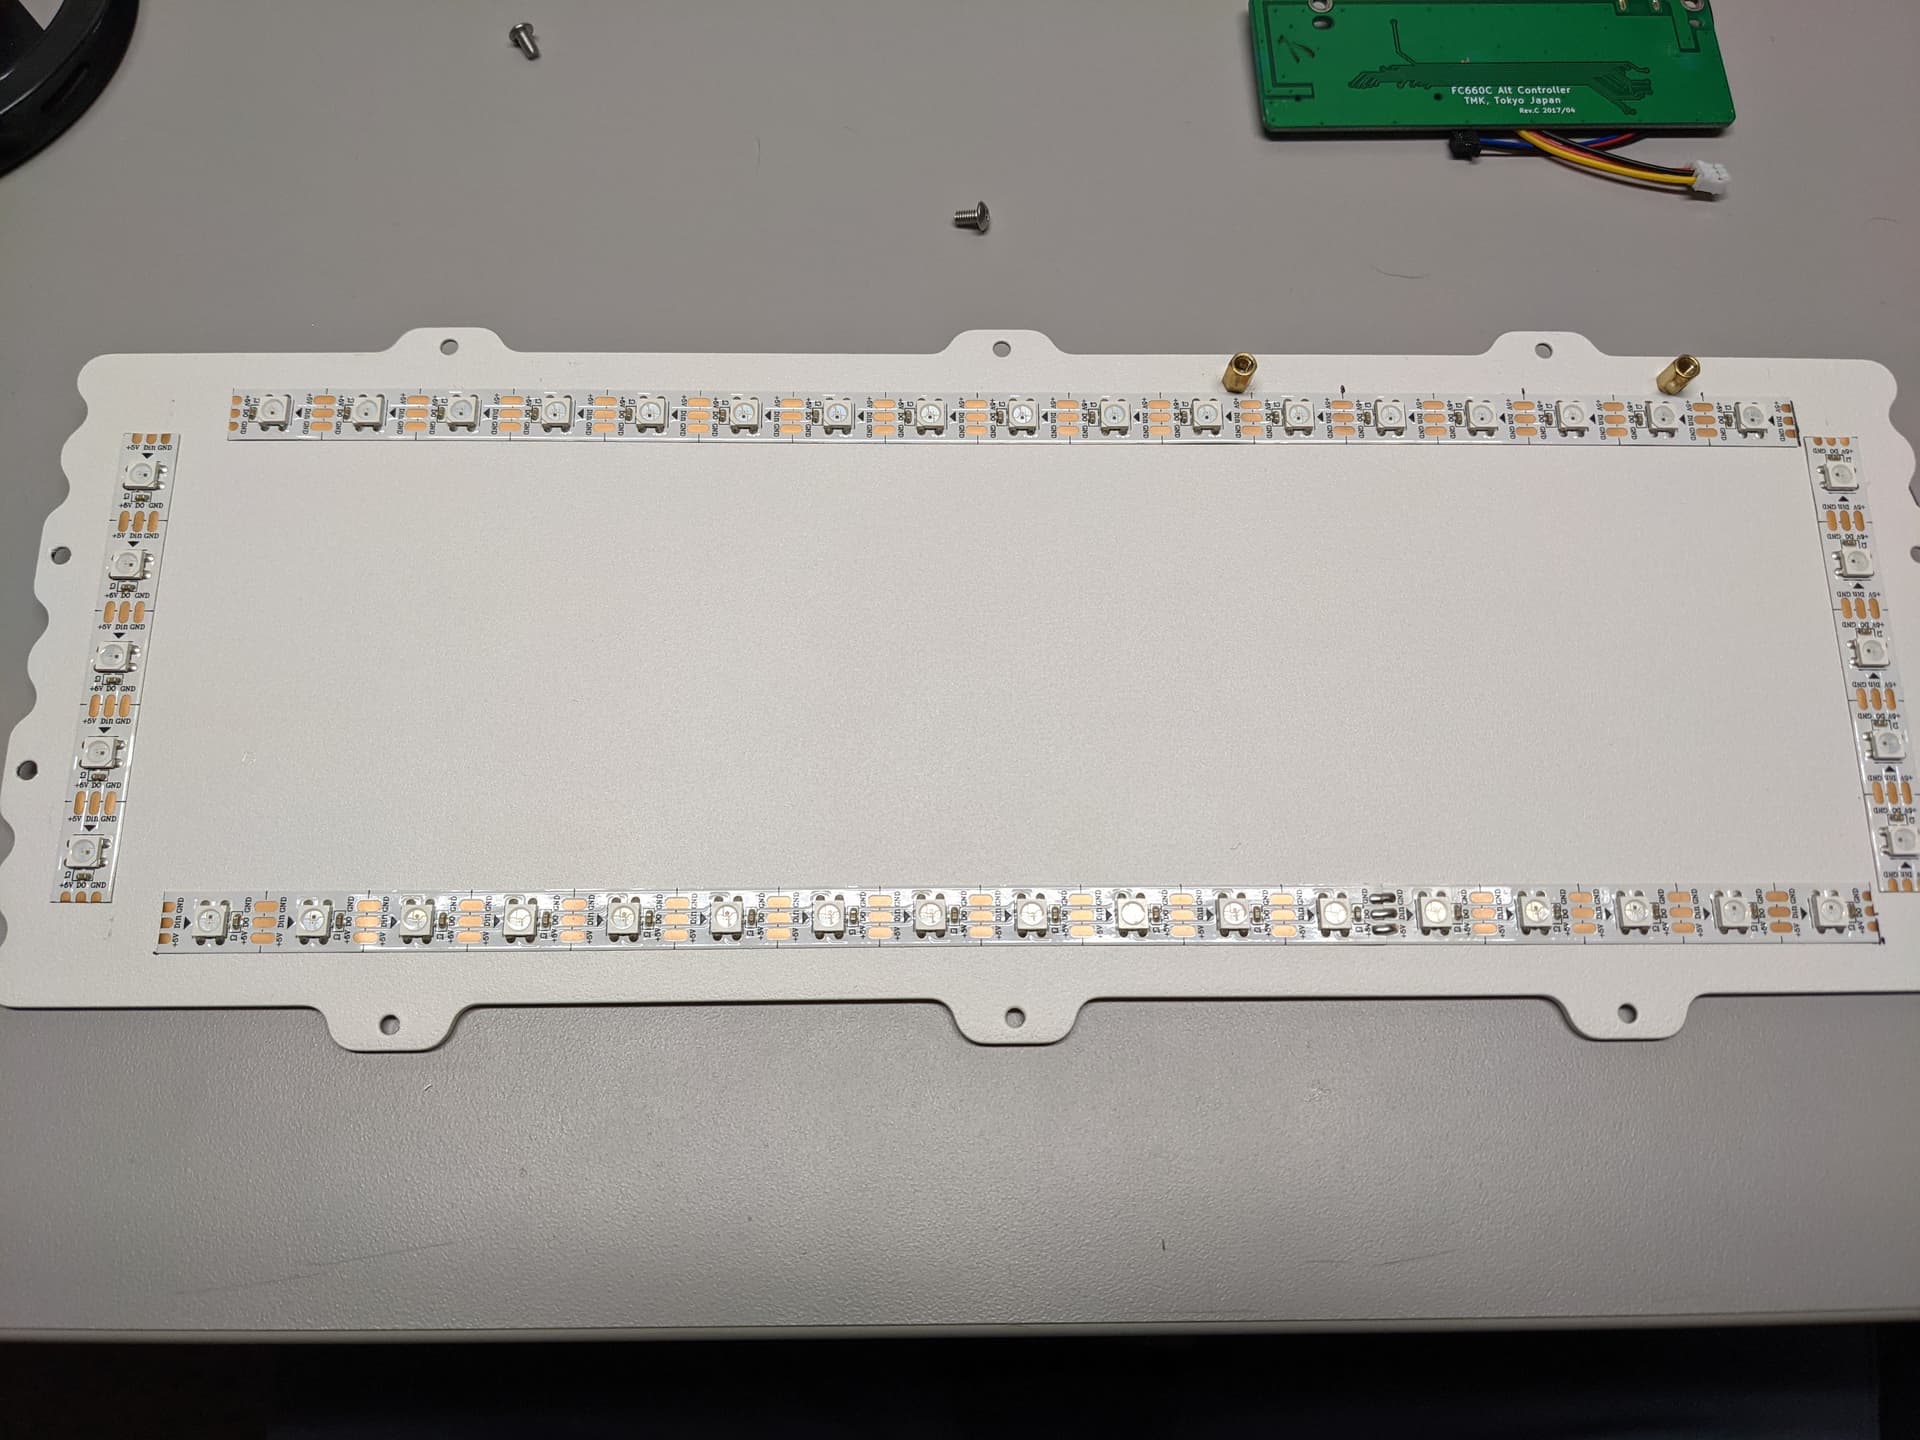
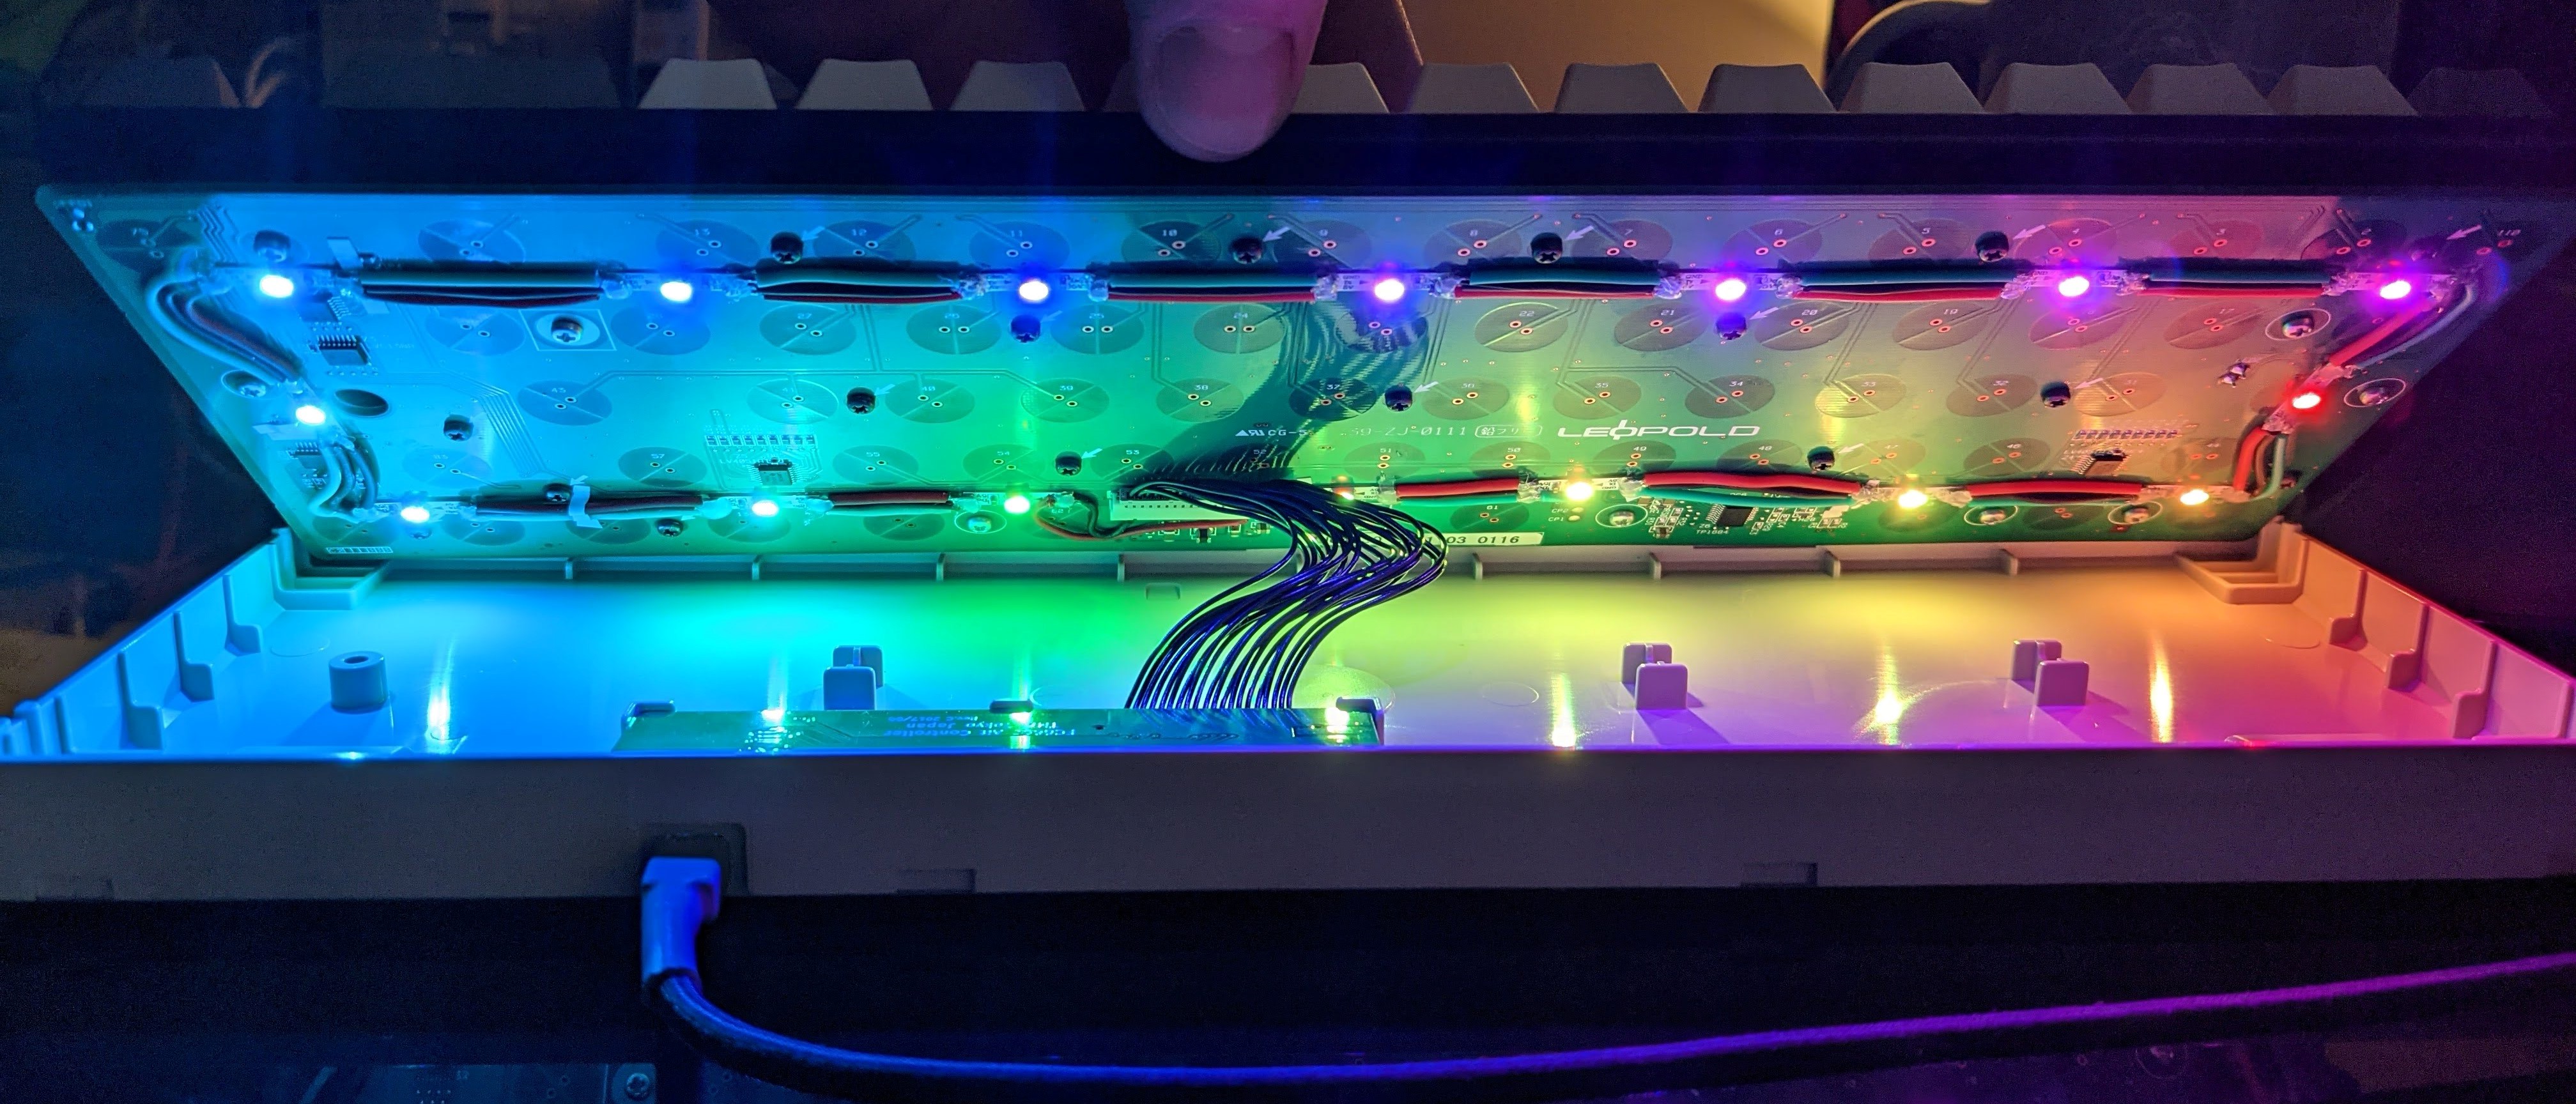
Diverging from my original guide, and in an effort to increase color consistency, I chose to install a higher-density, 60led/m WS2812 strip. Cut a strip for each of the sides of the back plate, attempting to center them and being mindful of any plate-case overlap where an LED might get pinched. Additionally, ensure that the top strip is pressed tight against the controller standoffs, as this will help fight any dark spots from the controller. Once you’re satisfied, peel and stick the strips. Connect the strips with some soldered jumpers and land the other end of the connector at the beginning of the LED strip and connect.
.
Step 3 - Firmware
From here, you need only flash the firmware.In the QMK FC660C keyboard repo are a couple RGB keymap layouts. Pick one (Default_RGB or via_RGB), compile, flash, and you’re on your way.
Other considerations
-
If you have an older model with a soldered Insert LED, it with either remain lit all the time, or you’ll need to remove the LED or cut the trace feeding it
-
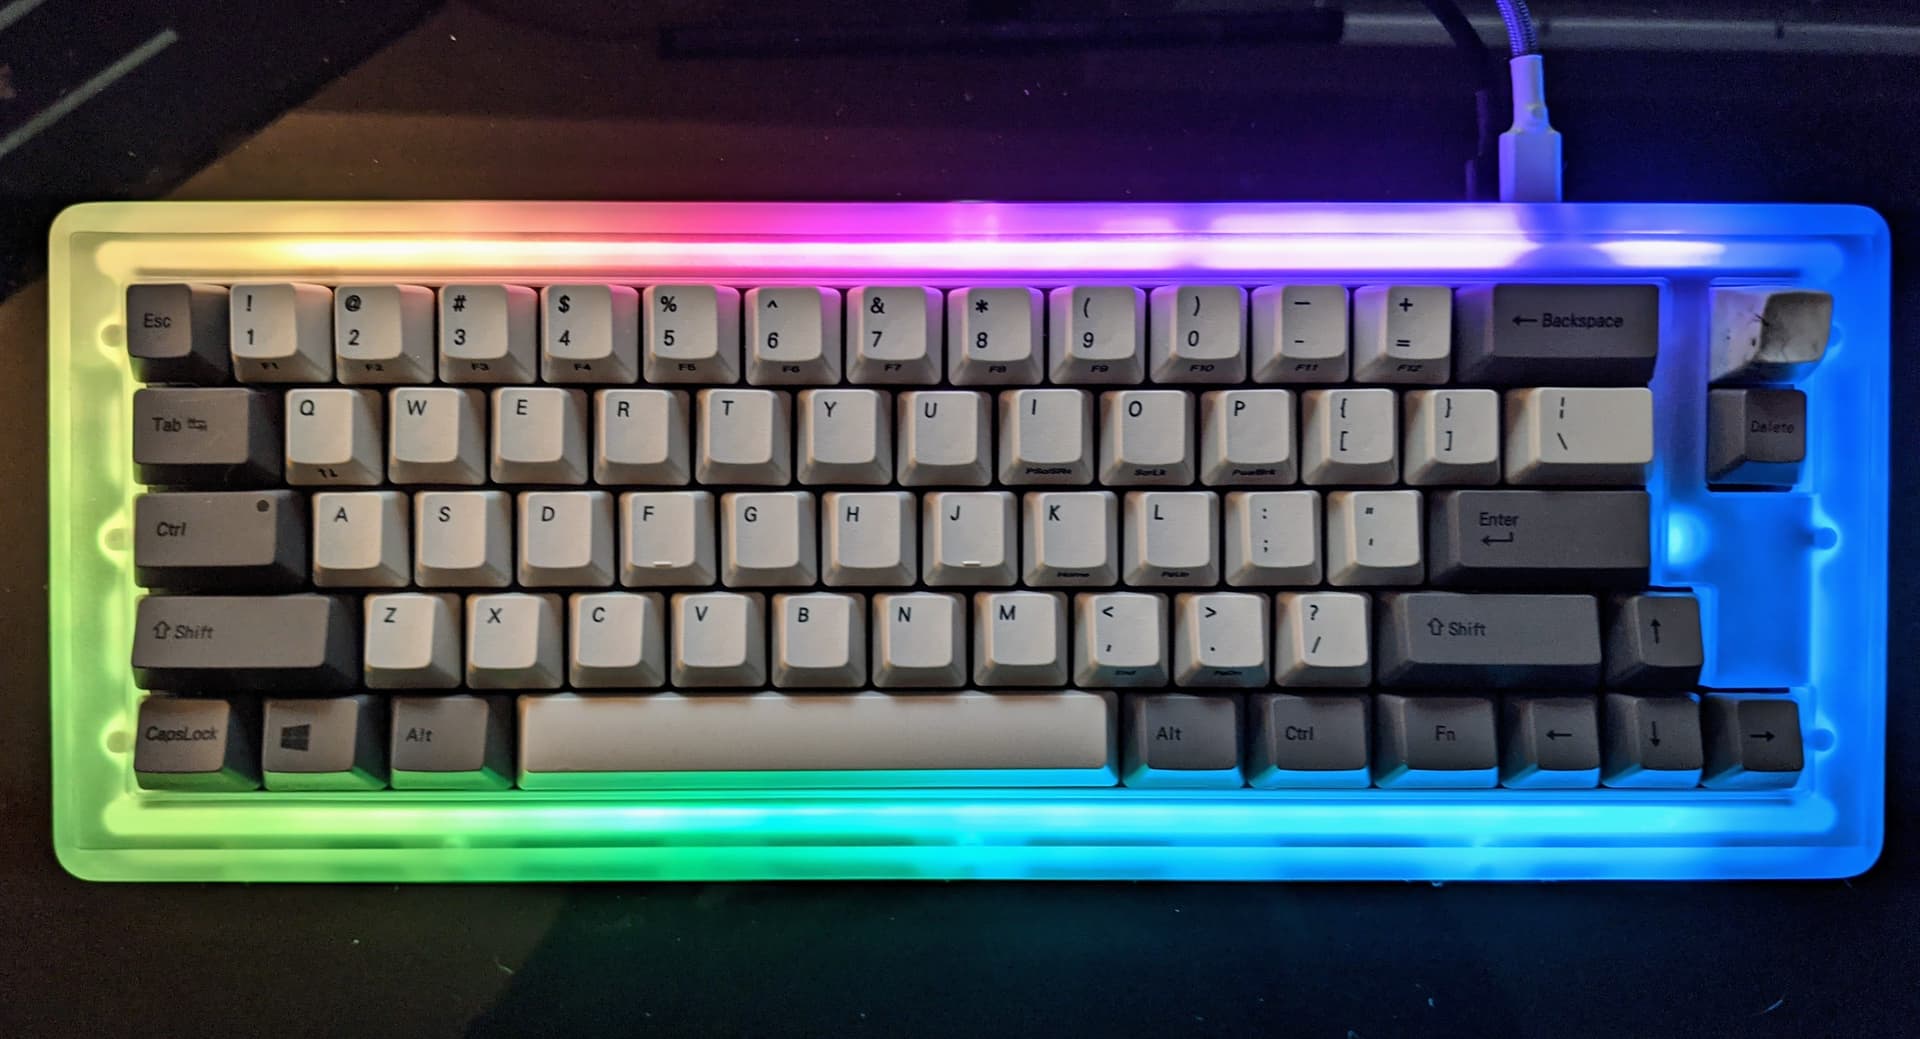
With the LEDs facing up towards the green PCB, you may find some colors to be tinted green. I addressed this issue with a simple layer of white tape on the back of the main PCB above the LEDs.
-
Due to the mounting of the HASU controller above the LEDs, you may notice a darker section in that region. Our friend @Dave developed a rather elegant solution to this issue! He modified Hasu’s design, creating a channel for the RGB to shine through the Hasu controller. While this concept is still in beta, the final design should be open-sourced and accessible to all.

I think that covers the bases. I’ve had a blast and learned a lot implementing this; please feel free to ask questions, make improvements, and share your results here!
Special thanks to @pixelpusher for alpha-testing my mod and identifying bugs, @Dave for pioneering a solution to the controller RGB shadow, and @insolentpotato for the encouragement.
Cheers!
Initial Concept and Implementation, for posterity
A quick note to anyone looking to implement this:
I’ve received my case and assembled it, and there is no space for any LEDs between the controller and the main PCB. My fix was to mount the LEDs on the back-plate. I will update the guide and photos soon.
The first task was determining a spare pin that could be used for controlling the RGB. Initially, I determined there were several spare pins on the MCU that I could repurpose, but getting that signal from the HASU to the PCB seemed like an unnecessary complication. Fortunately for me, the pin-out for the 20-pin cable is plainly detailed in the readme. I decided to repurpose the Insert LED, pin 19, as an RGB output. I grabbed 5v here as well. Originally I grabbed the GND pin here, but found it on another pad on the PCB which alleviated some of the cable cluster here.
Users with an insert LED soldered to their board will need to desolder the LED or cut the trace to it, else it will remain on all the time.
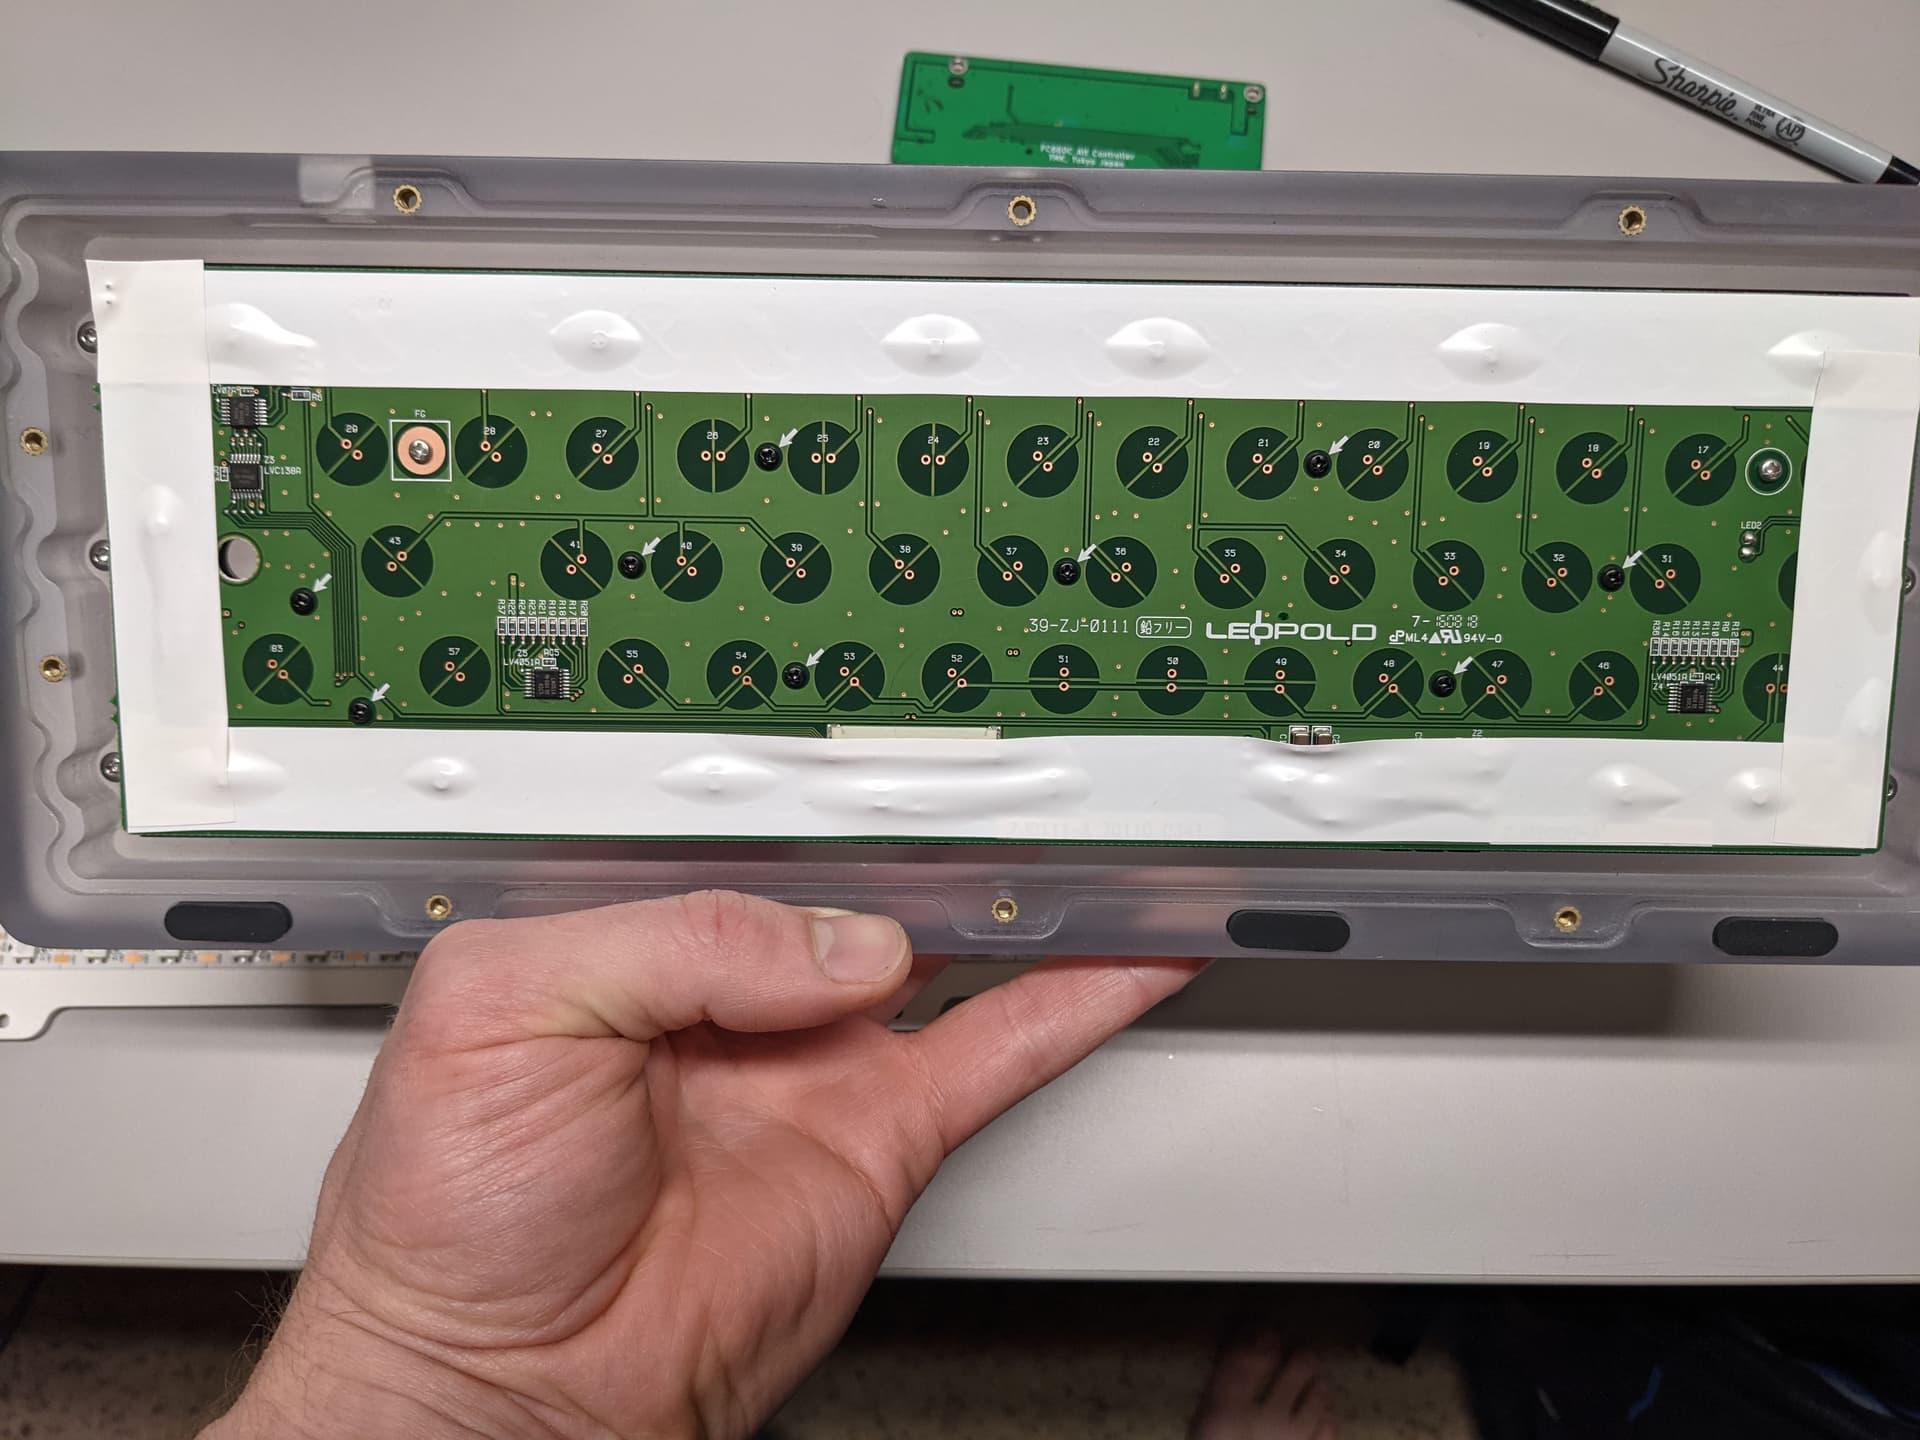
From here it was a matter of sticking & soldering LEDs. For this process, I used a Sparkfun RGB strip with 60 LEDs/meter. What followed was 48 jumper wires / 96 solder joints (Note the circled pad where I picked up the ground connection).
Editorial Note
Because of the density of the LED strip I had on hand, I had to solder each LED individually. If I were to source LEDs to do this again, I would seek out a strip with about half the density and try to get away with a single long strip on top and bottom, reducing my solder work to 15 jumpers / 30 joints.
See this comment and the subsequent comment from Dave for some product suggestions.
Lastly you need to flash the firmware! Firmware changes have been merged into the QMK main branch! You can pick a keymap (Default_RGB or VIA_RGB), compile and flash!
Firmware Modifications - Depreciated
Finally it is just a matter of updating the firmware to drive them. Changes included creating new keymap folders and including a config.h file with RGB control and a rules.mk file with RGB enabled (and a couple other tweaks).
See the firmware repo here for complete firmware. Copy the keyboards/fc660c/keymaps/default_rgb or keyboards/fc660c/keymaps/via_rgb folder(s) into your working QMK repo and compile them to get rolling. If you want to use via with the extra RGB functions, you can find an updated via json in the via_rgb folder.
I’ve submitted a PR with the QMK repo to have these folders added so that anyone can enjoy them.
Even More Depreciated Firmware Details
Changes made include:
- Disabling the Insert LED indicator in matrix.c
- Adding RGB to config.h, adding RGB to rules.mk
- Disabling Command_Enable in rules.mk (firmware was too big when including via)
- Adding a rules.mk to the default keymap to retain the Command_Enable functionality in non-VIA keymaps
- Modifying VIA json for RGB support
I’ve uploaded the modified keyboard firmware to it’s own repo. Downloading and dropping the fc660c folder into your QMK folder (rename the existing fc660 folder first) should allow you to get up and running in short order.