Hi, I'm jshufelt

Great build log. I had trouble with gaskets too. More so because I forgot to take the keycaps off after putting them on to check keycap alignment. This left PCB sitting too high when upside-down so I had to hold the case top between my legs while placing the PCB between side gaskets.

It was only after I finished assembling that I remembered I had built a custom rig for holding keyboard upside while working with Topre domes. Doh.

2 Likes

Nice looking build. I enjoyed the write up. I like my Gateron yellow inks, but I wish they weren’t a “speed” switch that actuated so high up. However, their smoothness, sound, and spring weight are very appealing to me.

3 Likes

As usual, very nice report :slight_smile:

2 Likes

Build #39: Kaffeeb(r)auer

How many of us begin our days at a keyboard with a cup of coffee? Let’s take that relationship to the next level.

I’ve written before about the dangers of trying to color match boards and keycap sets based on renders, or even photos - color matching is no joke. But as much as I try to be rational and scientific about these things, sometimes I just have a hunch. When I saw the bronze cerakoted Bauer and GMK Café, I knew what had to happen - and, as awful as my FCFS/raffle/RNG mojo has been in recent months, I got lucky here with the Bauer. Let’s start brewing.

Grind

This is what showed up on my doorstep back in March 2020. Are we excited yet?


There is a part of me that doesn’t care all that much about the packaging details - ultimately, it’s the product that counts. Then there’s the other part of me that gets fired up when I see touches like this echo of the Bauer curve on the packaging. Details matter!

And again - echoing the Bauer base, with virtual bumpons.

Yes, it’s a slow reveal. Finger holes for the protective foam - another minor detail, but I like it.

We’ll get to the PCB in a moment, but this is a nice touch, printed on good cardstock. Thanks, Mr. and Mrs. Dixie!

And, a helpful cautionary warning. Sadly, grit in the threads is a problem I’ve encountered the hard way on a somewhat recent build, so this is both topical and useful.

I don’t want to spoil the Bauer’s thunder, nor my own with this build log, but take a moment to check out the Bauer build guide. It sits right next to the Norbaforce cartoon guide at the top of the heap, as far as instruction manuals for custom keyboard builds go.

Tamp

I know, I’m such a tease. But before we go further, let’s get switch tuning out of the way. For this build, I wanted to try out the Deskeys switch films. These come in precut sheets, and individual films can just be peeled away from the backing. They’re not particularly sticky, but they do crease easily, so some care is warranted.

A disassembled NovelKeys cream, with tub-lubed spring and film in place.

When I’m lubing and modding switches, I prefer to work in small batches; I don’t always have time to do an entire board in one sitting - and if I’m being honest, the breaks are necessary to keep me from losing my mind. It is my fervent hope that good factory-lubed switches become a thing, but until that time…


Let’s take a look at the PCB. The Bauer’s PCB is the WT65-B, a Wilba production, so we know what to expect - clean traces and design, and a beautiful solder mask. Branding is kept to a tasteful minimum.

The underside is similarly clean. One notable addition is the JST daughterboard connector, over on the right side of the PCB near the Atmega32U4 controller chip. If I have any complaint here, it’s the lack of key labeling for each switch cutout. But this is just nitpicking, since this is almost the exact opposite of a “Swiss cheese” PCB - there are very few alternate layout options for the Bauer PCB, and it’s pretty obvious what those options are.

And, using the stock plate that comes with the Bauer kit (in this case, a sandblasted brass plate), even those few choices are eliminated.

Pull

Oh, all right, you want to see that Bauer now? First look, bronze cerakote with brass plate. I’m unable to properly capture that cerakote finish, but it is flecked with very fine gold specks that catch direct light in a lovely way.

If you’ve read through the previous 38 build logs, you know how the switch and stabilizer parade goes.
If you look closely, you’ll see I wasn’t particularly precise with film alignment when putting the switches back together. I didn’t notice any difference in sound or feel as a function of film placement. With Creams, the Deskeys films make for a tight fit - you will need to inspect each switch after reassembly to make sure both sides of the top housing have fully snapped into place. I found that when I listened carefully, I could hear two separate clicks; a louder one when one side of the top housing locked into place, and a fainter one when the other snapped into place. In any case, if they aren’t properly snapped together, you’ll find that out when you try to fit them into the plate, as they won’t fit.

Next, we need to attach the daughterboard to the bottom piece of the case, and then use the included cable to attach the daughterboard to the PCB. If you happen to be one of the last stragglers, like me, who hasn’t built his Bauer yet, and your eyes are as bad as mine, then I’m here to help. Here’s how the JST connector should look when it’s attached to the PCB.

In passing, I’ll also note that the adhesive foam gaskets that you see around the perimeter of the case bottom were preinstalled. Nice.

The plate is held in place by pressure from the gaskets on the bottom and top of the case halves, so the trick here is simply placing the PCB/plate assembly on the bottom gaskets and aligning the plate with the case, and then placing the other half of the case (also equipped with gaskets, which we can see here) on top.

Serve

From here, it’s just a matter of (carefully!) installing the seven screws to hold the whole thing together. Here’s the underside of the Bauer, exactly as we expected from the packaging. Details matter!

At this point, the Bauer is ready to receive keycaps.

And receive keycaps it shall, and, sometimes, our color hunches pan out. GMK Cafe turns out to be just the thing for the dark finish of this Bauer.

Lessons learned

  • The sound of Cream switches is modestly but noticeably improved with the use of films; I found it to be crisper and cleaner than a stock Cream switch.
  • Deskeys films seem perfectly fine to me for switch filming; they are a bit more delicate than TX films, so if creasing the films is an issue for you, you may prefer TX films.
  • With preinstalled gaskets, it’s a little harder to tell, but I think the gaskets are making a significant difference in board acoustics. To see this for yourself, snap some Creams into place in the plate, and then actuate the switch while holding the plate close to your ear. You’ll hear plate ping, which is essentially gone once the plate is sandwiched between the gaskets. I initially thought I might have to use some Sorbothane or foam in this board, but it’s not needed.
  • Packaging, instructions, ease of build, and quality of the Bauer kit are all well in line with what you should expect from a premium custom build, and this bodes well for the imminent Bauer 2.

I hope you’ll agree that a proper coffee service is a thing of beauty.

Specifications

case: DixieMech Bauer
- 6063 aluminum
- bronze cerakote top
- brass bottom
case dampening:
- preinstalled adhesive foam gaskets, top and bottom
PCB: WT65-B
- VIA support
plate: brass Bauer plate
plate/PCB dampening: n/a
stabilizers: GMK PCB screw-in
- 1x7u, 2x2u
stabilizer mods:
- clipped and lubed with SuperLube
- installed with cloth washers
switches: 66x NovelKeys Creams
switch mods:
- springs tub-lubed with Krytox GPL 104
- stems hand-lubed with Krytox GPL 205g0
- no housing lube
- filmed with Deskeys switch films
keycaps: GMK Café
HxWxD (without caps or feet): 1.13" x 12.88" x 4.81"
HxWxD (without caps): 1.19" x 12.88" x 4.81"
HxWxD: 1.44" x 12.88" x 4.81"
assembled weight: 2.39 kg (5.27 lb)
16 Likes

I’ve waited so long for this build, and was afraid you had decided to stop doing it :smiley:

Very nice build log as always, the Bauer looks to be a stunning board to type on.

1 Like

Build #40: ElectroType 87

This client build began with a few requests:

  • I’m a light typist, and even then, clack makes me crazy. Build me a keyboard as silent as you possibly can.
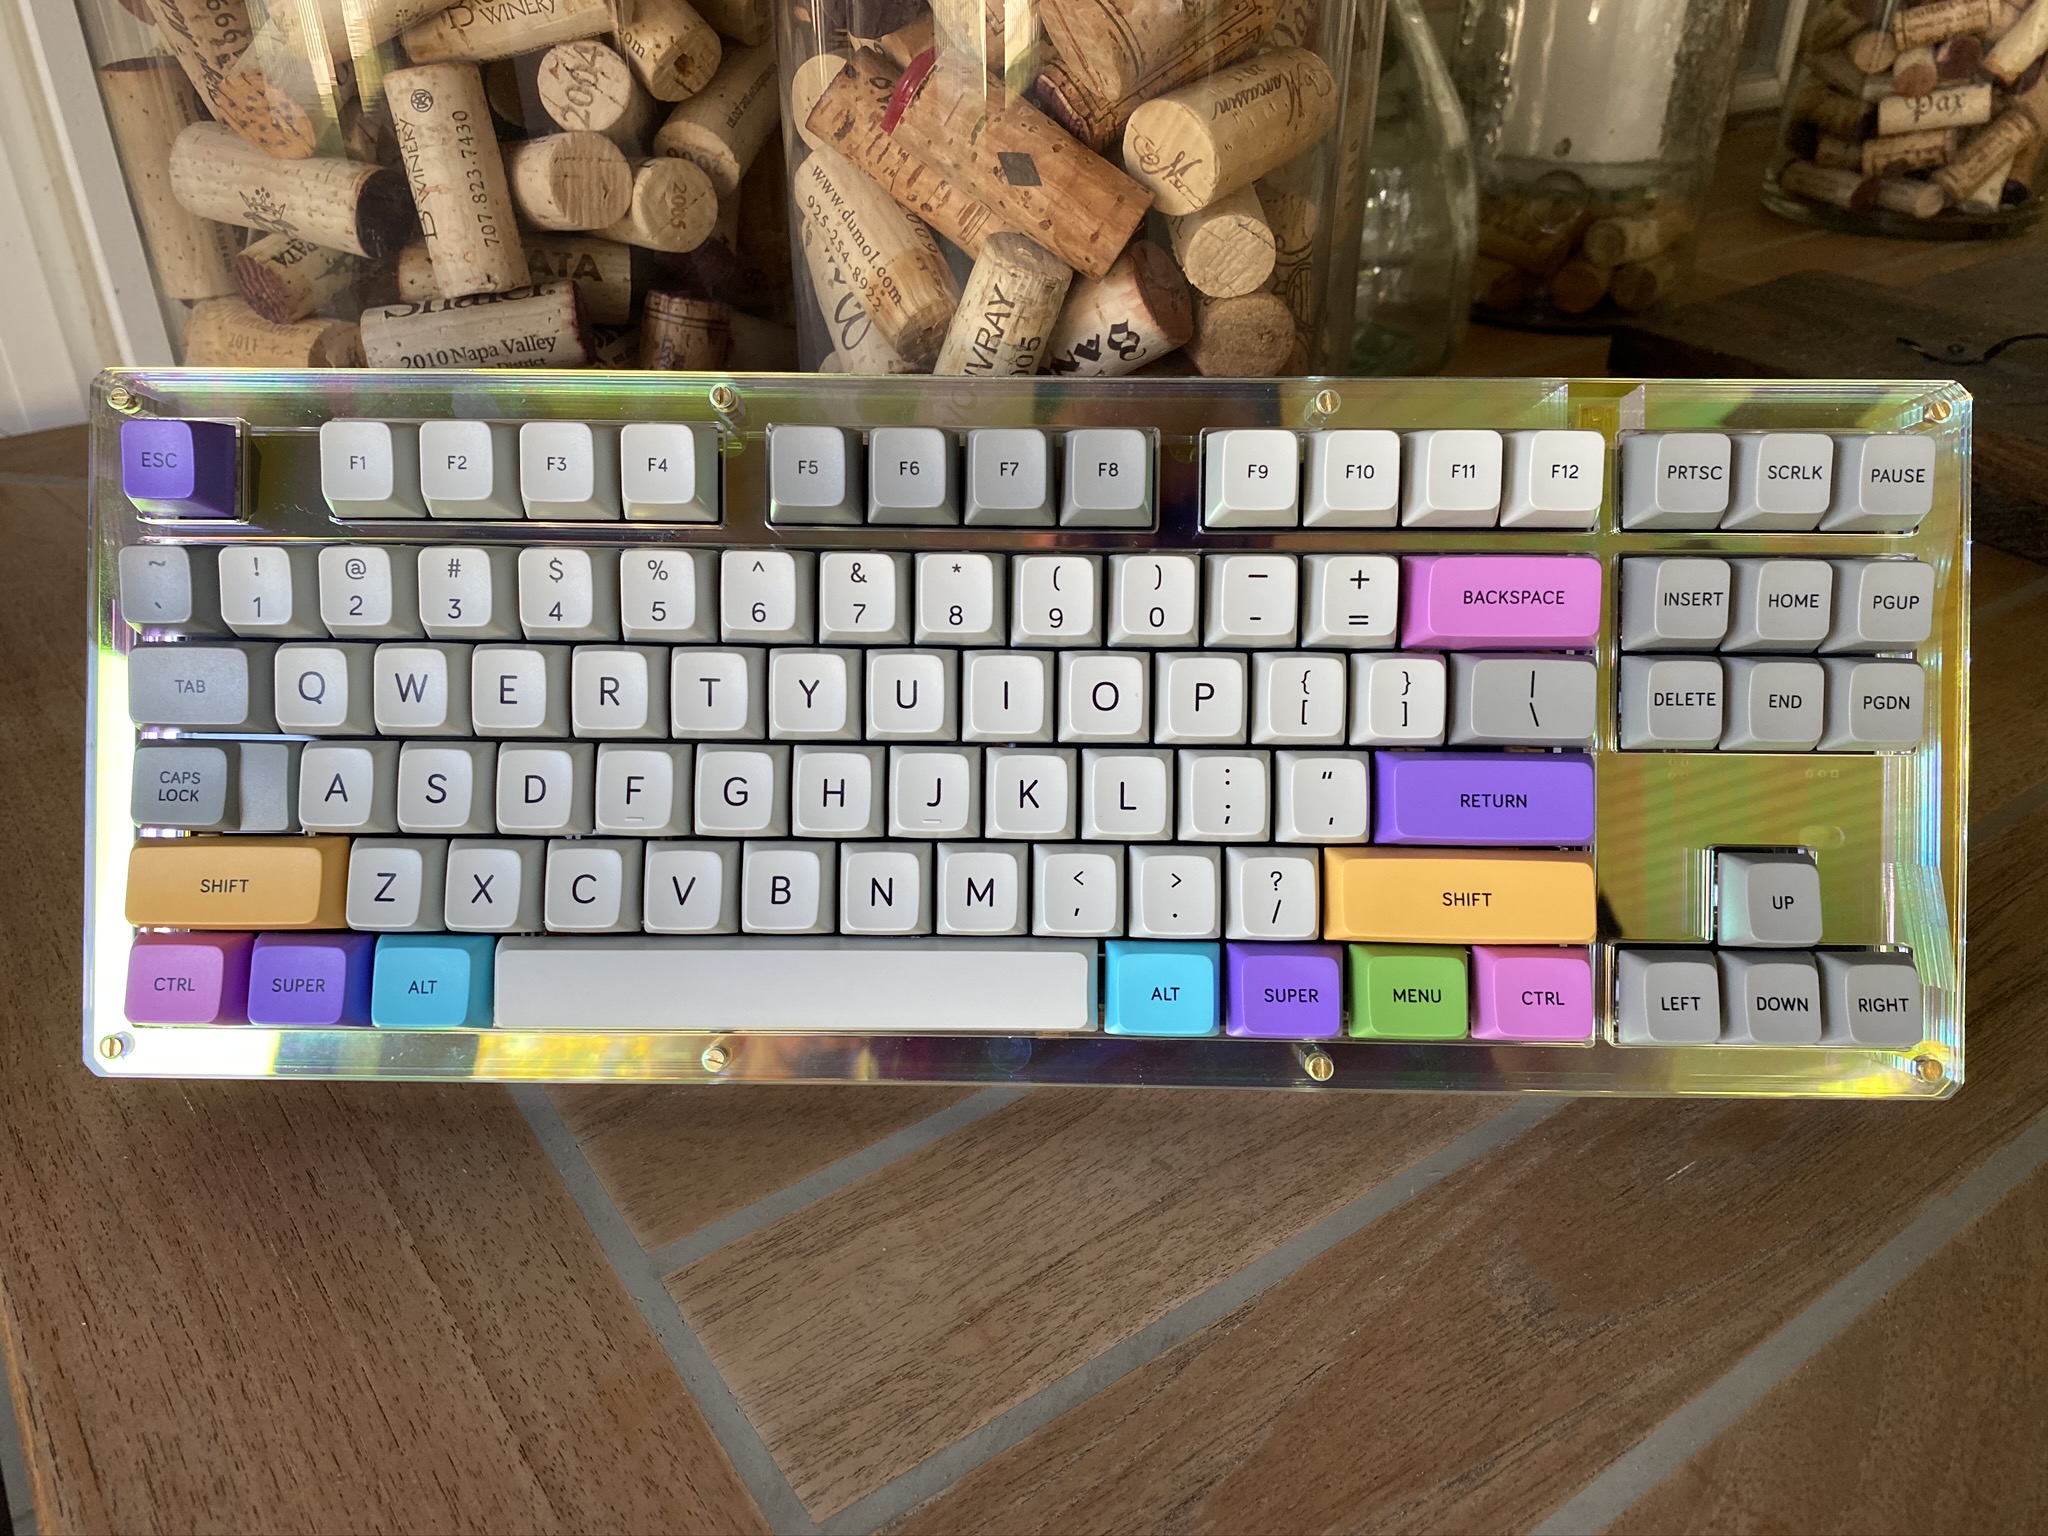
  • This is not a wallflower keyboard. Give me colors.
  • No tactiles. Bumps are for kids.

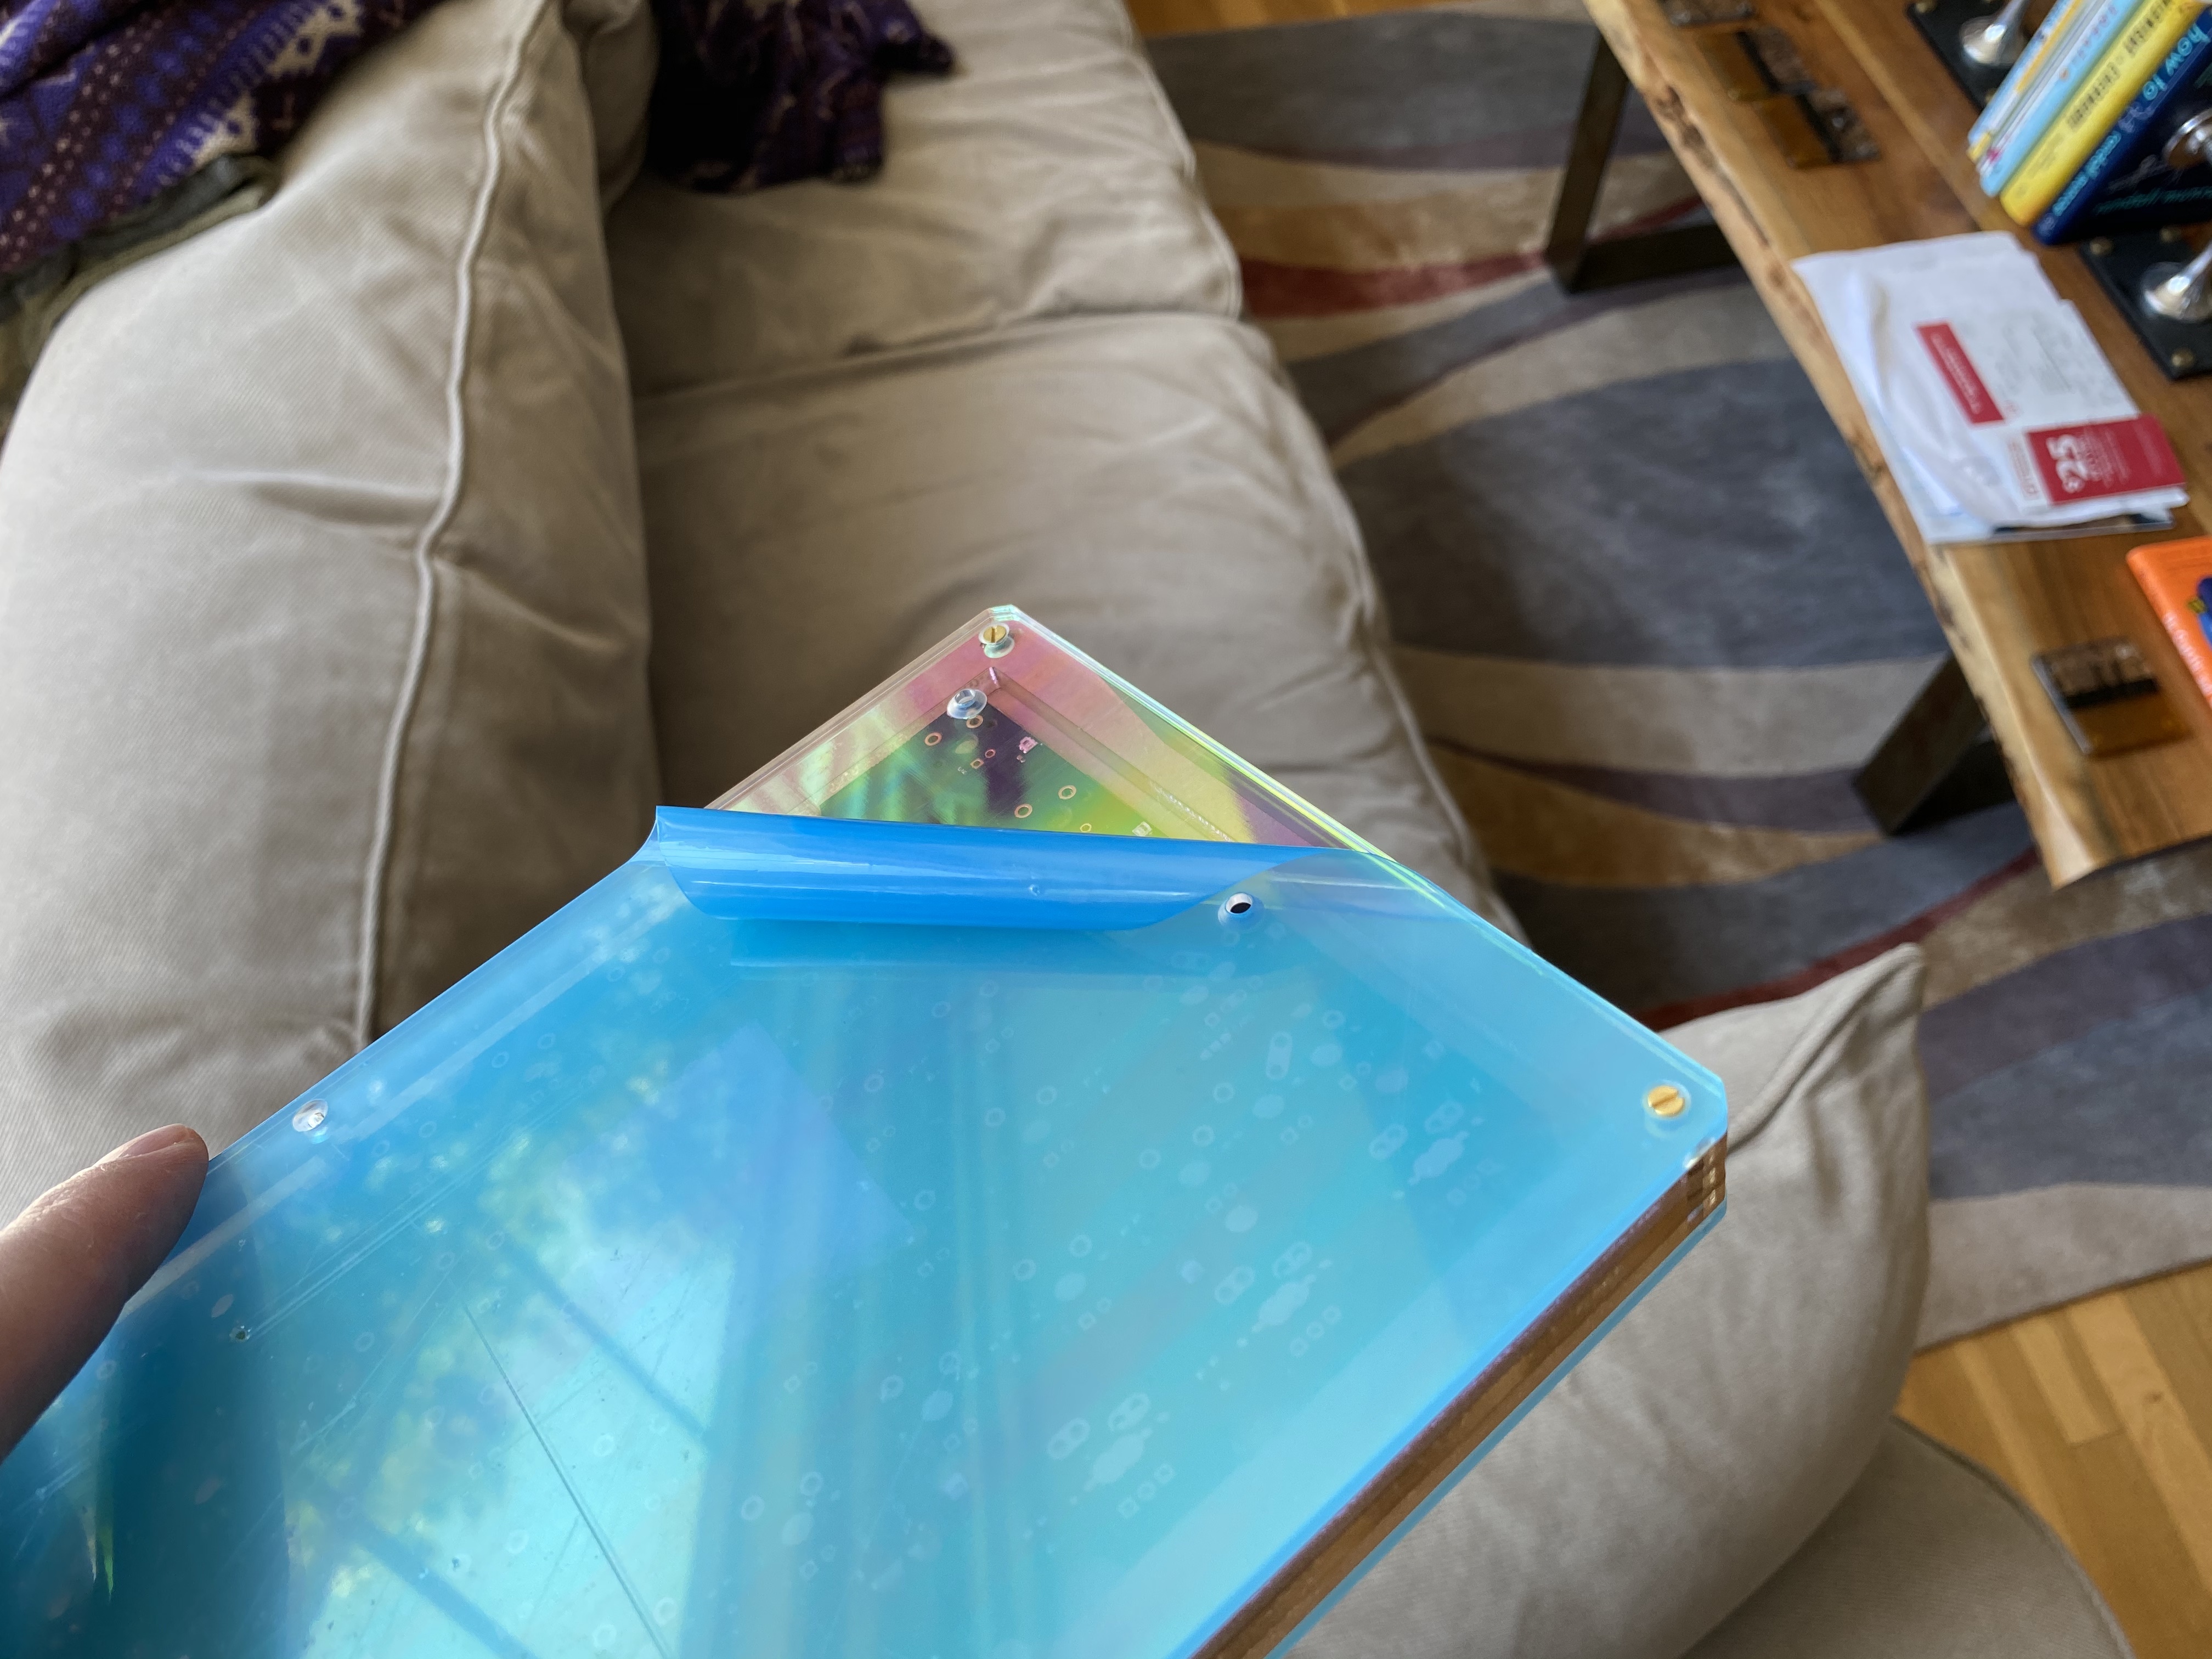
Ha! She had seen the acrylic tofu build I did some time ago, and really liked the MDA Big Bone set, so that solved the keycap portion of the equation. But what to use for the case? After some back-and-forth, it eventually occurred to me to show her a section of bifrost acrylic, acrylic with a different finish sometimes called a ‘mirror-like’ finish. While I wouldn’t call the result mirror-like, it does catch the light in interesting ways. Under direct lighting, it has almost a golden sheen, while under indirect lighting, particularly natural light from a window, prism-like rainbow effects are readily apparent.

Sold! The bifrost acrylic in question came as part of the ElectroType 87 kit, a TKL build from SwitchCouture. But before we get much further into that, we’ve got some switch and stab work to do.

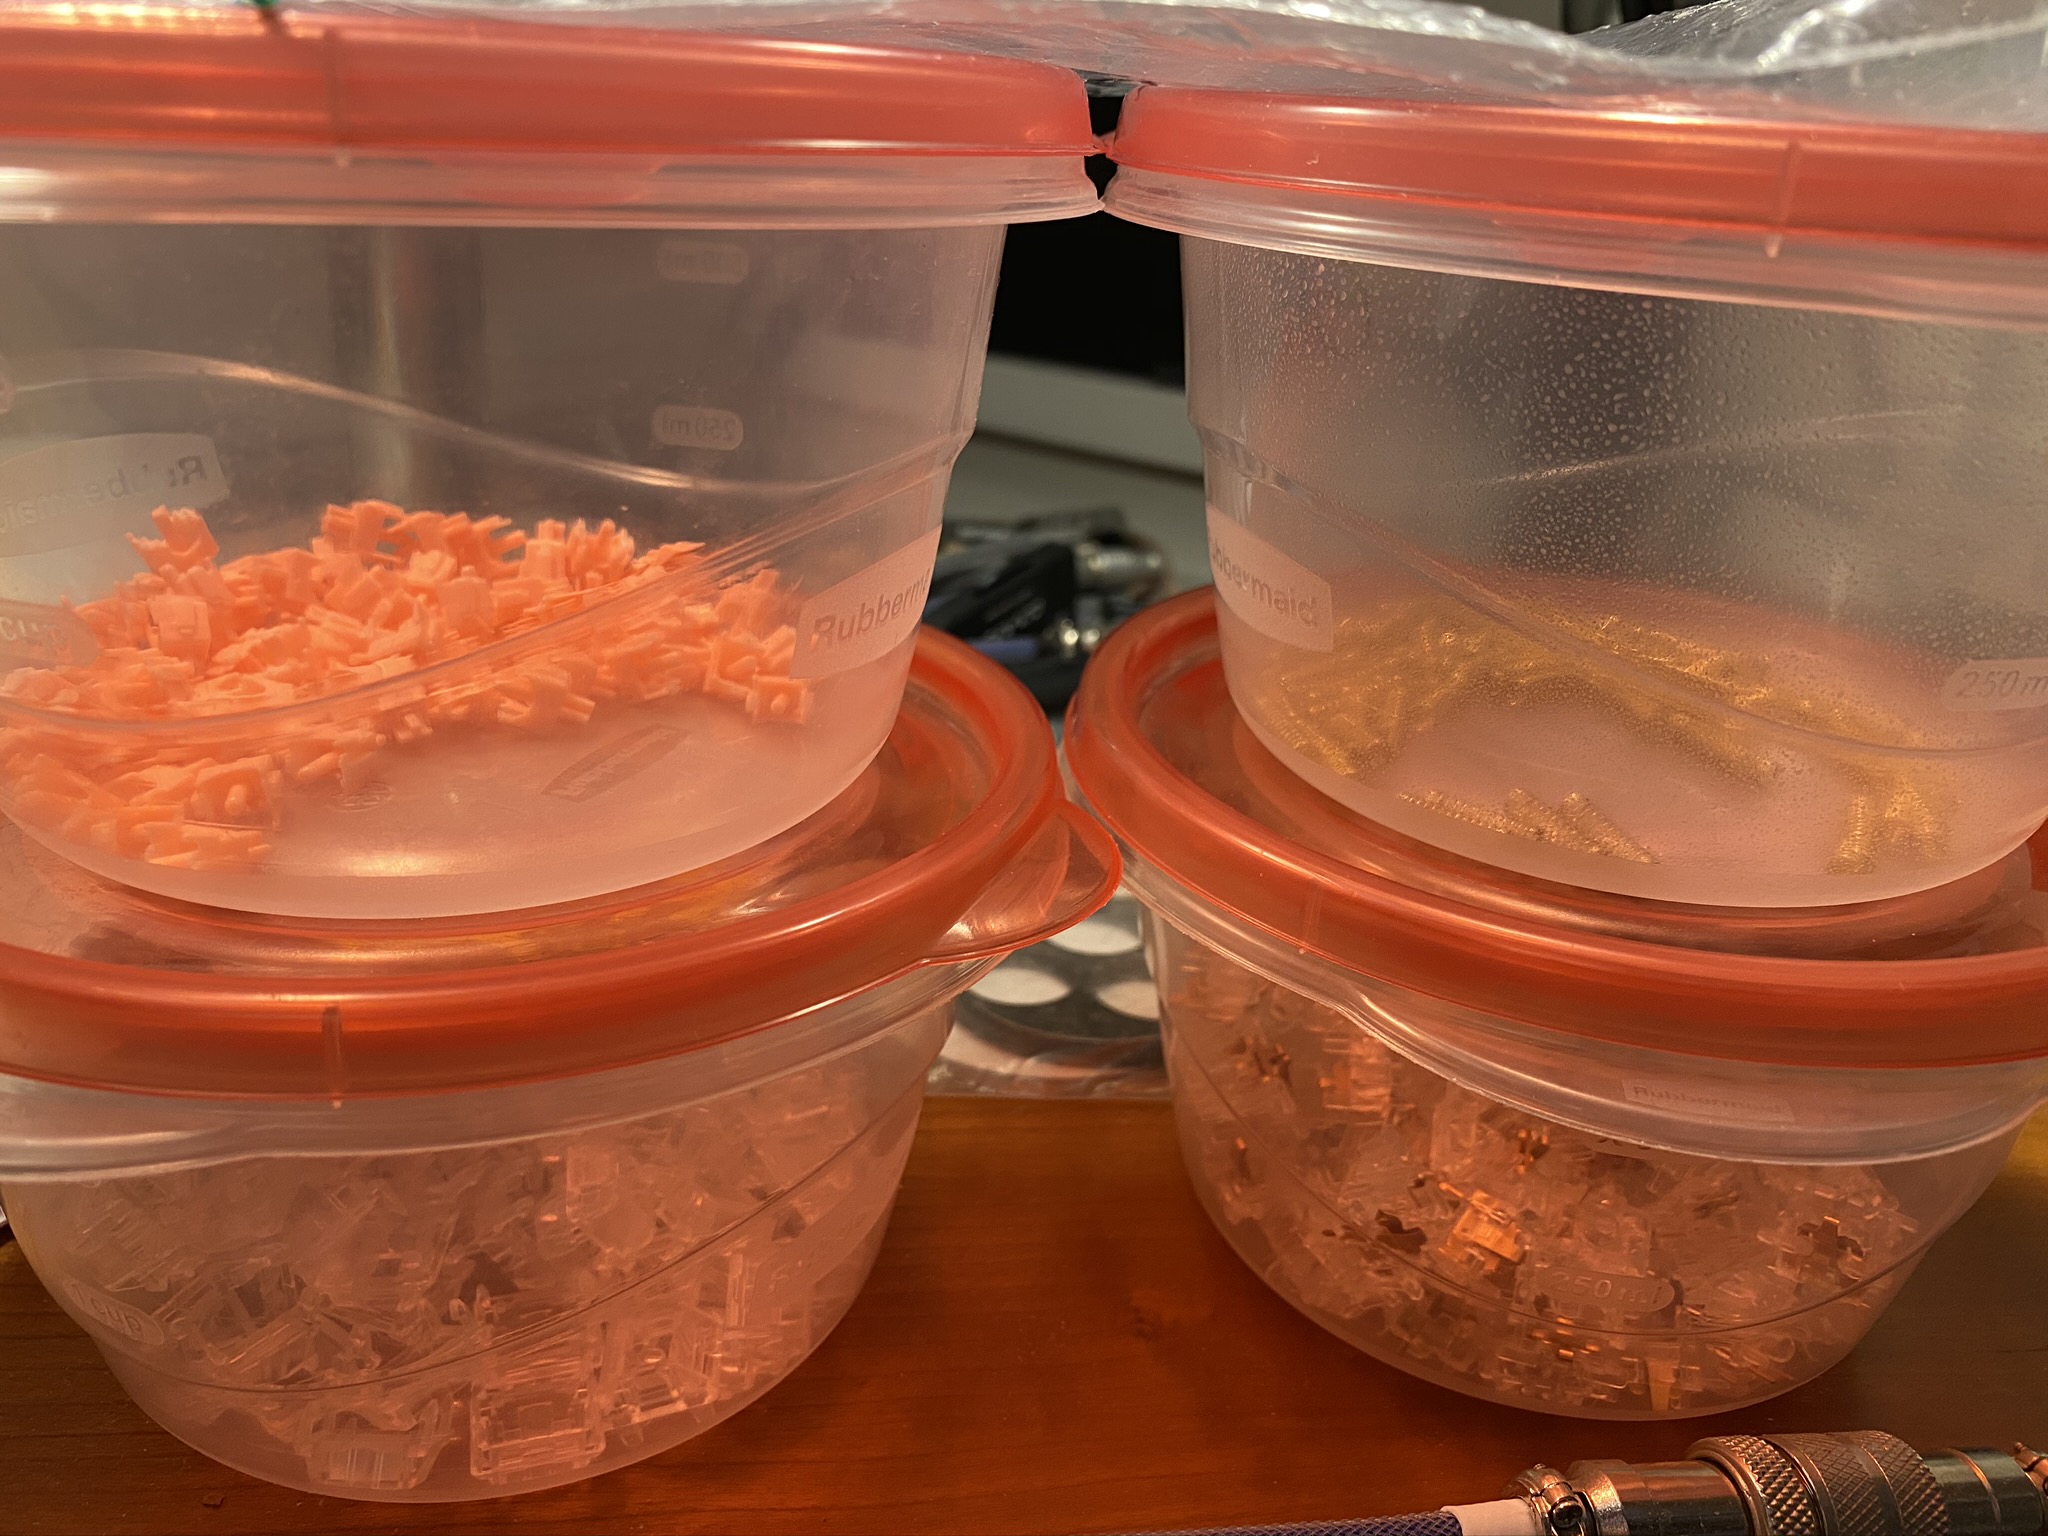
The constraints of “silent”, “linear”, and “light”, intersected with my current collection of switches, yielded exactly one result: Sakurios. I used these back in Build #23, and found them to be quite pleasant to use. But at that time, I hadn’t graduated to Krytox GPL 205g0 for linears, which I suspect will yield an even quieter, smoother experience. This time around, I’ll do my usual spring tub lubing with 104, and then hit the stems with 205g0. Here we are post-tub lubing, pre-stem lubing.

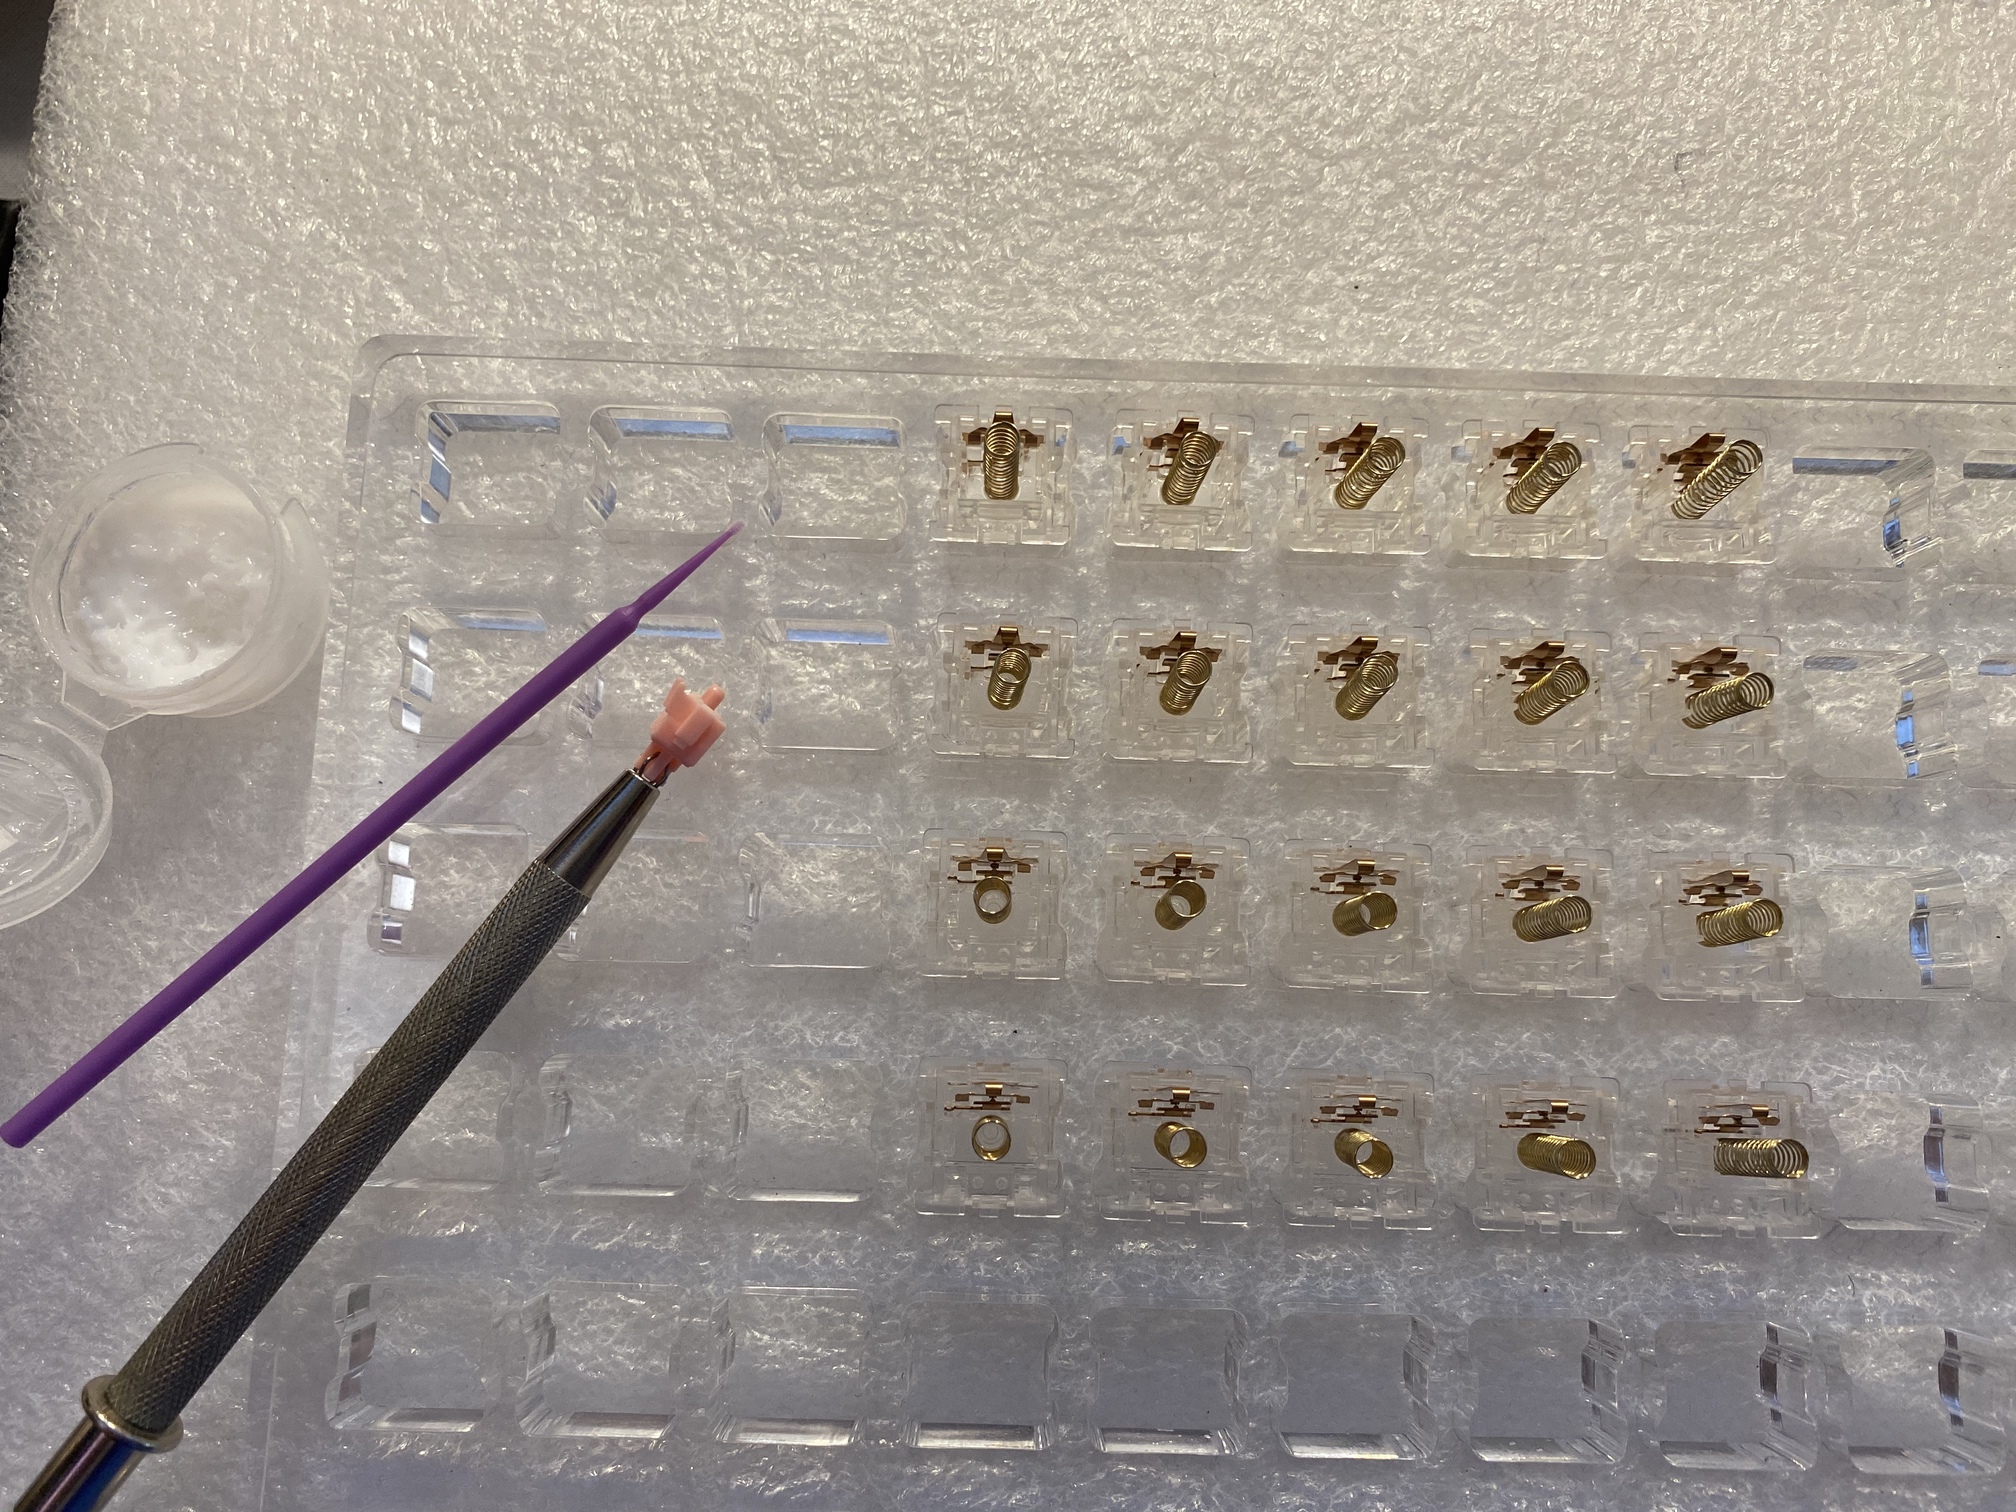
As I’ve mentioned before, I like to lube switches in small batches, so I don’t go mad with the repetition. With 205g0 (well, really with any switch lube), I’ve been using dental applicators for a while now - I feel I have better control over lube application than I do with a brush, which means faster switch lubing.

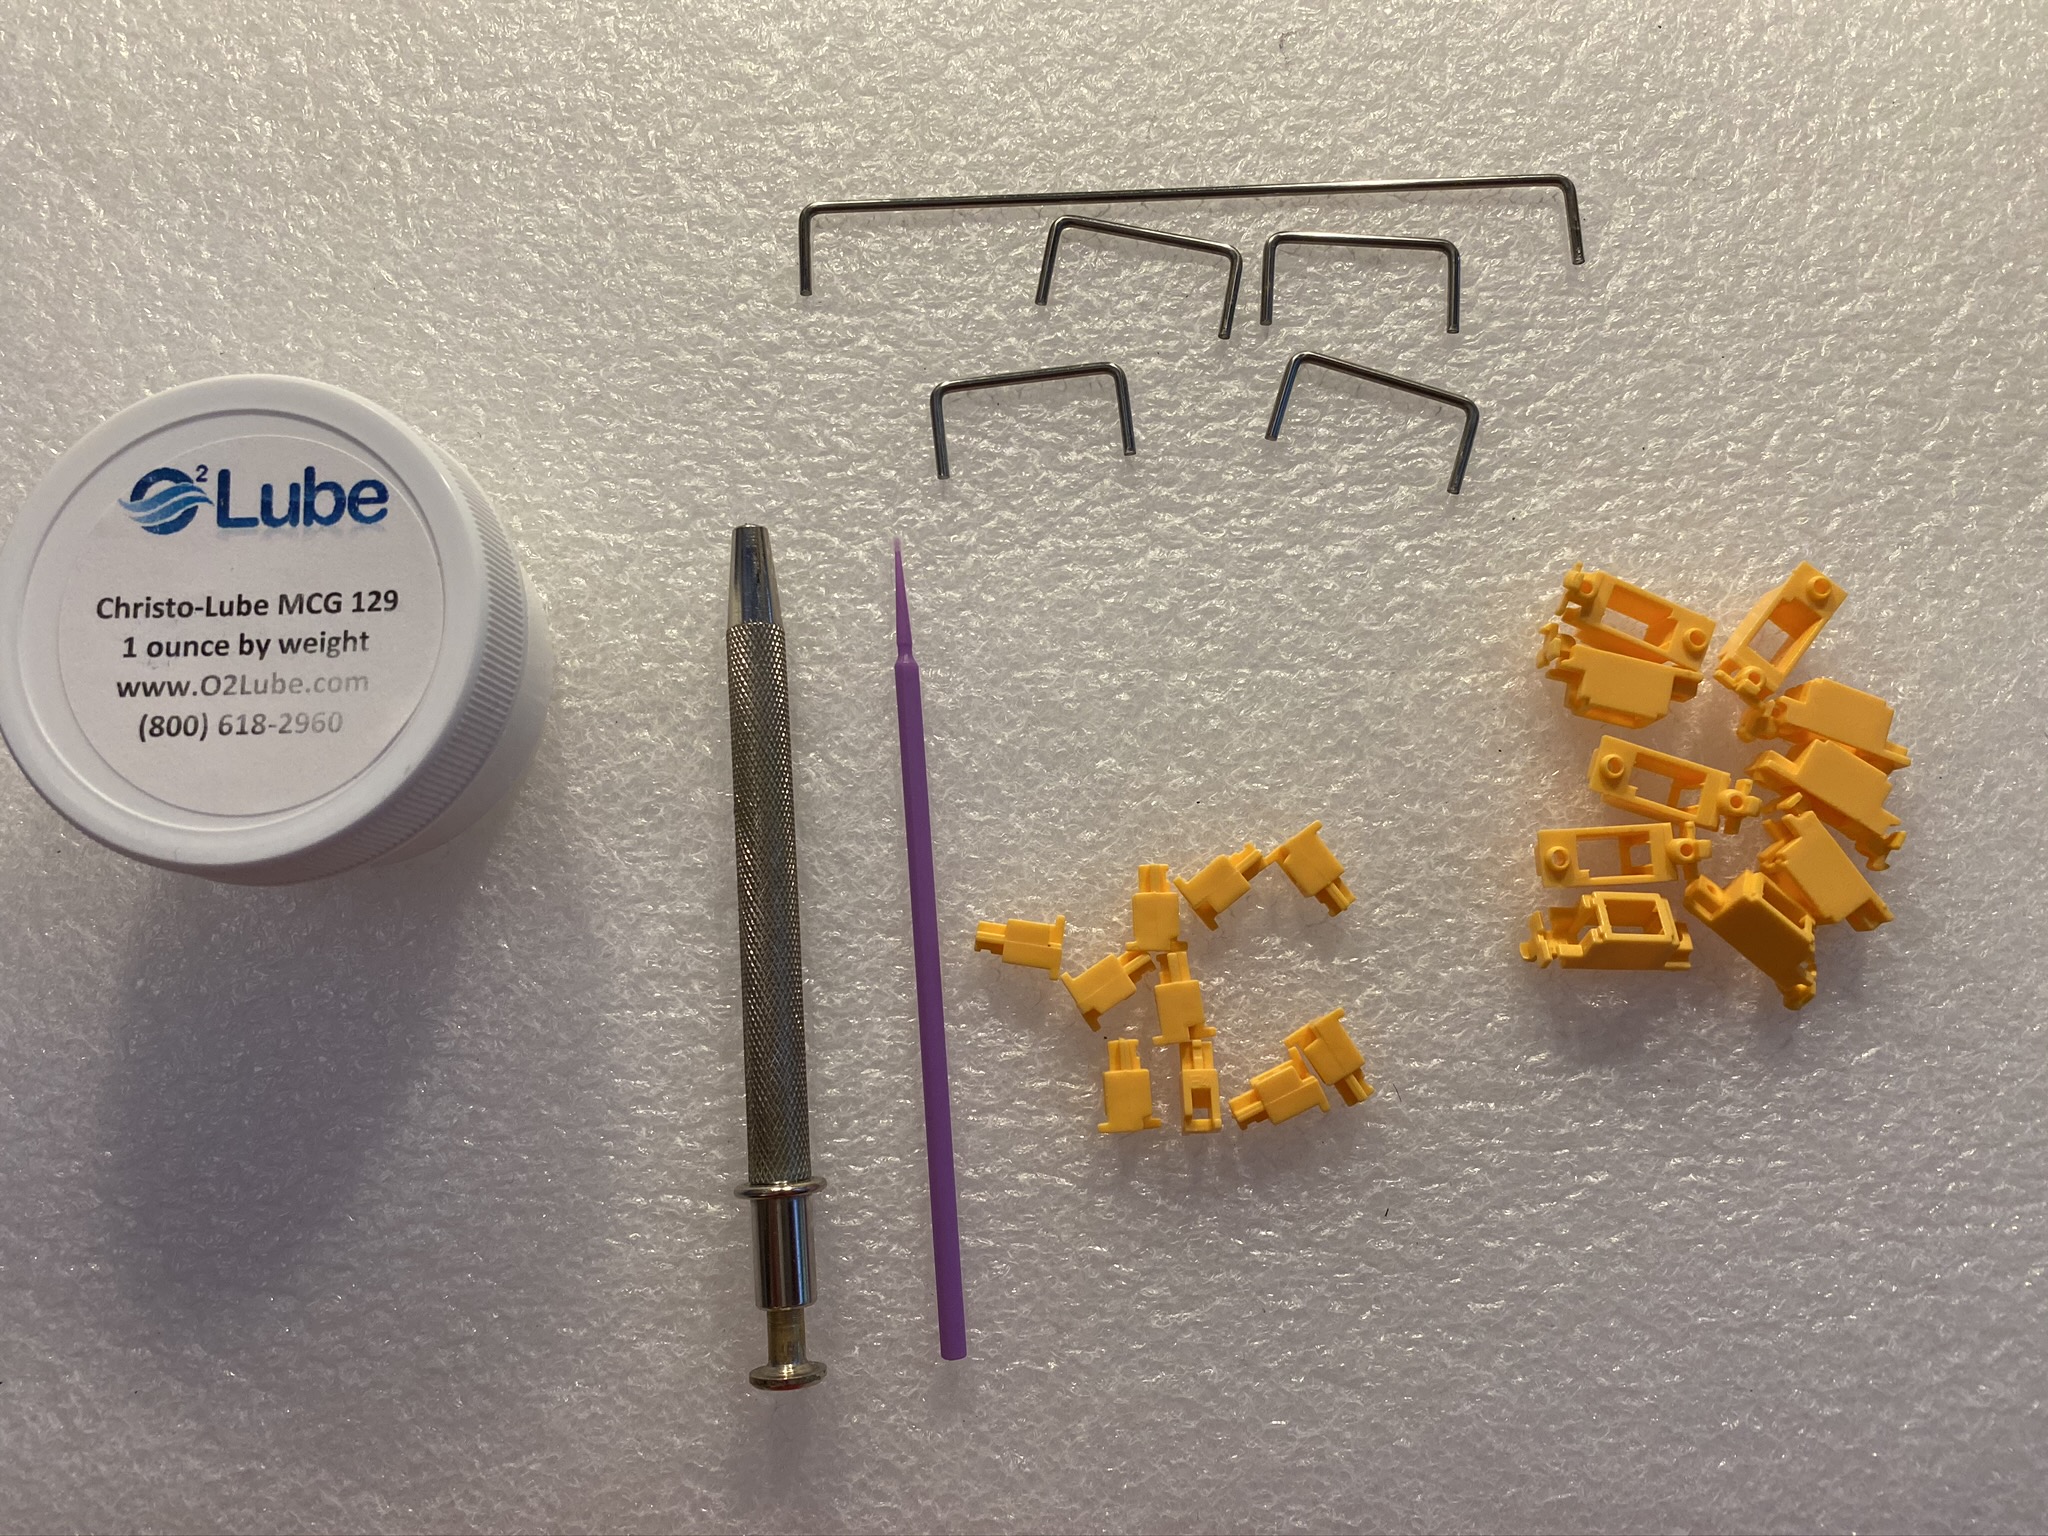
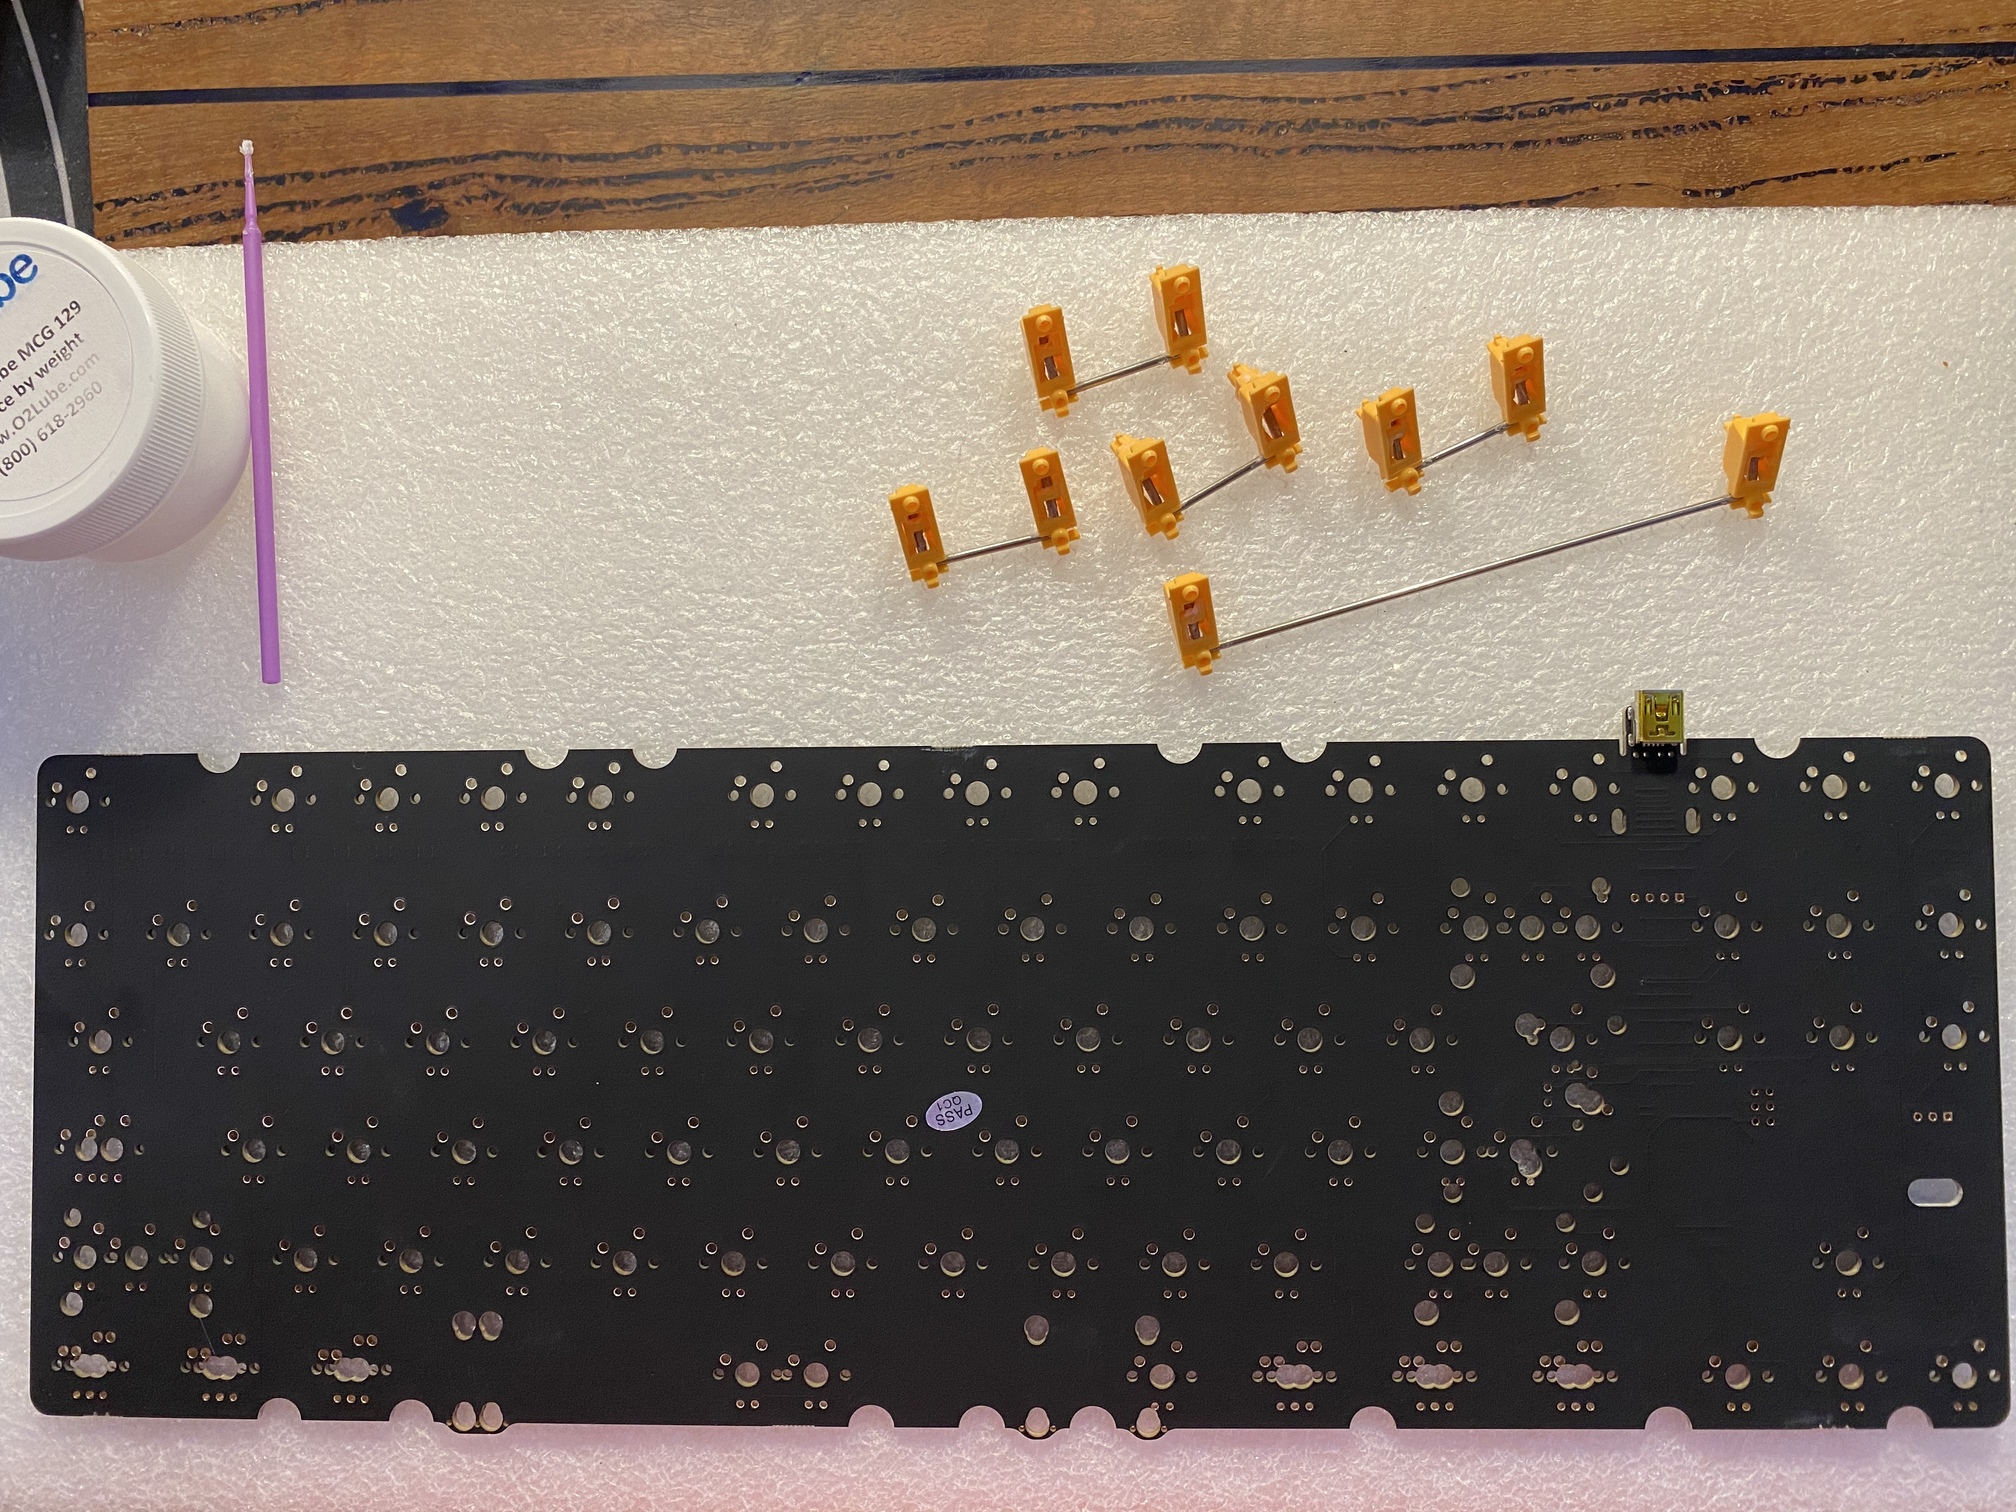
For stabilizers, I went with Christo 129. This isn’t the obvious choice for a silent build, but I wanted to stay with stock switches, and given the 62g spring weights, I wanted to err on the side of responsive stabilized keys.

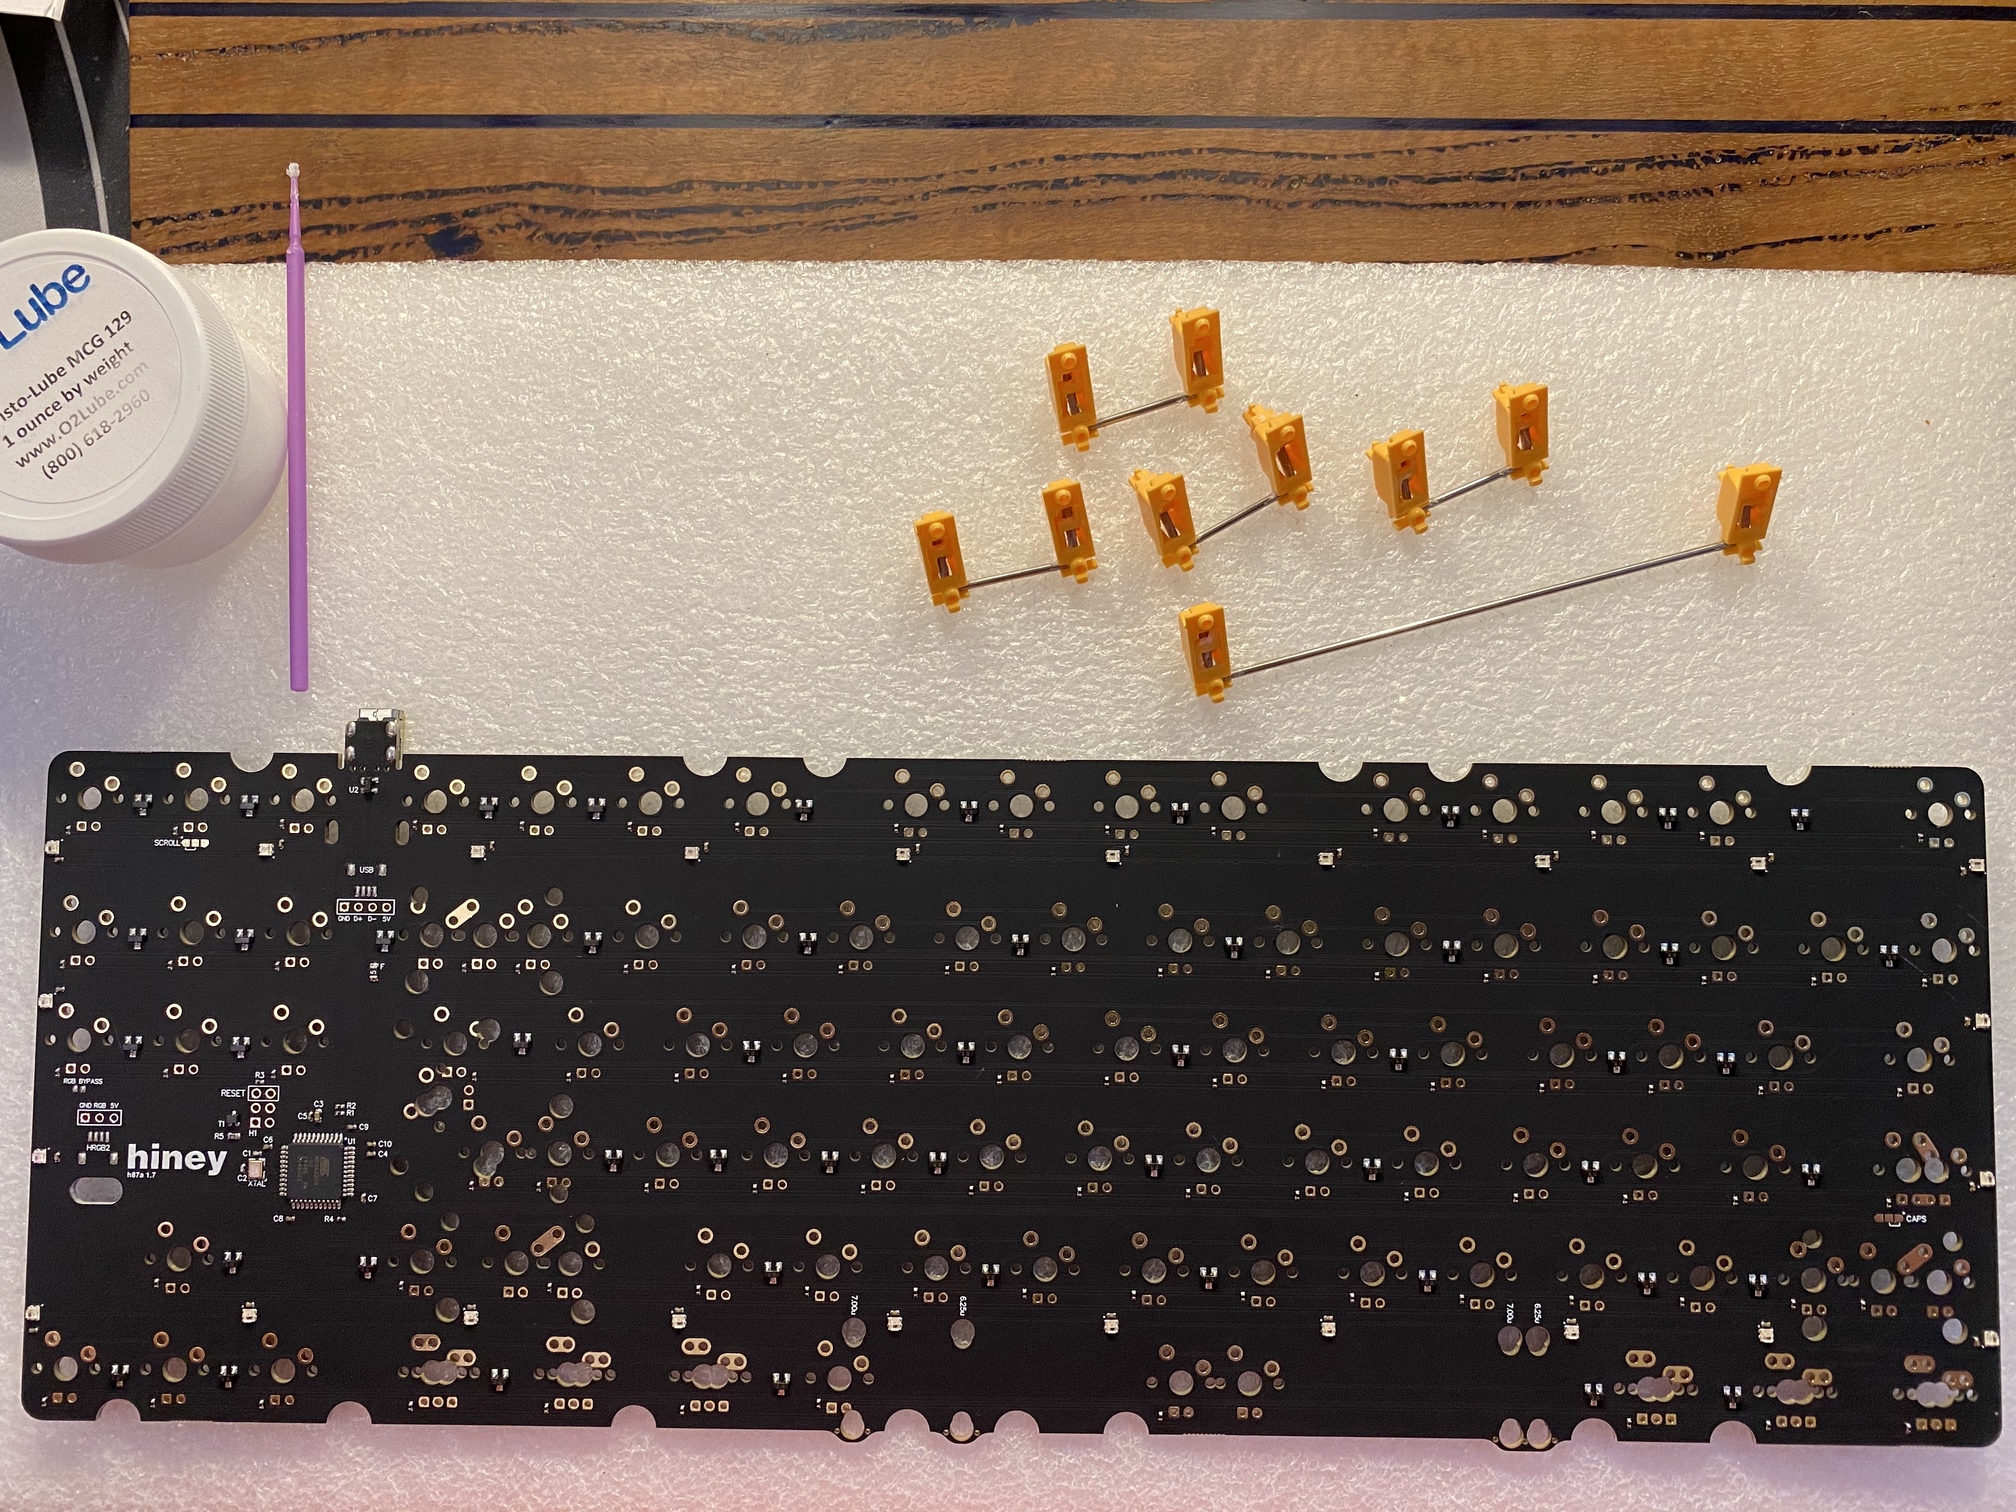
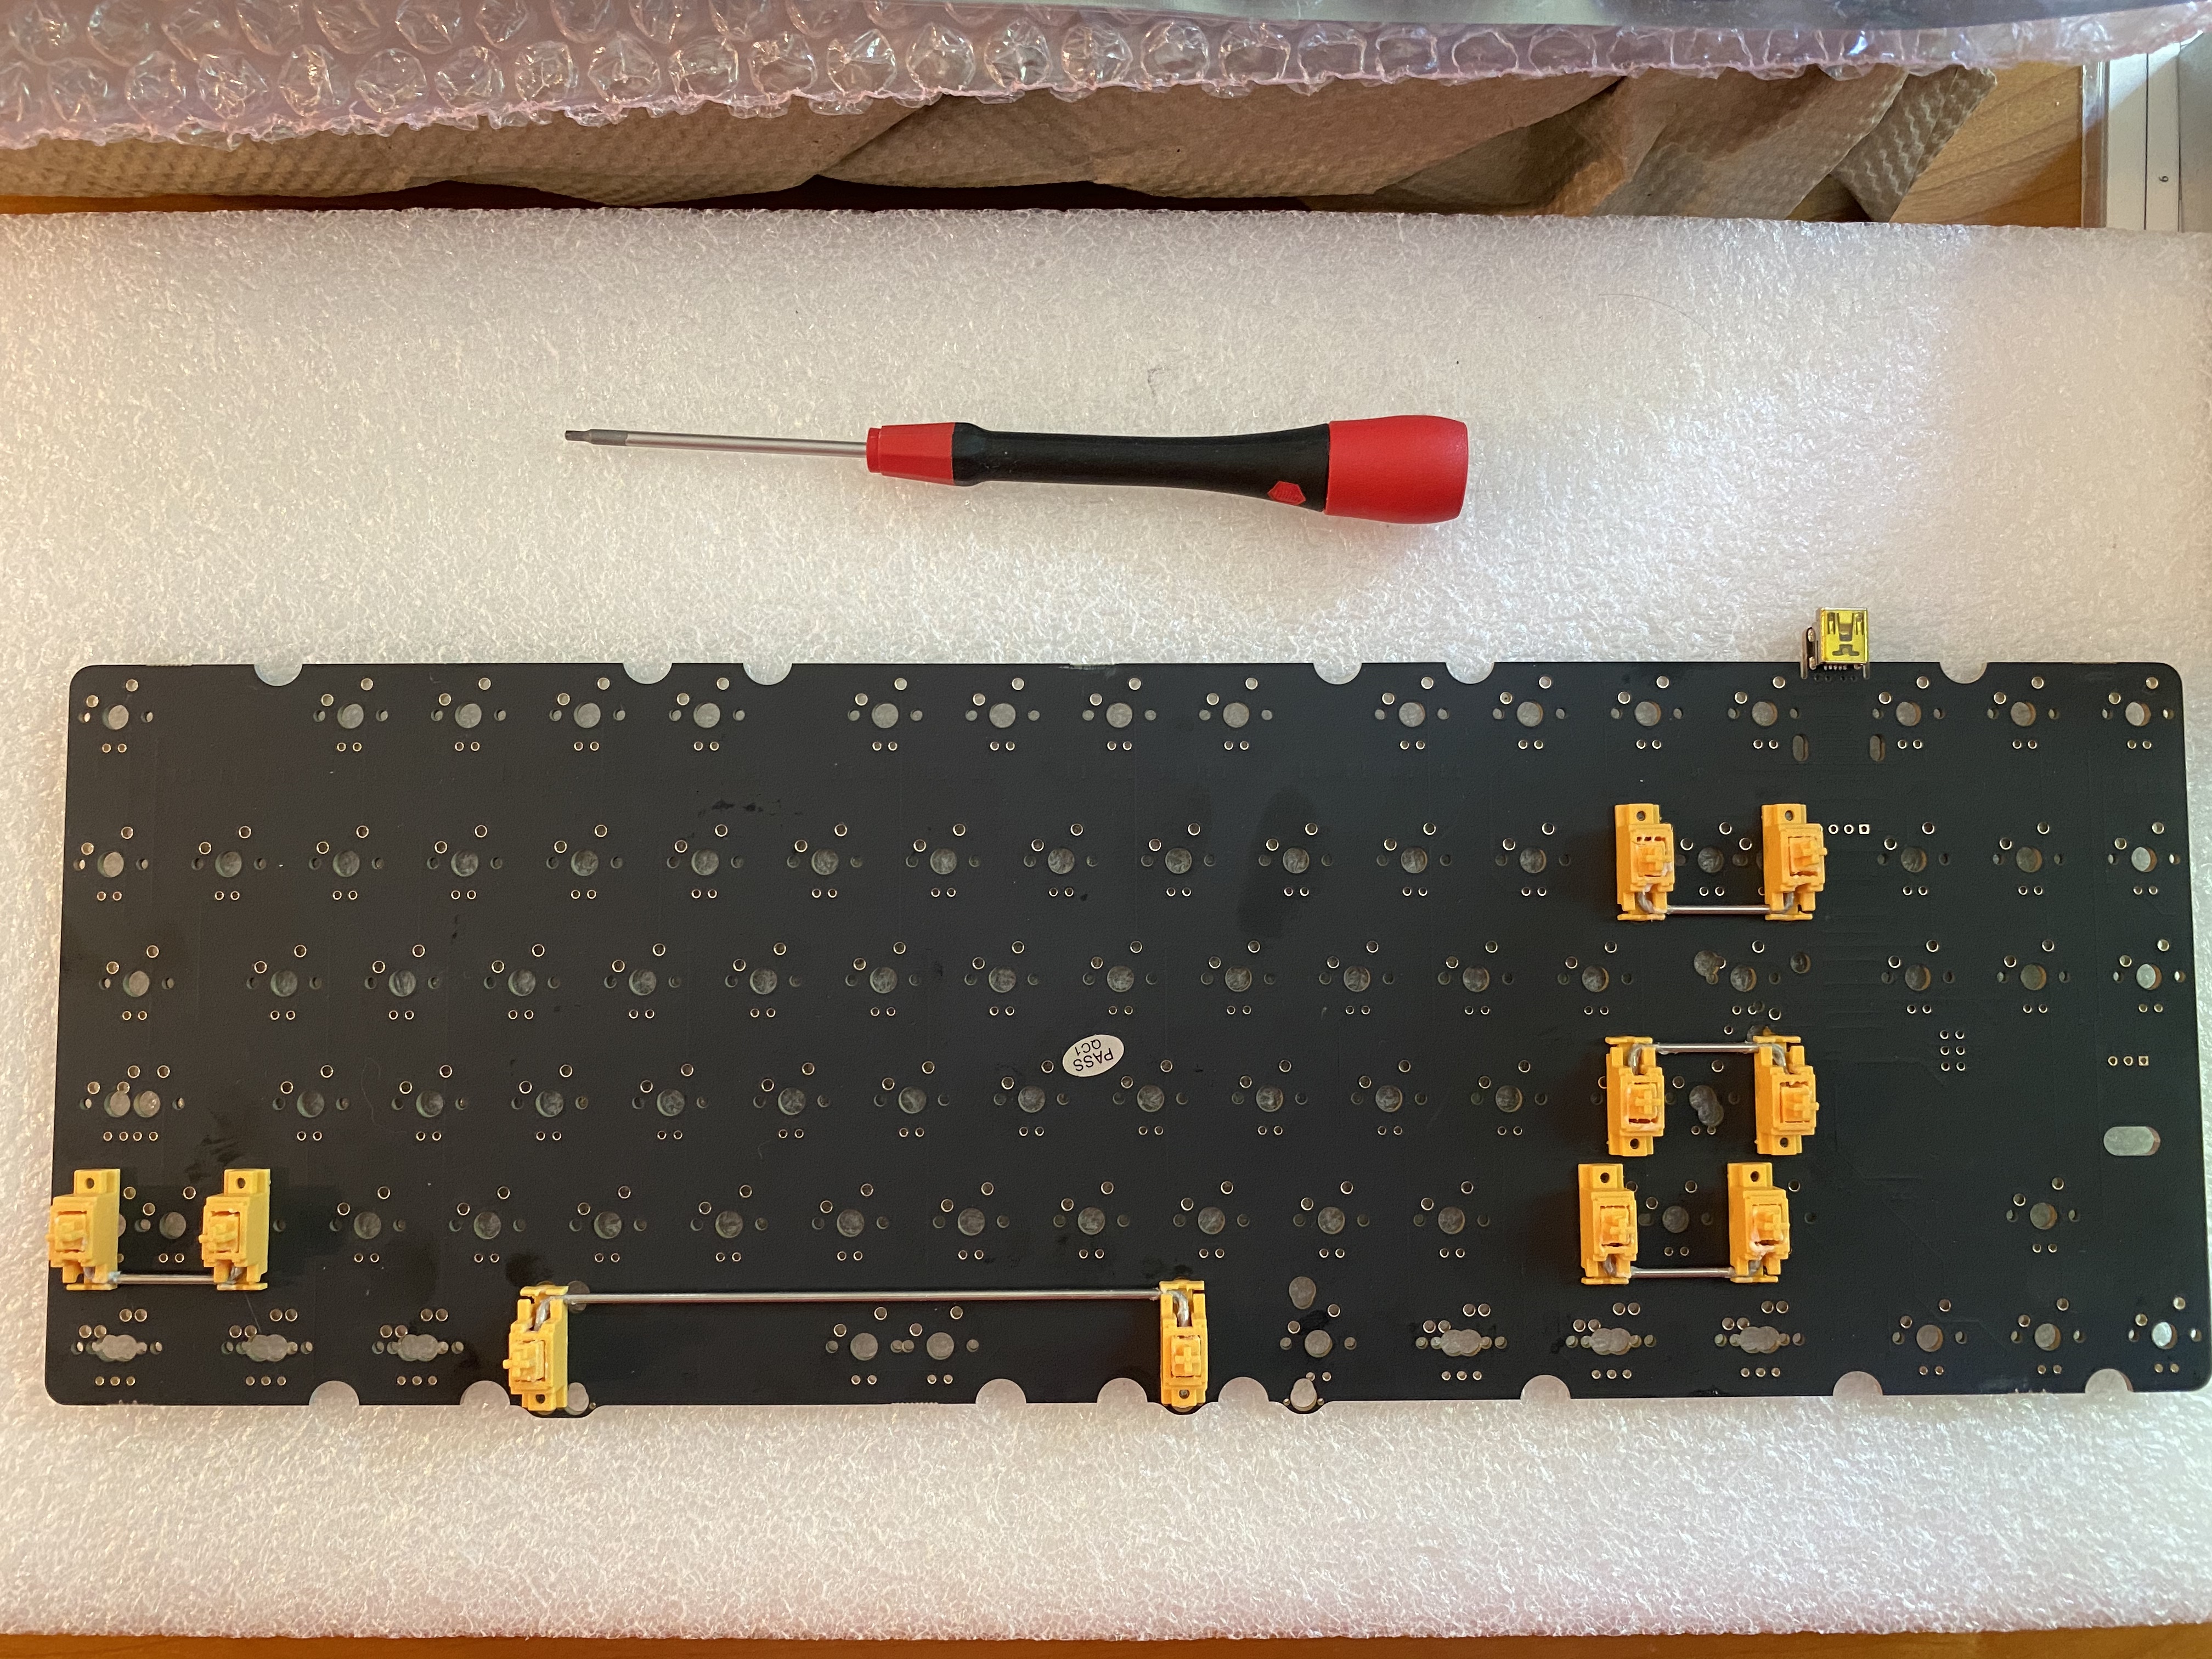
Ready for installation into the PCB, the h87a from Hineybush, which shipped with the ElectroType 87 kit. This is v1.7 of the h87a, which allows for north- or south-facing spacebars, something to consider before installing those spacebars!

Even if it’s not strictly necessary, these days I’m in the habit of installing cloth washers on the stabilizer screws, just as an extra precaution against PCB shorts. Regardless of what you may think about C3 stabs, it’s handy that they include the washers as part of their stabilizer kits.

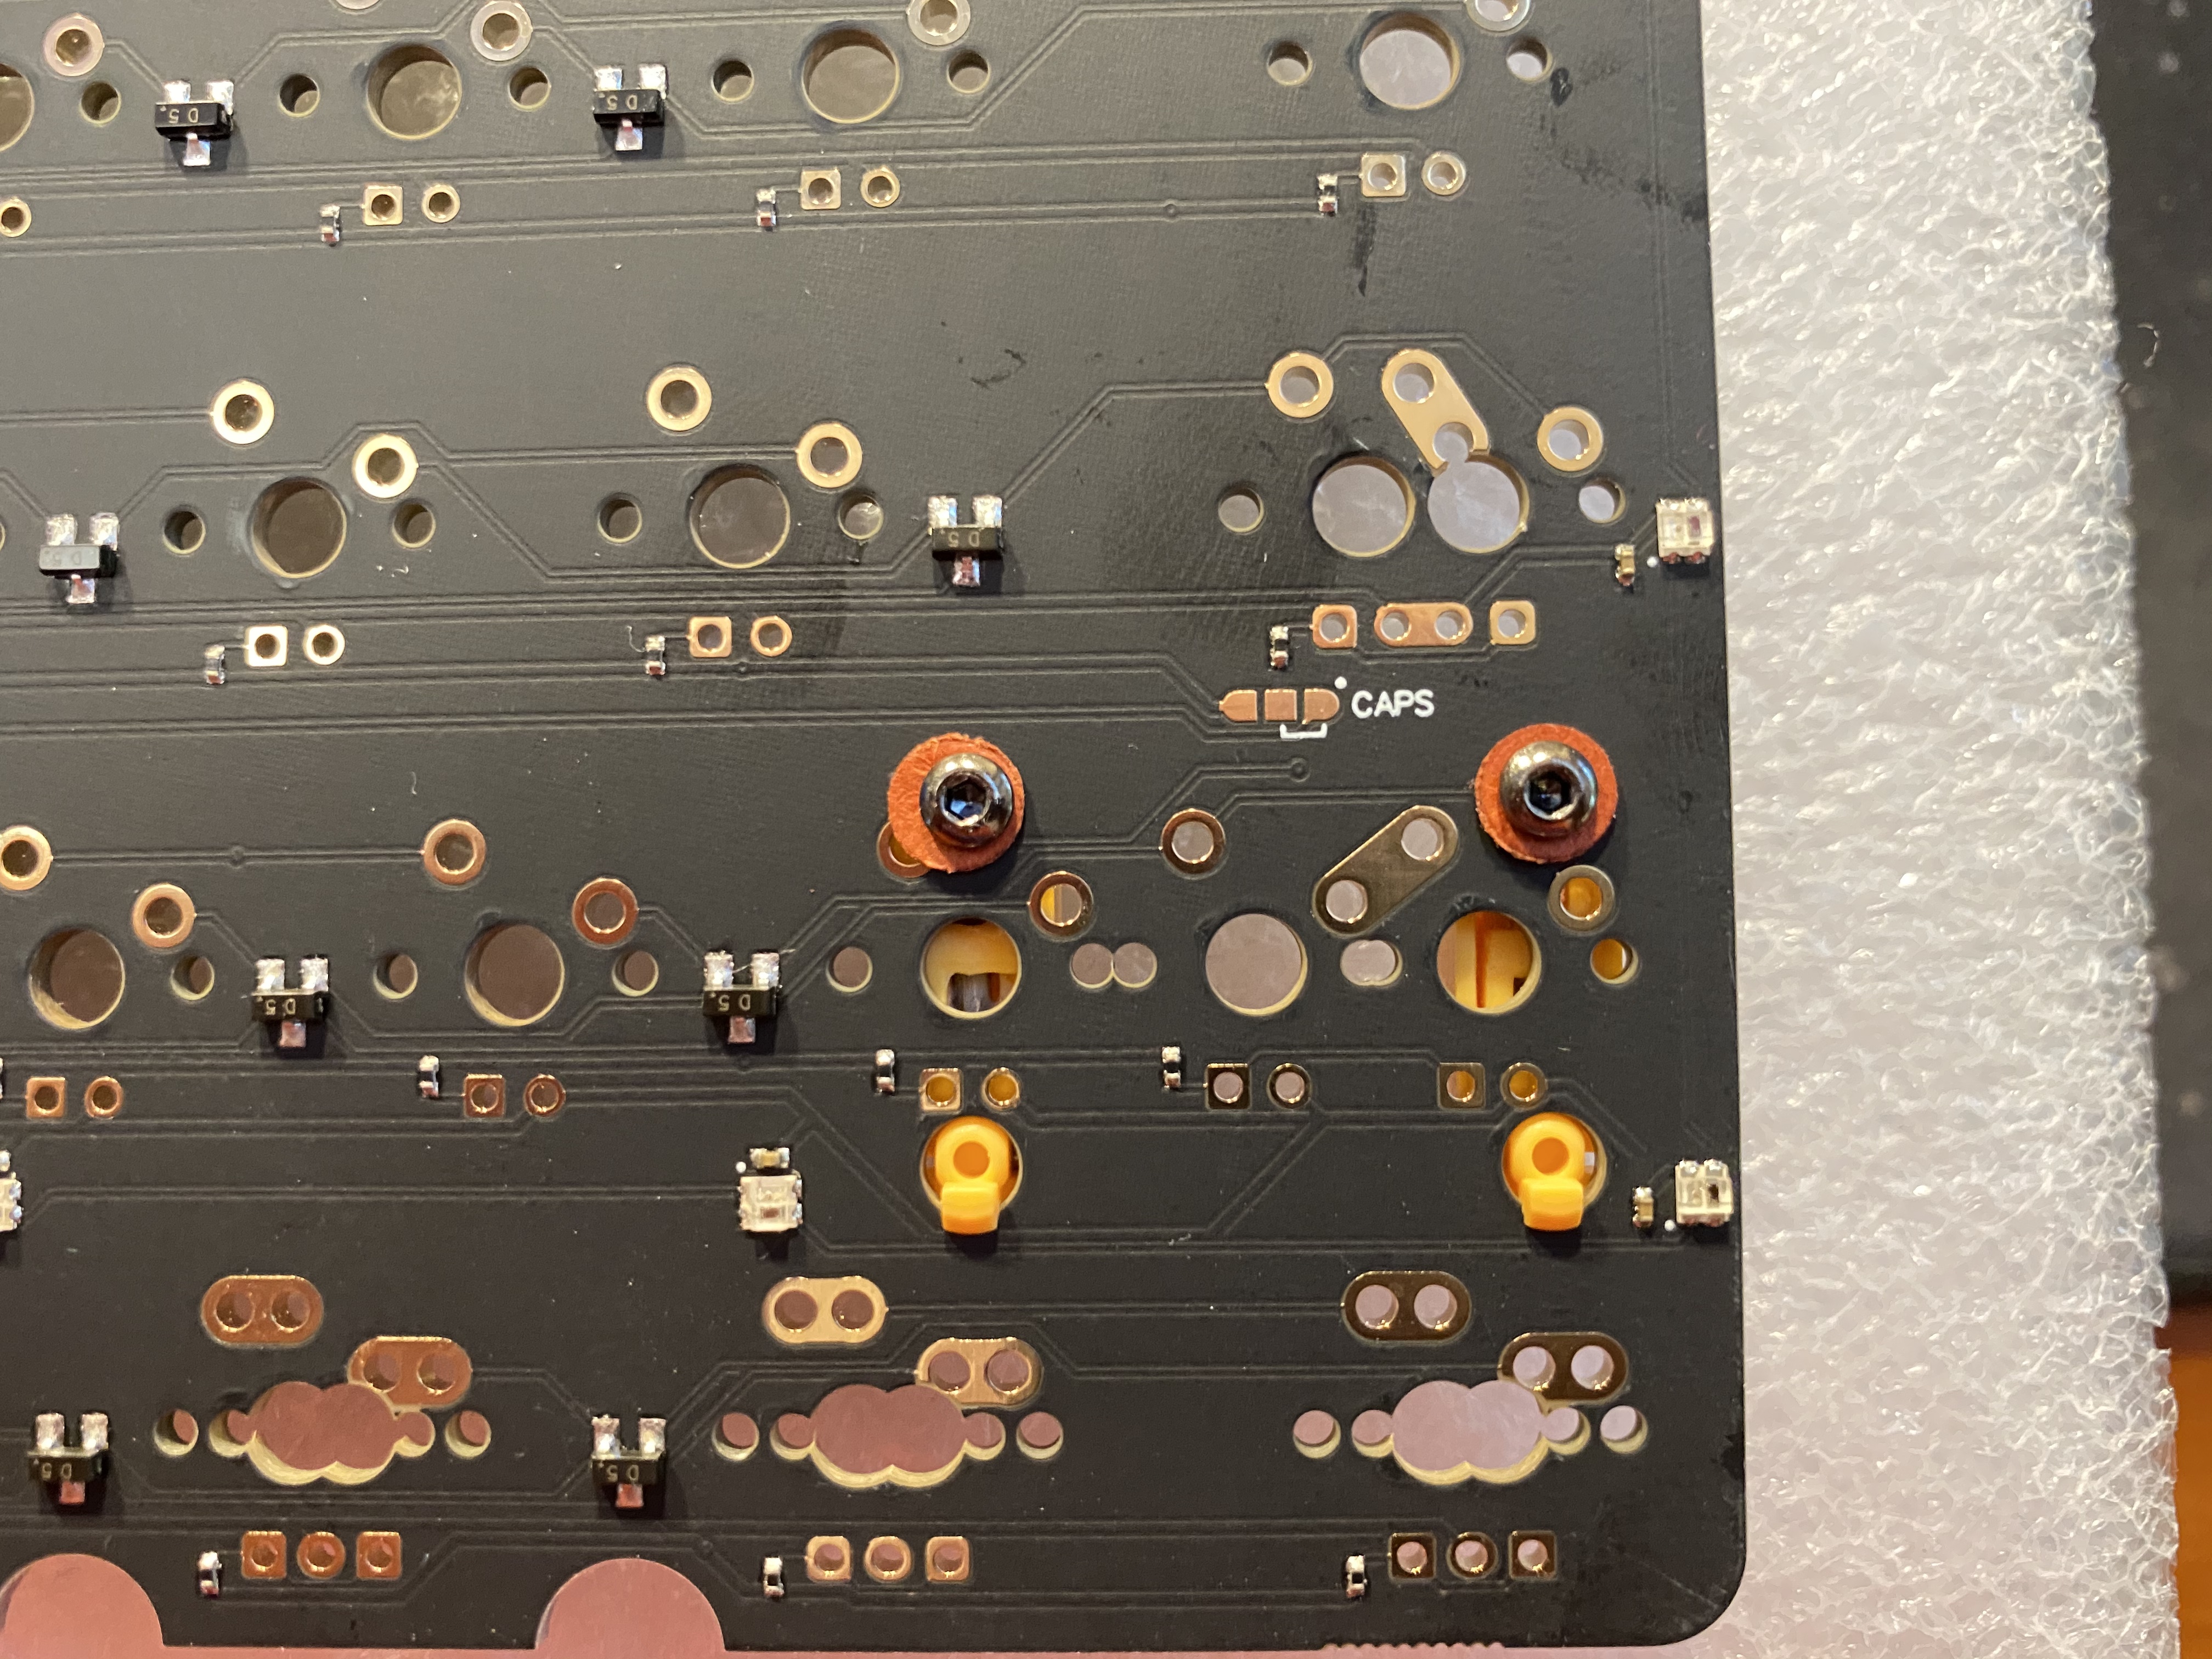
All right, stabs in!

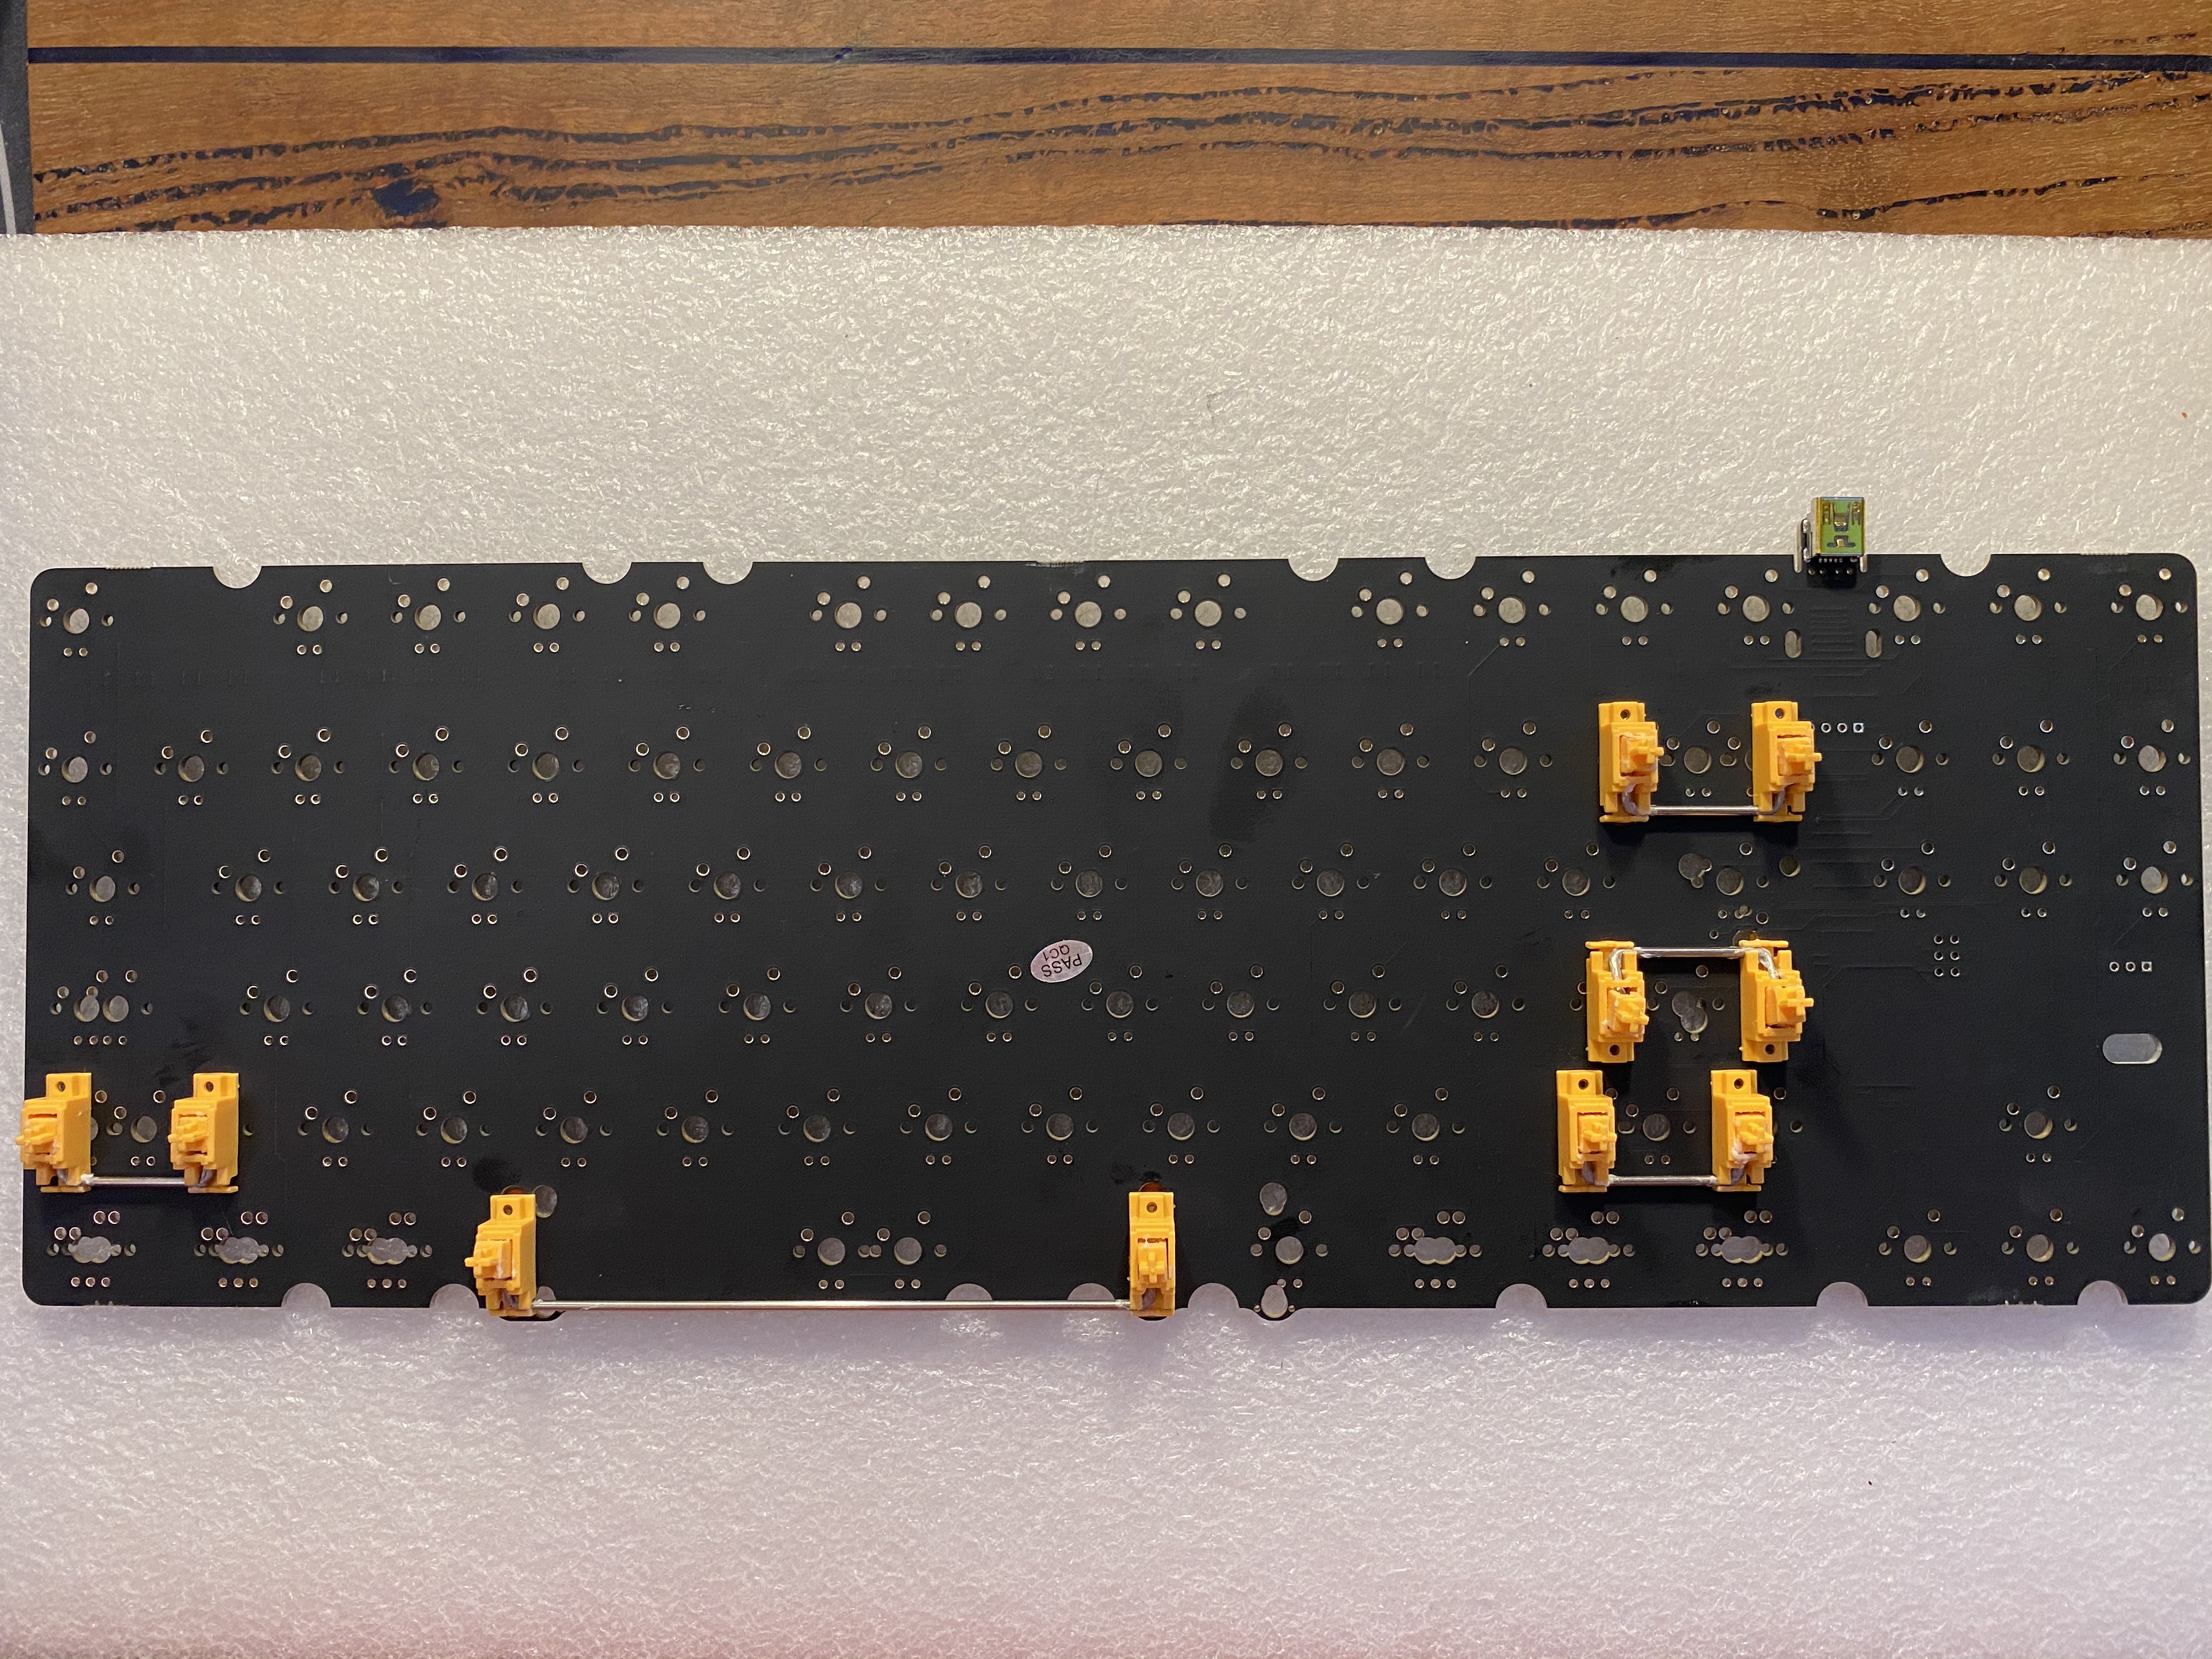
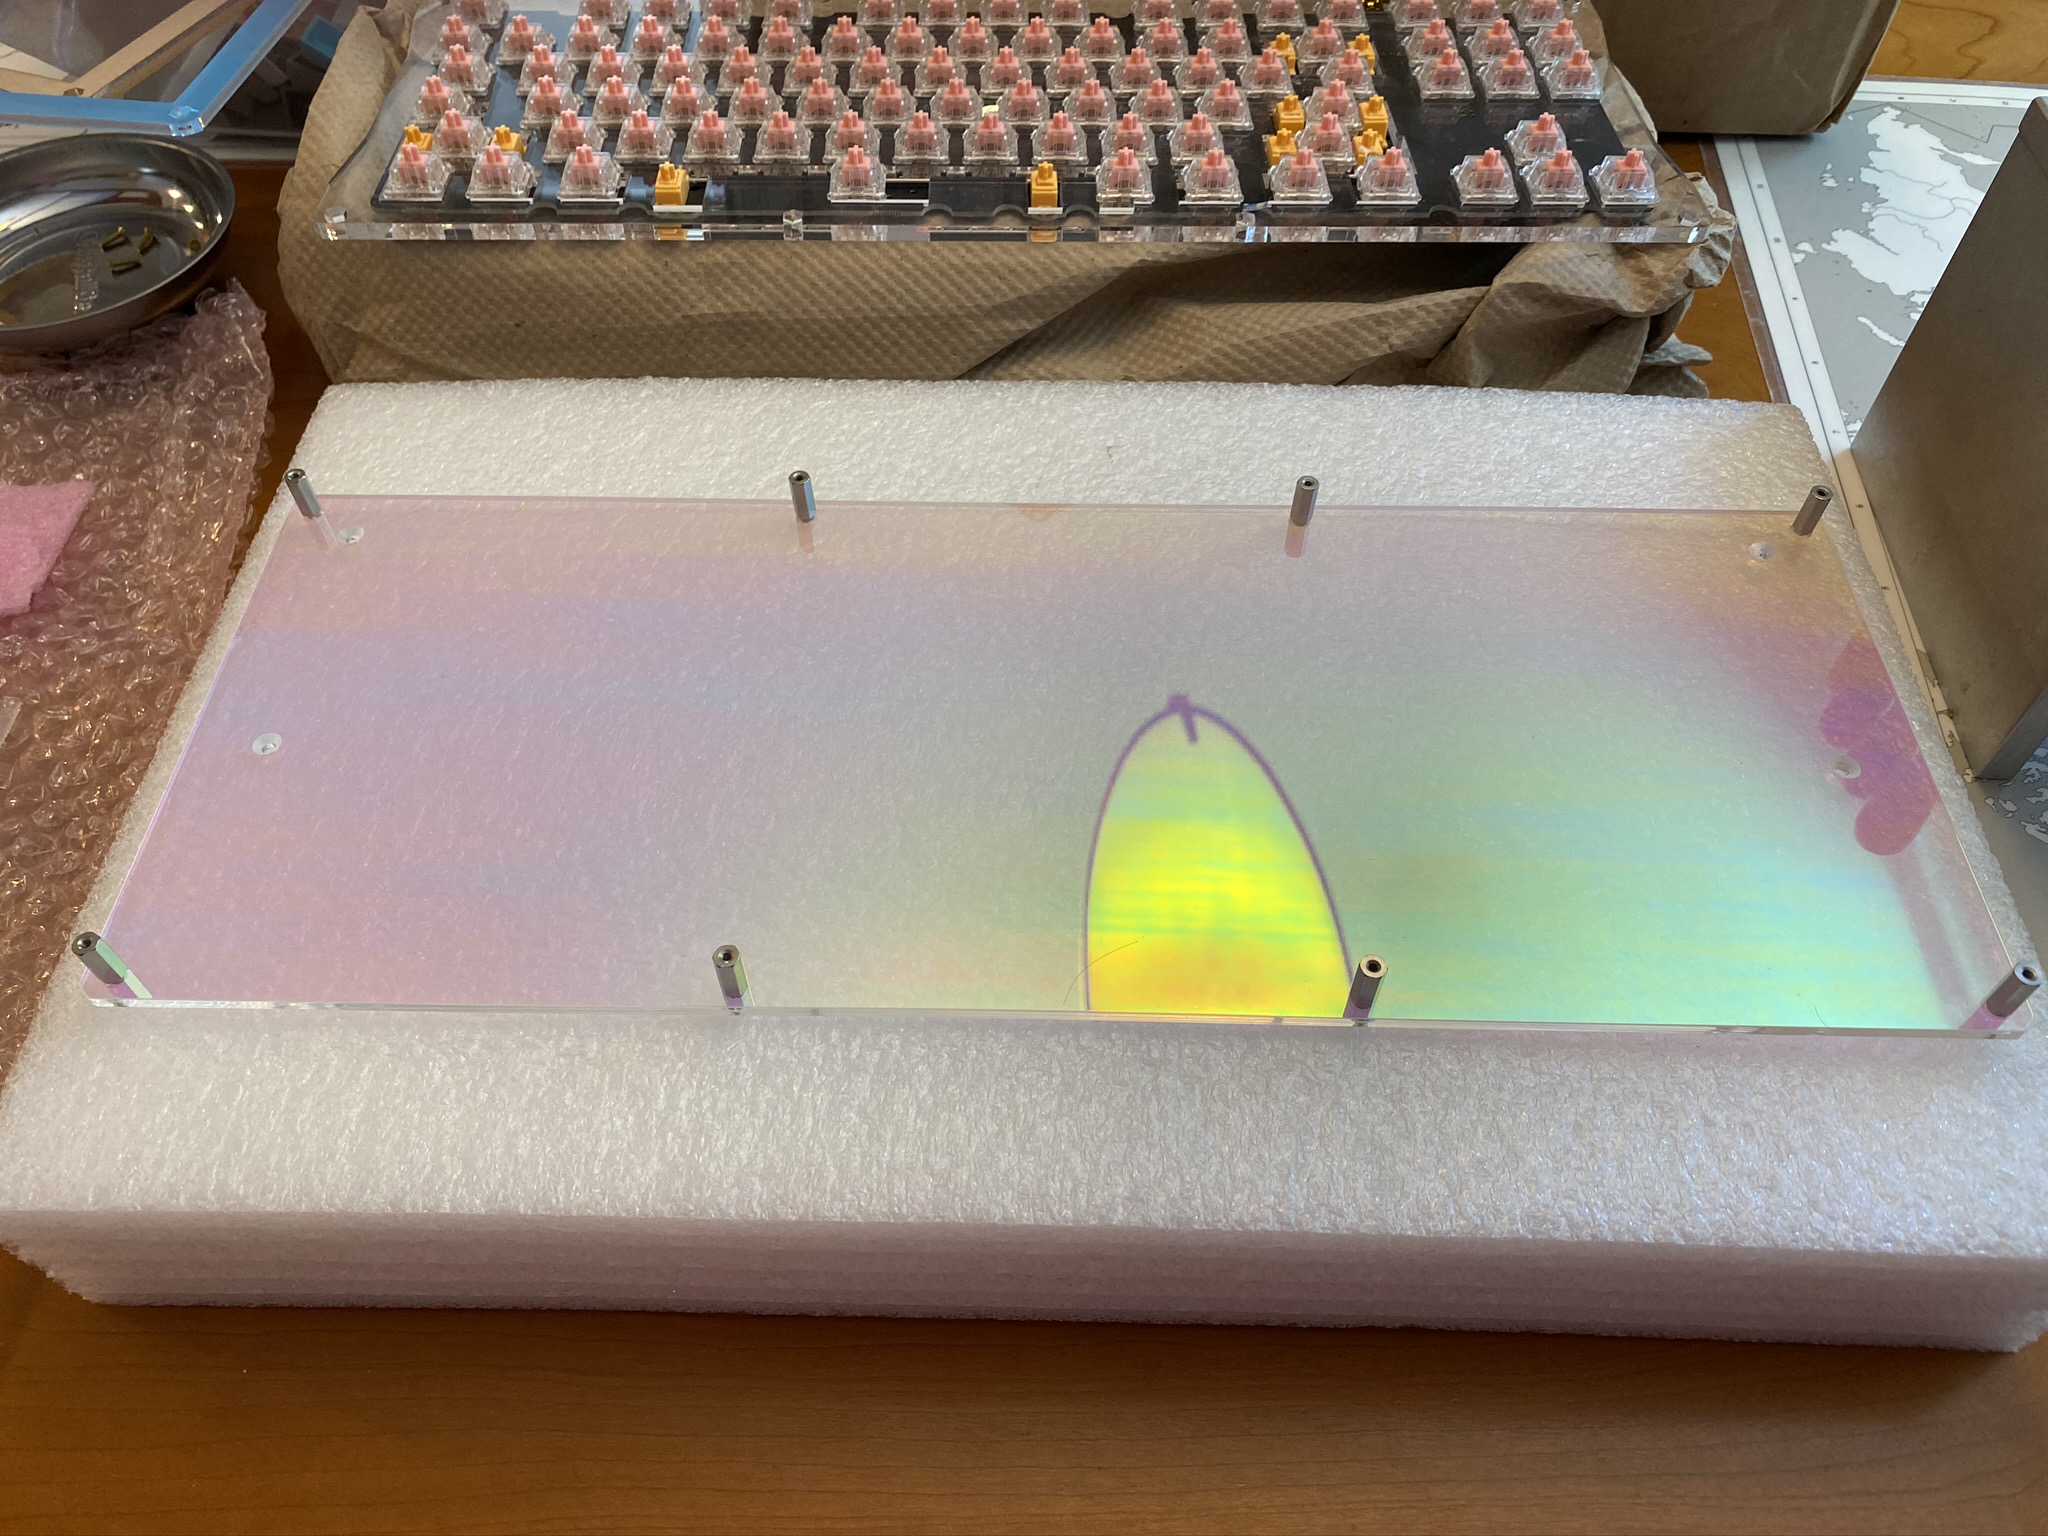
Quiz time. Here’s the acrylic plate (with protective backing still in place). What have I done wrong?

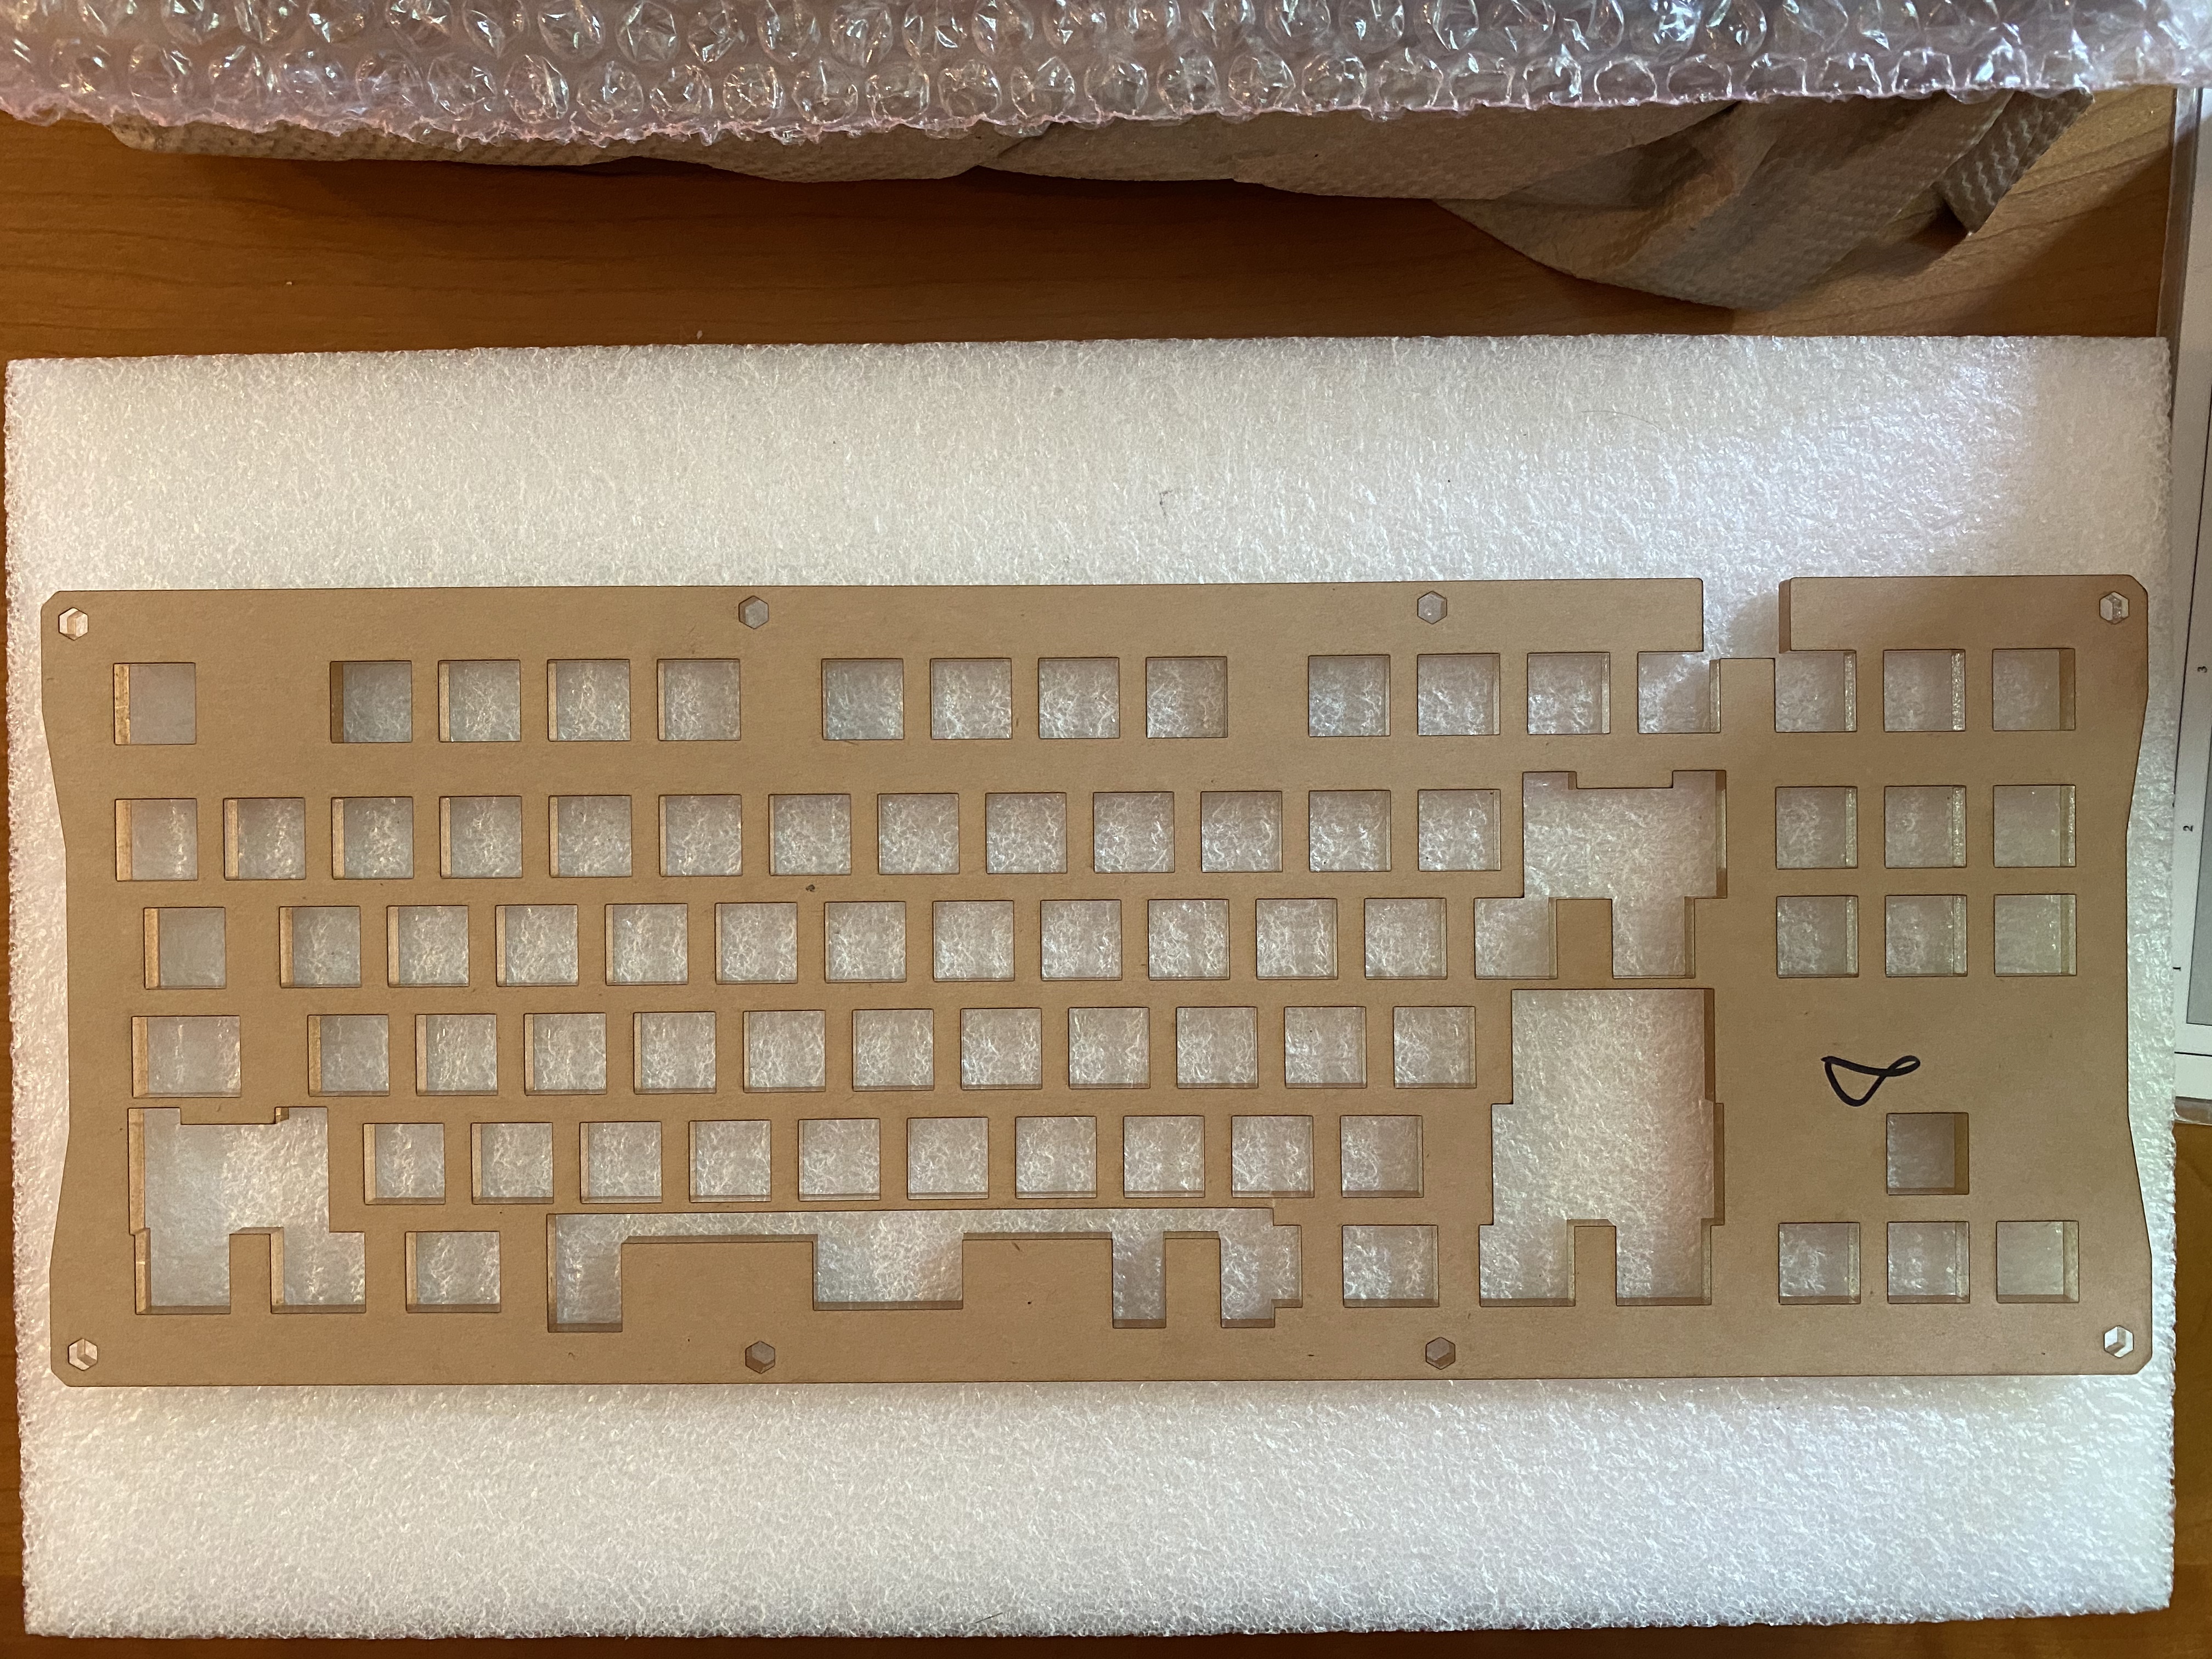
Yeah, I didn’t pay attention to spacebar orientation. Sigh. Fortunately, just a couple minutes of work with the screwdriver is all that’s needed. All right, stabs in again!

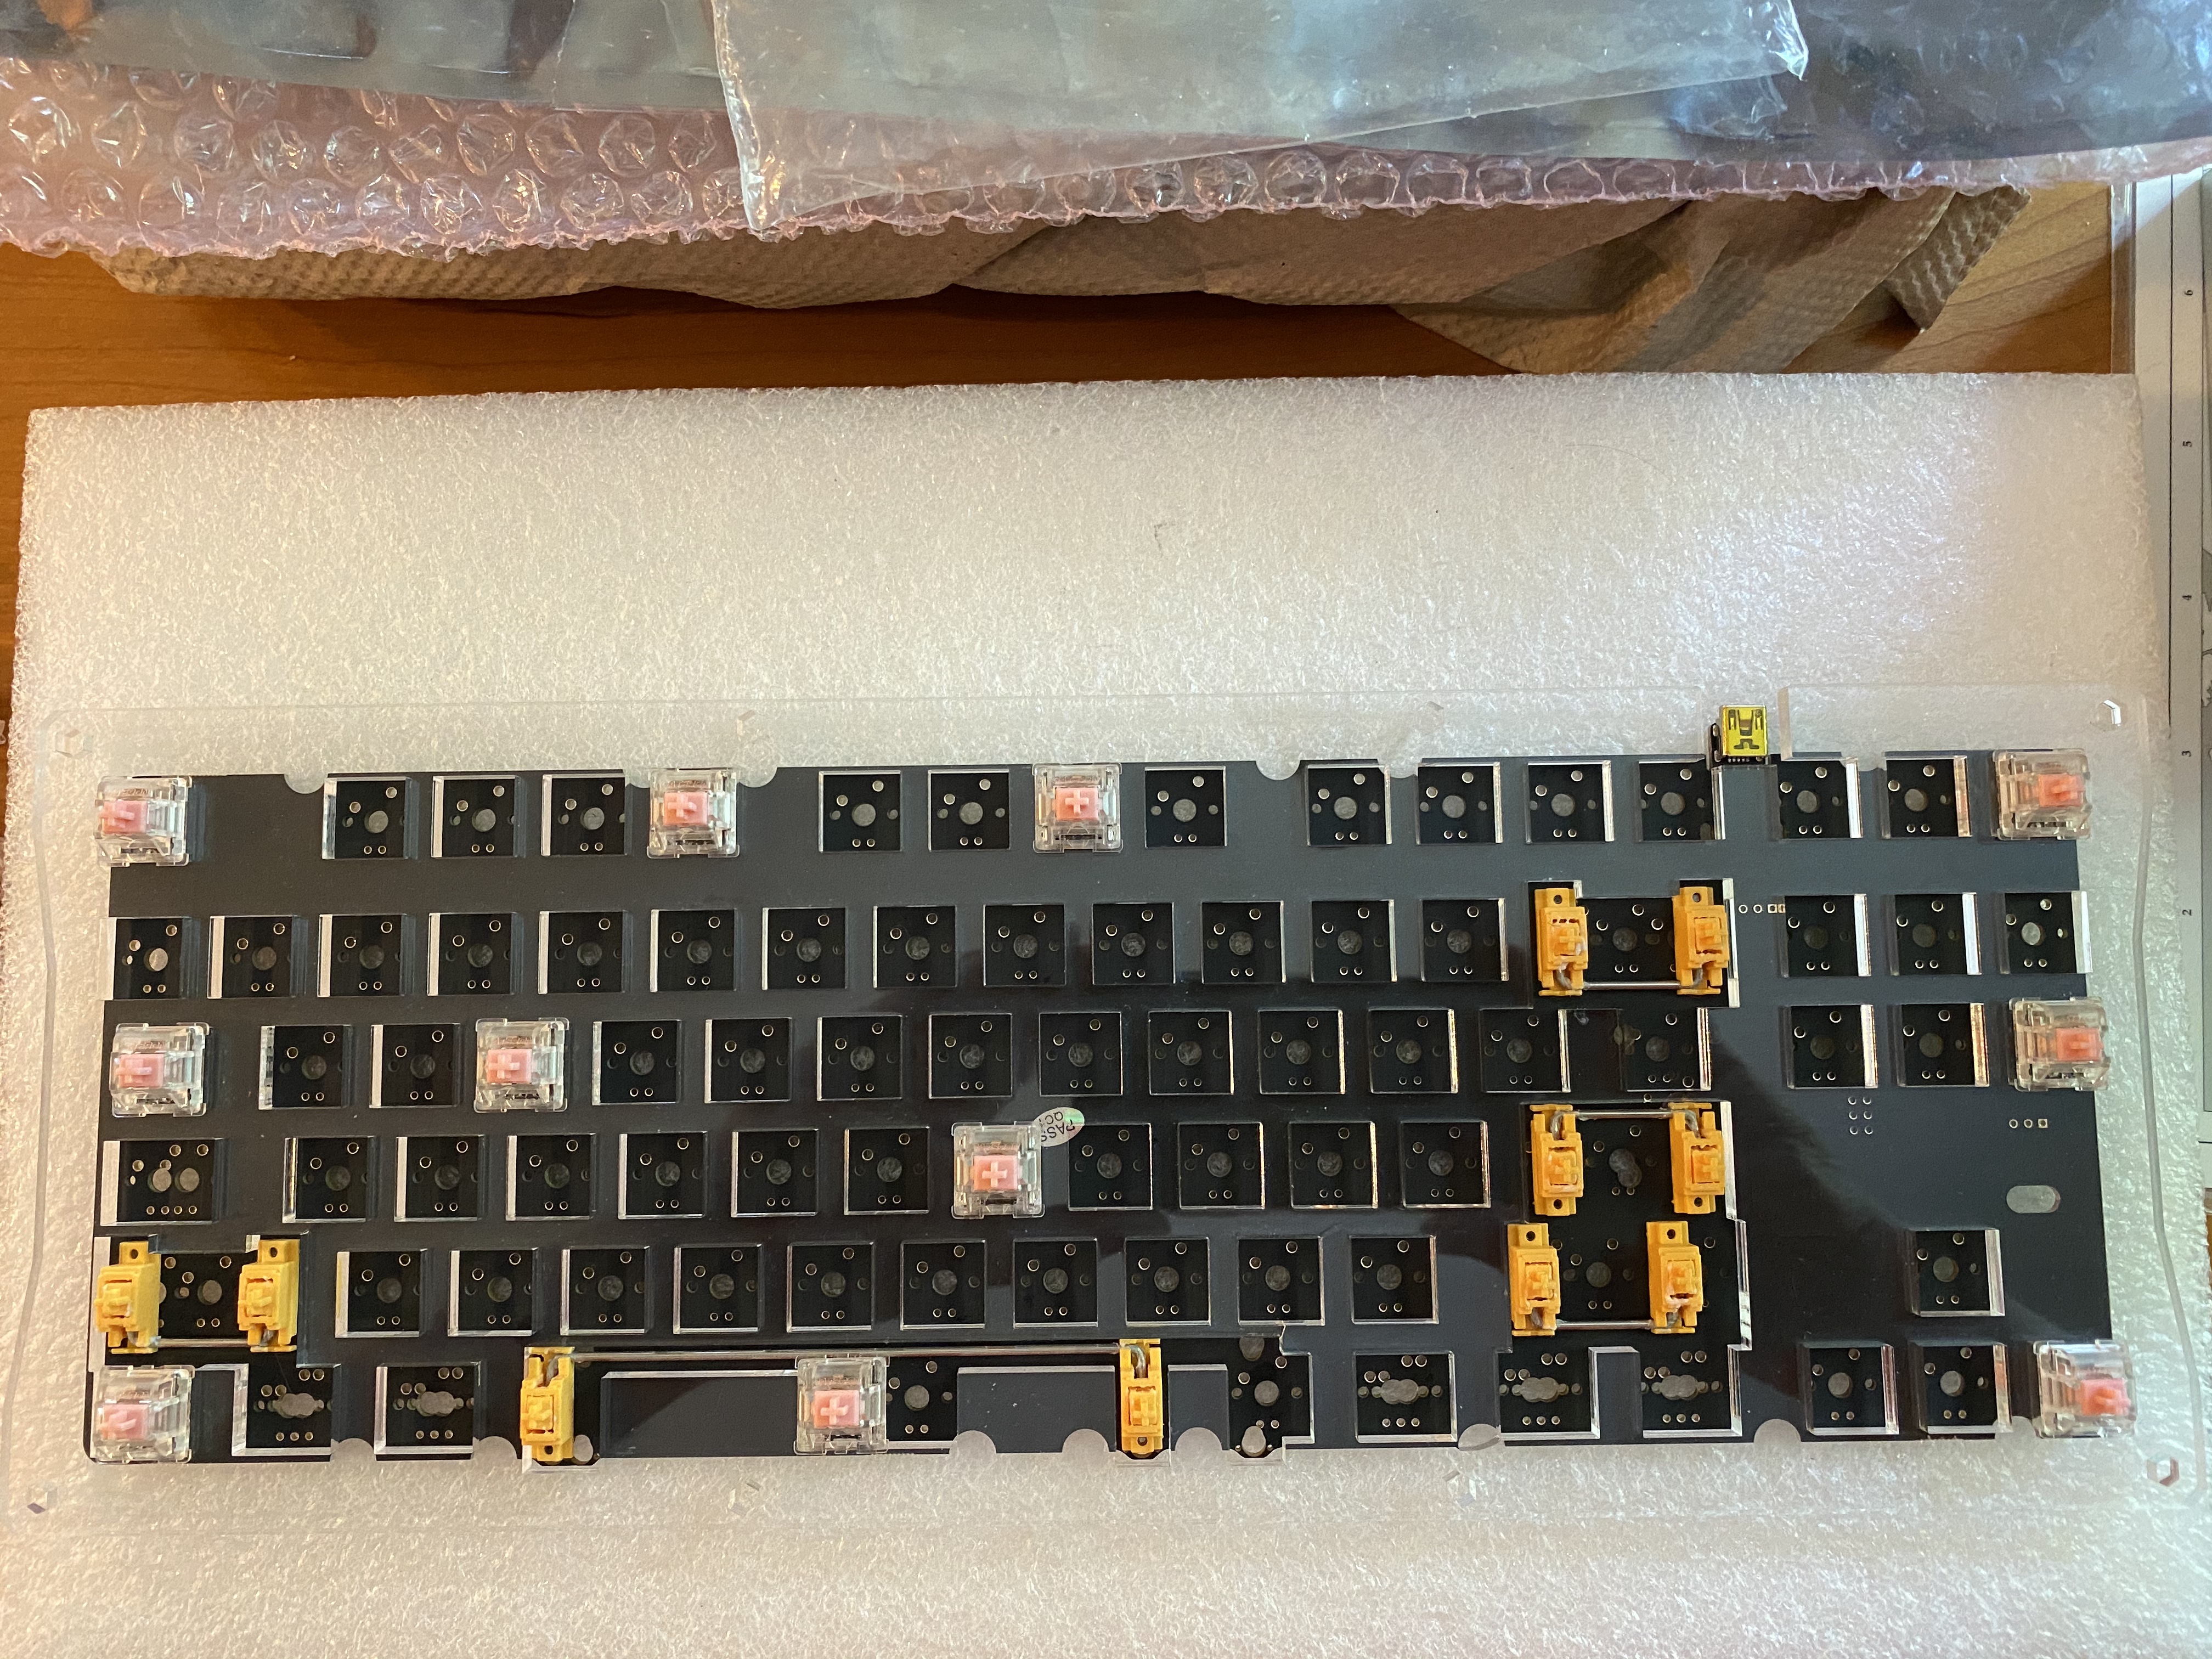
Next, we mount a few switches to get the alignment of the plate and PCB dialed in. Yes, I know some of you would have removed the “PASS QC1” sticker from the PCB, but I like to be visually reminded of Hiney’s love, as I’m sure my client will be.

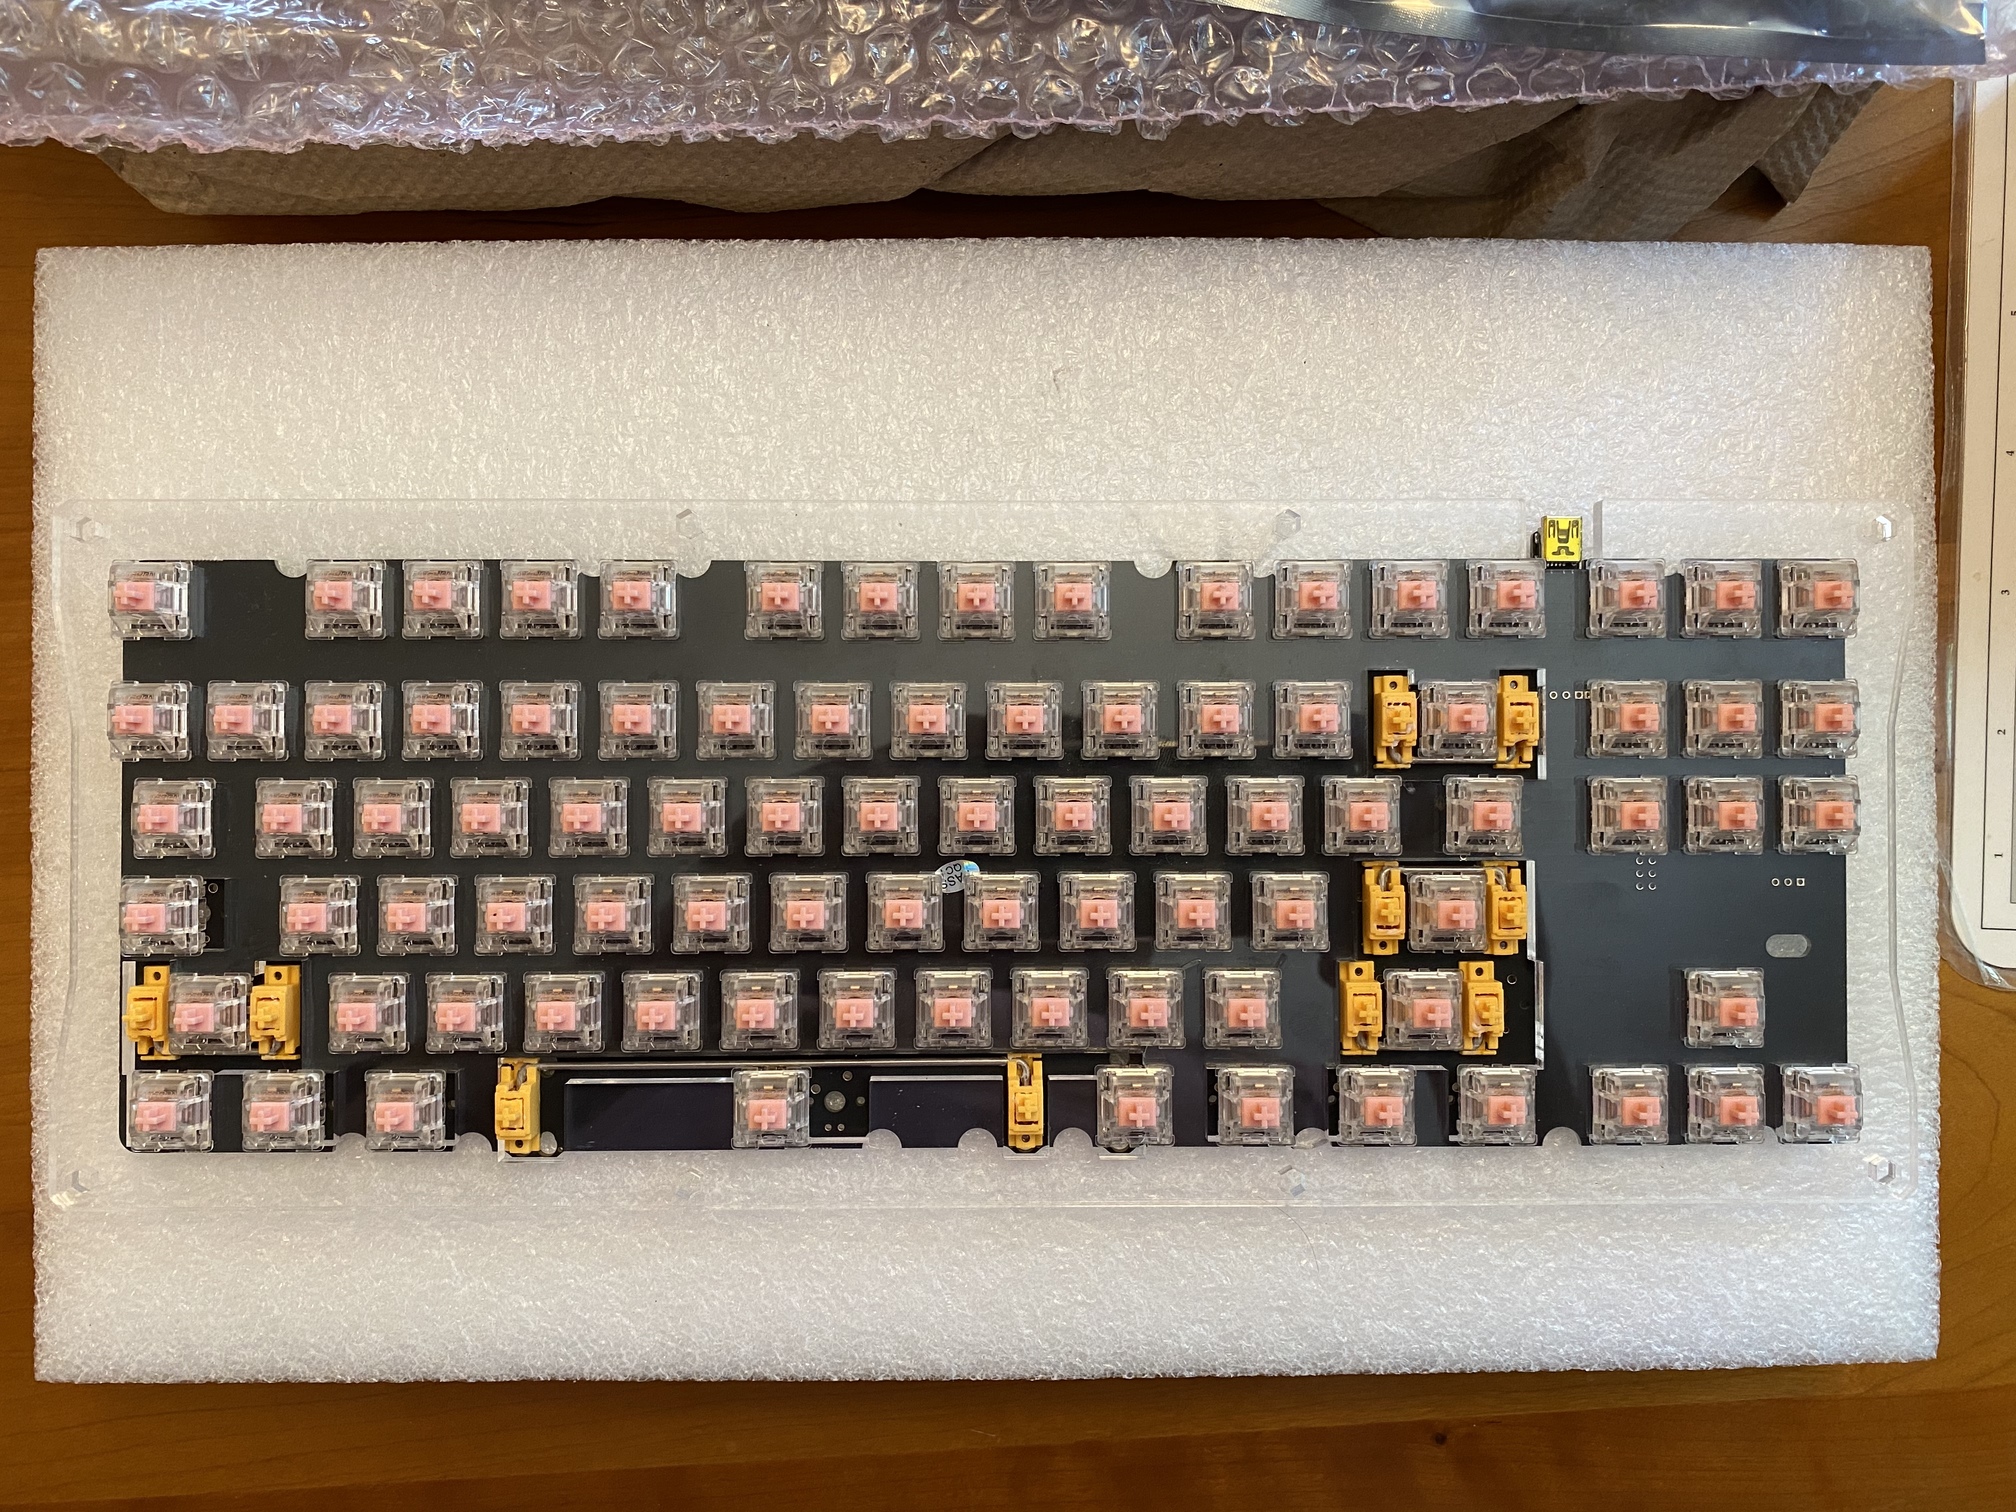
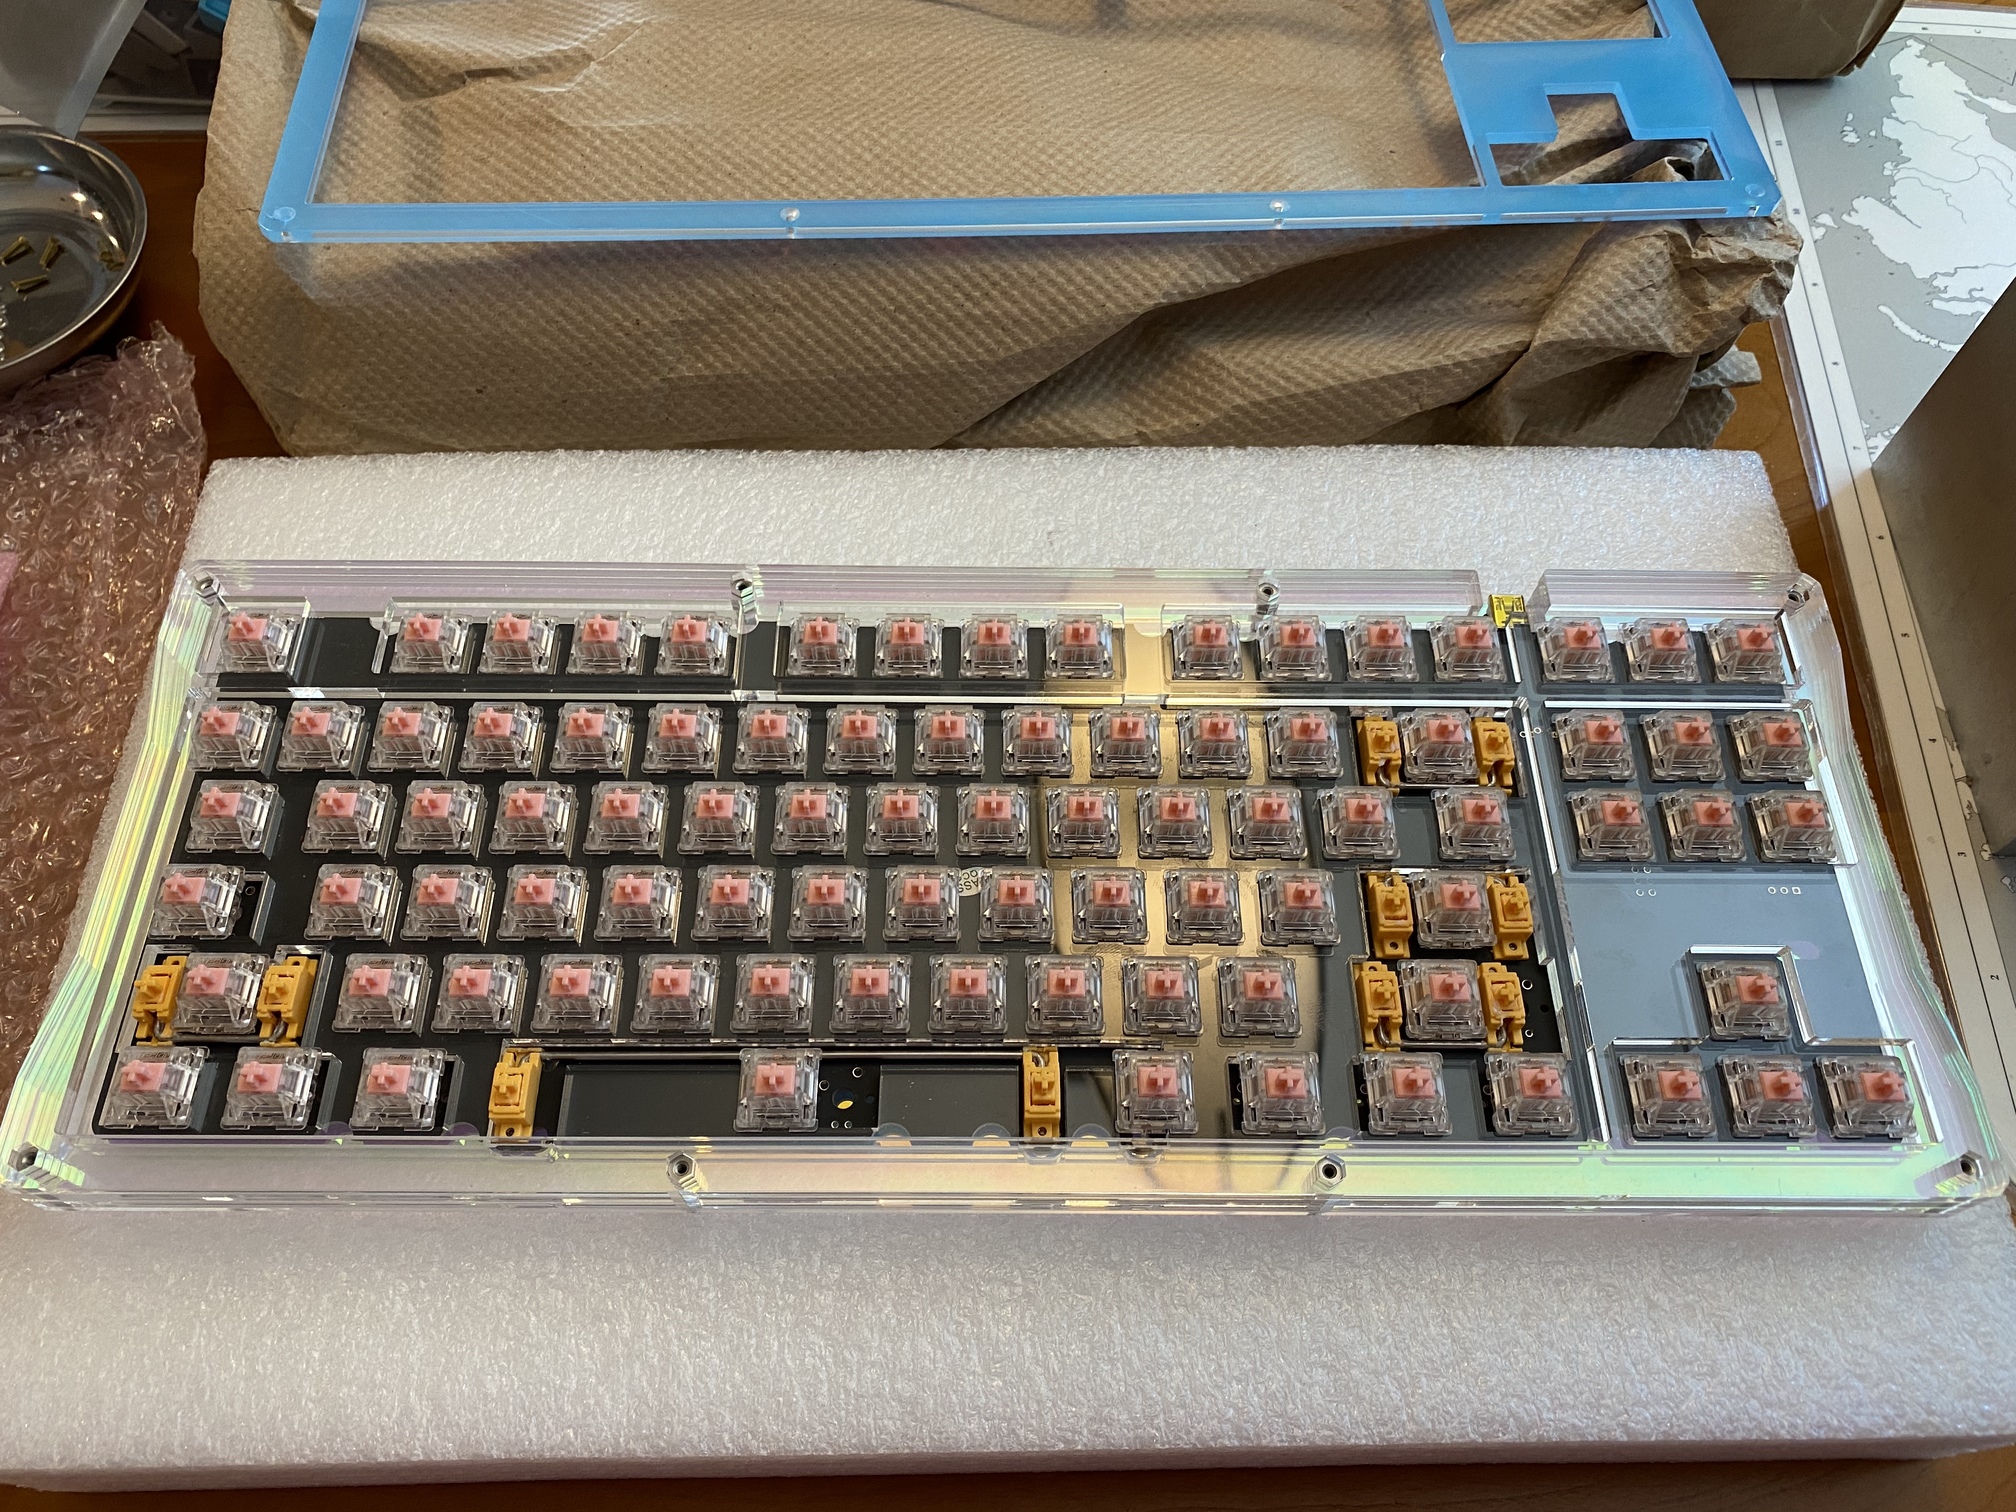
All switches soldered and ready for action. Now is a good time to point out a nice feature of this acrylic build - the interior acrylic layers have cutaways on either side, which effectively creates board grips on both sides of the board when these layers are sandwiched between the rectangular top and bottom layers which don’t have the cutaways.

Also, note that the interior plate acrylic is clear, not bifrost - the interior layers of the ElectroType 87 kit are all clear acrylic.

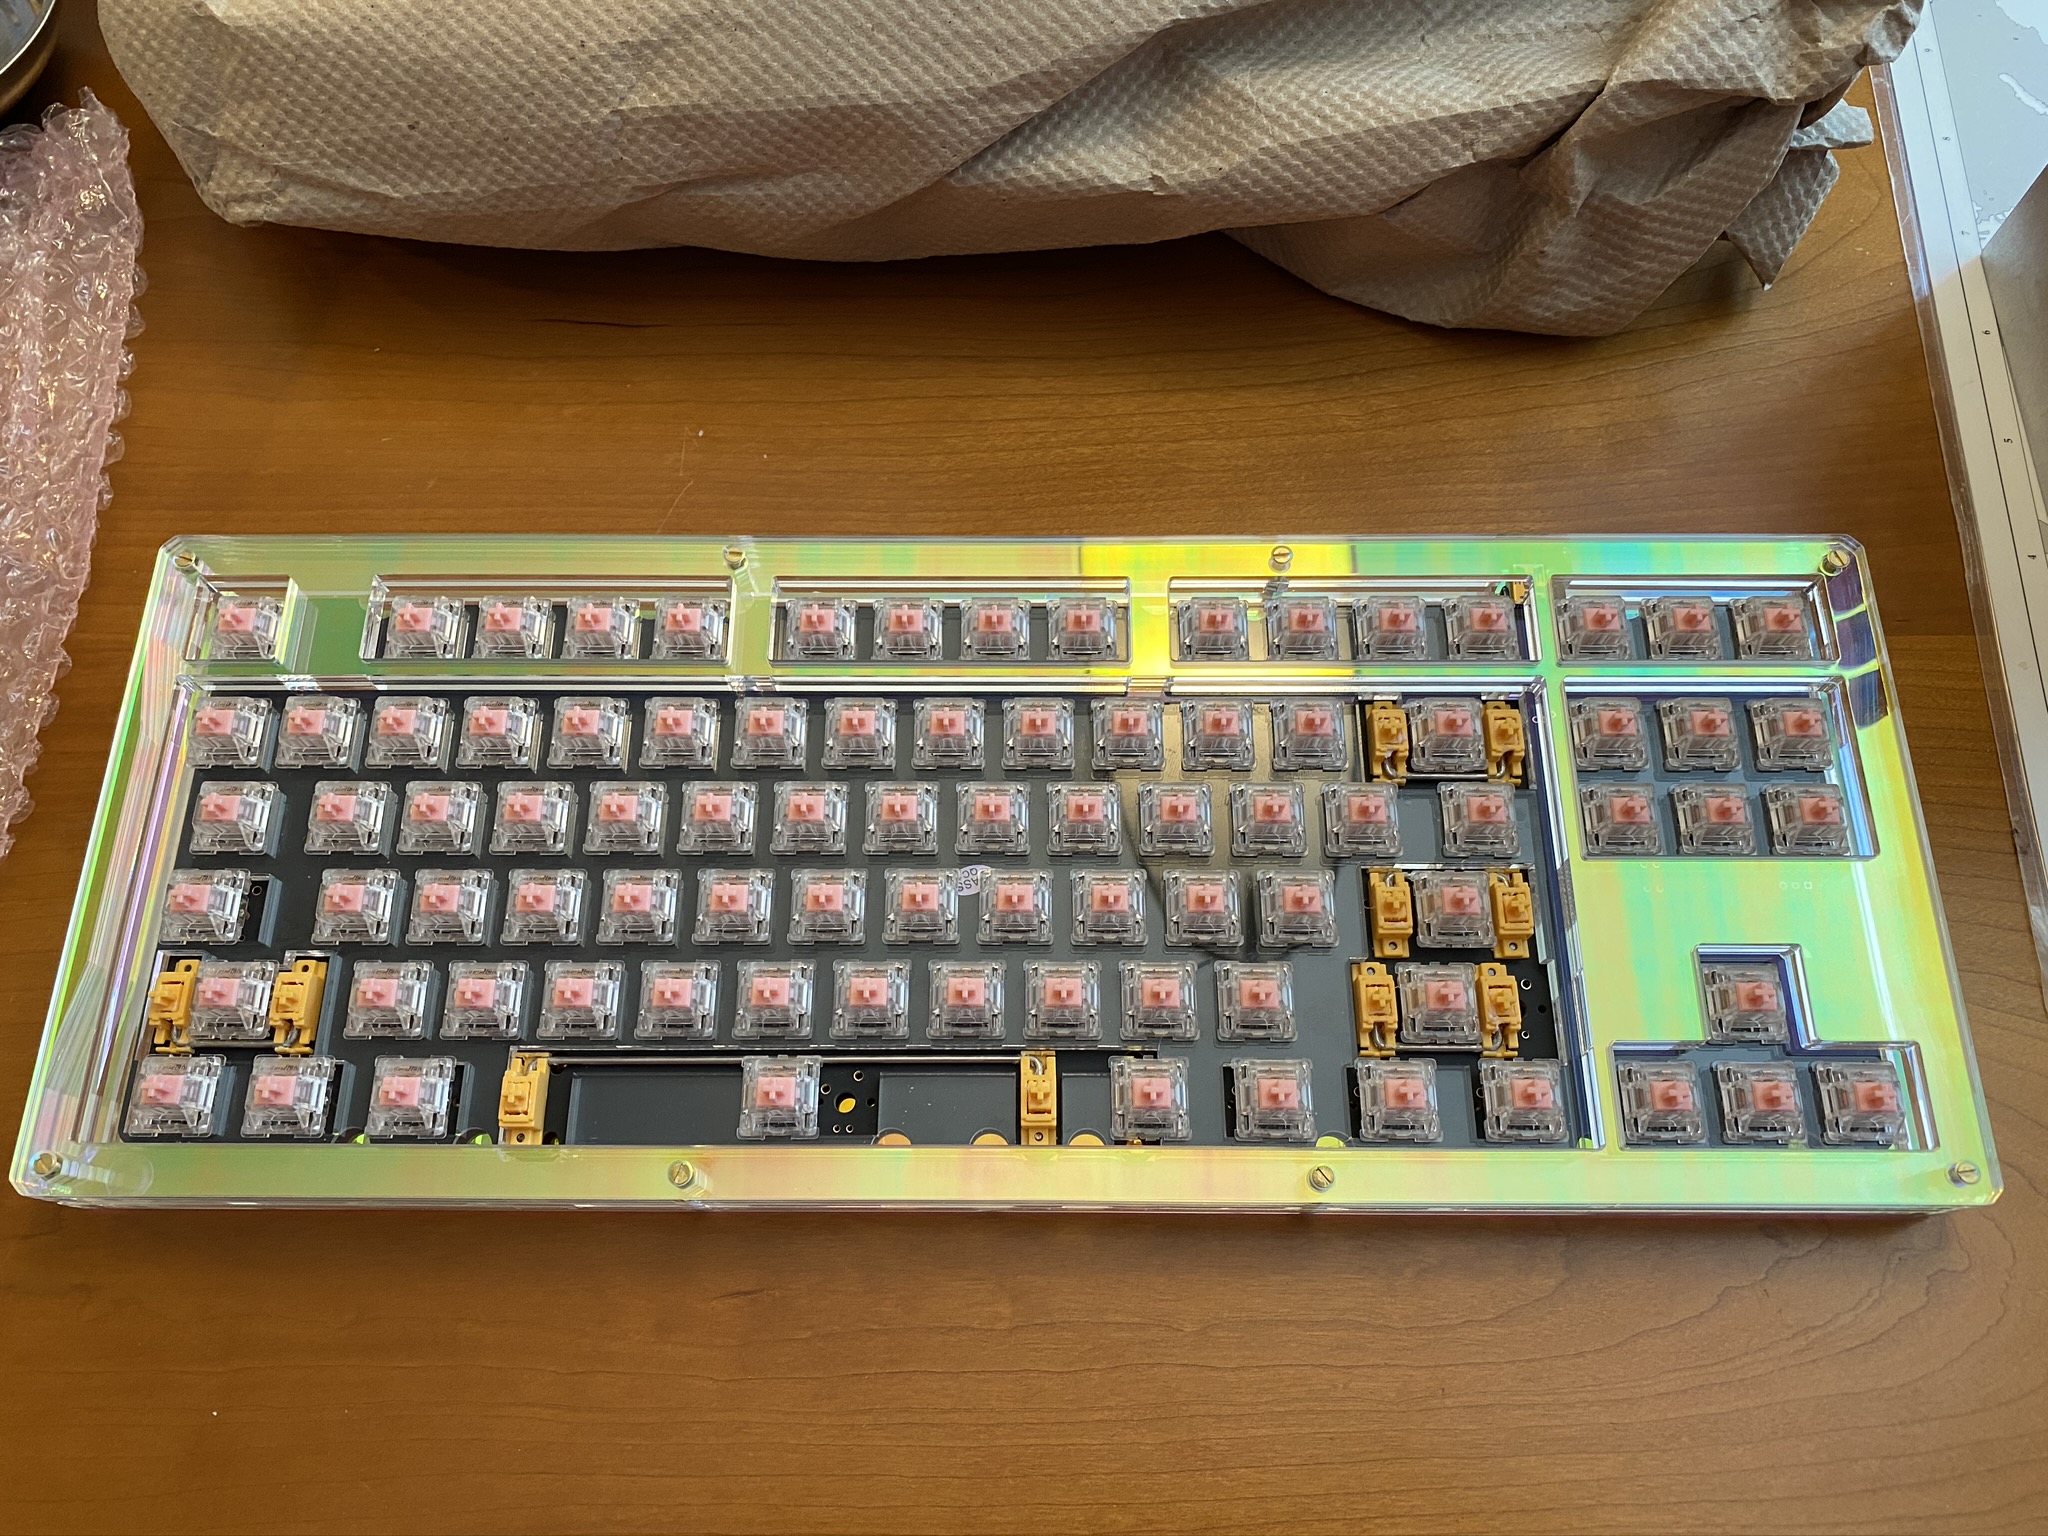
The sandwich assembly starts with the bifrost base and eight hex nuts which are screwed into place from the underside. Although photos don’t do it justice, you can see the rainbow effect I mentioned earlier - my fingers aren’t purple, and the light over the table isn’t yellow-green…

As we stack the layers, it’s a good time to point out another appreciated feature of this sandwich build; the laser-cut holes for the bolts are hexagonal, not circular, which both facilitates alignment of the individual acrylic layers, and makes it easier to tighten the nuts when they can’t spin with your driver. Here we have the base and the three interior layers in place, with only the top layer missing.

With the top layer in place, we’re ready for keycaps.

Lessons learned

  • Although I haven’t logged them yet, I’ve built a few Alice-style boards from laser-cut materials. Based on this experience, hexagonal bolts (and hole cutaways) would have been useful for all of those builds. The next time I have some sheets of plastic cut, I should modify the circular holes in the template to be hexagonal, and source hexagonal nuts and bolts.
  • A truly silent mechanical keyboard is likely a contradiction - but this is certainly one of the quieter boards I’ve built. 205g0 on Sakurios is, as expected, very smooth and pleasant.
  • I continue to enjoy MDA as a hypothetical and perhaps optimal point between the high profiles of SA and the flat expanses of XDA. If you dislike both SA and XDA, this might seem a bit like drinking a blend of two poisons for good health, but I’ll continue to argue that it’s worth a try if you’ve not yet done so.
  • Bifrost acrylic brings its own kind of polarizing bling to the party - whether you like it or not is of course subjective, but it really does catch light in an interesting way.
  • Before mounting stabs, check your plate for stab orientation. I feel like I learn this lesson about every ten builds or so, and promptly forget it every time. Part of me wonders if Hiney’s move to south-only spacebar wire on v1.8 of the h87a was because he’s as forgetful as I am…

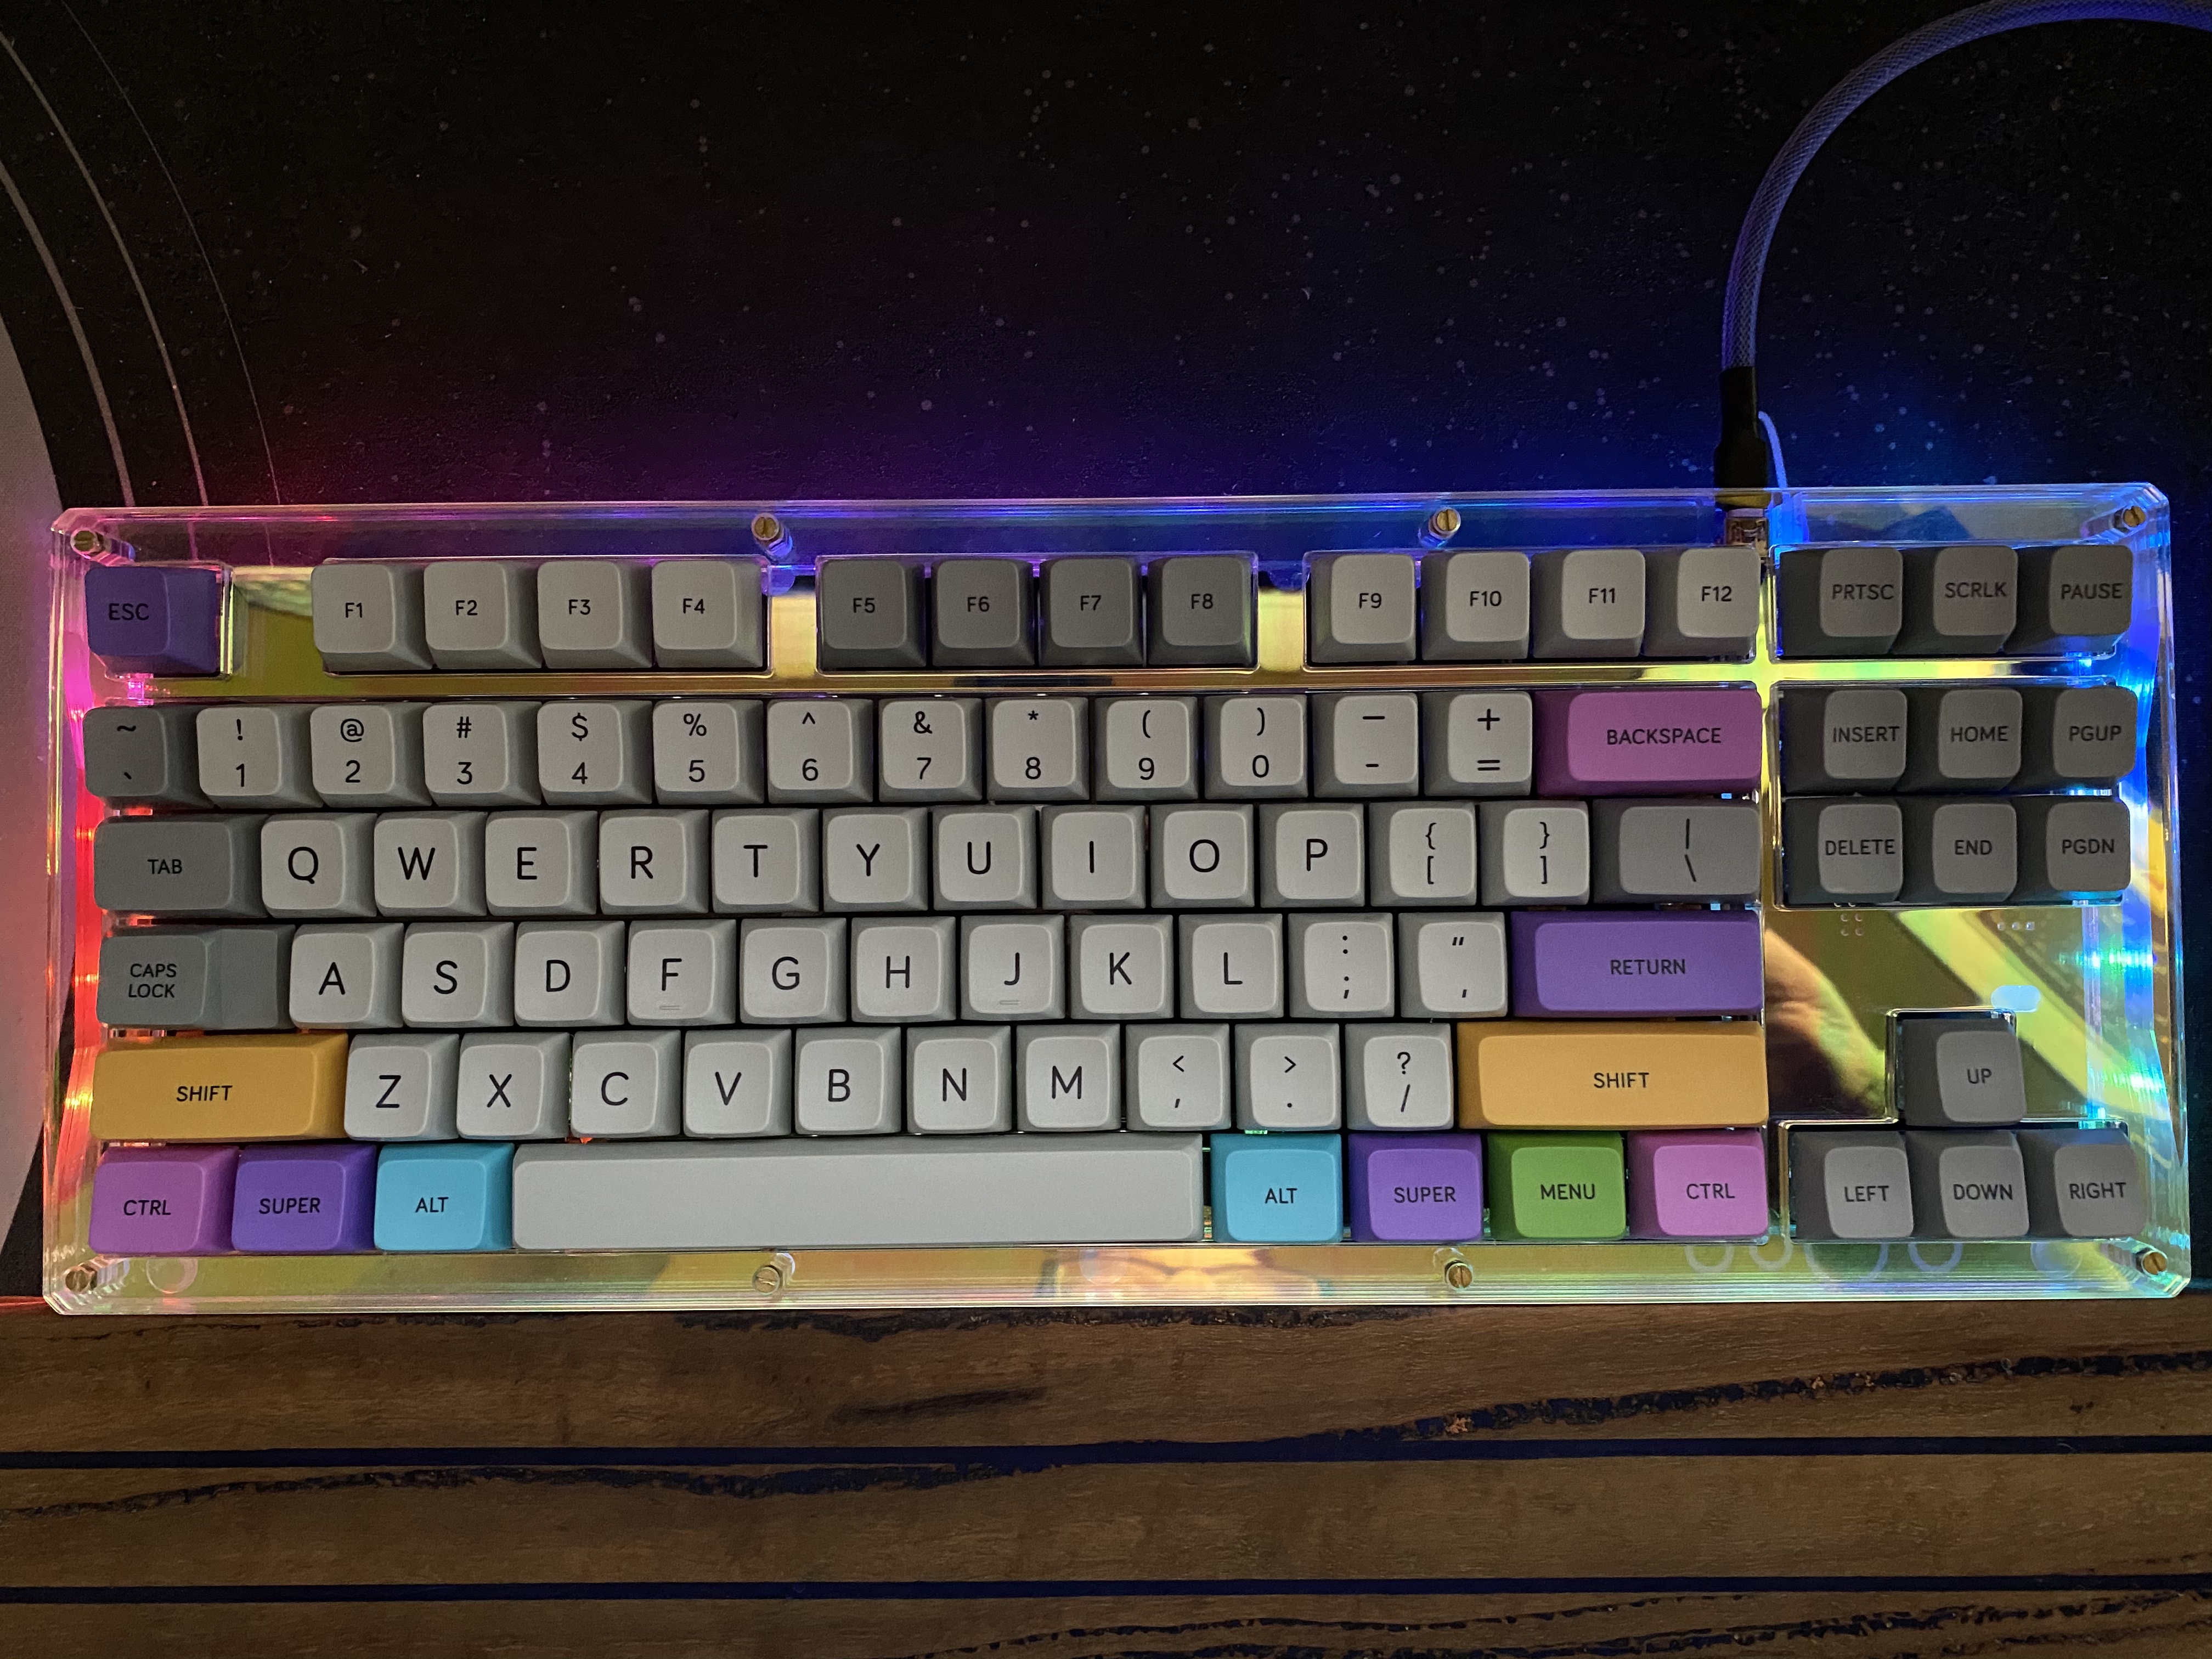
You want color, we got color.

Specifications

case: ElectroType 87
- sandwich-style TKL
- bifrost (radiant) acrylic top and bottom layers
- clear acrylic interior layers 
case dampening: n/a
PCB: h87a 1.7
plate: clear acrylic
plate/PCB dampening: n/a
stabilizers: C3 screw-in
- yellow, 1x6.25u, 4x2u
stabilizer mods:
- lubed with Christo-Lube MCG 129
- installed with cloth washers
switches: 87x 62g Sakurios
switch mods:
- springs tub-lubed with Krytox GPL 104
- stems hand-lubed with Krytox GPL 205g0
- no housing lube
keycaps: MDA Big Bone
HxWxD (without caps or feet): 0.75" x 14.5" x 5.5"
HxWxD (without caps): 1.13" x 14.5" x 5.5"
HxWxD: 1.38" x 14.5" x 5.5"
assembled weight: 0.95 kg (2.09 lb)
10 Likes

Build #41: Norbaforce Galaxy Class (Part I)

Heads up - this is a very long build log, perhaps the longest one I’ve done to date. Long enough, in fact, that I hit a 32K character limit on posts, so I’ve split it into two parts. Grab a nice beverage and get yourself comfortable.

I’ve been in the hobby for a little over two years now. That’s enough time to get many of the basics down, but there is still a great deal of backstory for which I don’t have first-hand experience. Because of that, my first encounters with custom builds from prior eras of the hobby are often just as instructive and entertaining as builds of the latest new shiny toys.

At some point during my keeb infancy, I ran across Ryan Norbauer’s bio here on keebtalk, and, specifically, the teaser photo of DSA Galaxy Class on a Norbaforce housing. Wait. This is a thing? Someone actually did a keyboard based on the LCARS interface from Star Trek: The Next Generation??

Sexy as hell, right?

At the time, I didn’t know that the keyset was DSA Galaxy Class, nor did I know that the housing was a Norbaforce in the Galaxy Console finish. Knowing what I know now, that seductive photo should be accompanied with a detailed warning, not unlike those that come with power tools or industrial chemicals. I imagine such a warning might include the following admonitions:

  • WARNING: This photo depicts a DSA keyset that is no longer produced, and will be difficult to find in the aftermarket.
  • WARNING: This photo depicts a housing that is infrequently produced, in a finish that was itself only one of several options during the production run.
  • WARNING: This housing is intended for a Realforce, a Topre board that does not natively support MX-style keycaps such as DSA.
  • WARNING: Replacement Topre sliders that support MX are either (a) bad or (b) present only in a keyboard (the CoolerMaster Novatouch TKL) that has been out of production for years and commands steadily increasing aftermarket prices for slider harvest by Topre fans.
  • WARNING: Yes, that’s right, you need to harvest parts from two other OEM boards to achieve the result so blithely displayed in that photo.
  • WARNING: Novatouch sliders for the modifier keys do not fit into stock Topre modifier housings.
  • WARNING: The left CTRL key on a Realforce 87U has a unique slider and housing unlike all the rest, because life was never meant to be easy. You are defined by the struggles you overcome.
  • WARNING: The Realforce 87U uses a 6u spacebar. Not 6.25u, not 7u. 6u.
  • WARNING: A 6u spacebar, which DSA Galaxy Class does not include. Do you see a spacebar in that seductive photo? No? Hmmm…
  • WARNING: A 6u Topre spacebar, which means you have limited options if color matters and you decide to stick with a Topre-style spacebar on your converted-to-MX build.
  • WARNING: A 6u Topre spacebar, which means the spacebar stems are not in the same location as they would be for an MX-style spacebar. Wait, you didn’t know about that?
  • WARNING: Are you sure about this build? I mean, really sure?
  • WARNING: You could build other boards. How about lubing some switches? Doesn’t that sound nice?
  • WARNING: Or maybe just enjoy a happy fun ball instead.

No! If this build log is to mean anything, then we must boldly go where no one has gone before. Or, barring that, tentatively and fearfully go where many people have gone before, and ride on their shoulders, using their heads as convenient shields and clutching a phaser dialed to maximum power, just in case.

One more warning before we begin:

  • WARNING: If you are attempting to replicate this build, I strongly recommend that you read the entire log first - I had to backtrack several times. Avoid unnecessary work and don’t repeat my mistakes!

Sourcing the parts and materials

There’s no getting around it - to do this build in 2020, you need to start sourcing parts in early 2019,
have some spare cash on hand, and enjoy more than a little serendipity.

  • Realforce 87U - even though Topre has moved on to the Realforce R2, the original 87U remains reasonably easy to obtain, and can still be found at Amazon even now.
  • Novatouch TKL - this is possible but harder to obtain on ebay - boards do not appear for sale as frequently, and the prices have been steadily escalating due to the demand for acceptable MX-sliders among Topre aficionados. I waited for a broken one to show up, and pounced - we don’t need the Novatouch to be functional, as long as the sliders and housings are in good condition.
  • Norbaforce in Galaxy Console finish. When I began to pursue this build, the original Norbaforce group buy was nearing completion, and rumor had it that extras would eventually be available on Norbauer’s site. Eventually those extras were up for sale, the powder-coat Galaxy Console finish was among those available, and I pounced.
  • DSA Galaxy Class. This was long gone from the market by the time I became aware of it, and I had just about resigned myself to a long and potentially fruitless slog through the aftermarket, when to my surprise Ryan made some recently discovered extras available on his site. I pounced again! It’s like I’m a cheetah!
  • DSA 6u spacebar. The escape key in DSA Galaxy Class, with the “EJECT CORE” legend, has a deep salmon color. As fortune would have it, PMK was selling 6u DSA spacebars, and one of the available colors was RAG - a salmon color that sure looks like the same color as the EJECT CORE key, which means I have a possibly compatible space bar for this build and Galaxy Class! I pounc— OK, enough of that.

We’re in business! Or so I thought…

The slider harvest

The donor Novatouch was missing one keycap, and, as advertised, not functional - no signs of life when plugged in. But the sliders felt nice - either the previous owner really broke this keyboard in, or did some lubing work of their own.

A minute or two with a keycap puller, and it appears that we have a good set of sliders for the taking, along with some detritus on the plate. Expected, and I’ve certainly seen worse.

Onward with the harvest. To get inside a Novatouch, there are four screws on the underside of the case that need to be removed. Two of them are next to the keyboard risers, while the other two are hidden beneath the two stickers - or would have been, but it appears that the previous owner has already been inside the case.

From here, we can use a flat-head screwdriver or credit cards to wedge the top and bottom halves of the Novatouch apart, working slowly around the perimeter. The USB port is attached to the case by two screws, and with those two screws removed, we have our first look at the PCB/plate assembly.

To separate the plate from the PCB and get at the sliders and slider housings, get your screwdriver ready: there are 32 screws that need to be removed from the PCB (20 black-headed, 12 silver-headed). Yes, 32. All of these screws serve the purpose of tightly compressing the rubber dome sheet between the plate and PCB, ensuring that the springs inside those rubber domes can actually generate the necessary capacitive effect to register keypresses.

Once all the screws are out, a little care is in order. Holding the plate and PCB firmly together, we flip the assembly over and set it down on our workmat, and then we gently lift the plate away from the rubber dome sheet. After a long time under compression, the rubber sheet will want to stick to the plate, and unless you want the springs under those domes to go flying everywhere, it’s wise to take this part slowly - gently separate the plate from the sheet, separating the sheet from the plate by hand if necessary as you lift, and with any luck, it will eventually lift cleanly away.

We can now get a good look at the objects of our desire - the infamous purple sliders. Specifically, 83 1u sliders, 4 modifier sliders, and a wire slider assembly for the spacebar.

Removal of the 1u sliders is straightforward. Using a fat hex bit, just apply pressure to the cruciform of the slider, and the slider will snap out of its housing. Once you get a feel for the necessary amount of pressure, it won’t take more than a couple of minutes to remove all of the 1u sliders.

The modifier sliders can be removed from their wires (and their housings) by sliding them off of the wires; the underside of these sliders have cutouts for the wire to easily pop out and back in. Similarly, with a little fiddling, the spacebar wire sliders can be separated from their wire.

We’re not going to need the PCB, domes, or springs from the Novatouch for this build, but there’s no reason to throw away potentially useful parts and materials. Here, we’ve reattached the plate to the PCB to keep those rubber domes and springs in place for storage.

The previous owner had in fact lubed the sliders, so before we can use them for this build, we’ll need to clean them. Time for a good ultrasonic cleaning. Add water and a touch of dish soap to the cleaning bin, throw in the sliders, and let it run for 30 minutes.

Once that’s done, we spread the sliders out on paper towels, and let them dry for a full day to be sure that no water remains inside the slider.

Disassembling a Realforce 87U

Here’s the Realforce donor board: a brand new 87UW55, with 55g rubber domes.

Prior to getting into the case, we remove all the keycaps. The Realforce comes with a keycap puller in the box, and I recommend you use it - the Topre caps are very tight on the sliders, enough that damage to the sliders seems a real possibility if you try to remove the caps without a puller.

Also, be sure to grab that spacebar spring and put it somewhere safe if you plan to continue using it; I generally don’t keep it in the build, as I think it adds rattle and no meaningful change in spacebar weighting, but to each his own.

Also, while we’re here, take a look at the Topre spacebar mounting stems. We’ll come back to these later on.

Getting into this board couldn’t be easier. On the underside of the board, simply pop open the four tabs along the front edge of the board.

Be careful when opening the board, however, as the USB cable is attached to the PCB and the plate.

Flipping the case back over, we can more clearly see what’s going on. The board’s cable forks into a connector for the PCB, and a separate ground wire attached to the plate.

To completely separate the PCB/plate assembly from the case, gently remove the PCB connector, and unscrew the ground wire from the plate. Don’t lose the ground wire screw - you’ll need it for reassembly.

Foreshadowing

Let’s take a quick tour of the existing sliders and housings on the Realforce, shall we? Here, we have a good look at three of the modifier slider housings; just a solid piece of plastic with a hole in the center for the Topre slider.

And, while we’re here, let’s take a look at the housing and slider for the left control key. First, note that the housing has two diagonal cutouts on opposite corners - one to match the plate cutout, and one to make room for an inconveniently located LED. Second, note that this slider itself is different from all the others - two notches on each side of the interior, rather than one. Third, although it’s difficult to see in this photo, note that this slider is slightly narrower than all the other 1u sliders, and its housing has a slightly smaller hole to accommodate that.

There will be consequences.

Back to disassembly

Did you enjoy all that screwdriver work with the Novatouch? Guess what, it’s your lucky day with the Realforce. All the fun one person can handle. Well, slightly less fun: 11 silver-headed screws instead of the 12 the Novatouch uses, but you still get all 20 black-headed ones to address.

You can use the Novatouch approach to separate the plate from the PCB and rubber domes, but even more caution is necessary here. Unlike the Novatouch, the Realforce’s domes are not in the form of a single unbroken sheet. Each dome is its own perforated piece, although some are more perforated
than others. Because of this, it’s even easier for individual domes to lift away, so be careful as you separate the plate from the domes. I ended up having to reposition a few domes and springs during this process.

More foreshadowing

Now that we’ve separated the plate from the domes and PCB, let’s take another look at that left control key. Interesting - the left cutaway on the housing goes even further than the plate cutout for the LED.

There will be consequences.

To drill or not to drill

In all of the Norbaforce build logs I’ve seen online, the need for drilling holes is frequently mentioned, but I’ve never seen a clear set of photos or descriptions illustrating exactly why this is necessary. Out of sight, out of mind, until this point in the build. Take a look at a Novatouch and a Topre mod slider, side by side:

See those two nubs on the top of the Novatouch slider? The Topre slider doesn’t have those, nor does its housing have holes in it to allow for those nubs to pass through, as I showed you before.

So, we have a choice - drill holes in the Topre modifier housings to allow the Novatouch sliders to fit, or swap out the Topre modifier housings for the Novatouch modifier housings. Since we have the whole
Novatouch board, the latter seemed like the way to go, and it was, except I wish I hadn’t screwed the Novatouch back together, since I now have to open it up again to retrieve those housings. Sigh.

Note to future me and current you: when you harvest the Novatouch sliders, harvest the Novatouch modifier housings too! You’ll thank me later.

After putting the Novatouch back together again (gotta keep those domes and springs out of harm’s way), we’re back with the Realforce plate, and it’s a quick job to swap modifier housings.

Silencing and lubing

Untuned Topre sliders can be very loud, and a number of aftermarket options for silencing them are available, but they all boil down to the same idea: put a ring of dampening material around the slider stem, so that the upstroke impact of the slider against its housing will be quieter. Generally speaking, there is a tradeoff - the thicker the material, the greater the silencing effect, but with a corresponding reduction in key travel, since the silencing ring prevents the slider from making a full return to the housing.

We begin by placing silencing rings on the slider stems.

Before we move to slider installation and lubing, let’s address stab lubing. Unlike the MX-style world, where it’s very possible to overlube stabilizer sliders and obtain sluggish key movement, Topre stab sliders can tolerate far more aggressive lubing, and often need it to fully silence rattle. I’d never apply anything close to this amount of SuperLube on a Cherry stab, but for the spacebar Topre stabs, this was barely enough.

You can get away with less grease on the modifier wires, but you still need to ensure that the wire clips and wire ends are lubed thoroughly.

At this point, the Novatouch mod sliders can be installed. It’s worth mentioning that you may still hear a bit of rattle from these sliders (and the 1u sliders, after they are installed and lubed), but if the lube job was satisfactory, all of that remaining rattle will disappear once the sliders are under compression from the rubber domes. Of course, this makes it a little difficult to test whether the lube job was sufficient during the build. Such is Topre life.

Now, we proceed with installation of the silenced 1u sliders. Note that each slider has two “arms” that fit into “rails” in the housing, so the sliders can only be installed in the correct orientation. Note also that other than the silencing ring, the only contact the slider has with the housing is on these rails, so that’s where we first apply lube. Tribosys 3204 is a good choice for this application. Once both rails have been lubed, the slider can be snapped into place.

For the moment, I’ve just placed the Topre spacebar slider back into its lubed housing, but otherwise, I think I’m done!

Except, wait - why doesn’t the Novatouch 1u slider fit into the left control housing?

That’s right. All that stuff I showed you before about the left control key weirdness? This is the actual point in the build where I began that voyage of discovery.

Yes, that’s right. To understand what’s going on with the LCTRL Realforce housing and the Novatouch 1u slider, I’ll need to look at the differences between the Realforce and Novatouch housings - which means I need to open up the Novatouch. AGAIN. And put it back together. AGAIN.

Will I recover from this blow? Stay tuned for Part II…

6 Likes

Build #41: Norbaforce Galaxy Class (Part II)

And now, the conclusion to “Build #41: Norbaforce Galaxy Class”…

Self-administered therapy

Realizing that my insistence on keeping those Novatouch domes and springs safe and sound has cost me a significant amount of build time at this point, and further realizing that my neglect in learning the LCTRL lessons from prior generations of builders is about to come back to haunt me, I realize that I’m about to get quite frustrated. And if there is any state of mind that isn’t conducive to a satisfying build, it’s frustration.

Fortunately, I’ve learned over the years to administer my own therapy for these kinds of situations. It’s summer. The weather forecast is good. We have fresh corn, tomatoes, basil, and mozzarella on hand. We have some sausages in the fridge. Open a nice bottle of white wine, and let’s just chill for a bit. This looks tasty.

I think LCTRL can wait until tomorrow. Pour me another glass, would you? Thanks.

Tackling LCTRL

It’s a brand new day, and we’re refreshed and ready to take the full measure of this LCTRL situation. As we noted in the first bit of foreshadowing, the left control slider on a Realforce is thinner than all of the other 1u sliders, and has a special housing to contain it, while avoiding interfering with a nearby LED on the PCB. Because of that size difference, a Novatouch 1u slider will not fit in that specific housing.

So, at a high level, we have two options:

  • Sand down a Novatouch slider until it fits in that housing. This could probably work up to a point, but I didn’t like the idea of introducing roughness to the slider, even if LCTRL is a comparatively infrequently used key. There is also some risk of overdoing the sanding, resulting in slider wobble.
  • Harvest a 1u housing from a Novatouch, which will by definition accommodate a Novatouch 1u slider, leaving us with the problem of installing the Novatouch housing in the Realforce plate’s LCTRL cutout.

All right, I’m calm. One more Novatouch opening/closing cycle to obtain a 1u housing, and here we are - Realforce LCTRL housing on the left, Novatouch LCTRL housing on the right.

Both housings have two “layers” - a bottom layer, which lies below and makes contact with the plate, and a top layer, which protrudes through the plate cutout and has a hole for the slider stem. There are three significant differences between the two housings:

  • The lower right corner of the top layer on the Realforce housing has a diagonal cutaway, to match the cutout shape of the plate.
  • The upper left corner of both layers on the Realforce housing is cutaway as well, to allow clearance for the LED.
  • Although it’s not visible in this photo, from above the housing the slider rails are in the upper right and lower left corners, unlike every other housing, where they would be in the upper left and lower right corners. This is necessary since the standard rail orientation conflicts with the LED placement.

For reference, let’s also take a look at the Realforce LCTRL plate cutout again, with and without the dome and PCB underneath it.

There’s a lot to think about here, but let’s work through it:

  • The Realforce cutout is not square - the lower right cutaway is diagonal, so the Novatouch housing will not fit without either cutting the plate to make room for it, or filing down the Novatouch housing so that it will fit. Given that we only have one Realforce plate and hence one chance to cut the plate correctly, but 83 Novatouch 1u housings and hence 83 chances to file correctly, filing seems to be a preferable option, and if for some reason that doesn’t pan out, we can always revert to plate cutting.
  • We’ll have to file down the opposite corner of the housing as well, since the LED will be in the way. Both the top and bottom layers will have to be filed, since both layers encroach on the LED cutaway space. Alternatively, we could desolder the LED, but since we already have to file the housing anyway to address the lower right corner of the plate cutout, it seems preferable to restrict our mods to just the Novatouch housing, leaving the Realforce plate and PCB intact.
  • Since we’re going to have to file through a corner of the housing, we need to be sure to file the two opposing corners that do not contain the slider rails. However, this means that we need to rotate the Novatouch housing 90 degrees from its usual orientation to install it, and the housing is not perfectly square, so we may also have to do a bit of filing on the sides of the housing.

So, to sum up: we start by rotating the Novatouch housing 90 degrees.

In that position, we file away the top layer’s lower right corner, and the upper left corner of both layers, using a flat needle file for better control. You can see a lot of the plastic particles on the paper towel I’m using for a work surface.

The plastic is thin on the lower right corner, so you’ll likely file through the housing at that point, but it doesn’t matter, as long as there is enough plastic to maintain contact with the plate.

On the upper left corner, you’ll also completely file through the lower layer of the housing, but you’ll only need to take away a small diagonal piece of the upper layer. If you look very closely, you can also see file marks running parallel to the top and bottom edges of the upper layer - I needed to sand down the “north” and “south” sides of the top layer to obtain enough clearance for the housing to fit in the plate, due to the slightly rectangular shape of the housing and the fact that we’ve rotated it.

Fitting our filed housing into the Realforce plate, we see that we have the cutaway for the LED, and that the rails are oriented in the opposite corners from all of the other 1u housings.

And, from the top side, the slider appears to fit cleanly.

But, the real moment of truth arrives when we screw back together the PCB/dome assembly with the plate. Do we have free slider movement? Success!

Don’t forget to lube the rails on this last housing.

Norbaforce (Mark I)

The Norbaforce housing has been waiting patiently all this time for its chance to shine.

These fine individuals are enjoying their day of unboxing - clearly none of them are suffering from LCTRL trauma. Must be that coffee.

All joking aside, you have to love the Norbaforce unboxing experience. Cartoons!

Our first look at the Norbaforce with the Galaxy Console powdercoat. Potato pics aside, that’s gorgeous.

Removing the housing from its packaging and flipping it over, we see two risers attached to the housing with screws, as well as a metal baseplate also attached by screws.

Removing the baseplate, we obtain access to the interior of the housing.

The Norbaforce housing upgrades the stock Realforce to support USB-C and removable cables, which it accomplishes via a replacement breakout board.

The other side of the breakout boards sports the Norbauer portcullis logo, and this is the side that will be face up when it’s installed in the housing, like so:

The Norbaforce includes a breakout cable for attaching the breakout board to the Realforce PCB.

The easiest way to install this is to flip the PCB/plate assembly over and attach the breakout cable with a twist in it, so that when it is flipped back into place, the cable will straighten out.

Don’t forget the ground wire included with the Norbaforce and the screw you reserved for it. One end is reattached to the plate with that screw…

…and the other end is attached to the breakout board. Yes, I had to unscrew the breakout PCB to attach this, but at this point, what’s one more screw.

An old Norbaforce learns new tricks

Since the original release of the Norbaforce, we’ve seen the release of the Norbaforce Mark II for the current Realforce R2 lineup, and alongside that release, we’ve seen some new upgrades compatible with both Mark I and Mark II Norbaforce housings. First, we have a new sound dampening treatment, the Norbaforce Acoustic Dampener, which arrives wrapped in custom tissue paper:

Opening that up, we find a custom-cut pad of felt Merino wool. If your order arrives during the hot summer months, as mine did, you’ll probably smell that wool before you see it…

The pad is meant to rest freely on the bottom of the keyboard, which it will do once the base is installed and flipped over, so it’s easiest to simply place it on the PCB at this stage.

We could just screw the baseplate back into place, but there’s one more quick upgrade to do. The stock Norbaforce Mark I baseplate is made of aluminum, which we can replace with new option: a much heavier brushed gold PVD-coated stainless steel baseplate, further assisting with noise dampening, and adding heft.

Installing that into place, we finally have our first look at the completed board, sans keycaps.

Spacebars: the final frontier

Up to this point, I’ve been glossing over the decision to leave the Topre spacebar
stabs and sliders in place. My original intent was to remove that slider and
those stabs and replace them with their Novatouch counterparts, at which point
I could use the salmon-colored 6u DSA spacebar to match the DSA Galaxy Class
color scheme.

But at some point along the way, I thought to line up the DSA spacebar with
its stock Realforce counterpart, and re-learned an old lesson: the spacebar
stems don’t line up. Sigh.

We have a few options:

  • Cut holes in the plate and mount the Novatouch stab assembly in those holes, in the correct locations for the DSA spacebar.
  • Add stems to the DSA spacebar in the Realforce-supported locations with epoxy, as outlined here by @AdrianMan.
  • Find a Topre-compatible spacebar in an acceptable color.

What to do? I ruled out the first option - I’ve made it this far without destructive mods to the Realforce parts. A quick troll through KBDfans yielded several Topre spacebars in a variety of colors, and one of them was both reasonably close in color to the Galaxy Class color scheme and less jarring than a bright salmon spacebar. We have a winner! (For the time being, at least - I admit to being intrigued
by the epoxy retrofit approach…)

Lessons learned

  • I’ve said it before, but I’m always struck by how much better a silenced and lubed Topre board sounds. The difference is dramatic and positive.
  • When harvesting a Novatouch for sliders, take a few extra minutes to harvest the mod housings and some 1u housings too while you’ve got the board apart.
  • Spacebars can be loud on Topre boards, but take a few seconds to be absolutely certain the keycap is fully seated on all three contact points. For a while, I thought I was going to need to put foam in the spacebar, until I pressed one with a bit of extra force to see if it was fully seated - and it wasn’t, and it subsequently sounded much better. Still the loudest key, but much more tolerably so.
  • Since the wool dampener is not compressed against the housing or the PCB, its acoustic dampening properties derive from sound absorption through the air, rather than dampening by direct contact with vibrating surfaces, a la Sorbothane. As such, I think Sorbothane would still yield a more consistent and effective result, but this pad will get you, subjectively, 80% of the way there. And how many keyboards do you have with wool in them?
  • With that said, I hope this particular application of wool isn’t as susceptible to static as its clothing counterparts, or we may have a problem, with that PCB in such close proximity.
  • The difficulties in using MX-style keycaps on Topre boards is maddening. While compatibility has become better with the availability of the Realforce R2 RGB, those boards suffer from tolerance and rattle issues more than their predecessors. Let’s hope a solution is forthcoming…
  • We’ve come to expect it, but it bears repeating: the powder coat finishes on Norbauer’s housings are pristine, and this is no exception. Aside from its pleasant texture, the finish captures light in a lovely way.

Shall we go see what’s out there?

Make it so.

Specifications

donor boards:
- Realforce 87U
- Novatouch TKL
case: Norbaforce (Mark I)
- Galaxy Console finish
- Stainless steel brushed gold PVD backplate
case dampening: Norbaforce Acoustic Dampener
- felt Merino wool
PCB: Realforce donor + Norbaforce USB-C breakout board
plate: Realforce donor
domes/springs: Realforce donor, 55g
slider housings: Realforce donor, except
- modifier key housings: Novatouch donor
- LCTRL housing: Novatouch donor, rotated and filed to size
sliders: Novatouch donor, except
- spacebar: Realforce donor
slider mods:
- Installed Deskeys #4 silencing rings
- Lubed rails with Tribosys 3204
stabilizer sliders: Realforce wires and Novatouch donor sliders, except
- spacebar: Realforce donor sliders
stabilizer mods:
- Installed Deskeys #4 silencing rings
- Lubed housing interiors with Tribosys 3204
- Lubed wire ends and wire clips with SuperLube
keycaps:
- DSA Galaxy Class
- kbdfans Topre PBT 6u spacebar, kit 7 (light blue)
HxWxD (without feet or caps): 1.25" x 15.0" x 7.0"
HxWxD (without caps): 1.31" x 15.0" x 7.0"
HxWxD: 1.5" x 15.0" x 7.0"
assembled weight: 2.67 kg (5.88 lb)
16 Likes

I can’t believe I read ALL of that. Fun build. Amazing dedication. I applaud you!

2 Likes

I can’t believe you did either. Returning the applause!

4 Likes

Super complete and great build log !
Looks like the tuning on this board is the most avanced you ever made.

I’d love to have a @norbauer case for my good old Realforce fullsize keyboard, if someday this gentleman is ready to make an aftermarket case for it …

2 Likes

i was resigned to the fact that I would have to cut the plate to accommodate the left control. Never thought to mangle a housing instead. Thanks!

1 Like

Ayyyyy, the galaxy console finish is the sexiest !

Nice work man !

P.S: @jshufelt this is a good place to brag I guess with a Galaxy Norbatouch that I used to own.

2 Likes

It never occurred to me to pair Chocolatier with Galaxy Console - that’s gorgeous!

1 Like

Beige is a pretty versatile color, GMK Cafe, Sandstorm, DSA Galaxy Class, Retro …

1 Like

don’t forget handarbeit it looks great on beige too!!!

3 Likes

I credit you with a remarkably open and generous definition of greatness!

4 Likes

Build #42: E8.5

Longtime readers of this page may remember the E6.5 build, which has been one of my favorites for feel, sound, and looks. Even though I don’t think of myself as a linear or a 65% guy, that board, with its lubed Gateron Inks, is a joy to use, and still occupies a spot on my desk today.

The E6.5 was my first Exclusive build, and since then, I’ve been following his ICs and GBs closely. When the E8.5 group buy ran in November 2019, with founders edition and standard edition versions, the big surprise was that the standard edition would be an unlimited group buy. No raffles or FCFS buys are always appreciated, and Exclusive’s buys enjoy a good reputation, but there are always concerns whether delivery times and/or QC will suffer. In this run, those concerns were magnified by the number of mix-and-match options for the case, plate, weight, and top accent. While I was optimistic, the proof, as always, is in the build. Let’s get to it.

My lubing game has been pretty stable over recent months when it comes to linears. I continue to disassemble, lube, and reassemble in small batches of 15-20 switches, to give myself multiple opportunities to step away from my lubestation, stretch my legs and back, and wonder why I’m so dedicated to a hobby that includes this task. Here we’ve got some lubed H1s being reassembled.

When it comes to stabilizers, there is always room for improvement. Recently I became intrigued with maxf’s approach, partially because of the “thick and creamy” characterization of the sound, and partially because of the use of two lubes, and resolved to give it a try for this build. The TLDR for his approach if you don’t have time to watch the video: 205g0 on the longer two inner walls of each housing, a liberal coating of 205g0 on the stab wire ends and wire corners, and then, once the stab is assembled, a squirt of SuperLube in the base of each stab housing, where the wire meets the slider.

Our stabilizer parts ready for lubing and assembly. What’s up with my purple mood lighting? I don’t know, just roll with it, people.

With stab lubing and assembly complete, it’s time to open up the E8.5 box, and as with the E6.5, it’s the kind of box you don’t want to toss in the recycling bin, with a nice exterior design.

Layers of firm foam separate the packaged PCB from the board, and so we get our first look at the case - anodized black, with a base weight anodized in a light green that is quite hard to capture in photos. Exclusive’s crown logo is lightly engraved in the base, and a script engraving adorns the green base weight in one corner. The two halves of the case are held in place by screws.

The case ships with the plate and top accent piece installed. Here’s our first look from the top side, and IMO, it’s lovely with the matching green plate and top accent. Three narrow lines above the arrow cluster will allow lighting to shine through.

Setting that aside, it’s time for our first full look at the PCB, with a black finish and a gold logo, supporting USB-C, QMK, and VIA. Note the presence of F13.

The top of the PCB, with stabilizers installed. Note the two RGB LEDs on the right side of the board - I sense a decorative lighting accent in our future.

To get to the plate, we unscrew the case, revealing that the plate is installed in a top-mount configuration. While we’re here, note the cutout above the arrow cluster, revealing a diffuser mounted in the top of the case for the LEDs we mentioned earlier. Also, note that despite the angular, geometric appearance, all of the corners are rounded - no sharp edges. This is a nice quality-of-life touch.

As you unscrew the plate, note one little asymmetry if you’re planning to stick with top-mount on the E8.5 - the plate mounting screw for the top right of the board (from the top) is noticeably longer than the other plate mounting screws, presumably to help attach the top accent piece for the board as well.

The E8.5 includes a foam layer for insertion between the plate and PCB. Don’t be like me and forget you have it midway through pushing switches into the plate and PCB. Sigh. Let’s try that again, shall we?

The foam tends to shrink and stretch a bit as you work with it, so I found it easiest to first place a few switches around the board to make sure the foam was evenly aligned with the plate cutouts across the PCB.

After mounting the remaining switches, and a quick round of soldering later, we have a complete PCB/foam/plate assembly, at least if you plan to top-mount the E8.5.

But, the E8.5 also offers a gasket-mount option, and given my happiness with that solution on the E6.5, I decided to give it a try here. As with the E6.5, the gasket is a loop of silicone.

For installation, the gasket must be stretched around the gap between the PCB and plate, taking care to thread the gasket underneath the USB-C connector to avoid damaging it.

When using gasket-mount, the plate does not need to be attached to the top as it would be for top-mount; instead, the gasket rests on raised “ledges” in the base, and the case is then screwed together to hold the PCB/plate assembly in by compression. The next couple of photos show the ledges more clearly.

At this point, we’d usually throw keycaps on and call it a day, but I couldn’t resist the urge to do a little acrylic infilling on those engravings. For the engraving on the green base weight, black paint was the obvious play. Does the following photo concern you?

No worries, it’s water-soluble acrylic - the excess can be removed with a damp wipe.

The base logo called for a matching shade of green, which required a precisely calibrated blend of a bright green paint with white (read: I totally winged it). I ended up targeting the green in the keyset, and while I didn’t match it exactly, the desaturated green is just fine.

Lessons learned

  • For shallow engravings, such as the Exclusive signature, it’s difficult to remove the excess paint while still leaving a deposit of paint in the engraving. I ended up with a faint color in the signature engraving, which was fine, but I need to work on technique for shallow engravings.
  • The combination of gasket-mount and PCB/plate foam is yielding a lovely typing sound. I wish I had decent recording gear to share it. I haven’t used Sorbothane for plate/PCB dampening in a while, but if I had used it here, I’d expect exactly the sound that the provided plate foam yields.
  • On top of that, the maxf approach does in fact yield thick, creamy stabs without impacting responsiveness. None of the stabilized keys are sluggish in the slightest, but they have a nice consistent thock across the length of each key, and consistent with the lubed H1s as well. I’ll be trying this approach again soon.
  • As usual, matching keycaps to board renders is perilous, and GMK Wasabi isn’t a perfect match for the actual green by any means. But the result is sufficiently striking that I can’t get worked up.
  • I participated in a GMK blank GB a while back, and picked up a bunch of CR blanks, not really knowing when those might come in handy. With the F13 key on this board,the handy time is now. I’d like to thank that earlier version of me, especially since I somehow didn’t notice F13 until putting Wasabi on the board and realizing I didn’t want to solve the issue with two Esc keys. Eek!

Unlimited GBs may be challenging to pull off, but if this board is indicative, I’d have no hesitation about participating in another one run by Exclusive. Bravo!

Specifications

case: Exclusive E8.5
- anodized black aluminum case
- anodized green aluminum top accent
case dampening: n/a
PCB: E8.5
- QMK/VIA support
plate: anodized green aluminum
plate/PCB dampening:
- E8.5 custom-cut foam
- silicone O-ring gasket
stabilizers: smoky Durock
- 1x6.25u, 4x2u
stabilizer mods: maxf-style lubing
- 205g0 on two longer inner stab housing walls
- 205g0 on wire ends and bends
- SuperLube on underside of assembled stab housing, between wire and slider
switches: 88x H1
switch mods:
- springs tub-lubed with Krytox GPL 104
- stems hand-lubed with Krytox GPL 205g0
- no housing lube
keycaps:
- GMK Wasabi
- R1 1u CR GMK blank (F13)
HxWxD (without caps or feet): 1.38" x 14.13" x 5.25"
HxWxD (without caps): 1.5" x 14.13" x 5.25"
HxWxD: 1.75" x 14.13" x 5.25"
assembled weight: 2.11 kg (4.66 lb)
12 Likes

I had been waiting for this build log since you teased me with photos a few weeks ago!

Very enjoyable read as usual, sir. We both took a gamble on that green (TWINS!!), and I agree that it might not have fully worked in our favor but, doesn’t necessarily mean it doesn’t work. That outline on the bottom though, mmm!

Can’t wait for the next build!:smiley:

2 Likes

Thank you very much for this great build log!
The board is a looker :slight_smile:

Interesting technique of Maxf for eliminating stabs rattle.
There is a very similar approach done by @Minterly that she nicely calls ‘plug the butt’:

It consists in plugging the back stab were wire ends with thick grease. I’ve experimented on my last builds with superlube and it works like a charm. One nice thing about this technique is that you can do that after having your PCB assembled and soldered.

For plate to PCB dampening i’ve used your sorbothane strud technique with great success.
But you say that foam is also working very well and it looks much cleaner.
I’m curious at what kind of foam is used for this keyboard.
Is it the same kind as standard crafty foam we commonly see use for cosplay or art?
And is it thick enough to be compressed between the plate and the PCB (in this case it should be 4mm thick) ?

5 Likes