Hi, I'm jshufelt

Build #22: Klippe+ Black/Blue (Laser Trio 2/3)

In the previous build log, we introduced the first member of the Laser Trio, a black Klippe+ with a red weight, red plate, and splashes of red from GMK Laser kits. With this build, I wanted to try out a slightly more visually subdued version of the same build, using a blue weight, blue plate, and the GMK Laser Kobe kit, and in keeping with that more subdued theme, I opted for 62g V2 Zilents. As with the previous build, the first task is switch lubing, and what can I say at this point that I haven’t already said? It’s switch lubing.

Waiting for the resolution to the Rama heatshrink mod cliffhanger? Let’s jump right in. In order to diagnose the problem, I repeated the heatshrink mod on this build, installed the stabs, soldered in switches, installed the PCB/plate sandwich into the case, and tested.

Sure enough, the same sluggish, sticky behavior. Why? And why did I build the entire board to test this problem, when I could have just installed the stabs on an empty PCB and tested right then? Sometimes a time machine would be handy.

I have no answer to the latter question, but at least I have one for the former. Zeal stab wires are gold plated, and aside from the bling factor, another attribute of that plating is that it is smooth, noticeably more so than GMK stab wires. While you can apply heatshrink to these gold plated stab wires, eventually the heatshrink tube will loosen, and begin to move back and forth along the end of those smooth stab wires (the green arrows below illustrate the direction of movement). At some point, when the tube slides to the end of the wire, the tolerances inside the housing are tight enough that the tubing catches on the housing when the stabilizer stem moves, creating the sticky behavior.

I can imagine several potential solutions to this problem (use different wires or stabilizers, try tighter heatshrink, use epoxy to bond the tubing into place), but given that Zeal stabs are generally high quality stabs, I felt the best approach was a retreat from the Rama mod: desolder the board, unscrew and remove the stabs, remove the heatshrink from the stabs, relube, and try again. This did the trick. Thank goodness for desoldering guns.

With that solution in place, the build went quickly from there, perhaps my fastest build up to that point (ignoring, of course, the entire desoldering that just took place, for this build AND for the previous build, to fix the stab problem. Sigh). Here, I’ve installed a few switches to get the plate and PCB lined up.

This was also one of my earliest attempts using the @donpark Sorbothane strut mod, in which small Sorbothane pieces are inserted into the gaps between switches through plate cutouts, before all of the switches have been installed. Here’s a side view of one such Sorbothane piece.

YMMV, but I think the blue plate and light blue Zilent stems work well here. As with the previous build, to facilitate direct comparison of sound and feel, I used a Sorbothane sheet between the PCB and case.

So, what do I think of this second member of the Laser Trio? It’s a fun board. In terms of sound, the Zilents have a bit of a “scratchy” sound that may not be to everyone’s taste, but there’s no question this board’s acoustics would be acceptable in a shared office environment. As far as switch feel goes, the 62g Zilents are a bit on the light side for me, but much more workable than the V1 Zilents with the same weight, where at times I felt that breathing on the keys was going to result in actuation. Exaggeration, of course, but yeah. Subjectively, the 62g V2 feels like something between a 65g and 67g V1.

Full disclosure: out of curiosity, I tried this build with and without the Sorbothane layer between the case and PCB, with and without a deskmat. While the best sound came from the combination of the Sorbothane case treatment and the use of a deskmat, the deskmat alone got 90% of the way there, eliminating the bulk of the metallic ping that resulted from using the untreated board on a hard wooden desk without the deskpad.

Lessons learned

  • The Rama shrink-wrap mod doesn’t mix well with Zeal stabs - the tolerances are too tight and the wires are too smooth to prevent the shrink wrap from sliding and catching on the housing.
  • Don’t try a new mod on two boards at the same time - if the mod proves unsuccessful, you’ll be undoing it twice.
  • Don’t forget that the surface underneath the keyboard is part of the sonic equation - the presence or absence of a deskmat contributes significantly to the sound of a board.
  • This was the first build in which I tried @donpark’s Sorbothane strut approach, and I’ve been using it since; it’s easier to get good plate/switch/PCB fit first, before installing Sorbothane.
  • Take your time seating the PCB/plate sandwich in the Klippe+; it may initially look like you have it seated properly, but you’ll be able to tell otherwise since the screw holes won’t line up well with the PCB.

Specifications

case: Klippe+ (black case, blue weight)
case dampening: 0.1" 40 Duro Sorbothane sheet with cutouts
PCB: Zeal60 R4
plate: blue anodized aluminum
plate/PCB dampening: 0.25" 50 Duro Sorbothane, small squares
stabilizers: Zeal R2 transparent (1x6.25u, 4x2u)
stabilizer mods: lubed with SuperLube
switches: 62g V2 Zilents
switch mods:
- springs tub-lubed with Krytox GPL 104
- housings and stems hand-lubed with Tribosys 3204
keycaps: GMK Laser
- Kobe, Blocknet
HxWxD (without caps): 1.38" x 11.18" x 4.25"
HxWxD: 1.75" x 11.18" x 4.25"
assembled weight: 3.17 lb
5 Likes

FYI, I’m now using plate paddings from https://mkultra.click/ on all of my boards. While the Sorbothane ‘strut’ hack only improved the feel, plate paddings improved the sound as well. I think it’ll eventually become a ‘must’, like plates. Highly recommended.

3 Likes

Oooh, interesting. This might be a personal preference thing - both when I was installing the Sorbothane between the PCB and plate the “hard way”, and when I install it with your approach, I definitely hear a sound improvement. Specifically, the high frequency “ping” from plate impact is largely to completely attenuated with Sorbo, and that yields a deeper bassy sound which I prefer.

With that said, I’ve got a couple mkultra plate pads waiting on builds. Maybe I should think about doing an A/B comparison with a focus on sound…

1 Like

As always, a very pleasant read and I can’t wait for part three of this trilogy!

For PCB/plate dampening I’ve been going to my local hobby store and picking up some foam sheets. They’re about 2mm thick so if you adhere 2 of them together you get a pretty good fit between the plate and PCB.

It’s a bit cheap but it works well enough. Here’s what it looks like for my Rocketeer I’m working on.


Hmm thought I had a pic before I mounted it but I basically cut out the whole row. So the keys aren’t totally isolated but at least each row is.

2 Likes

Thanks for sharing this! I have some of that foam leftover from the kbd67 Jamon build, never occurred to me to try it for PCB/plate dampening. More experiments!

Build #23: Norbatouch Pi Astrophysical Purple (Laser Trio 3/3)

For the last of the Laser Trio, I’ve had a specific build in mind for a while - a pairing of GMK Laser with a Norbatouch, in the Astrophysical Purple finish. Certainly not a novel idea; even a brief bit of googling will reveal other builds with this exact pairing. Still, the reds and blues of Laser and that powder-coated purple just make sense to me, and I wanted to see it in real life.

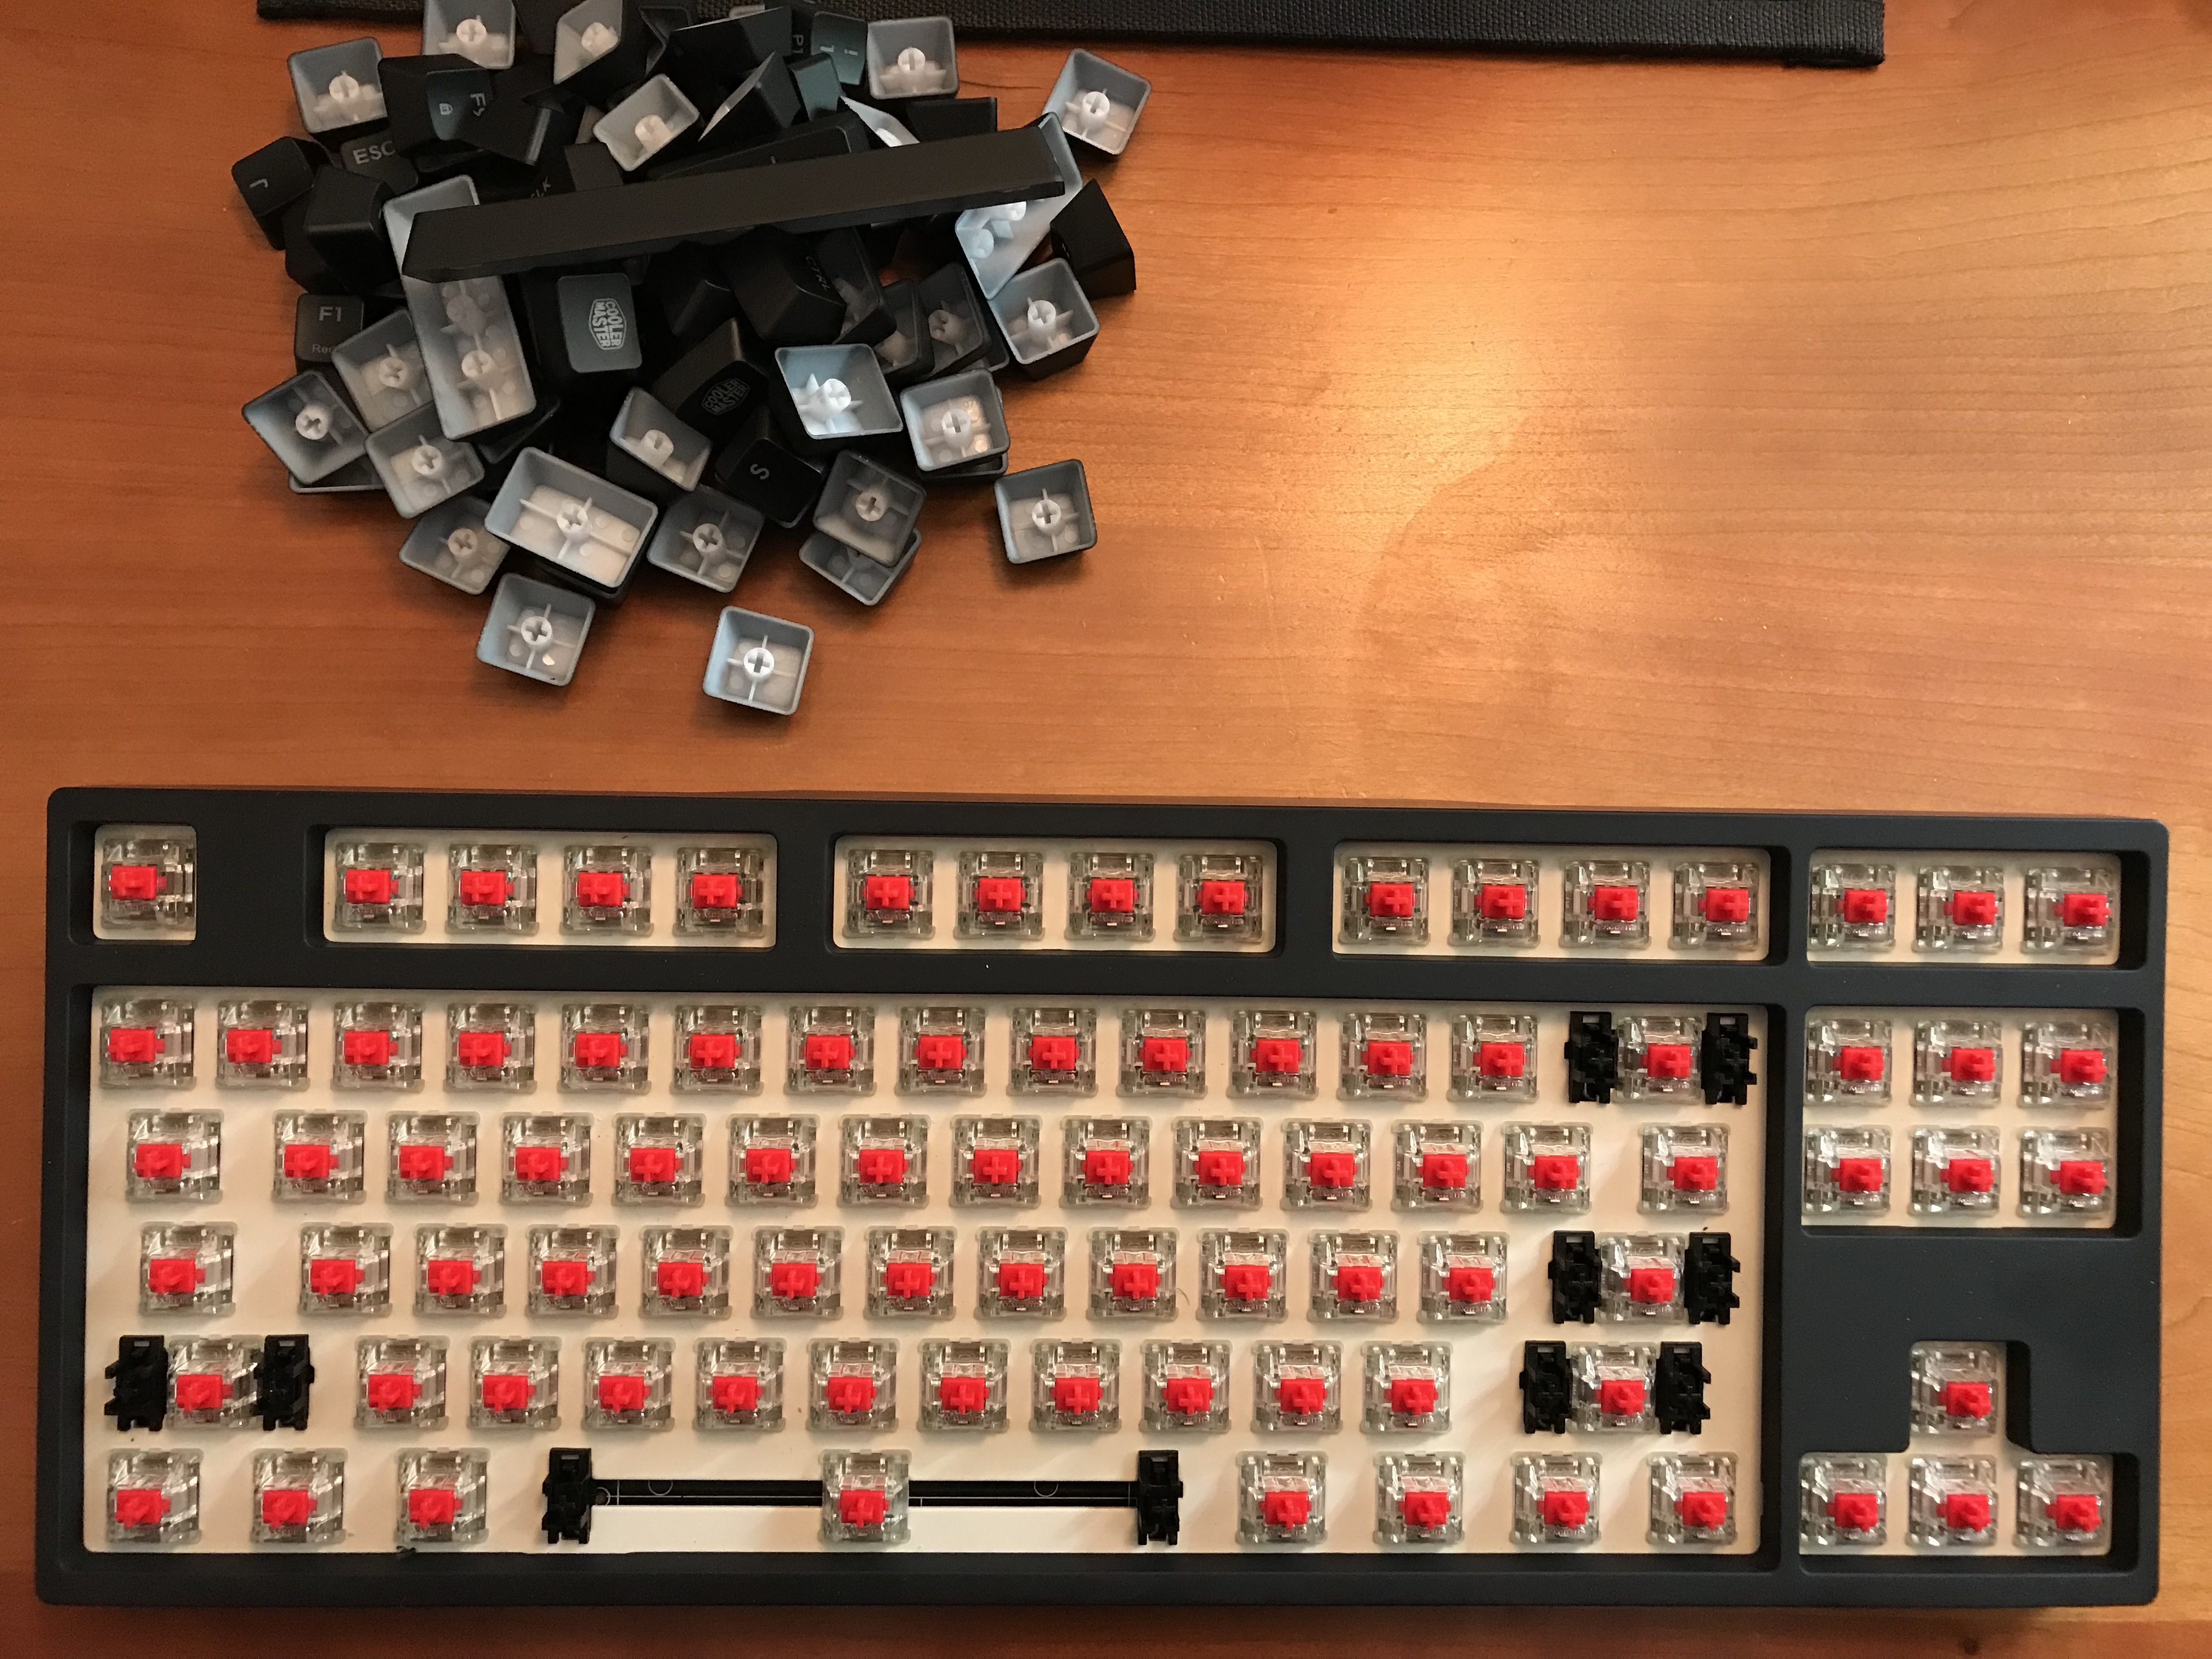
For this build, I used a CoolerMaster MasterKeys Pro S as the donor, and I’ve covered the build process for combining a MasterKeys Pro S and a Norbatouch Pi in exhaustive detail, so this log will be comparatively brief. Here we see the donor board with keycaps removed.

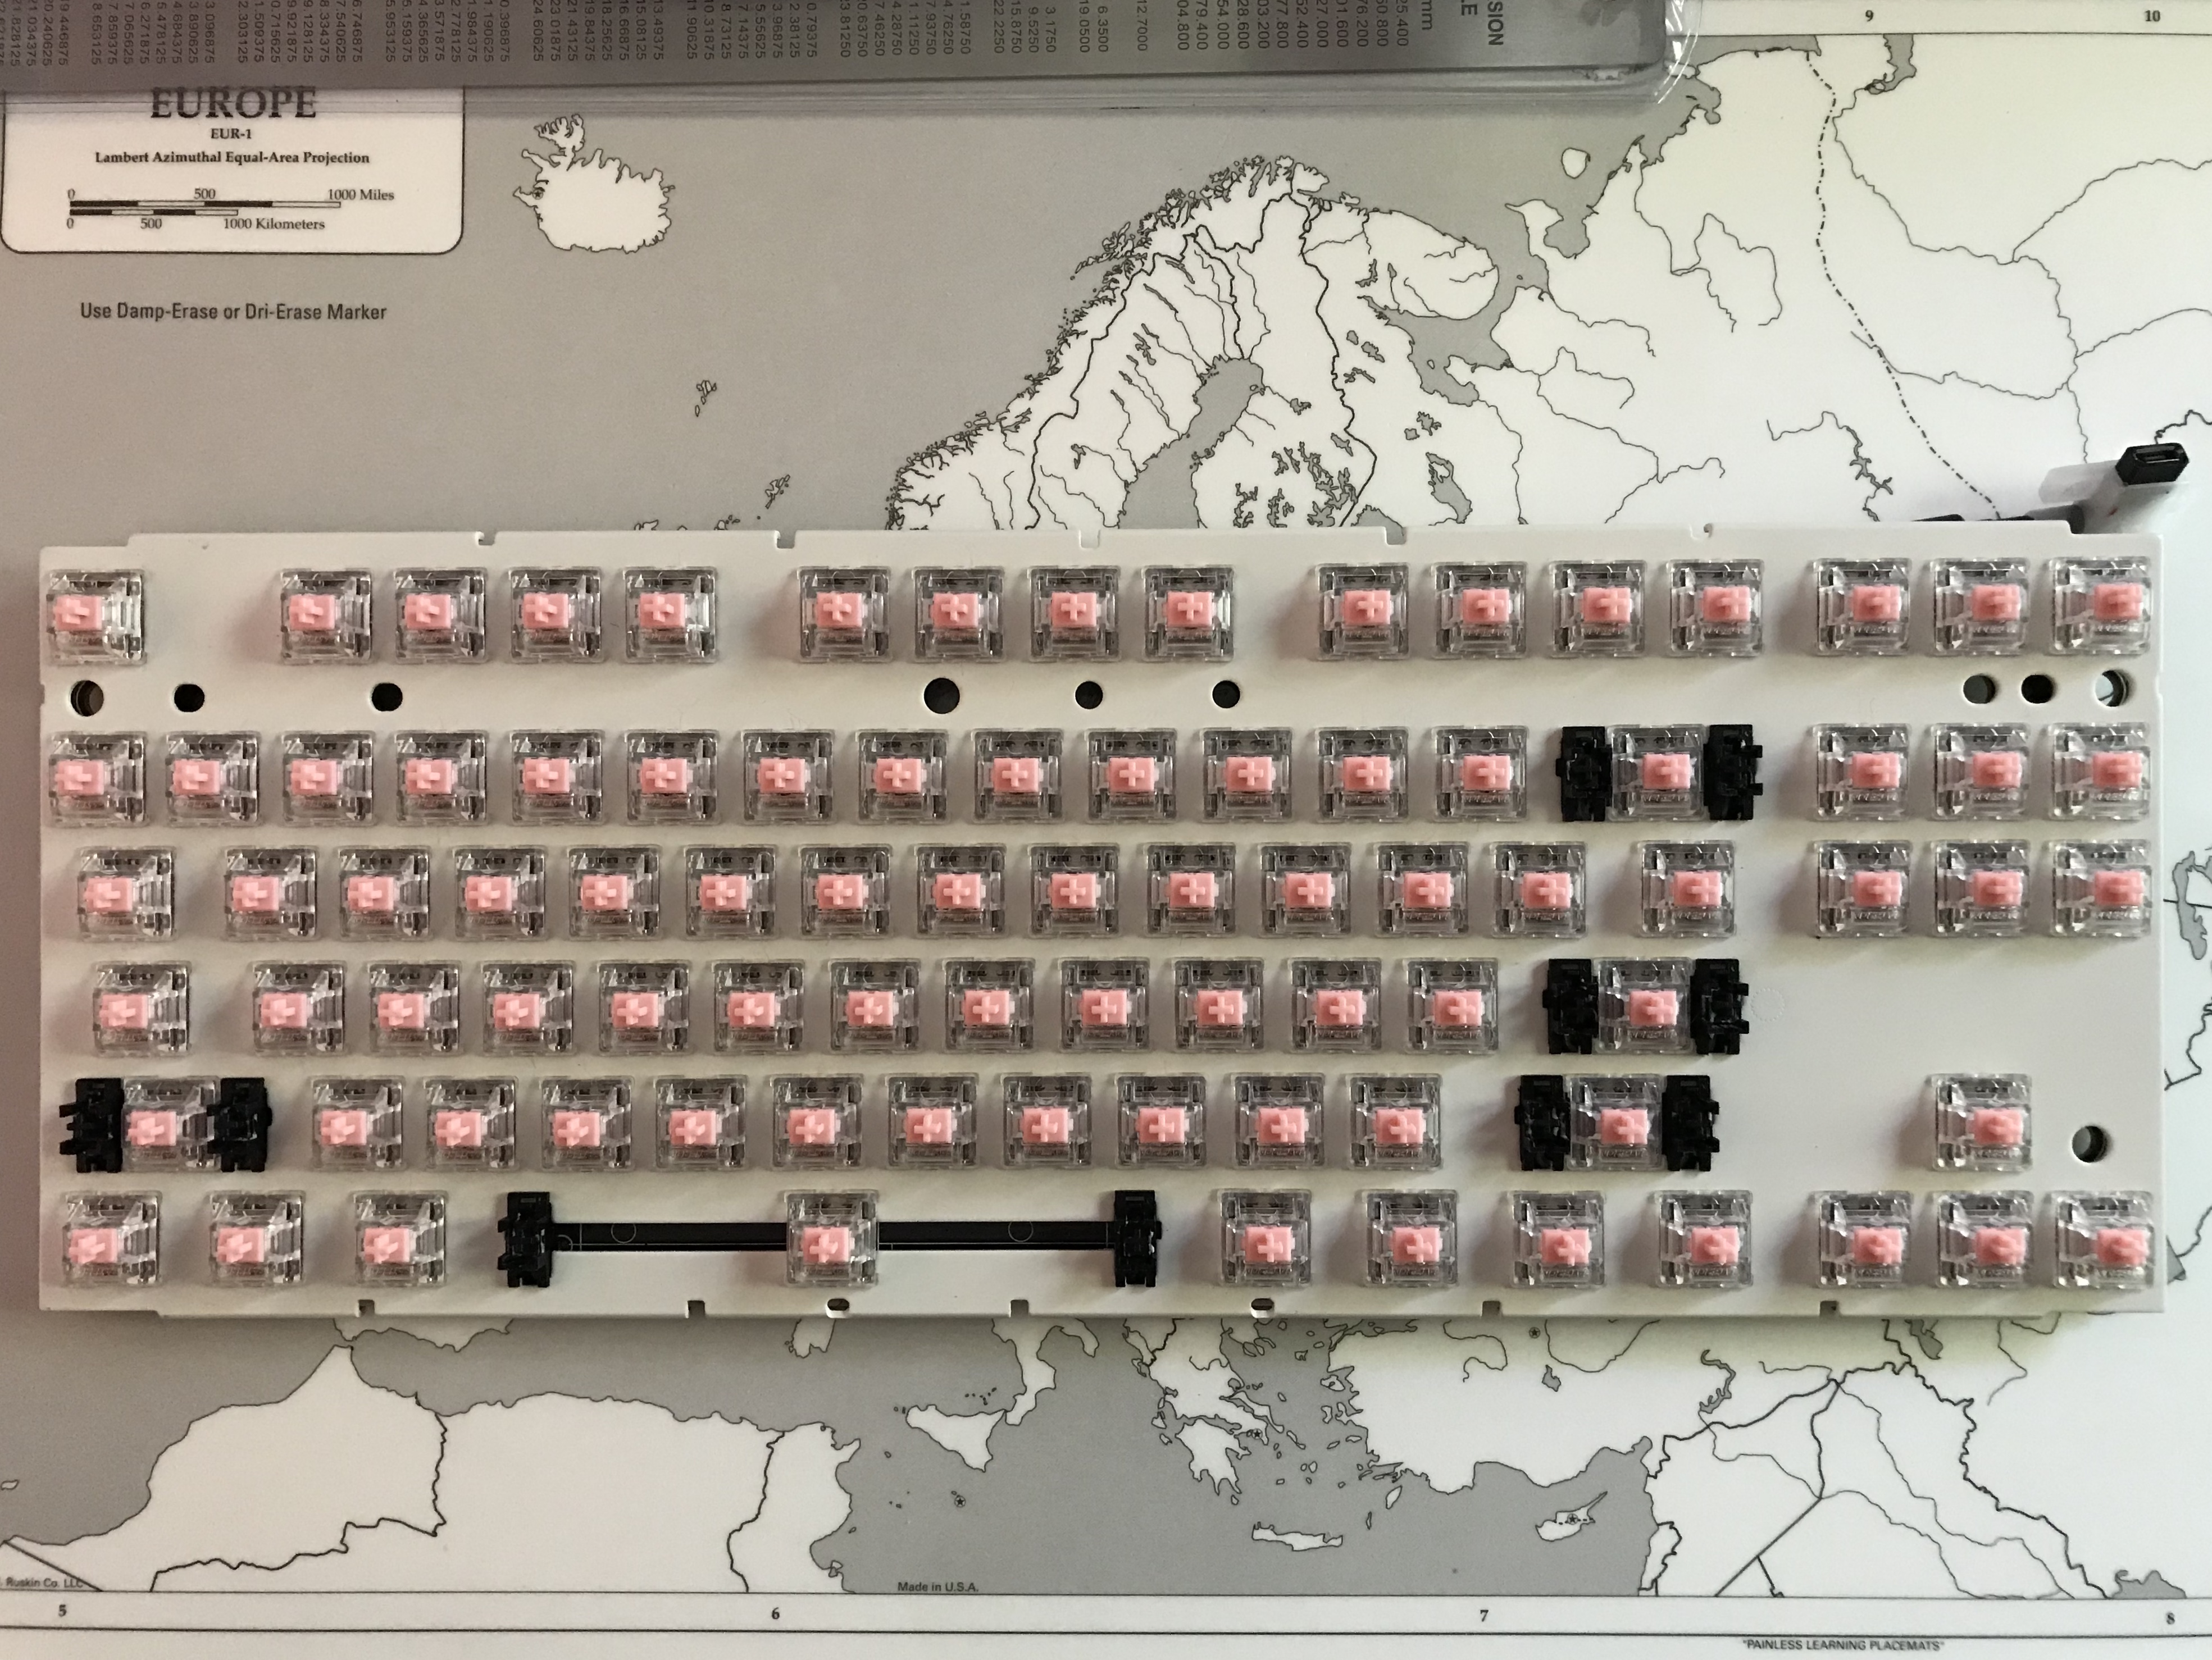
And here, we see the plate/PCB assembly.

As with the previous Norbatouch Pi build, we desolder the existing switches (in this case, Cherry Reds), remove the OEM stabs and replace them with clipped, lubed, and O-ring modded GMK plate stabs, solder in new lubed switches (62g Sakurios), and install Sorbothane struts between the plate and PCB. The result of all this work may not look radically different, but the feel and sound is another matter entirely. Smooth…

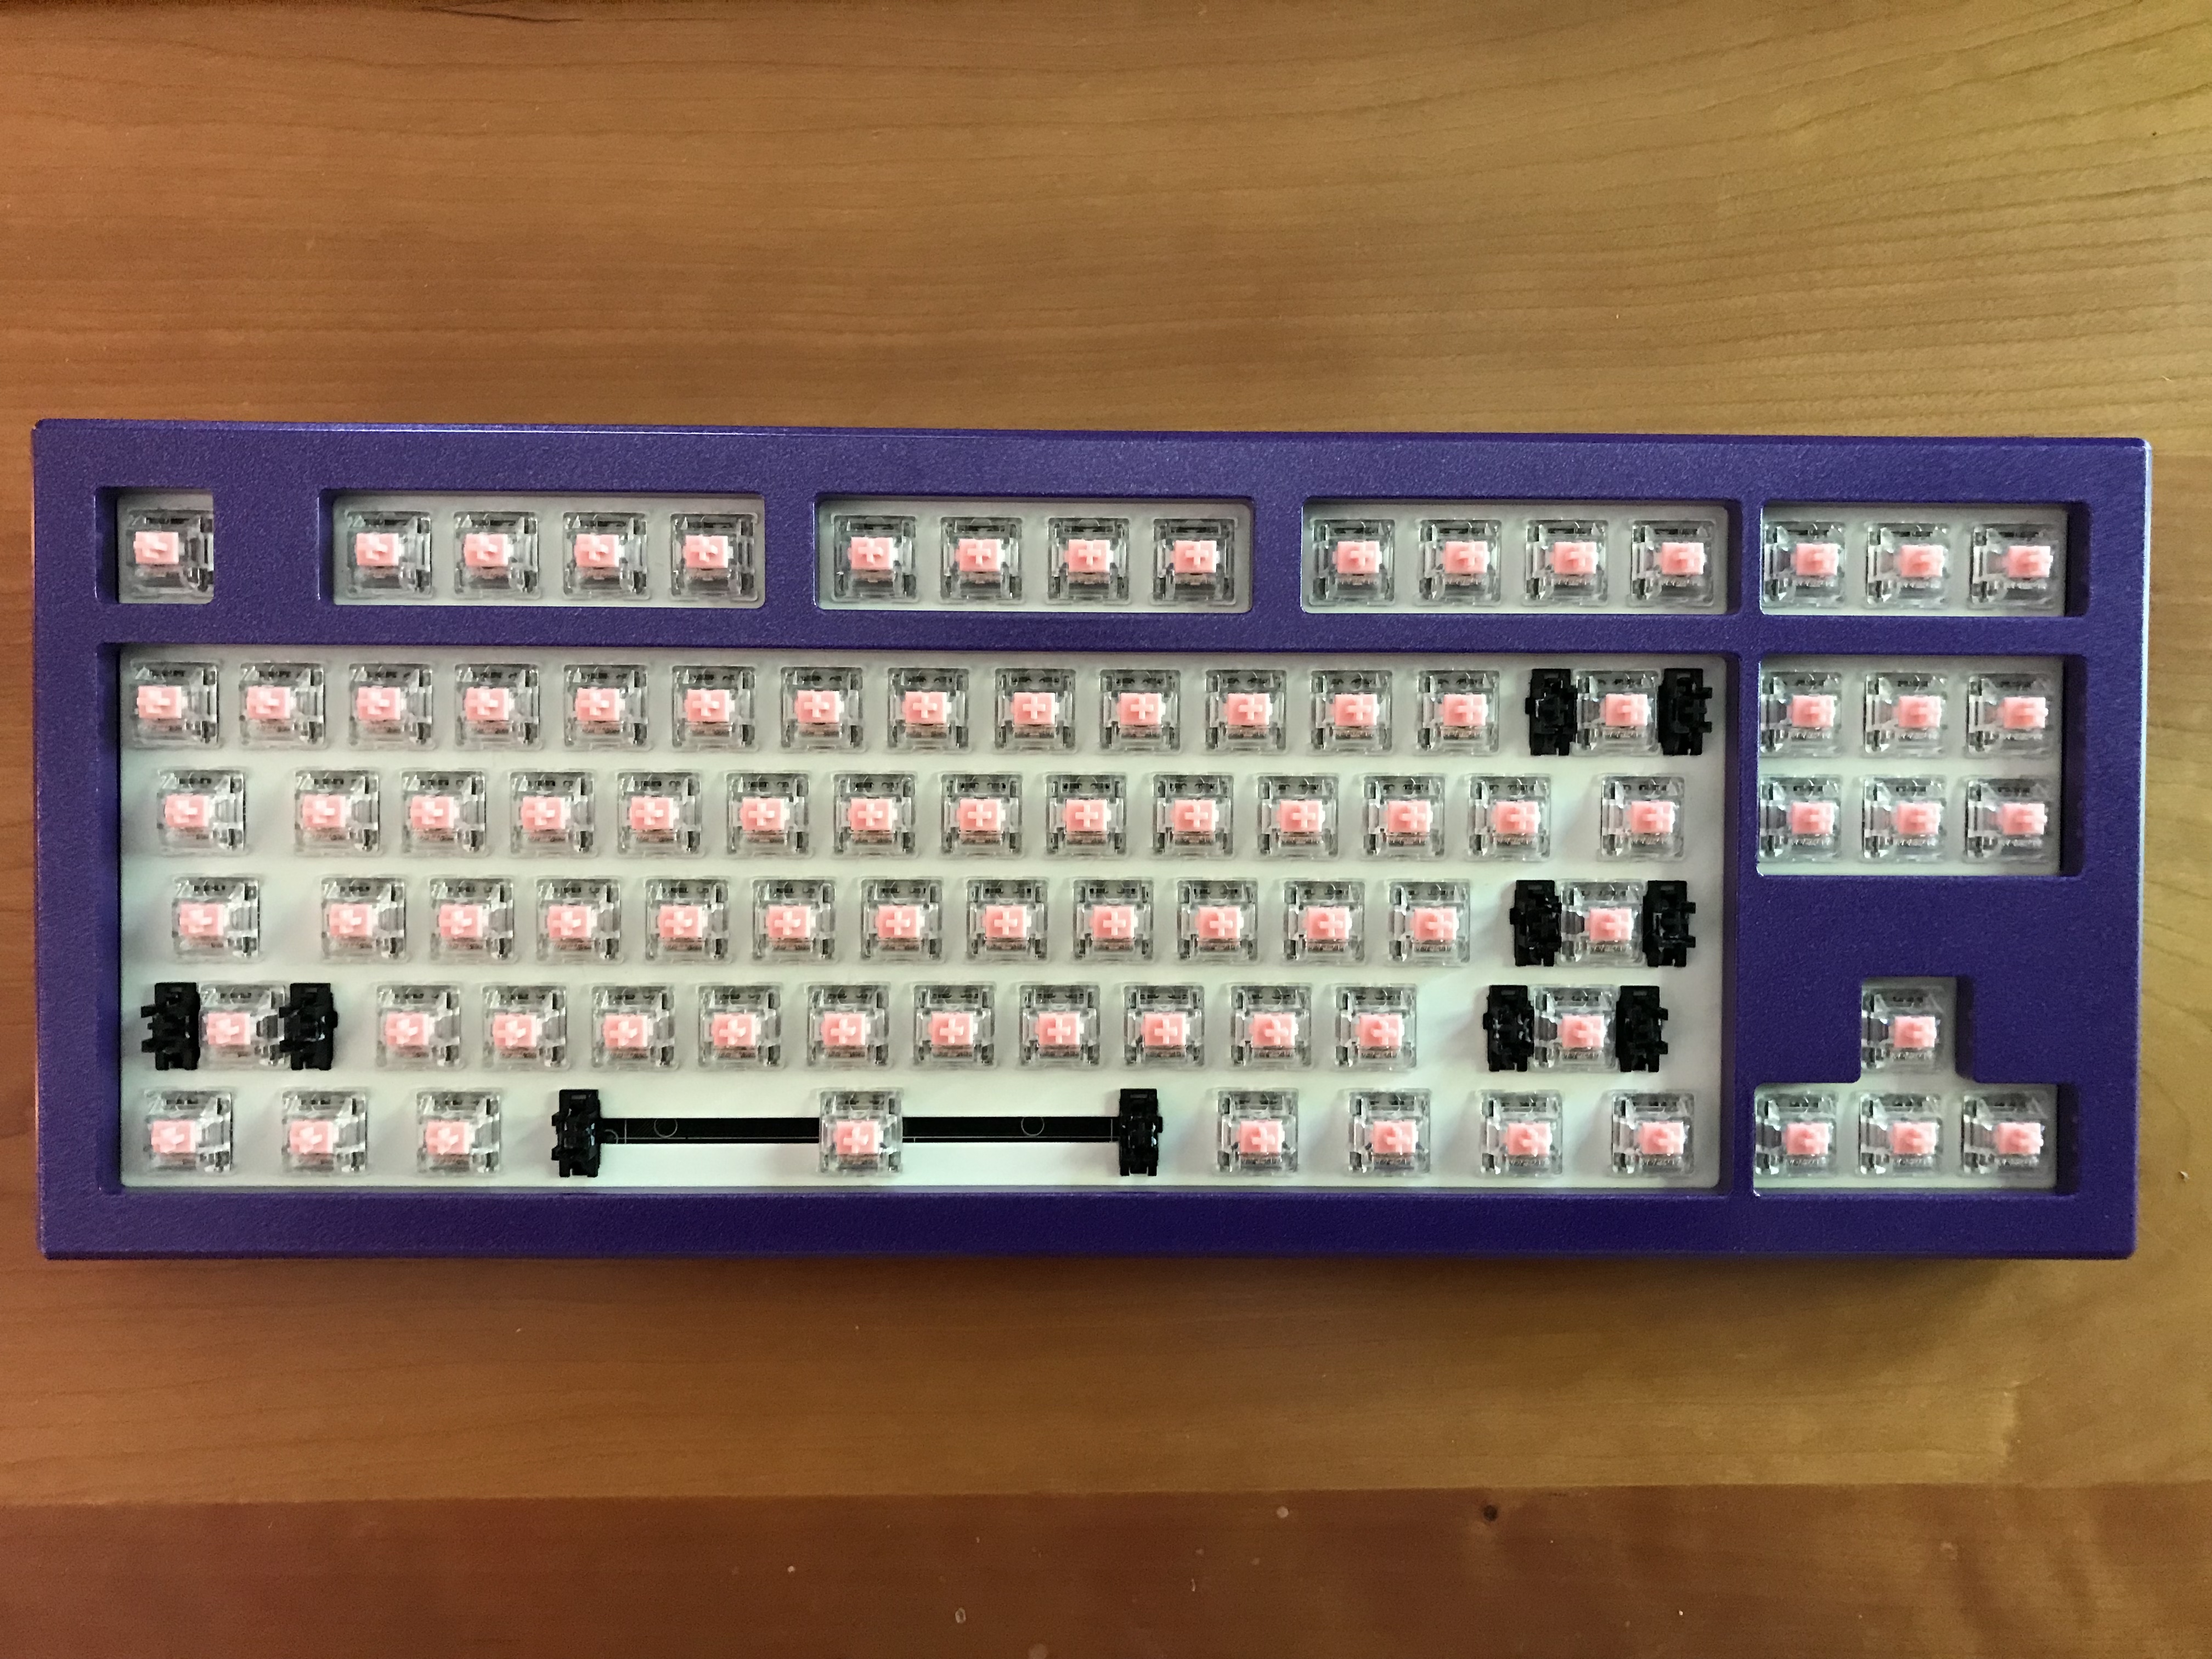
And, following our previous approach, we wrap pieces of Sorbothane in gaffer tape and place those between the PCB and the case before screwing the case halves together. With that done, we get our first look at the board, sans keycaps:

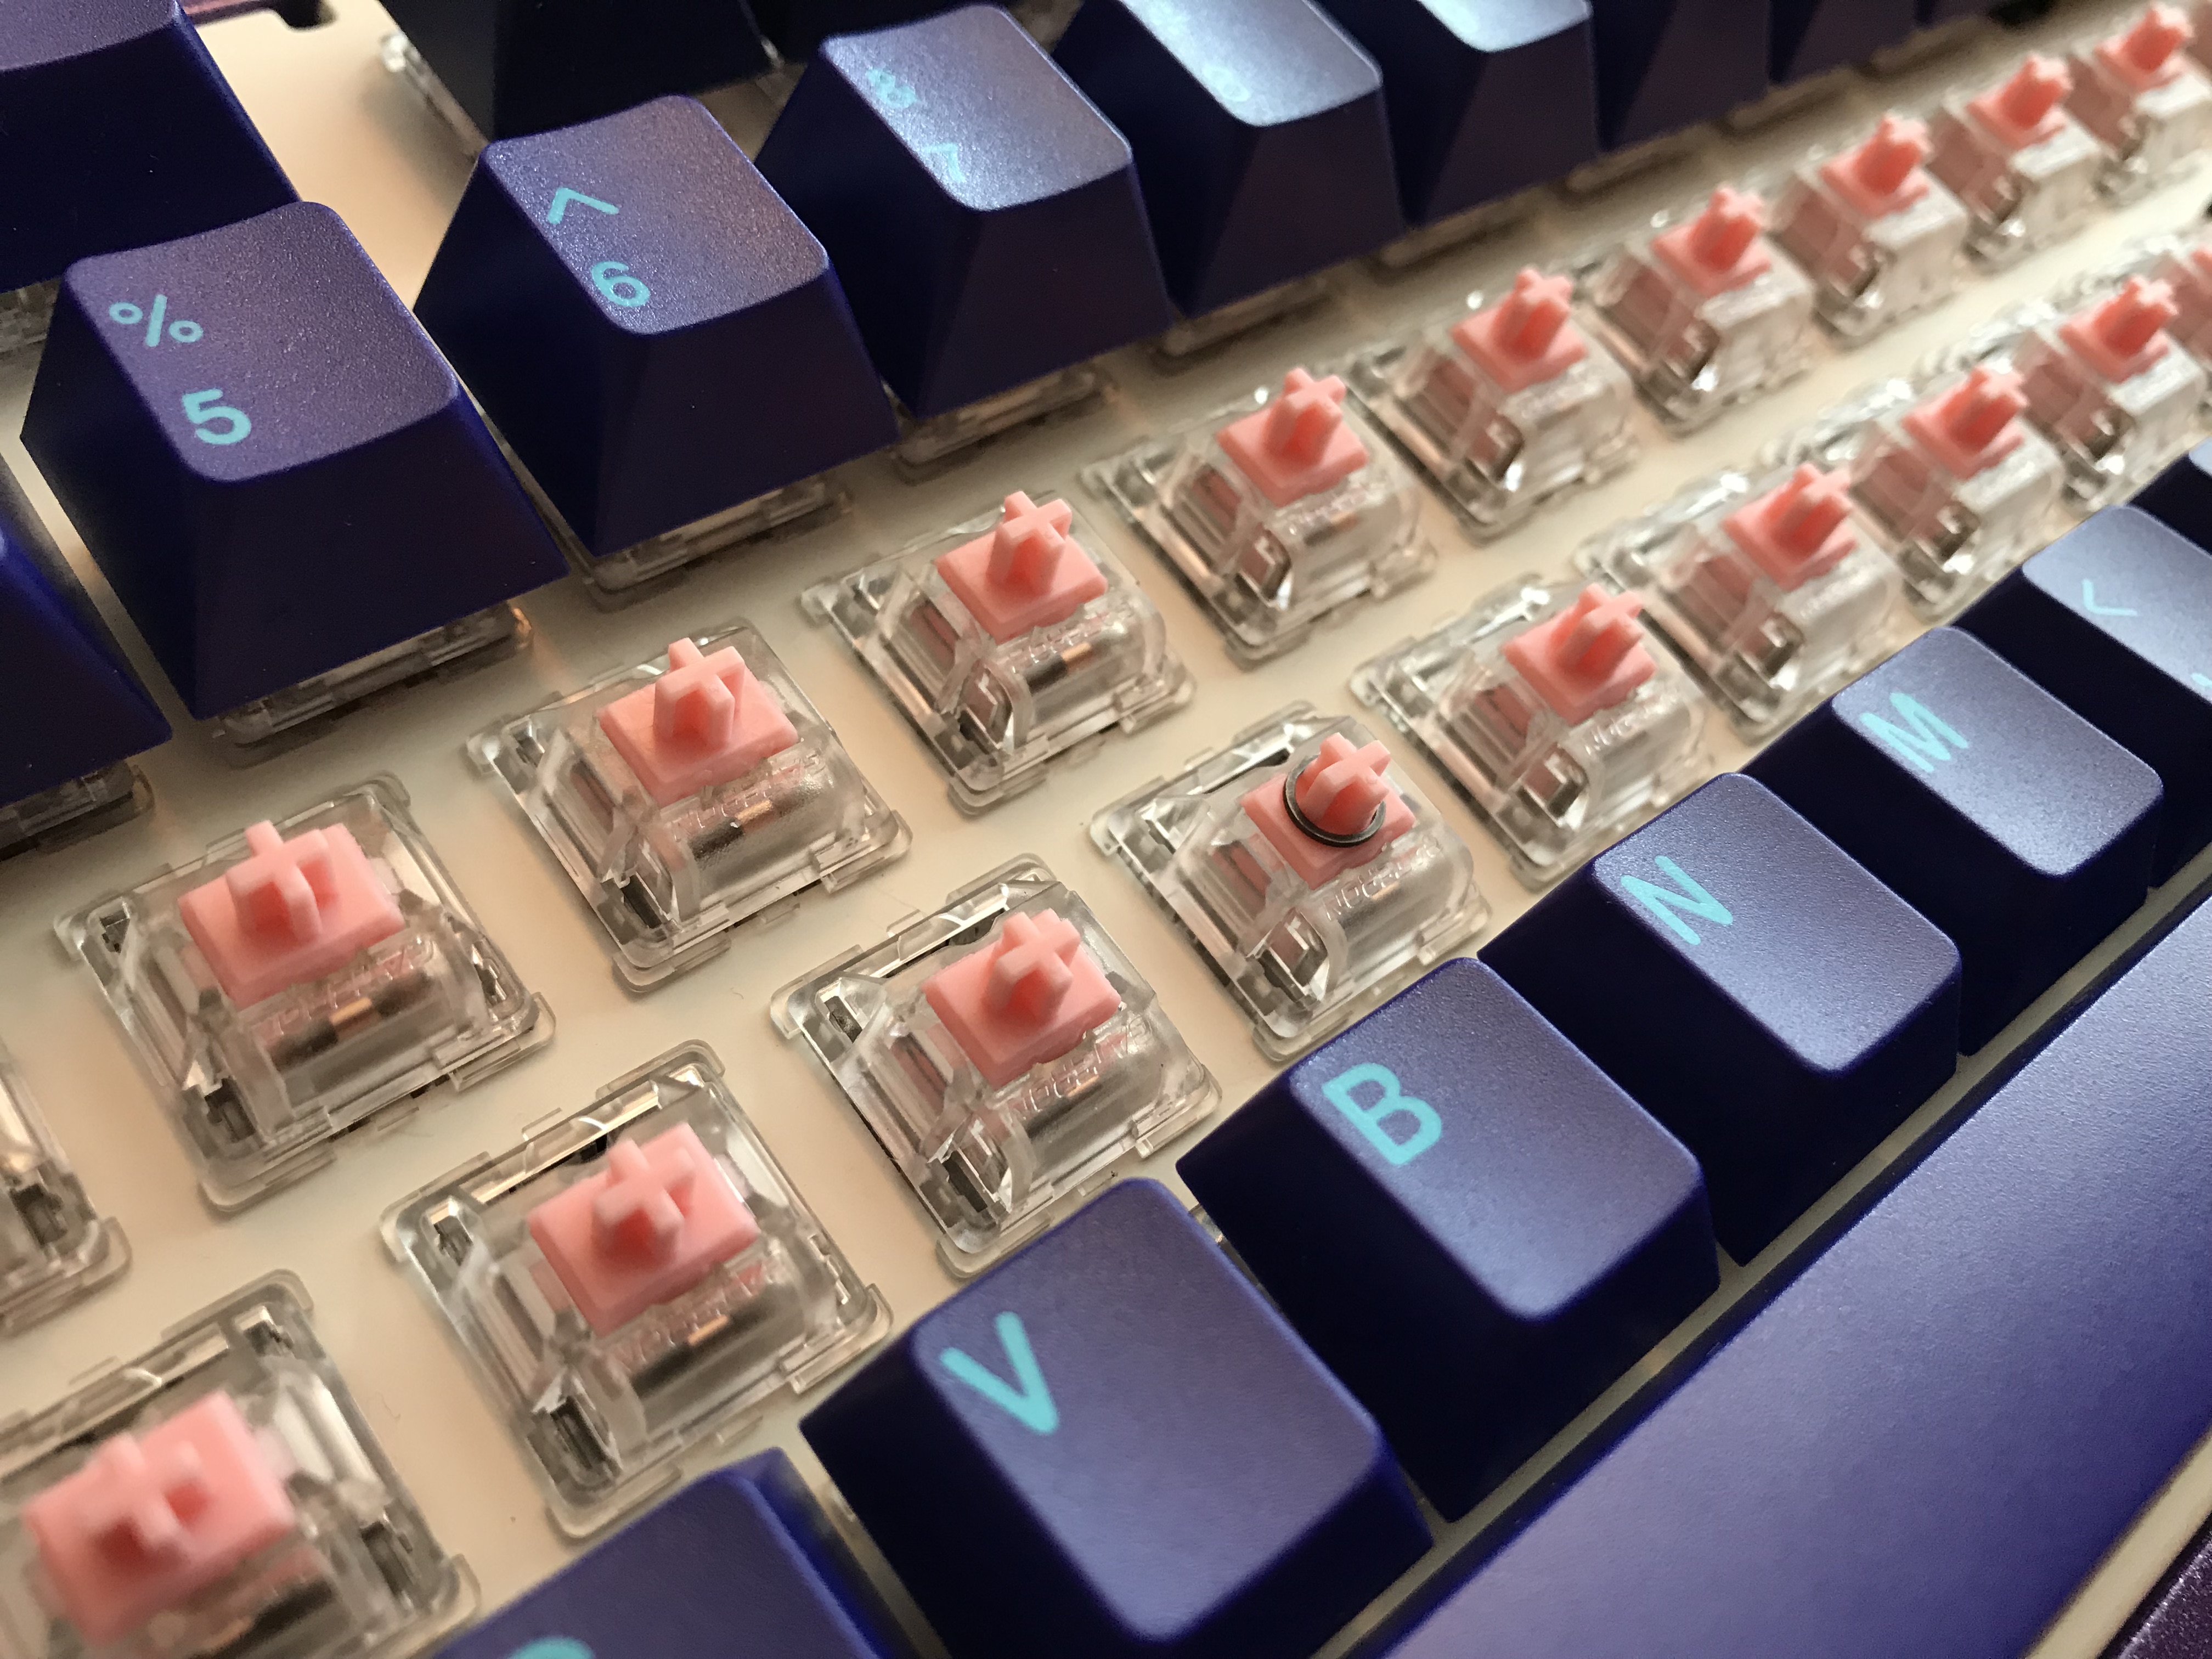
The MasterKeys Pro S PCB has north-facing LEDs, and we’ll be using GMK keycaps, so we need to apply washers to clean up the sound on rows 2 and 3 (the Tab and CapsLock rows). In this case, we’re using washers from NovelKeys, which means we need two washers per key. Here, you can see the installed washers on the H key. These washers are very thin, and tend to cling together - it’s easy to think you’ve installed two washers, and later realize you’ve installed one or three.

Lessons learned

  • I’ve mentioned it before, but I really like the O-ring mod on plate mount stabs; it’s very hard to distinguish the sound of stabilized keys from regular keys with this mod in place.
  • I have a strong preference for tactile switches, but the lubed Sakurios are really smooth and pleasant to use, and I’m finding the lighter 62g weight more enjoyable than I was expecting. Coupled with the thock that the Norbatouch Pi and the Sorbothane contribute, this might well be the first linear board I enjoy using.
  • Christo 111 works just as well on plate-mount stabs as it does screw-in stabs.
  • Don’t forget to use washers on PCBs with north-facing LEDs and GMK caps. Once you hear the caps hitting the switch housings, you won’t be able to unhear it, and washers get most if not all of the sound back.

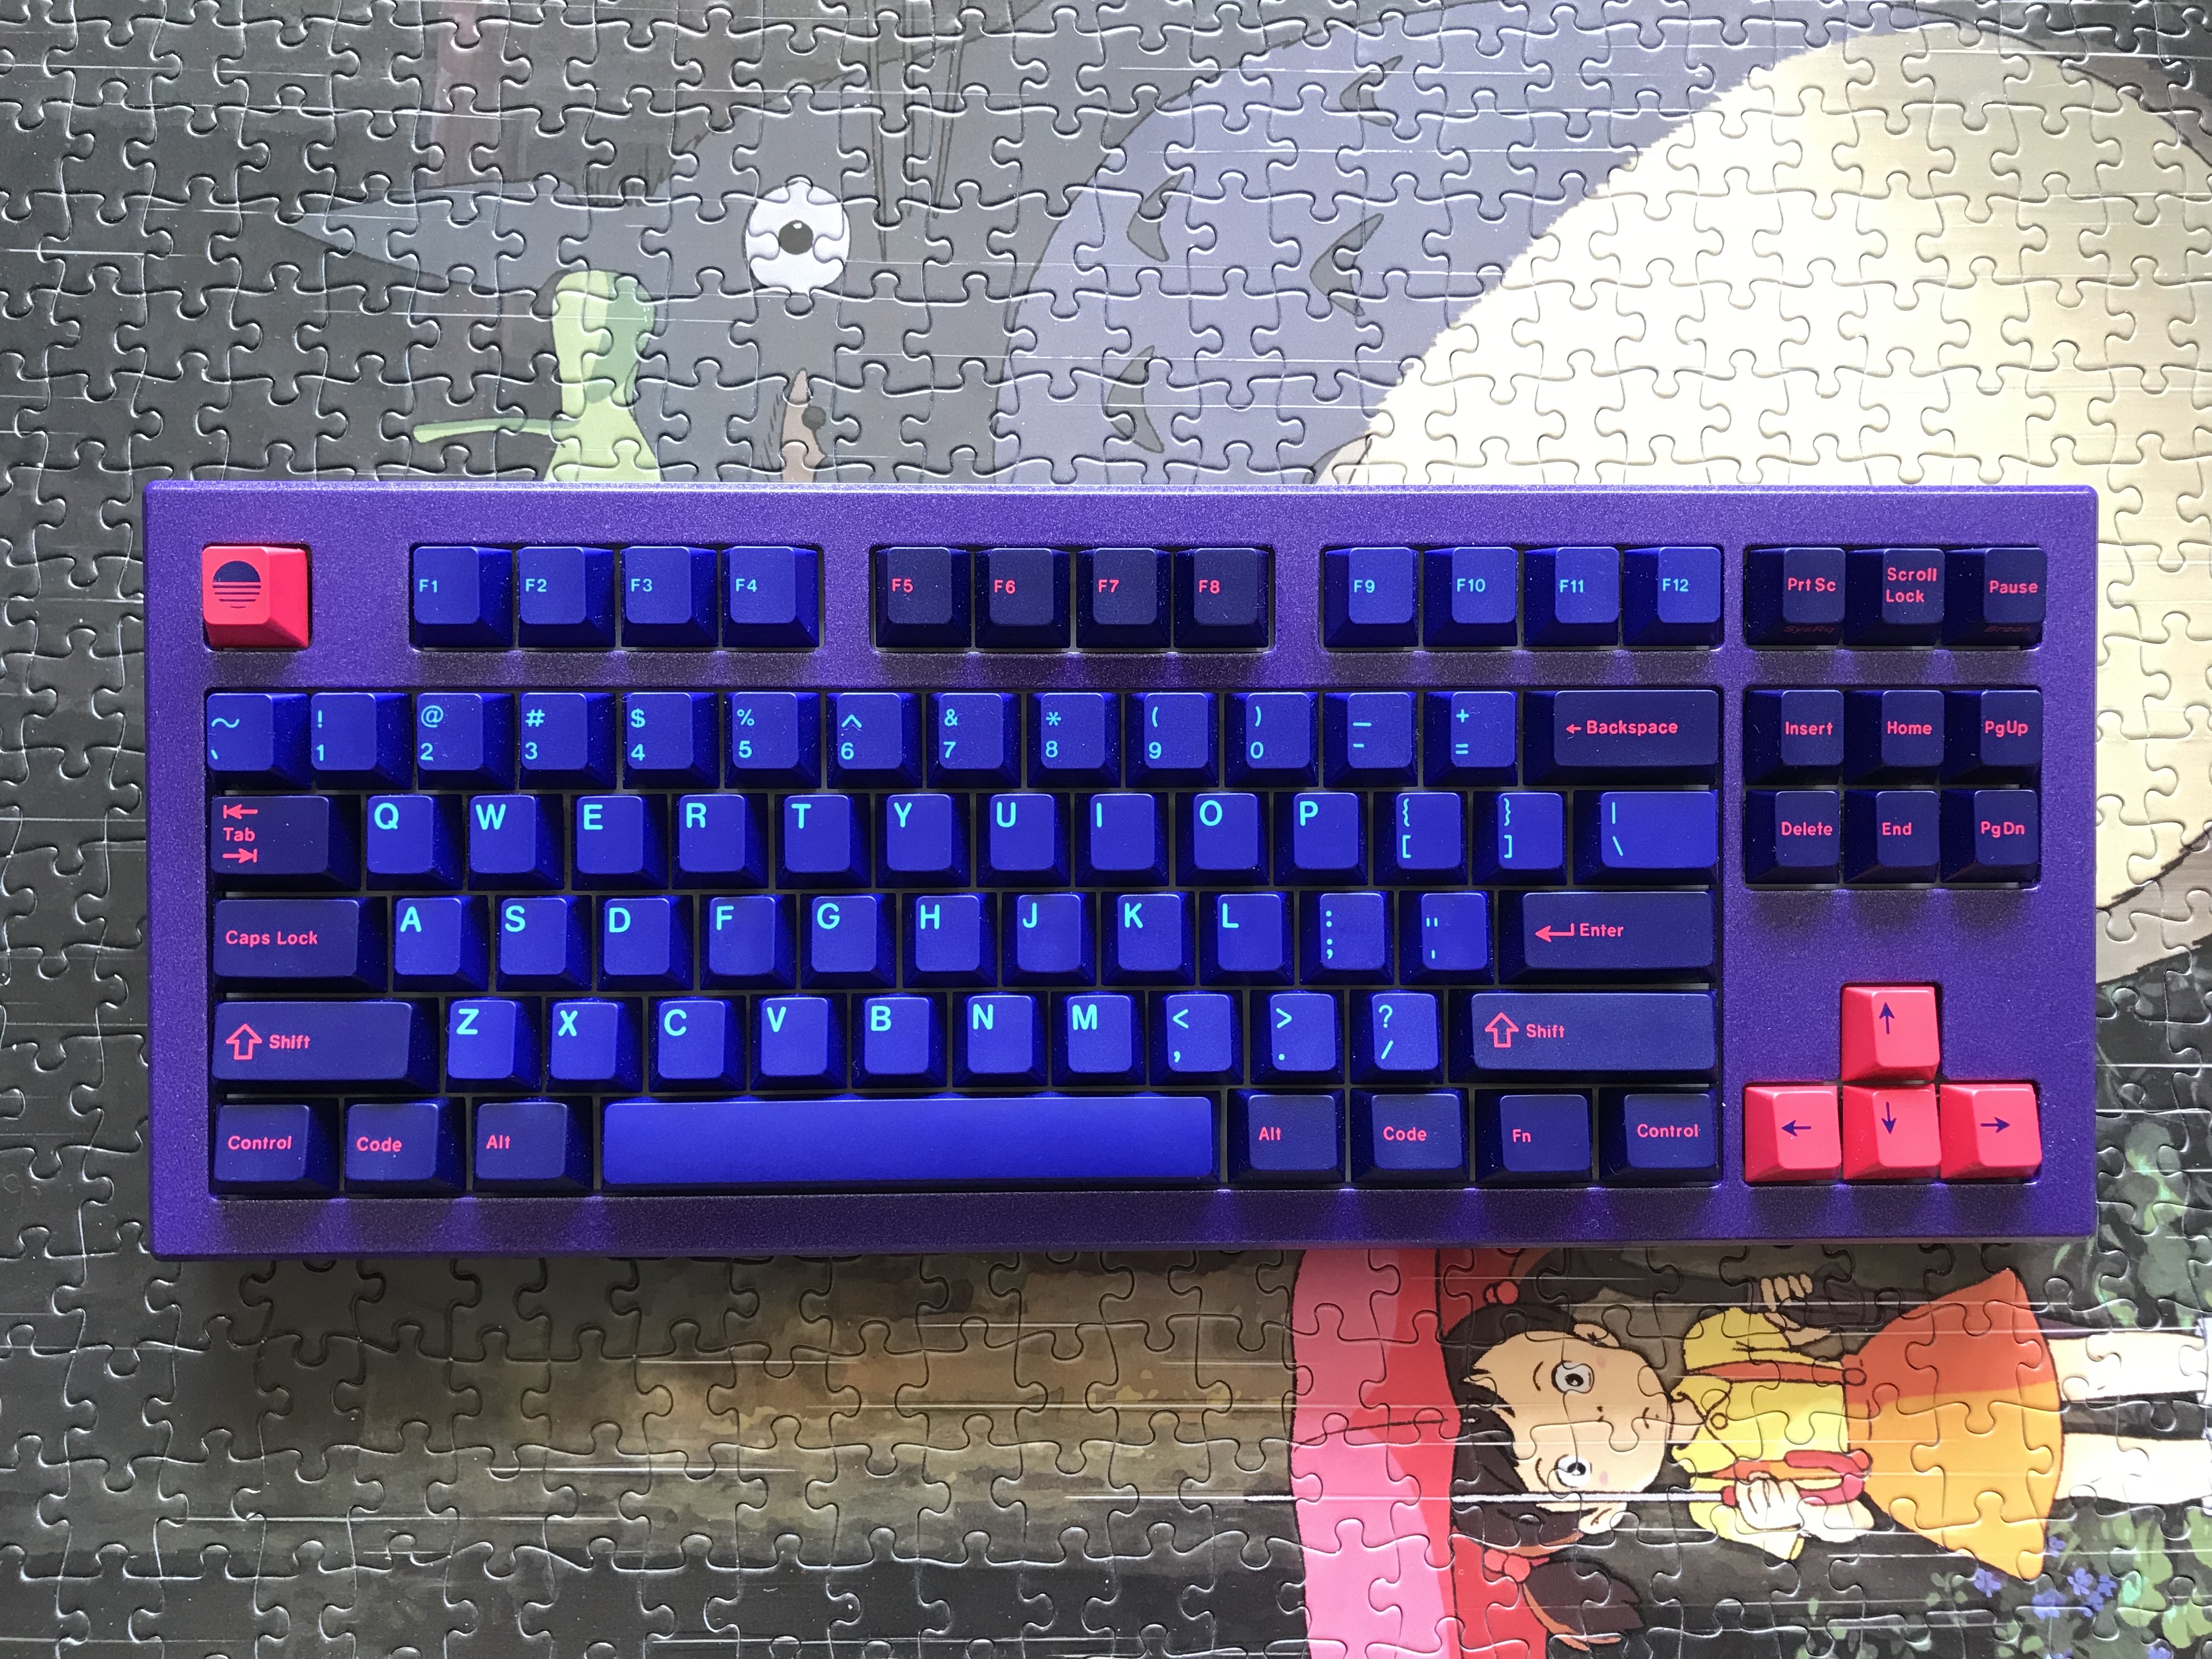
Before we move on to group photos, let’s take a quick look at the final board. Gotta love that purple…

Specifications

donor board: CoolerMaster MasterKeys Pro S RGB
case: Norbatouch Pi (Astrophysical purple finish)
case dampening: 0.1" 40 Duro Sorbothane, stacked to 0.2", wrapped with gaffer tape
PCB: donor
plate: donor
LEDs: per-key RGB, integrated in PCB
plate/PCB dampening: @donpark Sorbothane strut mod, 0.25" 50 Duro Sorbothane
stabilizers: GMK plate-mount
stabilizer mods: clipped (all four legs), lubed with Christo-Lube MCG 111,
  and O-ring modded
switches: replaced donor Cherry Reds with 62g Sakurios
switch lubing:
- manually lubed housings/stems with Tribosys 3204
- tub lubed springs with Krytox GPL 104
keycaps: GMK Laser
- Cyberdeck, Mitowaves
HxWxD (without feet or caps): 1.0"x14.63"x5.75"
HxWxD (without caps): 1.63"x14.63"x5.75"
HxWxD: 1.93"x14.63"x5.75"
assembled weight: 4.59 lb
3 Likes

Builds #21-23: Laser Trio family album

Once again, I’m not a photographer. Nonetheless, we need a little family album, don’t we?

The Klippe+ weights add a stark, clean splash of color that I love.

I mean, look at that.

Smile for the camera.

n00b trap!

8 Likes

Love it :slight_smile:
The builds are adding and stacking, and that’s great !

I am curious, what do you do with all the builds? Have you kept all of them ?

1 Like

All part of the growing collection. I wish I had enough space to display and cycle through all of them for daily driving, but in practice most are in storage bins, and a small number of them stay near my desk for regular rotation.

I would like to go back and rebuild a few of the early ones - between switch lubing, stab mods, and sound dampening, I’m sure much better results are possible.

4 Likes

It appears it’s been a year since I joined keebtalk. Thanks to all of you who have been following these logs and sharing your thoughts - I really appreciate it. You’re awesome.

16 Likes

Great to see you having fun, Papachoux!

1 Like

The amount of build logs you did in this year has been impressive!
Thanks for the last 3 builds in a row , I could read something interesting on my phone during my holidays :stuck_out_tongue:

1 Like

Build #24: Brutal60

It’s been a while since I did a build where I tried a bunch of new things all at once. CannonKeys’ Brutal60 is a pretty affordable build by custom standards, and it ended up being a great build for trying out several things that were new to me:

  • FR4 plate material
  • Linjär switches
  • GPL205 grade 0
  • Tsangan layout
  • Instant60 PCB
  • Burger mount
  • Polyfill
  • EPBT keycaps

We don’t have Smell-O-Vision yet, but if we did, I’d invite you to experience the lovely aromatics of the Brutal60 unboxing - a “subtle citrus scent” added to the packaging, according to Upas of CannonKeys. Between the harsh plastic smell of a desk mat, and the fragrant rotting fish of Cream switches, it’s nice to unpack keeb goods that leave you with the vibe of the therapeutic, rather than the carcinogenic.

Rather than use a swiss cheese approach to support ANSI and Tsangan layouts, the Instant60 comes in two variants. Here’s the Tsangan PCB, with built-in per-key white LEDs.

It’s a hotswap board, with RGB underglow.

I’m not really a linear guy; I like my tactile bumps. But since we’re using a hotswap board, we’re not particularly committed to the switch choice, so I thought I’d give linears another go, and since we’re using an FR4 plate, I felt I’d get a cleaner read on the sound of the plate by using linears. Plus, it was just time to meme it up. Check out those Linjärs. Just a small dose to let you gently adjust to that Swede life…

I tub lubed the switch springs with 104, but this time, I lubed the stems with 205g0. As this was my first time working with 205g0, I was careful to apply a very thin coat to the sides of the stem, and the “ridge” around the perimeter of the switch top; also, I didn’t lube the housing at all. I tried this approach because I wanted to avoid overlubing with this thick grease, and I thought that by putting the lube on all of the possible contact points on the stem, I’d further thin out the lube as the stem moved inside the housing. I also wanted to see whether it was strictly necessary to lube the housing, because if it wasn’t, that would be a big time savings, and at this point in my switch lubing life, I’m looking for every time optimization I can find.

On to assembly. The “burger mount” involves attaching the plate to the case top with screws, but rubber washers are used to isolate the plate from the case. Think of the washers as the “buns”, and the plate as the “patty”. Here’s the placement of one washer (the “bottom bun”) before placing the plate on top:

And here’s the plate with the other washer (the “top bun”) resting on top, before the screw is put into place to hold the whole thing together. As with many other things in keeb life, tweezers are your friends, and are essential for getting the washers exactly where you want them before threading the screws through the burger.

It’s important to make sure the screws are in far enough that they don’t stick out of the recessed areas in the case; aside from ensuring that the case top will fit cleanly on the case bottom, we don’t want vibrations traveling via screw contact with the bottom of the case, which would defeat the purpose of the burger mount.

Polyfill was provided with the Brutal60 kit for sound dampening, so, might as well try it, right? I’m not entirely sure if this was what was intended, but it seemed like the most plausible way to use the material.

The top and bottom are held together by screws. See the side of the case? If you use polyfill for sound dampening, and you exercise the same lackadaisical approach to using it that I did, you’ll most likely find that your board needs a shave.

After some quick experimentation at this stage of the build, I determined a couple of things:

  • Burger mount is pretty effective at eliminating plate ping (and the case ping that can also result). What it leaves behind is the hollow metallic sounds that result from the cavity between the PCB and the case. If you’ve never listened carefully to the quality of the sounds that your plate and case create, burger mount is a fun way to distinguish pings from echoes.
  • For the remaining hollow sounds, polyfill doesn’t seem to do much of anything, at least to my ears.

Well, we tried. I went back in, removed the polyfill, and rough cut a couple of 2mm sheets of craft foam to size. Two sheets were necessary to get good contact and a bit of compression.

For keycaps, we’re using EPBT. I found these to be very smooth to the touch, almost too smooth; I’m pretty inconsistent with my typing form, and if my fingers were striking the keys at an angle, instead of vertically, they would slide around on the keys a bit. Sound-wise, with the FR4 plate, very crisp, and the lube job seems to have worked out quite well - this is the first linear board I don’t mind using. I didn’t expect Tsangan to be much of a change from ANSI, and it wasn’t.

One problem with the spacebar. As many others have reported with EPBT spacebars, there is some warp. In this case, it wasn’t bad enough to prevent the spacebar from fitting on the stabs and functioning normally, but it’s visible if you look at just the right angle.

And, one other remaining problem with that spacebar. It’s loud. Disproportionately so, with respect to all of the other keys. Because we’ve got a hotswap board, it was easy enough to try something I’ve wanted to try for a while: use a silent switch for the spacebar. I replaced the Linjär with an already-lubed Zilent I had lying around, and wow, that completely did the trick. Would I recommend this in general? If consistency of sound across the board is more important to you than consistency of feel, then absolutely give this a try. If it’s the other way around for you, maybe still give it a try (although perhaps use a Zilent with tactiles and a Healio with linears? What can I say, sometimes laziness wins.)

Lessons learned

  • The stem-but-not-the-housing lube approach with 205g0 yielded smooth performance and crisp sound with no sluggishness. Since not lubing the housing is a time-saver as well, I’ll be trying this approach again soon.
  • FR4 - I see the appeal if you like a high-pitched crisp clack with your flex. I prefer a lower pitch and flex is probably a secondary concern for me, so I’d personally prefer alu or POM as plate materials.
  • Using a silent switch for the spacebar may be just what the doctor ordered to bring the sound volume in line with all of the other keys on the board.
  • Burger mount seems quite effective for removing high frequency case ping, which makes mechanical sense, and as a learning tool for understanding how different factors contribute to keyboard sound, it’s good fun.
  • Compressed craft foam does a solid job of mitigating hollow case sound, although I think Sorbothane is still better - if Sorb gets you 100% of the way there, craft foam is 80-85%. Polyfill, for me, was something like 5-10%.

Smell the brutality.


Specifications

case: Brutal60
case dampening: 2 layers of 2mm craft foam
PCB: Instant60 Tsangan
plate: FR4 Tsangan
plate/PCB dampening: none
stabilizers: GMK screw-in (1x7u, 2x2u)
stabilizer mods: clipped, lubed with SuperLube
switches: Linjär
switch mods:
- springs tub-lubed with Krytox GPL 104
- stems hand-lubed with Krytox GPL 205 grade 0
spacebar switch: 65g R11 V1 Zilent
- spring tub-lubed with Krytox GPL 104
- stem and housing hand-lubed with Tribosys 3204
keycaps: EPBT Grayscale
- base kit, blue spacebar kit
HxWxD (without caps or feet): 1.38" x 12.0" x 4.5"
HxWxD (without caps): 1.5" x 12.0" x 4.5"
HxWxD: 1.75" x 12.0" x 4.5"
assembled weight: 2.95 lb
10 Likes

Great write-up! I agree about sorbathane. The brutal60 top edge rings almost like a musical triangle when you tap a fingernail on it. Sorbathane helped my build dramatically. I was worried it would mitigate the top mount flex, but it doesn’t. I built mine with lubed and switch filmed creams.

Really like the light blues you have going here.

1 Like

Thx for the colorful build tale. Excellent Sunday read. :slight_smile:

If ePBT texture is too smooth, you’ll be horrified by POM keycap. I personally find it perfect for me, more so because it’ll be a long time before it starts to shine unlike ABS.

Re using silent switch for space bar, that’s what I do first when I build a new board. But what I want is not a silent space bar but a pleasant sounding one so, when I have the time to tinker, I try various tricks until I get the result I want.

Some tricks I use beyond stuffing lube into stabs:

  1. Try different spring weights. Heavier spring will push back just enough to prevent strong bottom out without causing excessive noise after release.
  2. Fill inside of space bar with foam or Sorbothane. Foam is recommended because it needs to be crazy glued due to the weight. I use epoxy polymer but it’s permanent and messy so I don’t recommend it.
  3. Holy Panda only trick: cut off the tip of Halo stem to mute HP’s signature sound.
1 Like

POM keycap - good to know. What’s odd is, I like the way ABS shine feels, and I don’t have the “slipping finger” problem there…but subjectively it seems just as smooth as the ePBT caps. I want to use this as an excuse to get a good microscope for some close-up key surface shots, but one financial battle at a time.

Thanks for sharing the spacebar tricks!

I probably didn’t make clear that the spacebar still isn’t silent in this build - it’s just muted enough so that the sound blends in with the other keys during typing.

You’ve also reminded me that I really need to start exploring the world of spring swapping. To some extent, I was waiting on enough reputable vendors to get into the spring game before diving in…

3 Likes

I highly recommend TX springs as they ship in a box that doubles as a spring lubing station and they come with their own thin lube as well… Something I’m sure you’d be interested in checking out. I’m currently running their 70g springs in Linjars on my alphas with 78g Sprit springs in Holy Pandas on my mods. Both springs I’d encourage checking out but TX gives you a bit more bang for your buck, and experimental value.

2 Likes

Build #25: Zephyr R2

25 builds! I think it’s safe to declare that I’ve officially fallen down the mechanical keyboard rabbit hole. Let’s celebrate that milestone by getting back to basics - simple, clean colorway, good stabs and switches, and heft. Oh, the heft.

Just in case I forgot what board I was building between looking at the middle of the box and shifting my gaze ever so slightly to look at the band around the box, there’s the brand name again. If that doesn’t trigger your OCD, I don’t know what will.

Opening it up, we’ve got rubber feet, stickers, and a lovely Wilba-designed Zeal65 PCB.

Putting that aside, we’ve got a boxful of Zealios, and tearing away at some tissue paper, our first look at the PVD plate. We’ll be admiring that plate throughout the build, but let’s just say it right now - gorgeous finish.

Here’s a closer look at the Zeal65. As expected, the PCB and artwork is quite lovely, and the key labeling is always a nice feature, particularly when it’s on both sides of the PCB. It’s by no means a necessary feature, but I wish more designers added it to their PCBs.

On a typical build with GMK stabs, I’d need to clip the stabs, lube, and possibly do a bandaid mod of some sort. However, we have pre-installed per-key RGB LEDs on the Zeal65, and in particular, we have LEDs under the stabilizers. The included Zeal stabs are clear, and it seems counterproductive to block the lights with a bandaid mod, so we can skip that step. Zeal stabs have nothing to clip, so we can skip that step too, which just leaves lubing. I originally considered using Christo 111 for the stabs, but I’ve found that 111 is an opaque white color when applied to stabs. So, back to good old SuperLube, which applies in a clear coat, and will let all of that RGB goodness through.


With the stabs installed, it’s always a good idea to check fit, especially with this thick plate. Tight fit, but comfortable.

Before we start installing switches, let’s take a good look at the case and the plate. I went with a clean colorway; black anodized case, silver plate. You can see my potato-pic reflection in that plate, but even then, the photos don’t do it justice.

Likewise, the underside of the case has a PVD-coated weight. 12 screws hold the case assembly together. I might have preferred that those 12 screws be black, but I’m just nitpicking.

The case top and plate have matching cutouts to allow the plate to rest snugly in the case top. Note that we can see some finishing marks on the underside of the plate - look at the bottom edge of the plate, near the opening for the spacebar switch.

Next up - after lubing the switches, we mount them in the plate and solder to the PCB.

The plate is 5mm thick, so even if we wanted to do PCB/plate sound dampening, there’s no room for any dampening material, which further simplifies the build.

With the PVD finish, the plate is a fingerprint magnet - and because it’s made of brass, it’s heavy. How heavy? This heavy.

From this point, it’s just a matter of screwing things together. Normally, I would apply a Sorbothane or perhaps a craft foam layer between the PCB and the case, but between the 5mm brass plate and the heavy case, I wanted to see how this board sounded without those treatments - further simplifying this build. Here’s another potato-pic mirror shot just prior to installing keycaps.

For keycaps, I continued the austere, clean theme, with GMK White on Black. After a lot of flashy over-the-top colorways recently, it’s nice to do one with a classic, simple look.

Lessons learned

  • 5mm brass plates are interesting - I’m not sure whether it’s the weight, the enclosing of each switch housing, or some combination of the two, but there is no plate ping at all. Not a cheap alternative to doing Sorbothane strut mods, but it does make for a quick build with no sound compromises. This makes me curious to try a thick PC or POM plate.
  • I’m torn on PVD finish. It looks so good…for the 0.0023 seconds before the PVD coating is replaced by a smudge and fingerprint coating.
  • There might be a slight sound improvement to be gained from a thin layer of Sorbothane between the PCB and case, but overall, the board has a crisp typing sound which I enjoy. It would be worth trying Sorbo, though, to try to get a handle on how much of the sound is driven by the case vs. the 5mm plate.
  • While it can be fun to get a bunch of disparate components to work together and feel and sound good in a build, there is definitely something to be said for a case/plate/PCB kit with tight tolerances and attention to detail across components. This was a very fast build, because generally, things just worked out of the box.
  • At some point I need to come to terms with layout. I make heavy use of the Windows key, I use CTRL heavily in editors, and I’ve become attached to the QMK left-desktop/right-desktop bindings for the Alt keys. I can still have those things with the 65 layout, but for some reason I haven’t been able to get my fingers to adapt to R3 CTRL, even though it’s clearly an ergonomic improvement.

Mirror-finish PVD, shiny black ano…and dust and fingerprints. Overdue for an upgrade to my photo game.


Specifications

case: Zephyr R2
case dampening: n/a
PCB: Zeal65 R1
plate: 5mm silver PVD brass
plate/PCB dampening: n/a
stabilizers: Zeal (1x7u, 3x2u)
stabilizer mods: lubed with SuperLube
switches: 67g V2 Zealios
switch mods:
- springs tub-lubed with Krytox GPL 104
- stem and housing hand-lubed with Tribosys 3204
keycaps: GMK White on Black
HxWxD (without caps or feet): 1.31" x 12.62" x 4.5"
HxWxD (without caps): 1.38" x 12.62" x 4.5"
HxWxD: 1.56" x 12.62" x 4.5"
assembled weight: 4.89 lb
14 Likes

This is a beautiful, simple, clean Zephyr.

You know, the things Zephyrs never should be? /s

(all jokes aside this is gorgeous)

1 Like

Great build, simple and so classy, love it !

1 Like