Nice! I have to send everything out to get done it takes forever especially for minor adjustments.
I don’t have an fc980c but a couple of ideas on the plate pcb attachment problem.
1 you can cut hex shaped holes in the plate and epoxy nuts in from that side that way it is a flat plate with the screws coming up from the PCB.
2 reverse the screws to go in from the plate. That way you can secure them with nuts from the pcb side.
Edit:
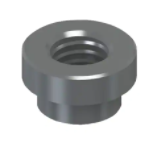
A better option that is more mechanically sound is using something like below. If doing an FR4 plae these could be soldered in in POM they would need to be glued (or maybe soldered to slightly melt the POM plate. That would leave a flat top of the plate screws going up from the pcb similar to OEM method.
finally got a chance to assemble my @Dave x NT-980 HS PCB with 7u bottom row.
Durock V1 smokey transparent with Krytox 206
Gateron Yellows on mods, Reds on alphas and number pad --will eventually redo these to either Bobagums 52g or Sakurios, but that’s for a different time
stock Leopold FC980M case
PBT Japanese minimalist keycaps, Klaykaps Kuma-o-Nigiri OG artisan
The 206 lube I ordered came in last night so I finally got to working on this board. Was concerned about the PCB mounted stabs (hadn’t ever put one together) but a @TaehaTypes video was really useful/helpful when figuring out how to insert the wire. Dave, thanks for a great PCB and plate; the photos you took helped a lot–I just kept zooming in to check that my mounting spots were correct.
I’m usually more in the Topre world these days, but a truly custom MX 980 has been a list item for me for some time. I will probably redo these in some kind of light silent linear later this fall, but for now am enjoying tuned stabs and a big ol spacebar.
Dave, would it be too to ask for you to elaborate a bit more on how to create a plate file? I’m interested in getting a pcb + plate for the Leopold 750 tkls.
TL;DR; It is going to involve a bit of work to make sure it is likely to be right on the first try.
There are many people better at this then I. This is a relatively simple plate without complex edges so this is how I would go about it.
At a high level:
Using the PCB key switch placements as a guide to ensure spacing is just right through KiCad. Using the PCB also helps with any mounting holes that need to be added. Finally setup the edges based on distance from edge switches.
Details:
Get some measurements from the existing plate:
Looking at photos the left and right of the plate can be about the same size as the PCB.
However the top and bottom extend past the PCB. So measure from the Esc key to to the top of the plate. And from the left Control key to the bottom of the plate. Measure the diameter of the 5 holes that go through the plate and PCB. Measure the diameter of the LED holes as well.
Make sure you can open the PCB design in KiCad (requires nightly build not official version)
Take the KLE from the Raw data tab and generate a DXF file with the AI03 plate generator https://kbplate.ai03.com/
Open the PCB design in KiCad
Turn on the layer User.Comments (this will show where the switch cutouts will go)
Create another layer for the plate (this will make things much easier IMO). File → Board Setup → Add User Defined Layer. Select User.1. Click Ok. Scroll down and change the label from User.1 to User.Plate. Click Ok.
Import DXF into KiCad.
-File → Import Graphics
-Select DXF file from step 4
-Graphic Layer: User.Plate
-Check group items
-Default Line width: 0.1mm
-Ok
-Drop the DXF file precisely on top of the key cutouts (tip you can use the arrow keys to help with placement) If it needs to be moved the whole layer is grouped so you can.
-Once you are happy with the placement, remove the layer grouping by right clicking on the plate outline Grouping → Ungroup. Now the individual lines and radiuses can be manipulated.
Next work on the mounting holes (Suggest copying from the existing holes in the PCB, then contract them to the appropriate diameter).
Set edges (so in this case move top edge up and bottom edge down necessary amount. After doing that make sure side edges are connected. I would suggest adding rounded corners (makes it a little nicer)
KLE: It was a difficult to get right specifically spacing between F and num rows long also had some funky spacing on the right side. Saved Layout: Keyboard Layout Editor
Build up a batch of PCBs from JLCPCB. Assembly/QA went unusually well (worth every penny to have the MCU soldered by machine). Had to make one repair a manufacturing defect with one switch socket with superglue, it looks like a pulled pad but works just fine.
I sold a few to some people. One person, I am not sure if they are going to do it or not (internal shipping is way more expensive then I thought). If they don’t go forward with it I will send you a message.
Besides this replacement PCB, i’m eying the Yang BLE Controller mod that some folks here have used.
But that controller and this custom PCB isn’t compatible it seems.
Eventually I may come around to wanting a Heavy-9 but that’s way later in the game =P
And I definitely will be swapping switches (probably to Bobagums) and lubing the stabs of course!
I may add some sound dampening too. The works!
Thanks! The Ble980m Yang controller is pretty nice! I don’t believe it works with the right FN key that I use that key quite a bit. (not hatting on it, it is a good mod for many people that I know have used it, and it is pretty accessible)
Been waiting months for inventory replenishment at jlc to place an order. Really not down to source the remainders and solder myself. Especially not an ATmega…
Solid move waiting they should be available sometime in the next month. (at least the MCU, but they will probably be out of Resonator or ESD chips which are not too pad to do with an iron).
Drag soldering the ATmega wasn’t all that terrible because I could tack it to the board with just the residual tin. The 16hz resonator was a nightmare though. I could’ve sworn I cooked that crystal but so far in all my tests the board has behaved fine except for it not showing up in via. I’ve got another 4 shots at it if this one dies at least.
That said, I don’t blame you one bit waiting for JLC to have everything.
If you’re into hotswap sockets, the 2nd gen Kailh sockets off their aliexpress store seem to work with the footprint file. IDK if it’s just a recolor but it might be worth ordering while you wait.