Simply96, a personal keyboard project

Hello keeb lovers,

Late last year I lurked again on various forums talking about mechanical keyboards and discovered that a lot had changed (in a good way) since I purchased my daily drivers around 8 years ago.

I’m a happy owner of two Filcos and a Topre Realforce and use them everyday but with so much beautiful custom keyboards in the wild I told myself that I had to own one ( at least :wink: )

Moreover the nice part of a hobby is to learn new things so why not design and build my own from scratch?

  • Do my own PCB design (I do have some previous amateur experience)
  • Do my own case design (I have no experience in CAD software and CNC manufacturing).

This will be fun :smiley:

Most of the enthusiast keyboards out there have small layouts.
One benefit is that it removes arm strain during prolonged typing and mouse usage.
As a software programmer one caveat to me is the lack of some keys: function keys are used a lot in professional tools and even on my TKL the lack of a keypad impacts my productivity.
Still want something a bit more compact though as my arms are beginning to hurt a bit at the end of the day.
I have to say that I’m a conservative old fart ( you made my day when you called me “Uncle Rico” @pixelpusher :smiley: ), breaking typing habits are getting difficult so learning new layouts being compact or worse ortholinear are out of the question: I want to use it at work and be productive very fast using it.
One accepted change is that, due to the lack of nice ISO/AZERTY keycaps, I will switch to US/ANSI layout.

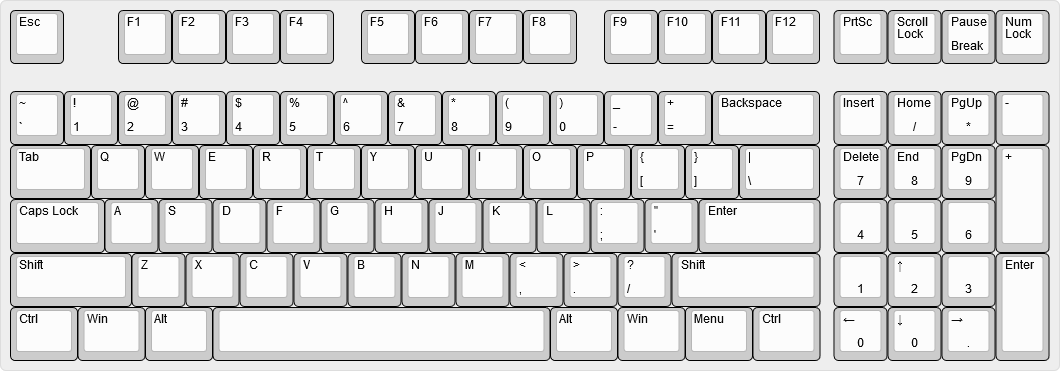
I started some research to what would be the best keyboard layout for my usage and found that the TK layout was just perfect for me:

  • It has a numpad.
  • Much closer to a standard ANSI/ISO layout than a 1800 layout.
  • Still significantly shorter than a full size keyboard.

Here are some links to known keyboards that used this layout already:

And also some KLE shots of the layout both in ANSI and ISO flavors:

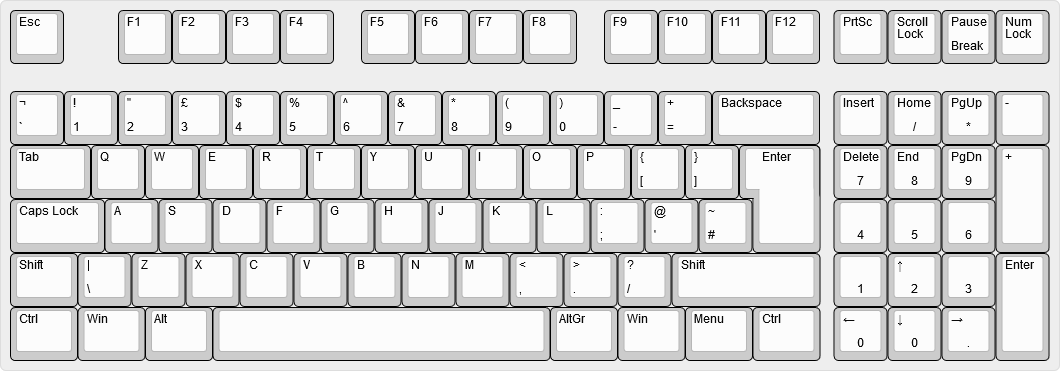
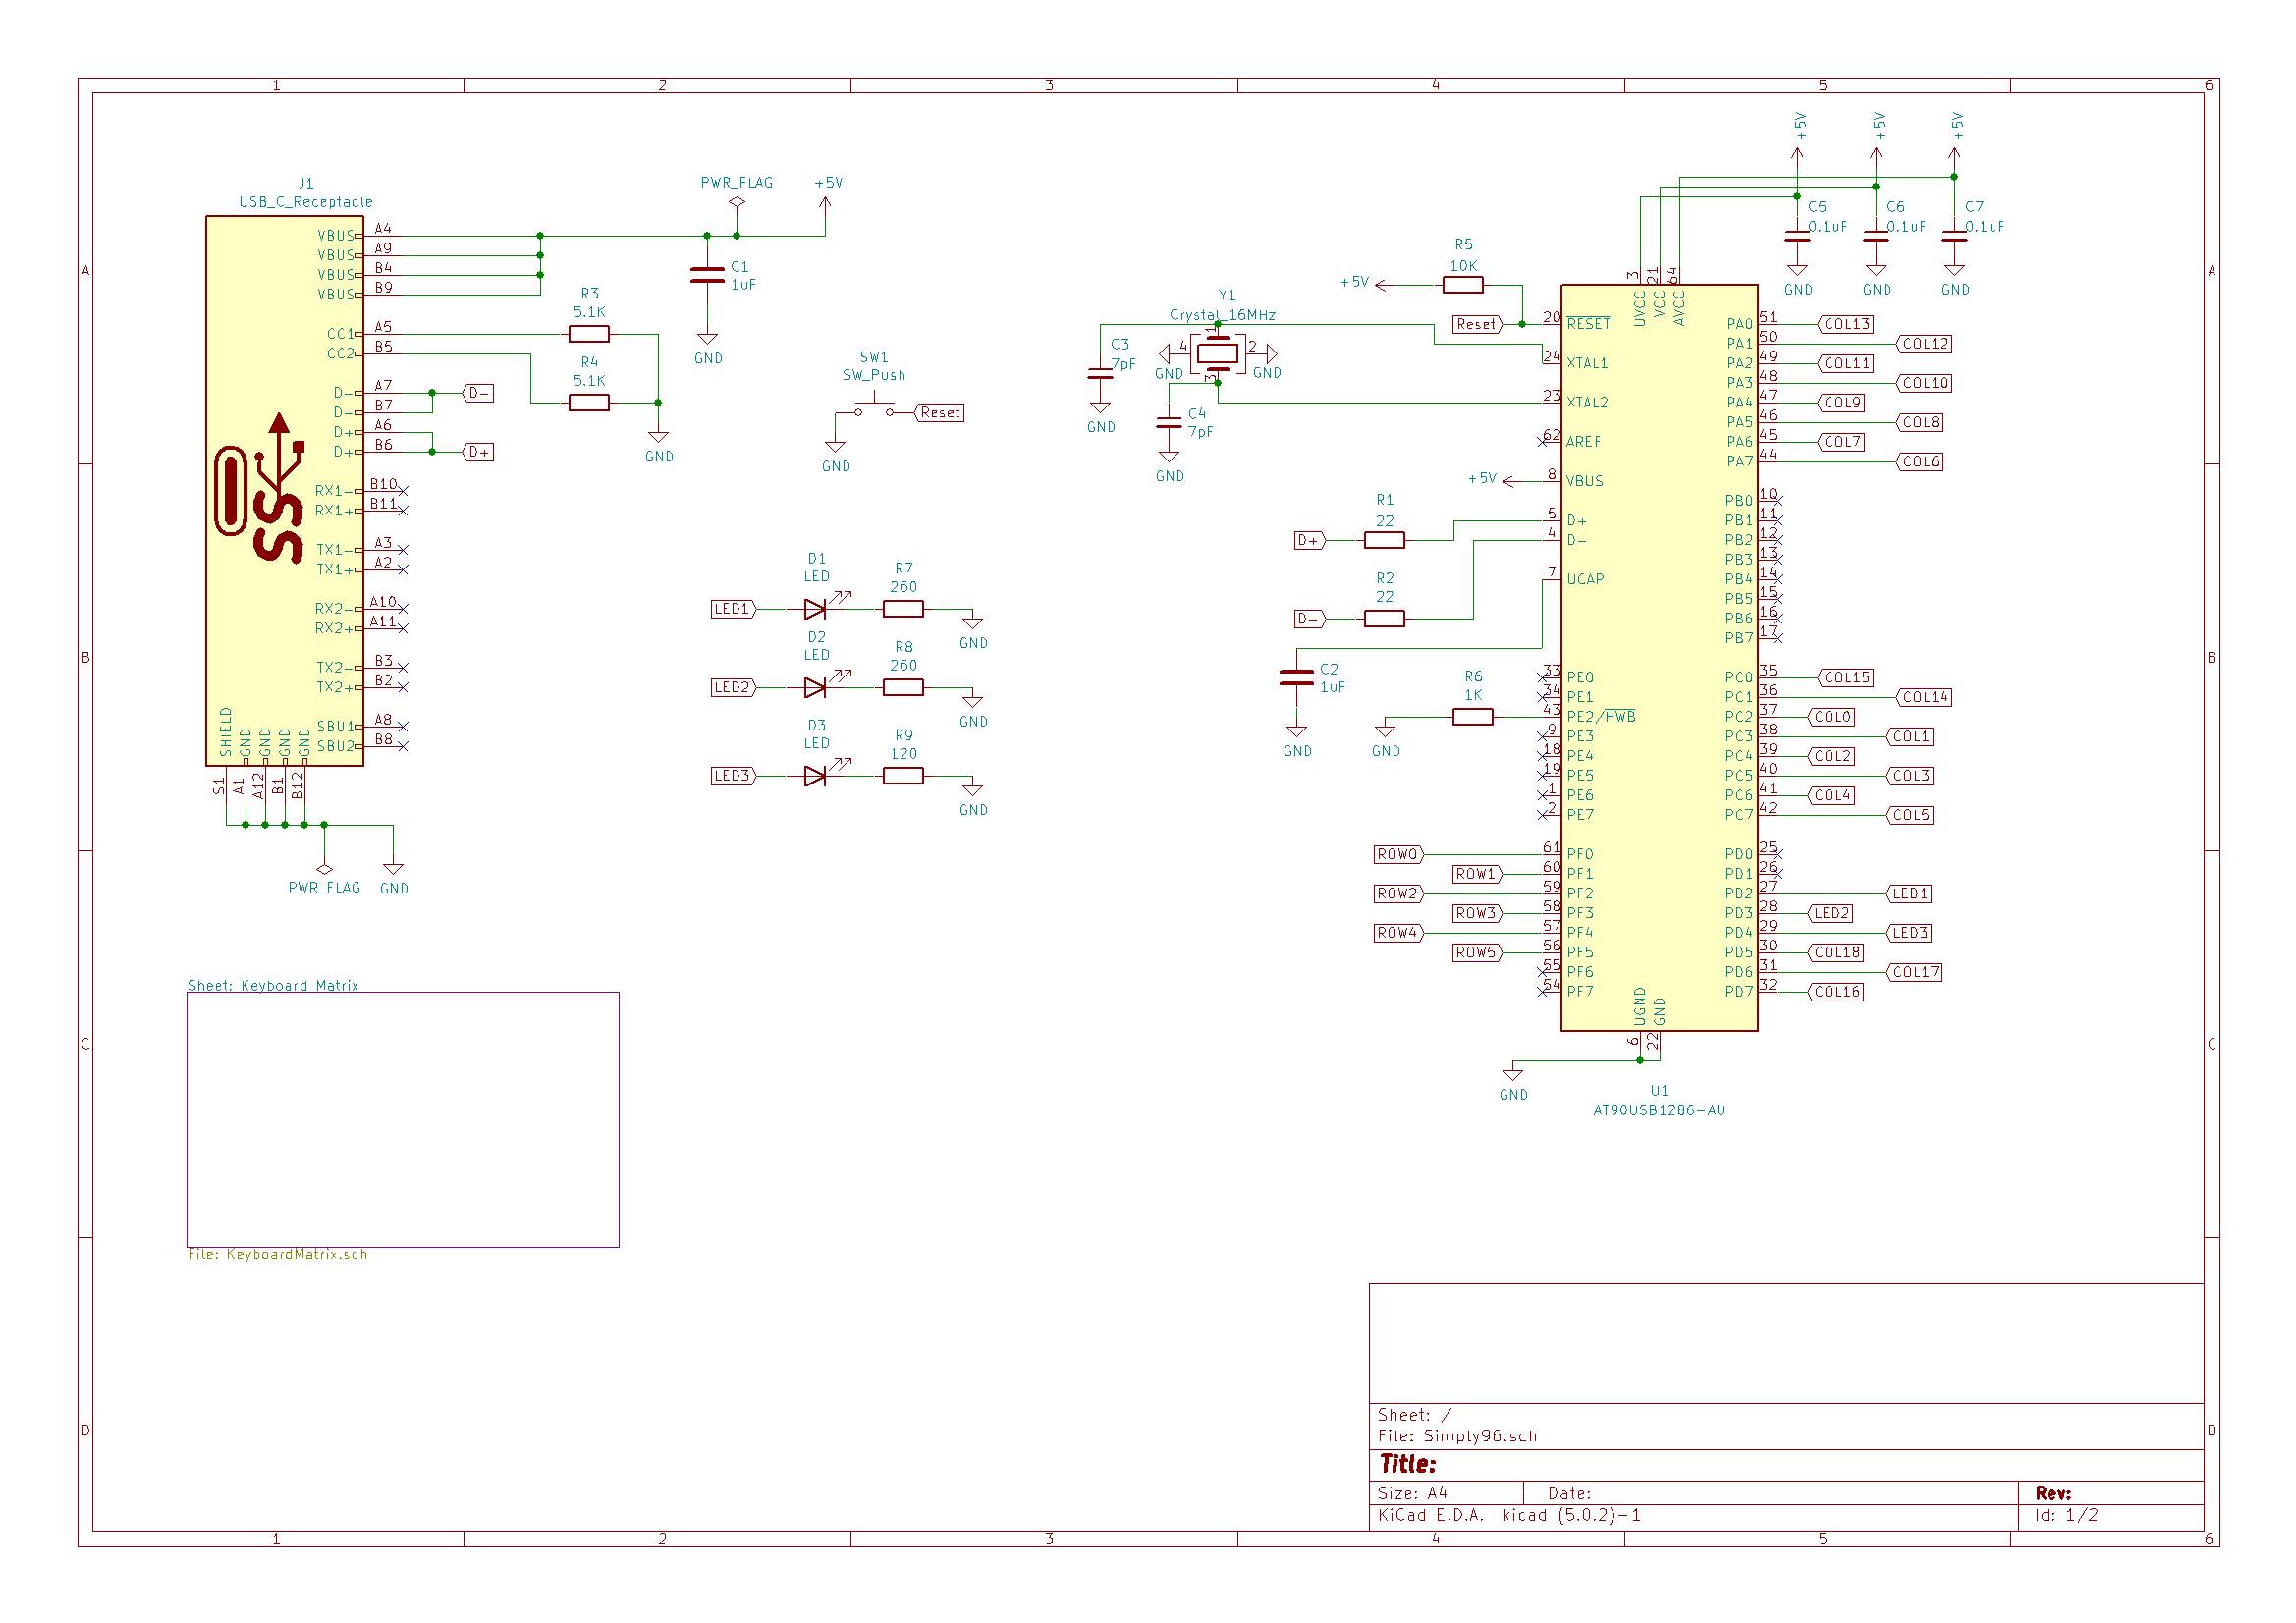
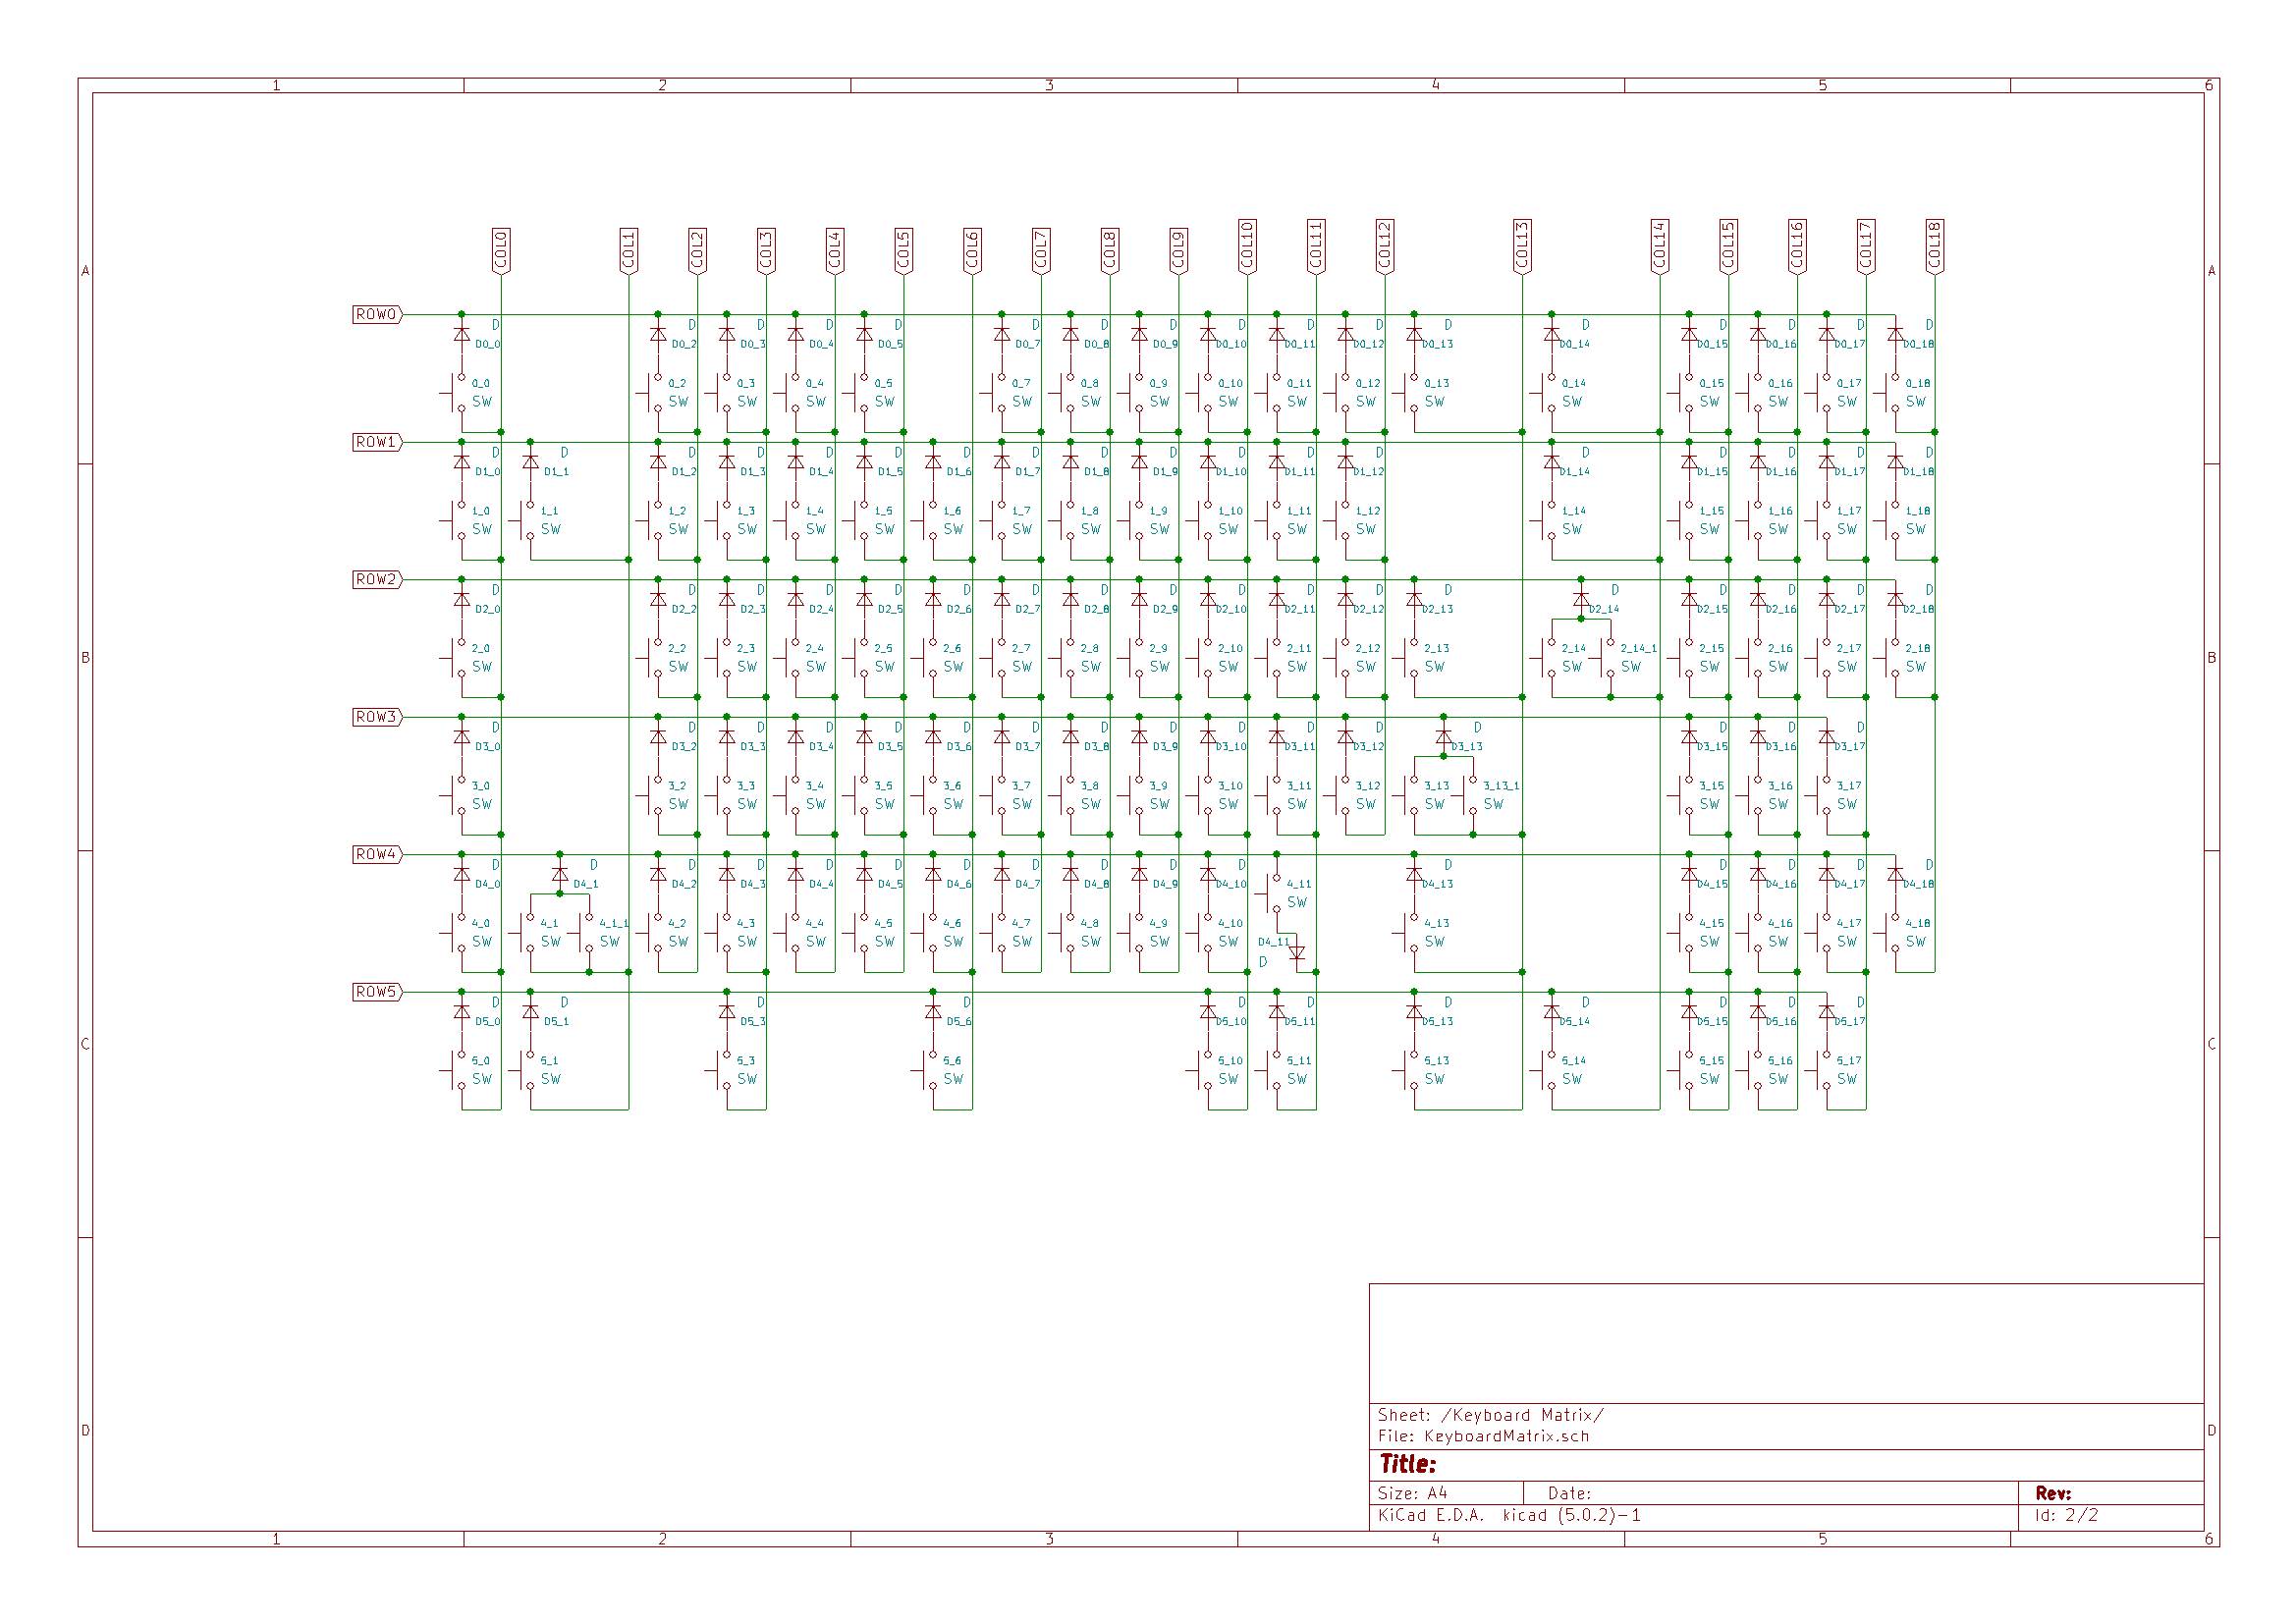
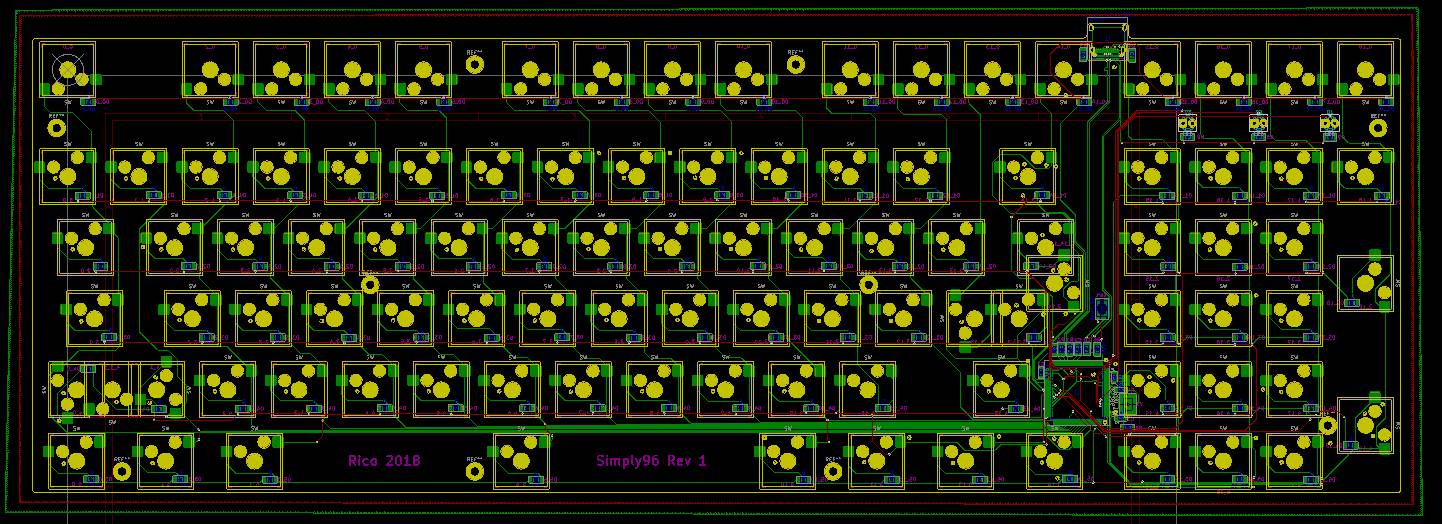
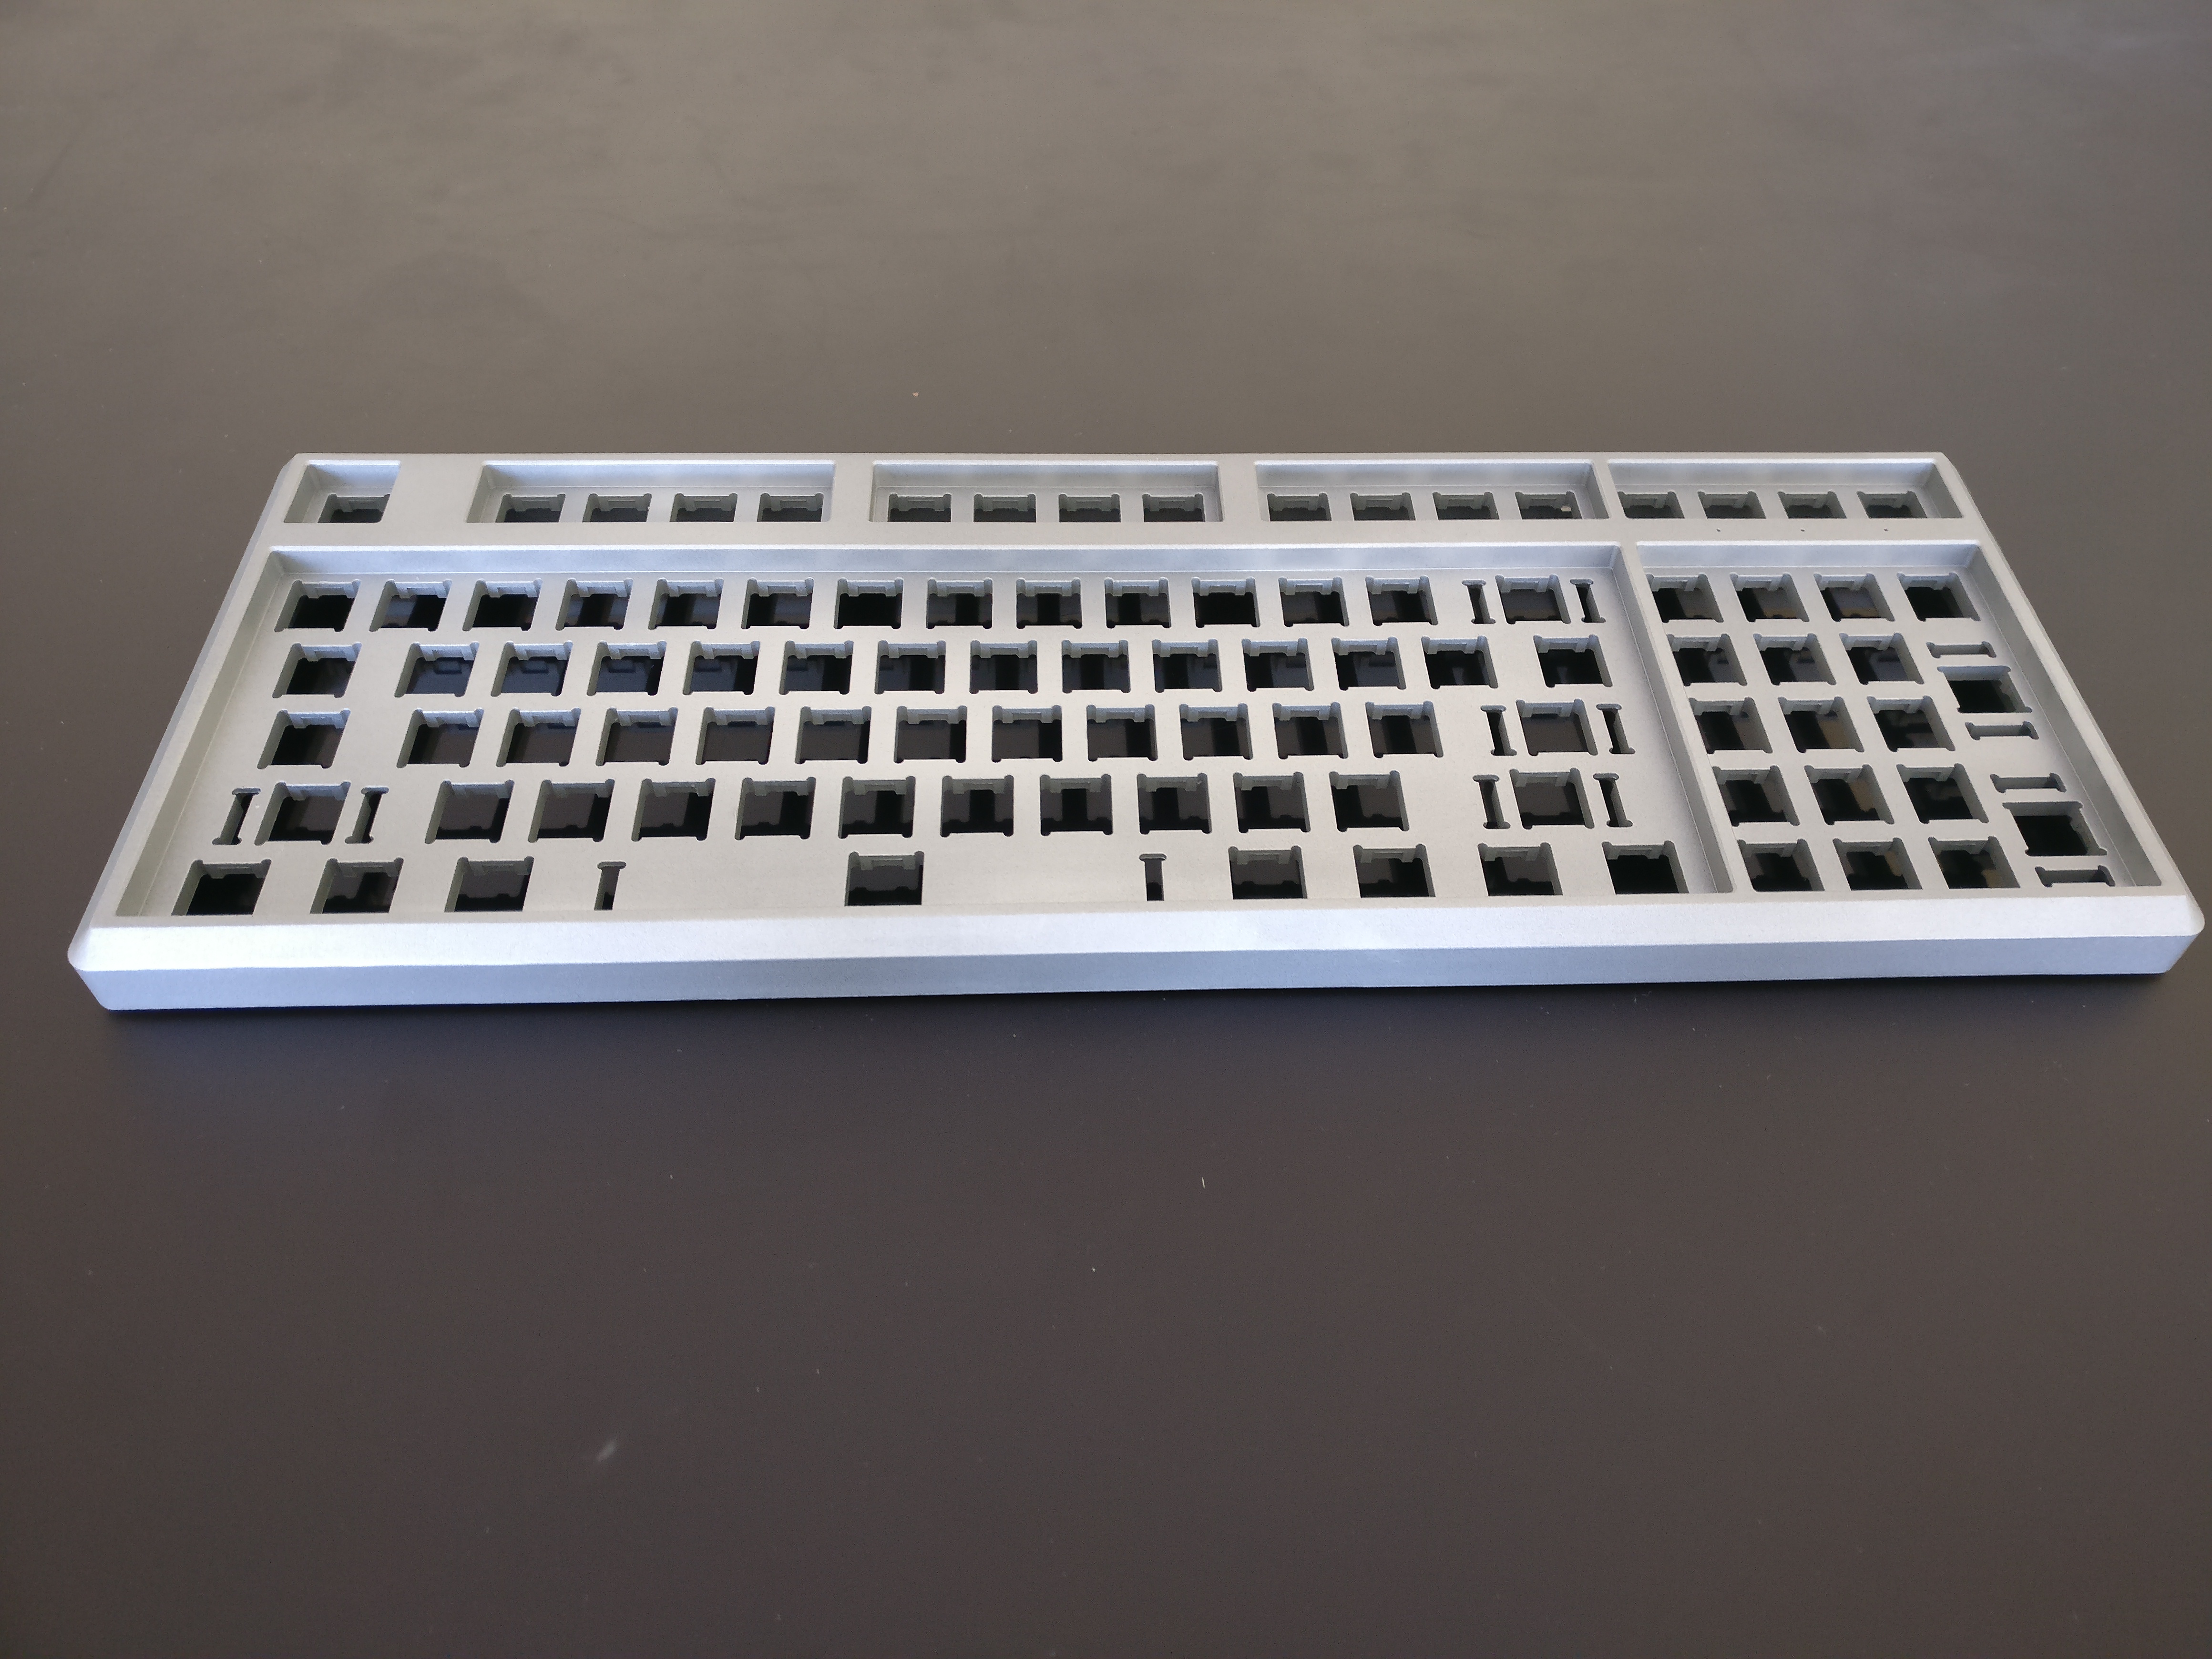
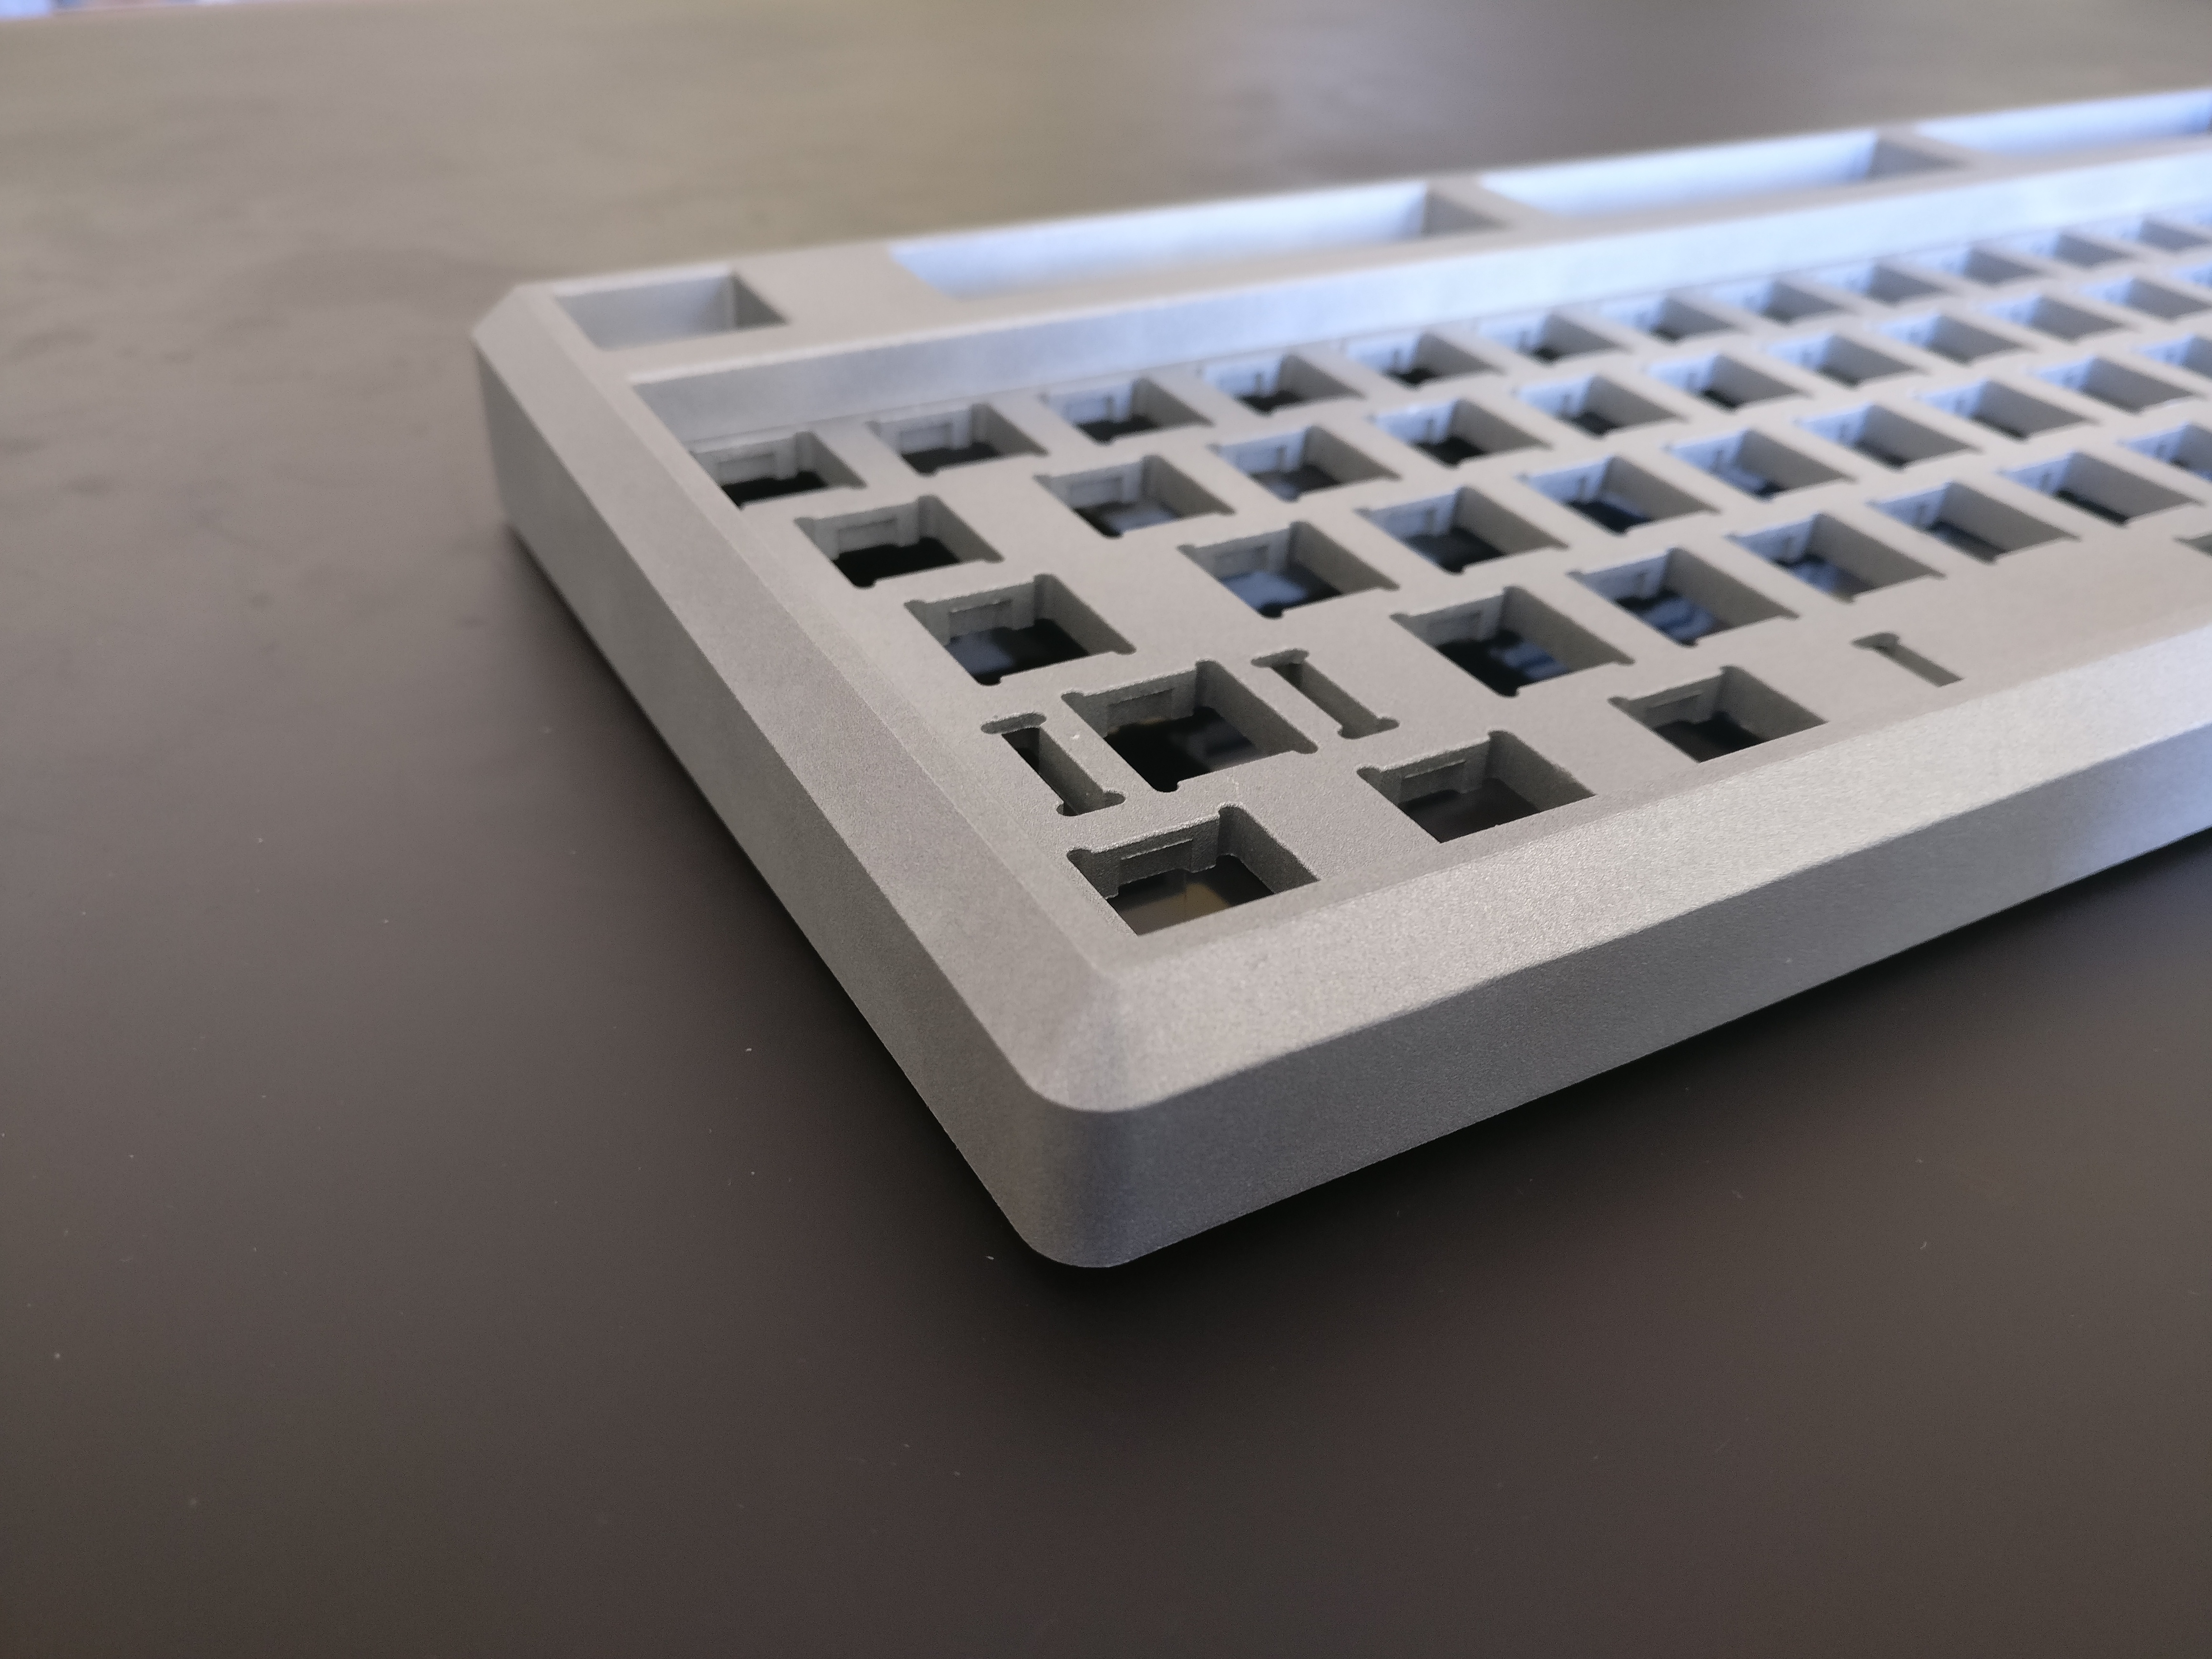
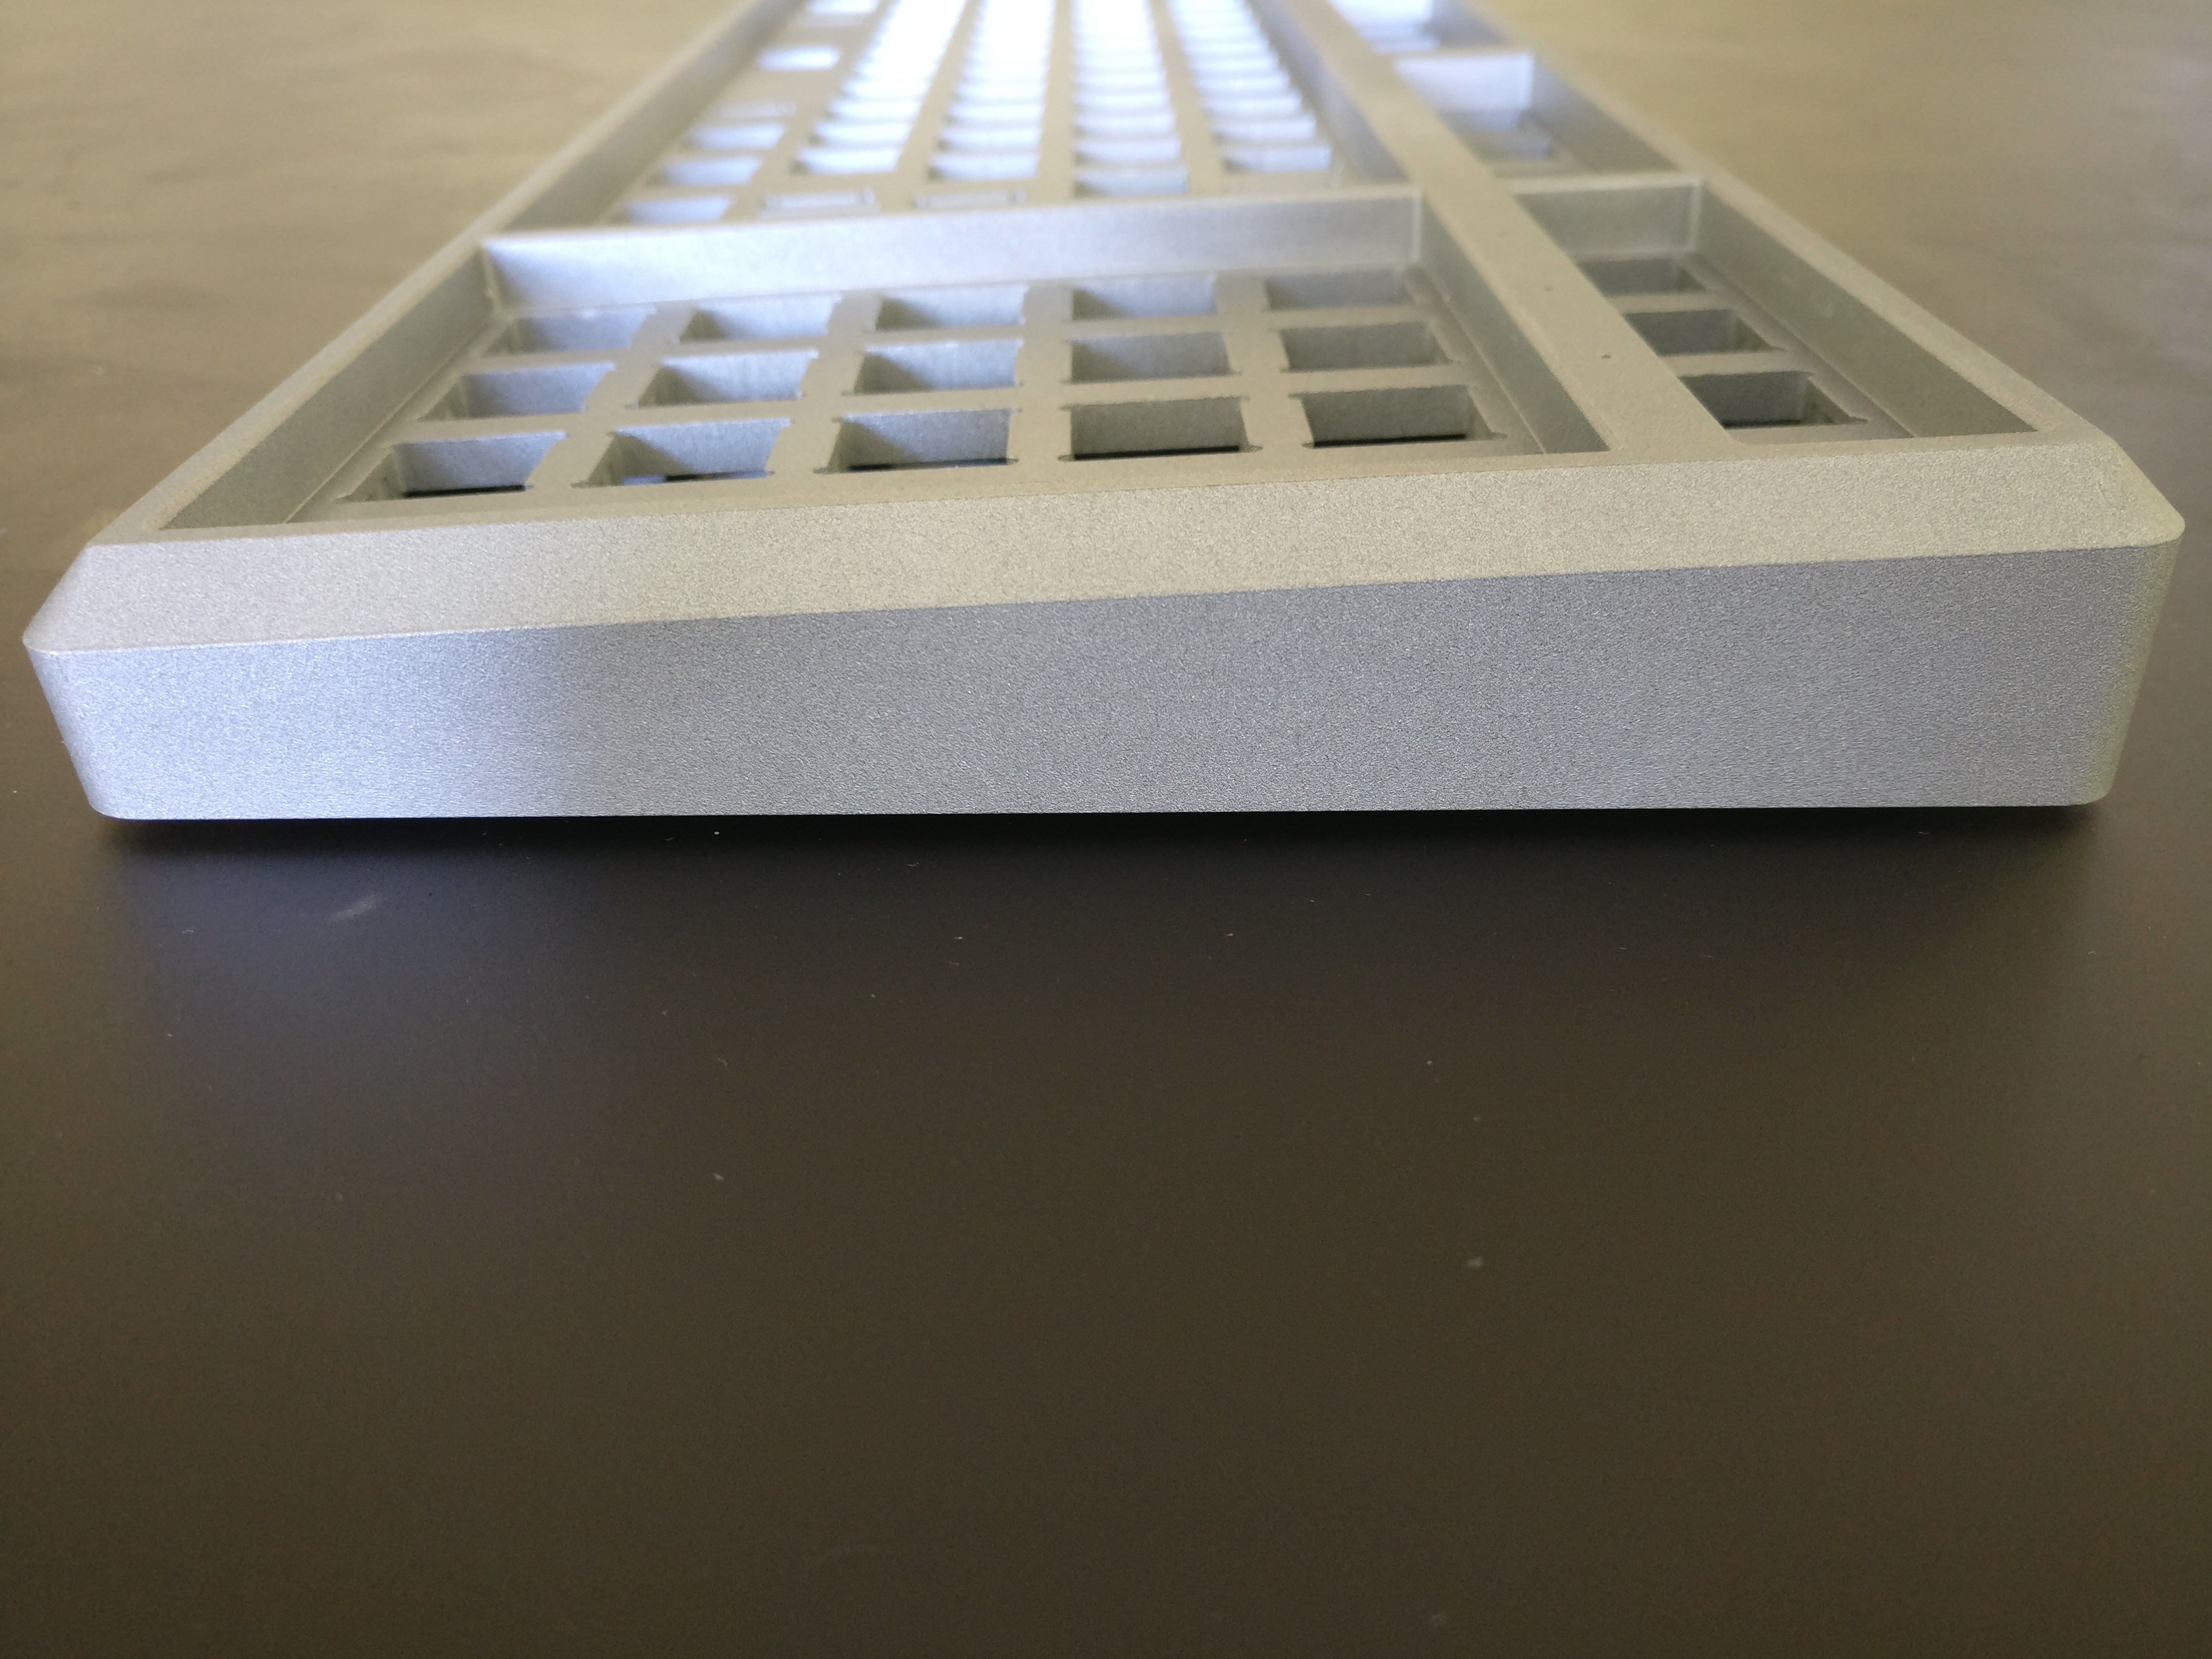
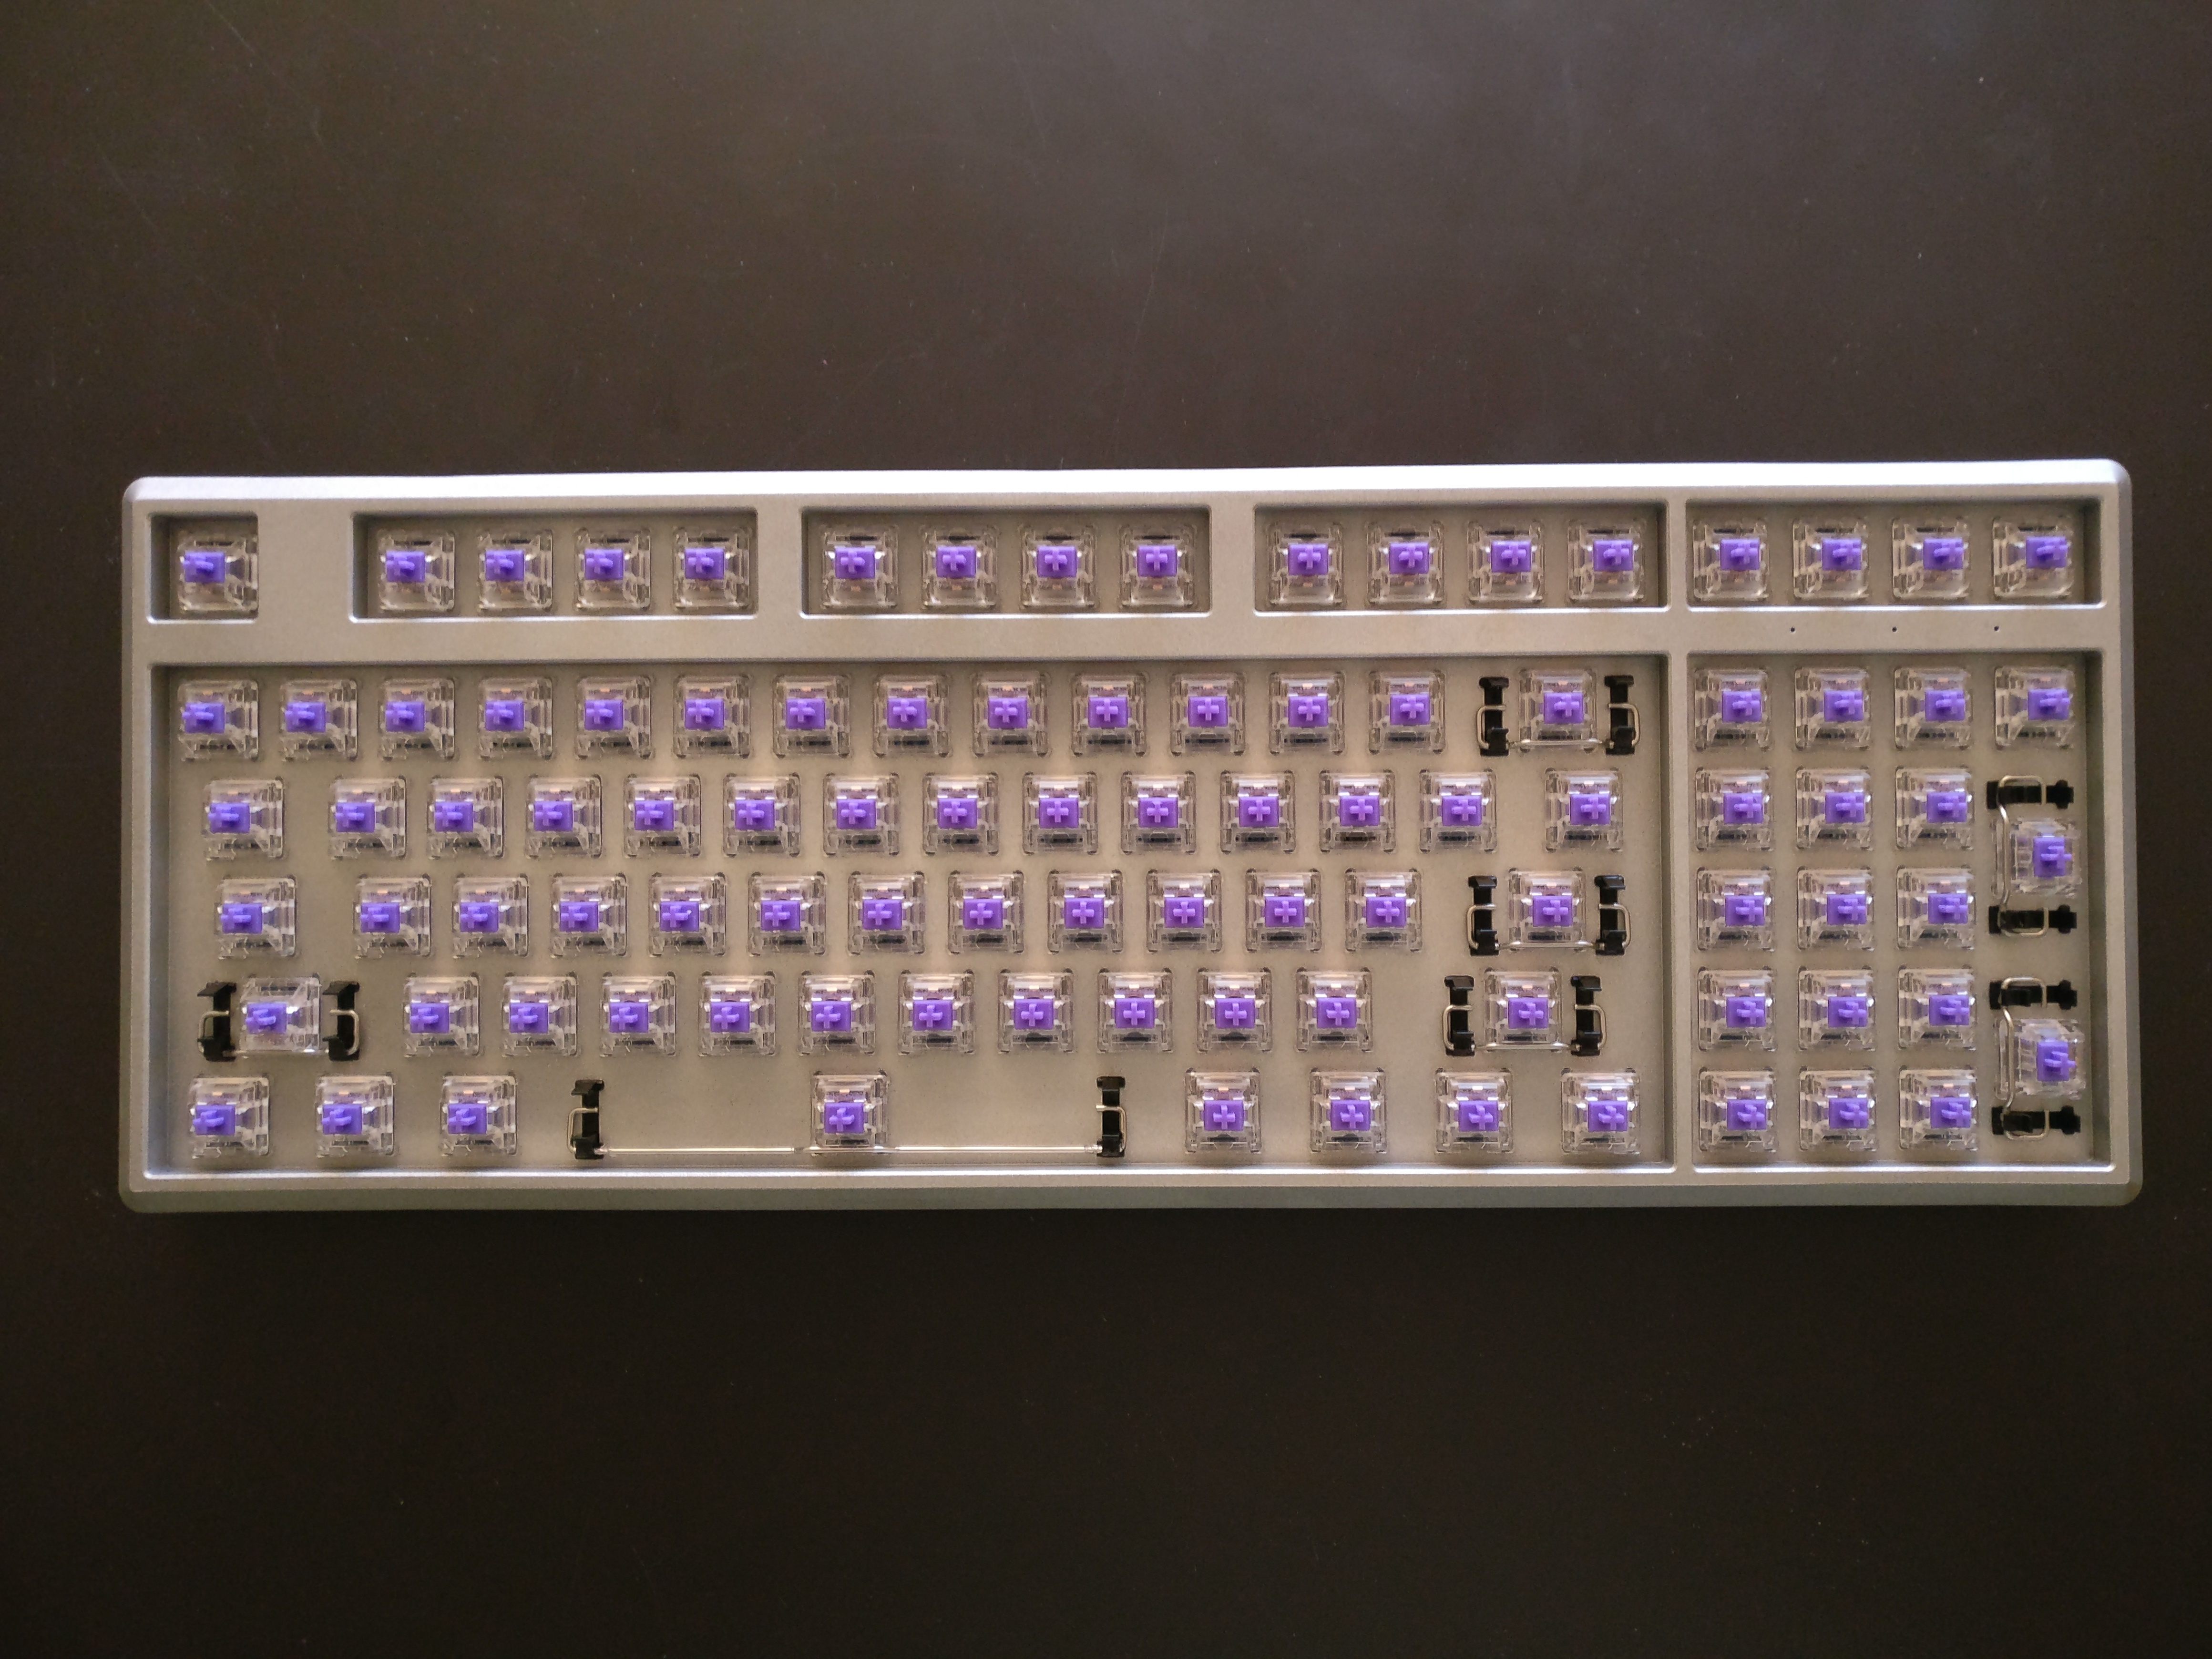
So development of the Simply96 keyboard started.
PCB and case designs are set and will probably not change unless I find a critical flaw that forces me to do that.

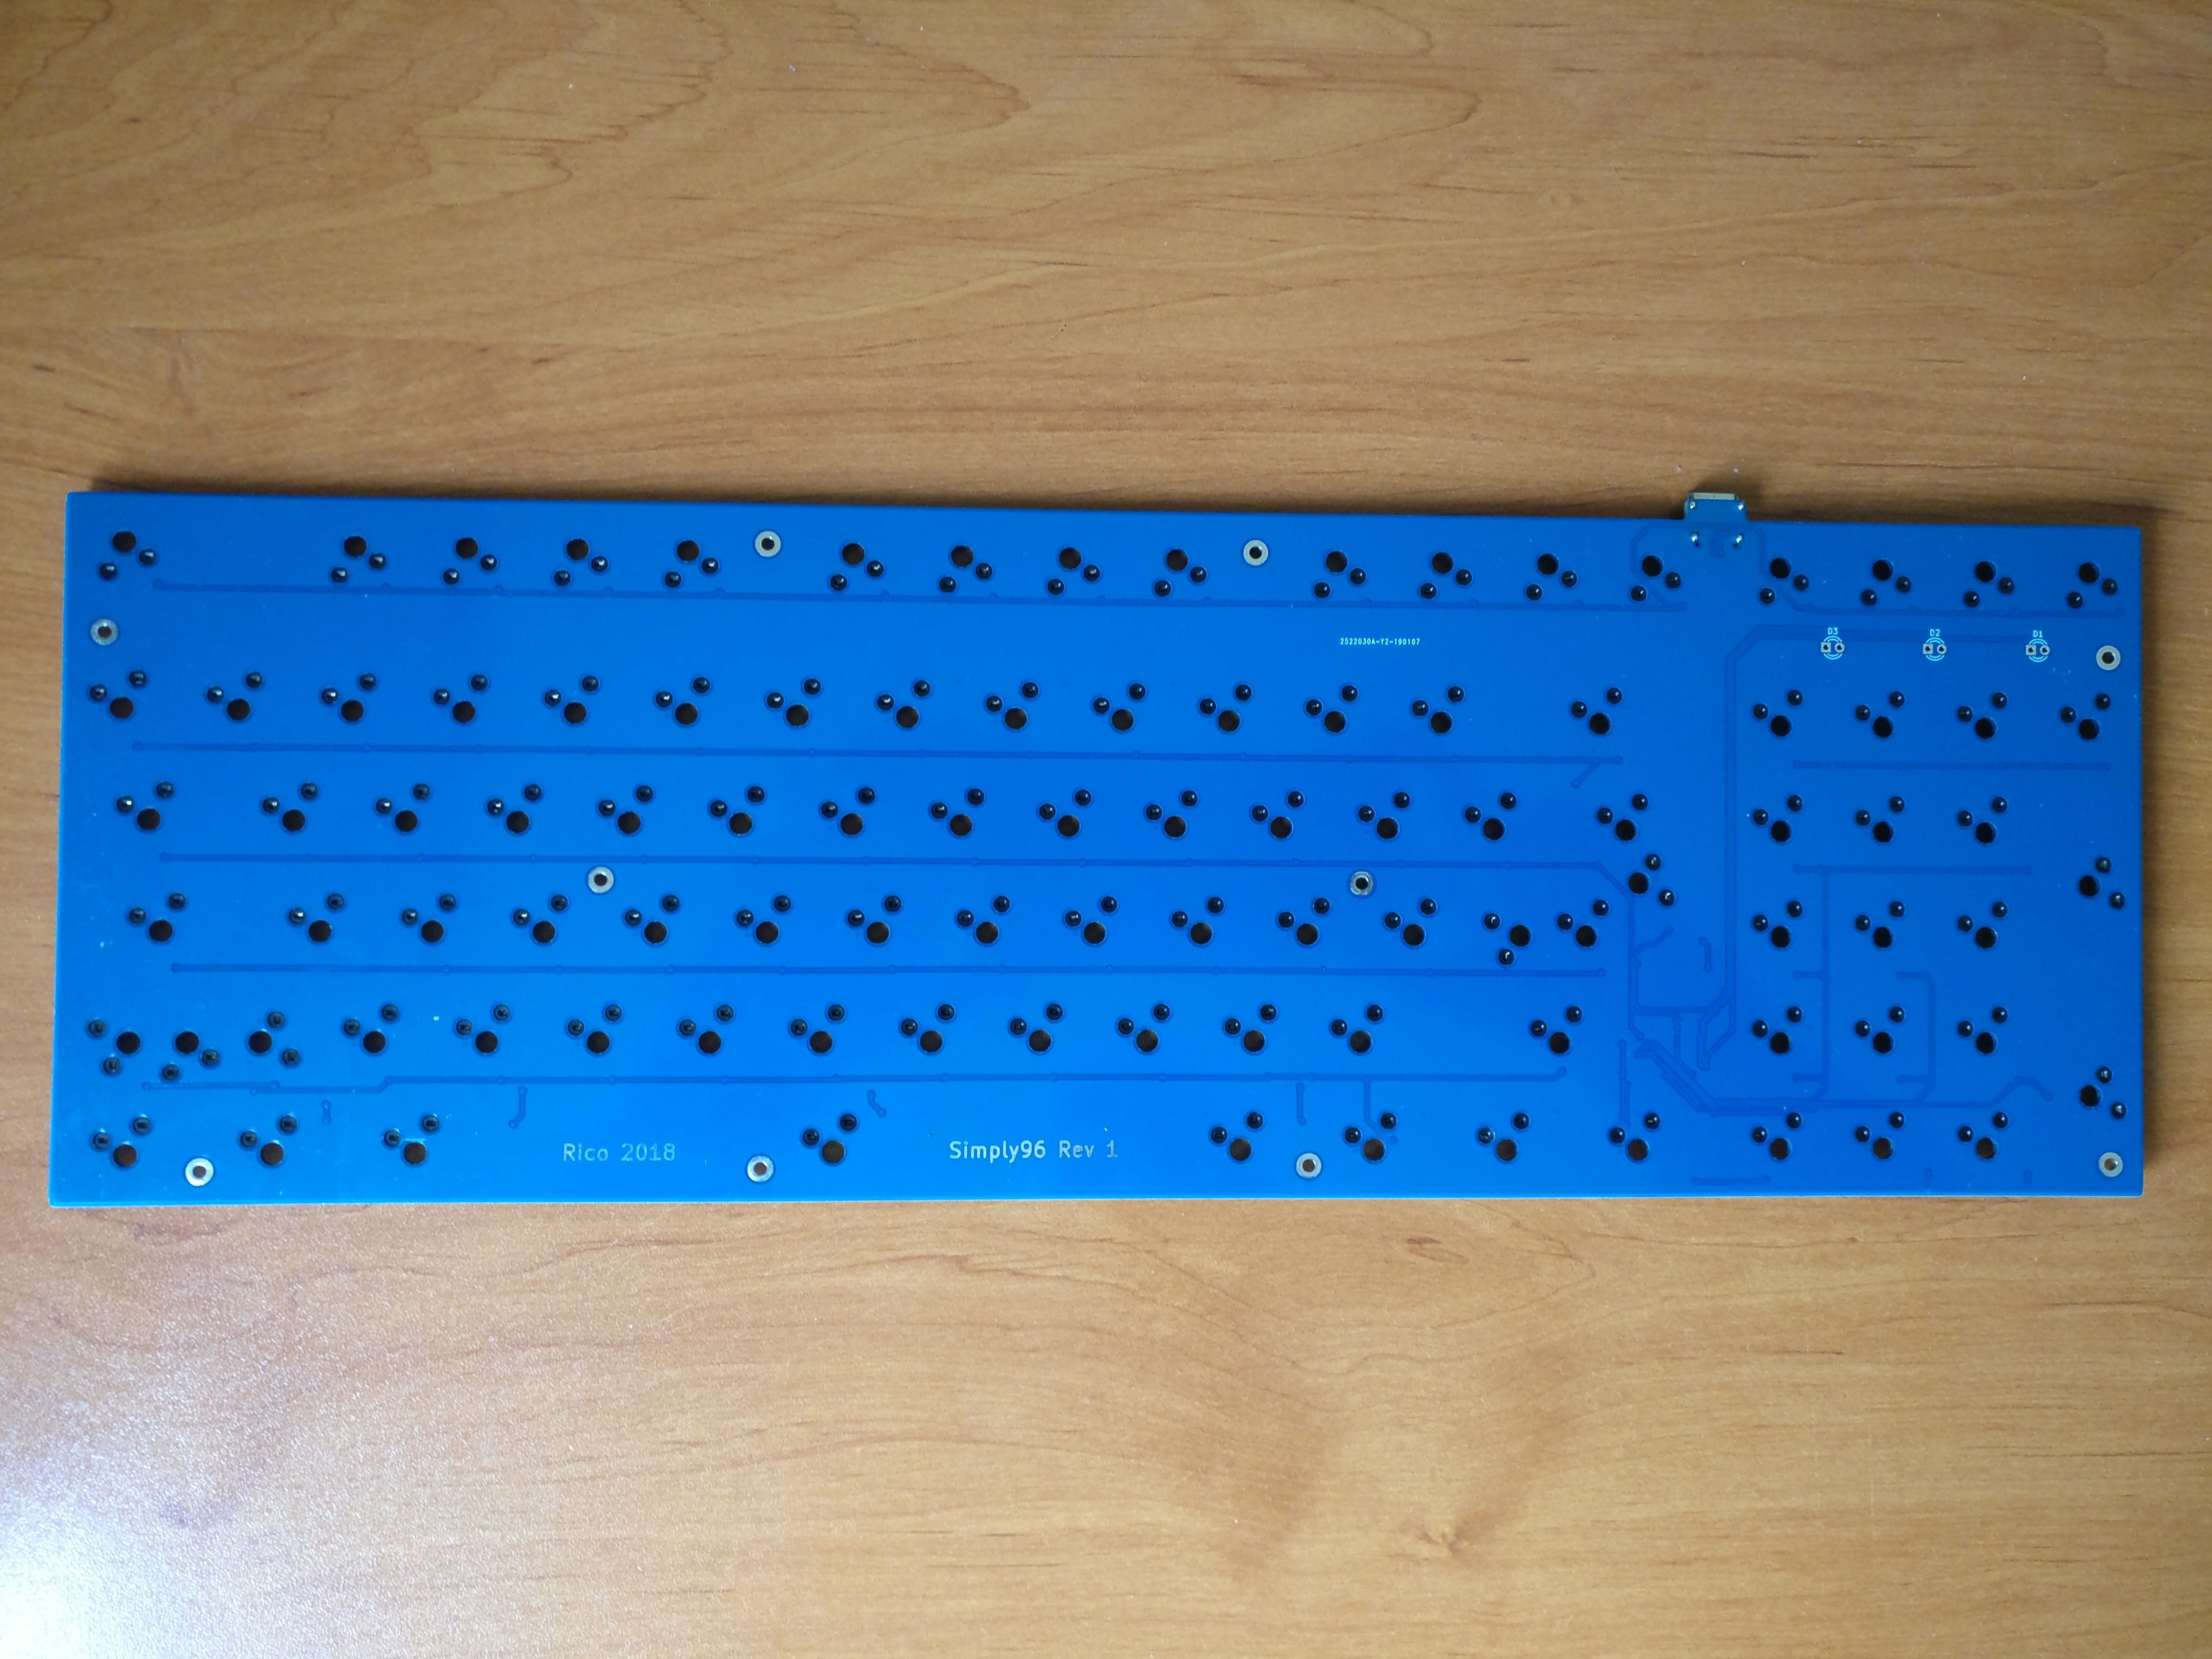
It is called Simply96 because it has exactly 96 keys in ANSI layout (97 in ISO) and it’s design is as simple as it can get:

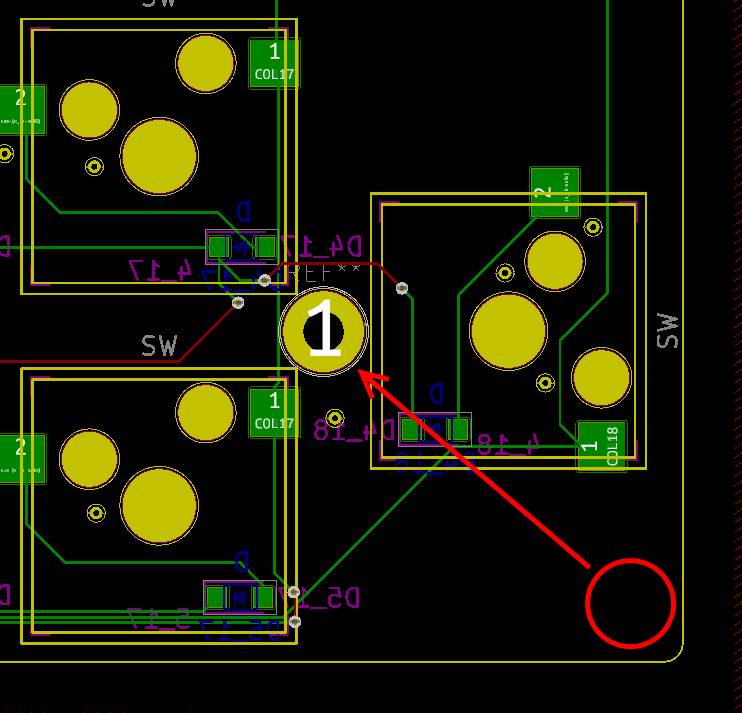
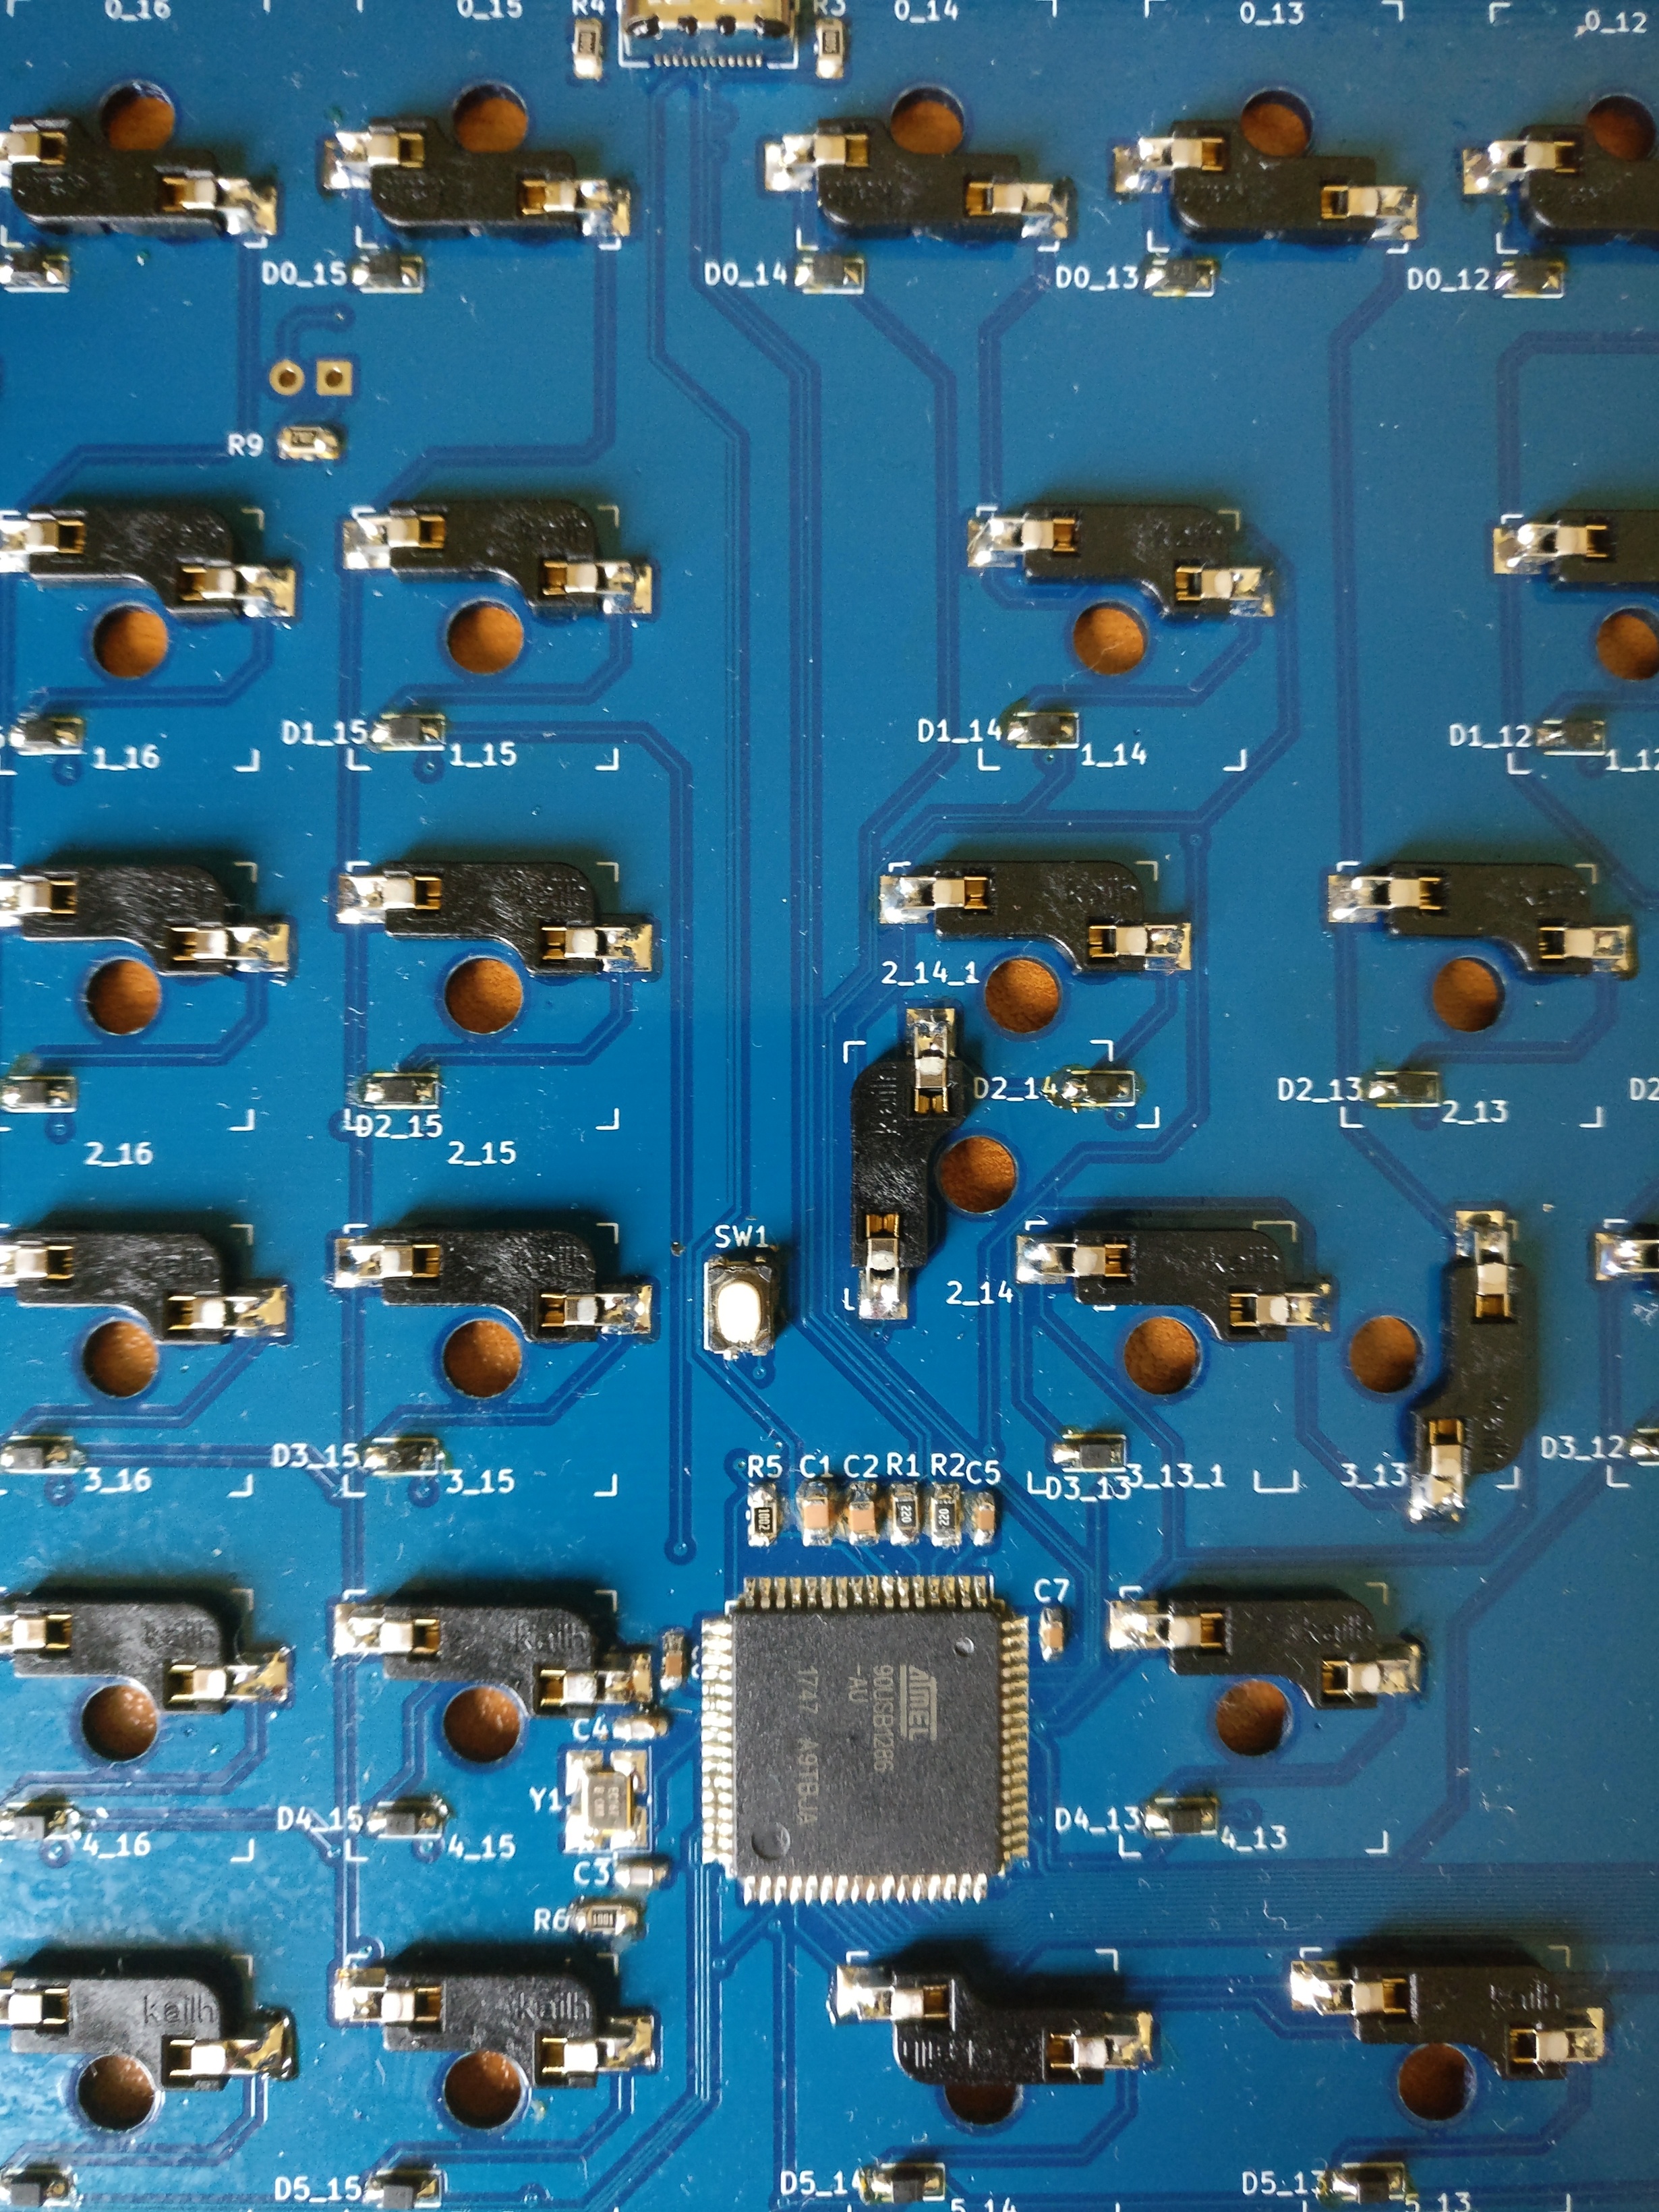
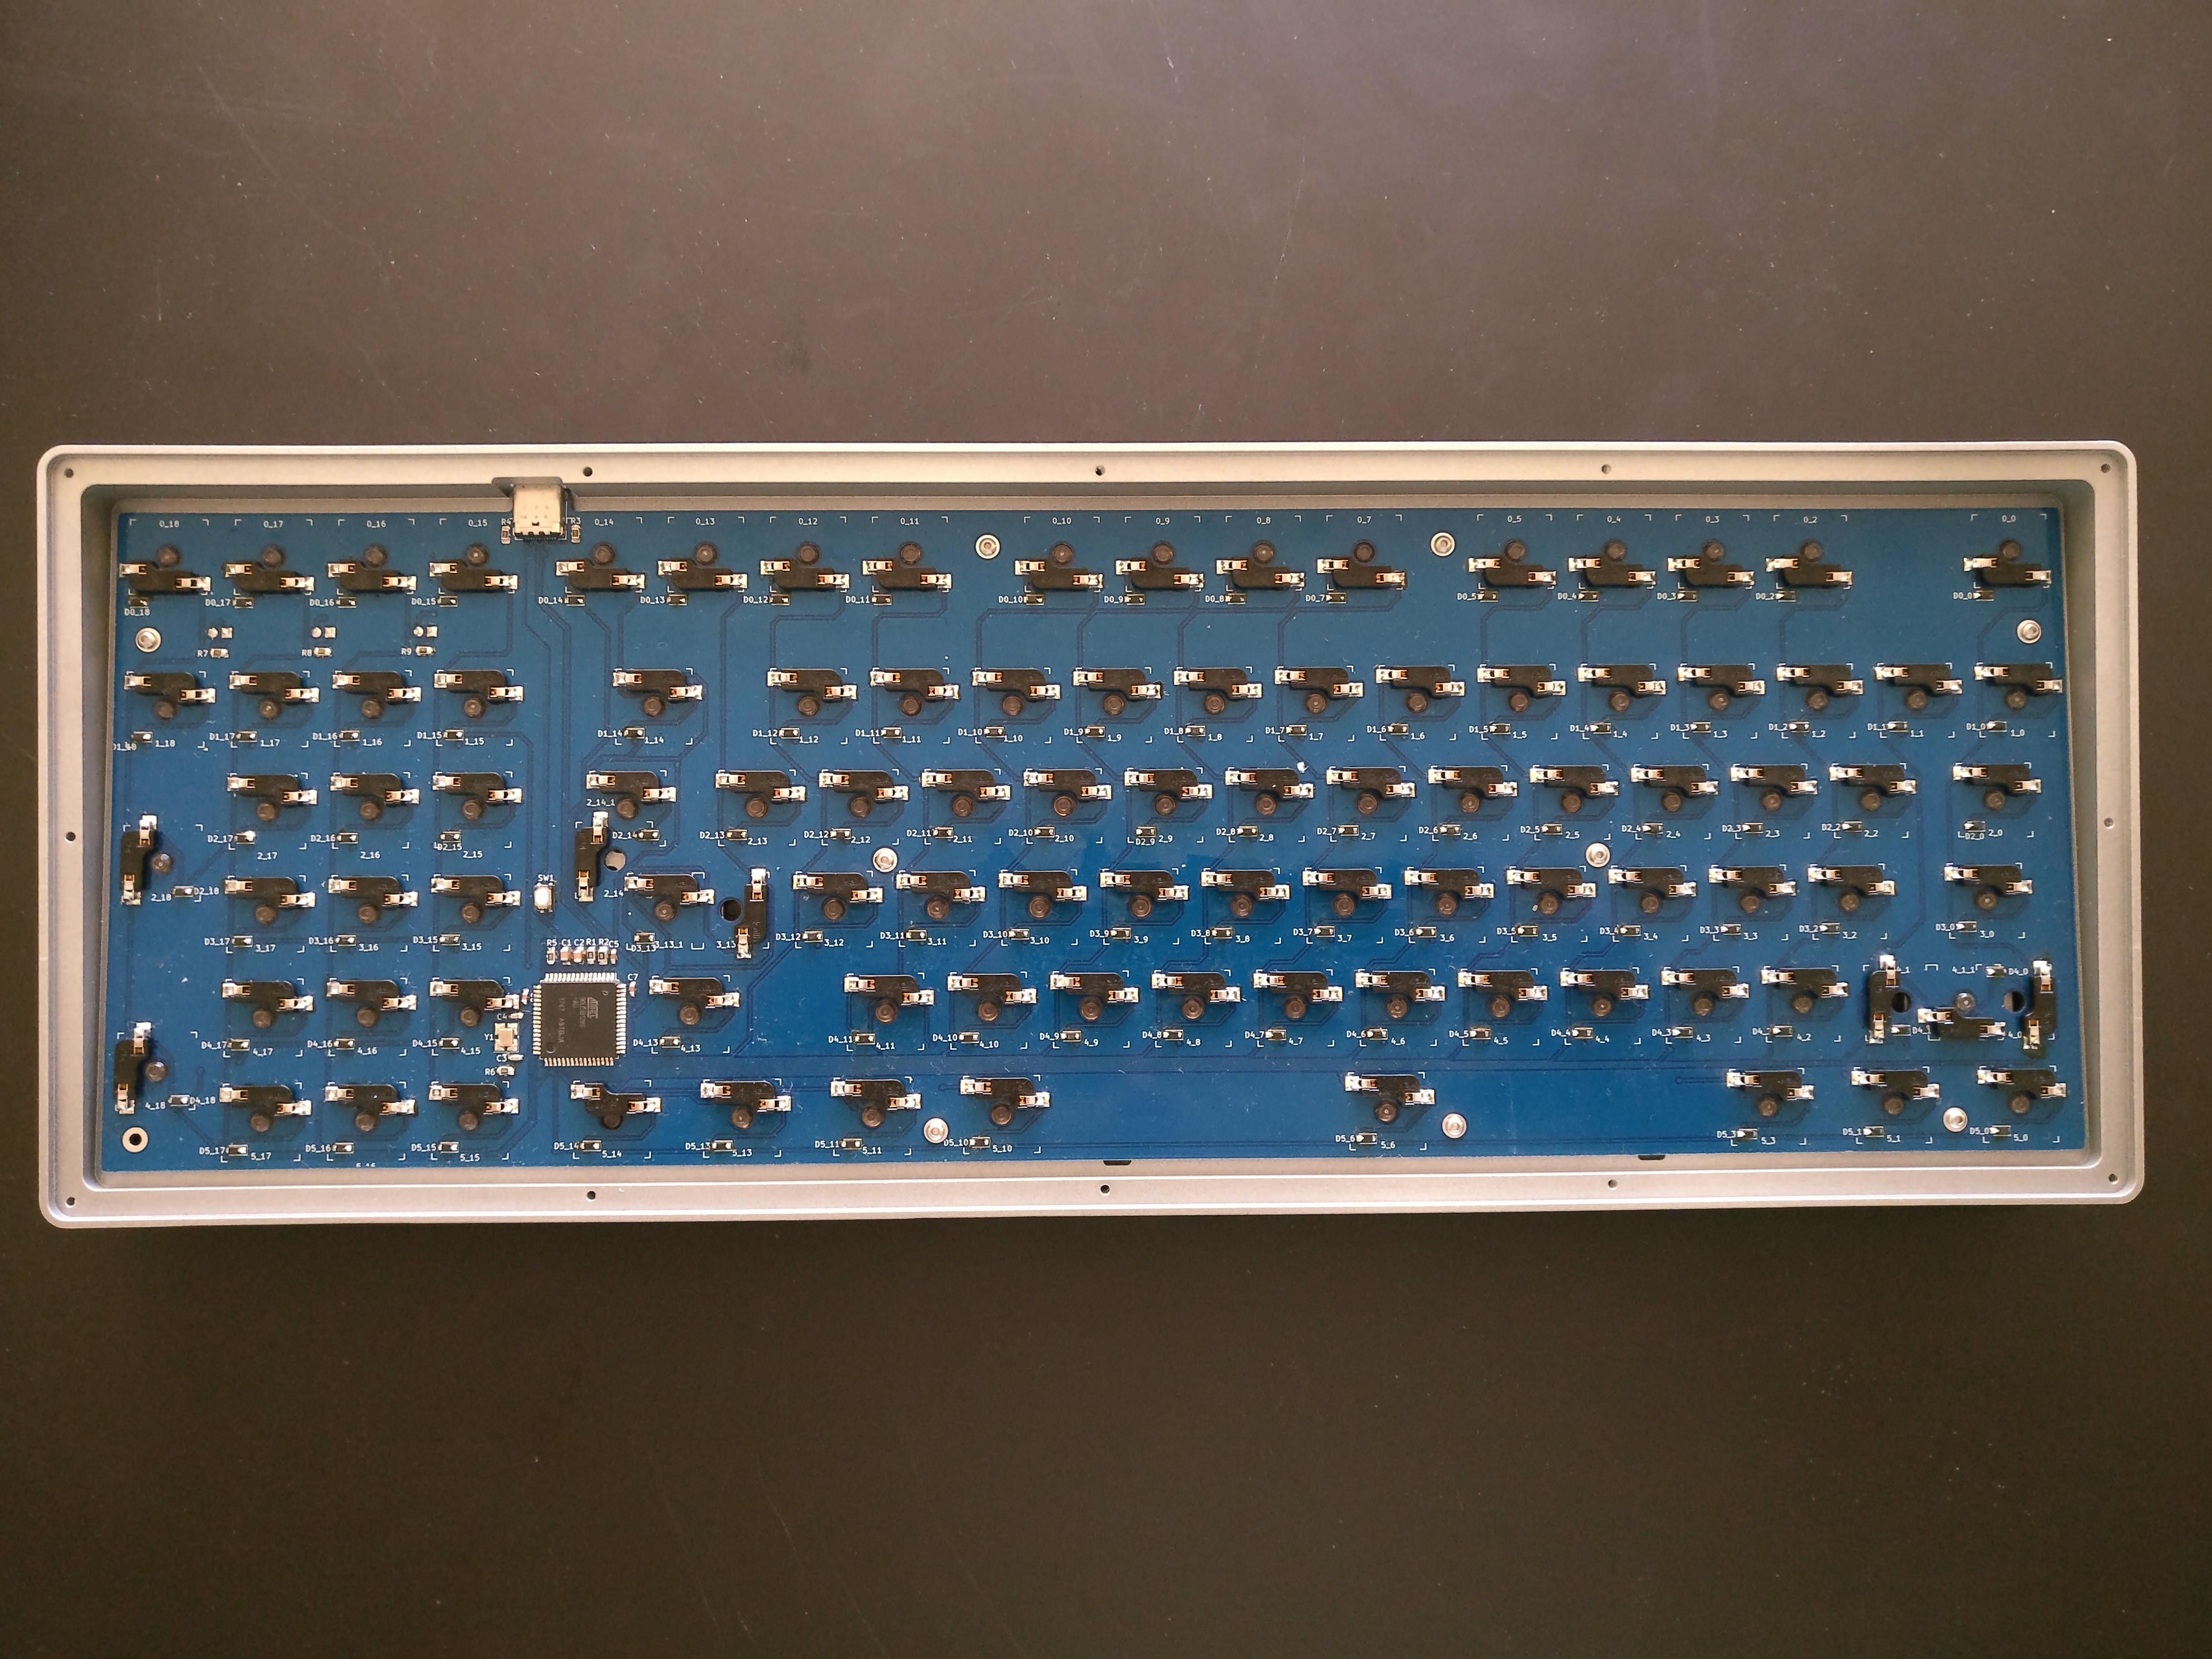
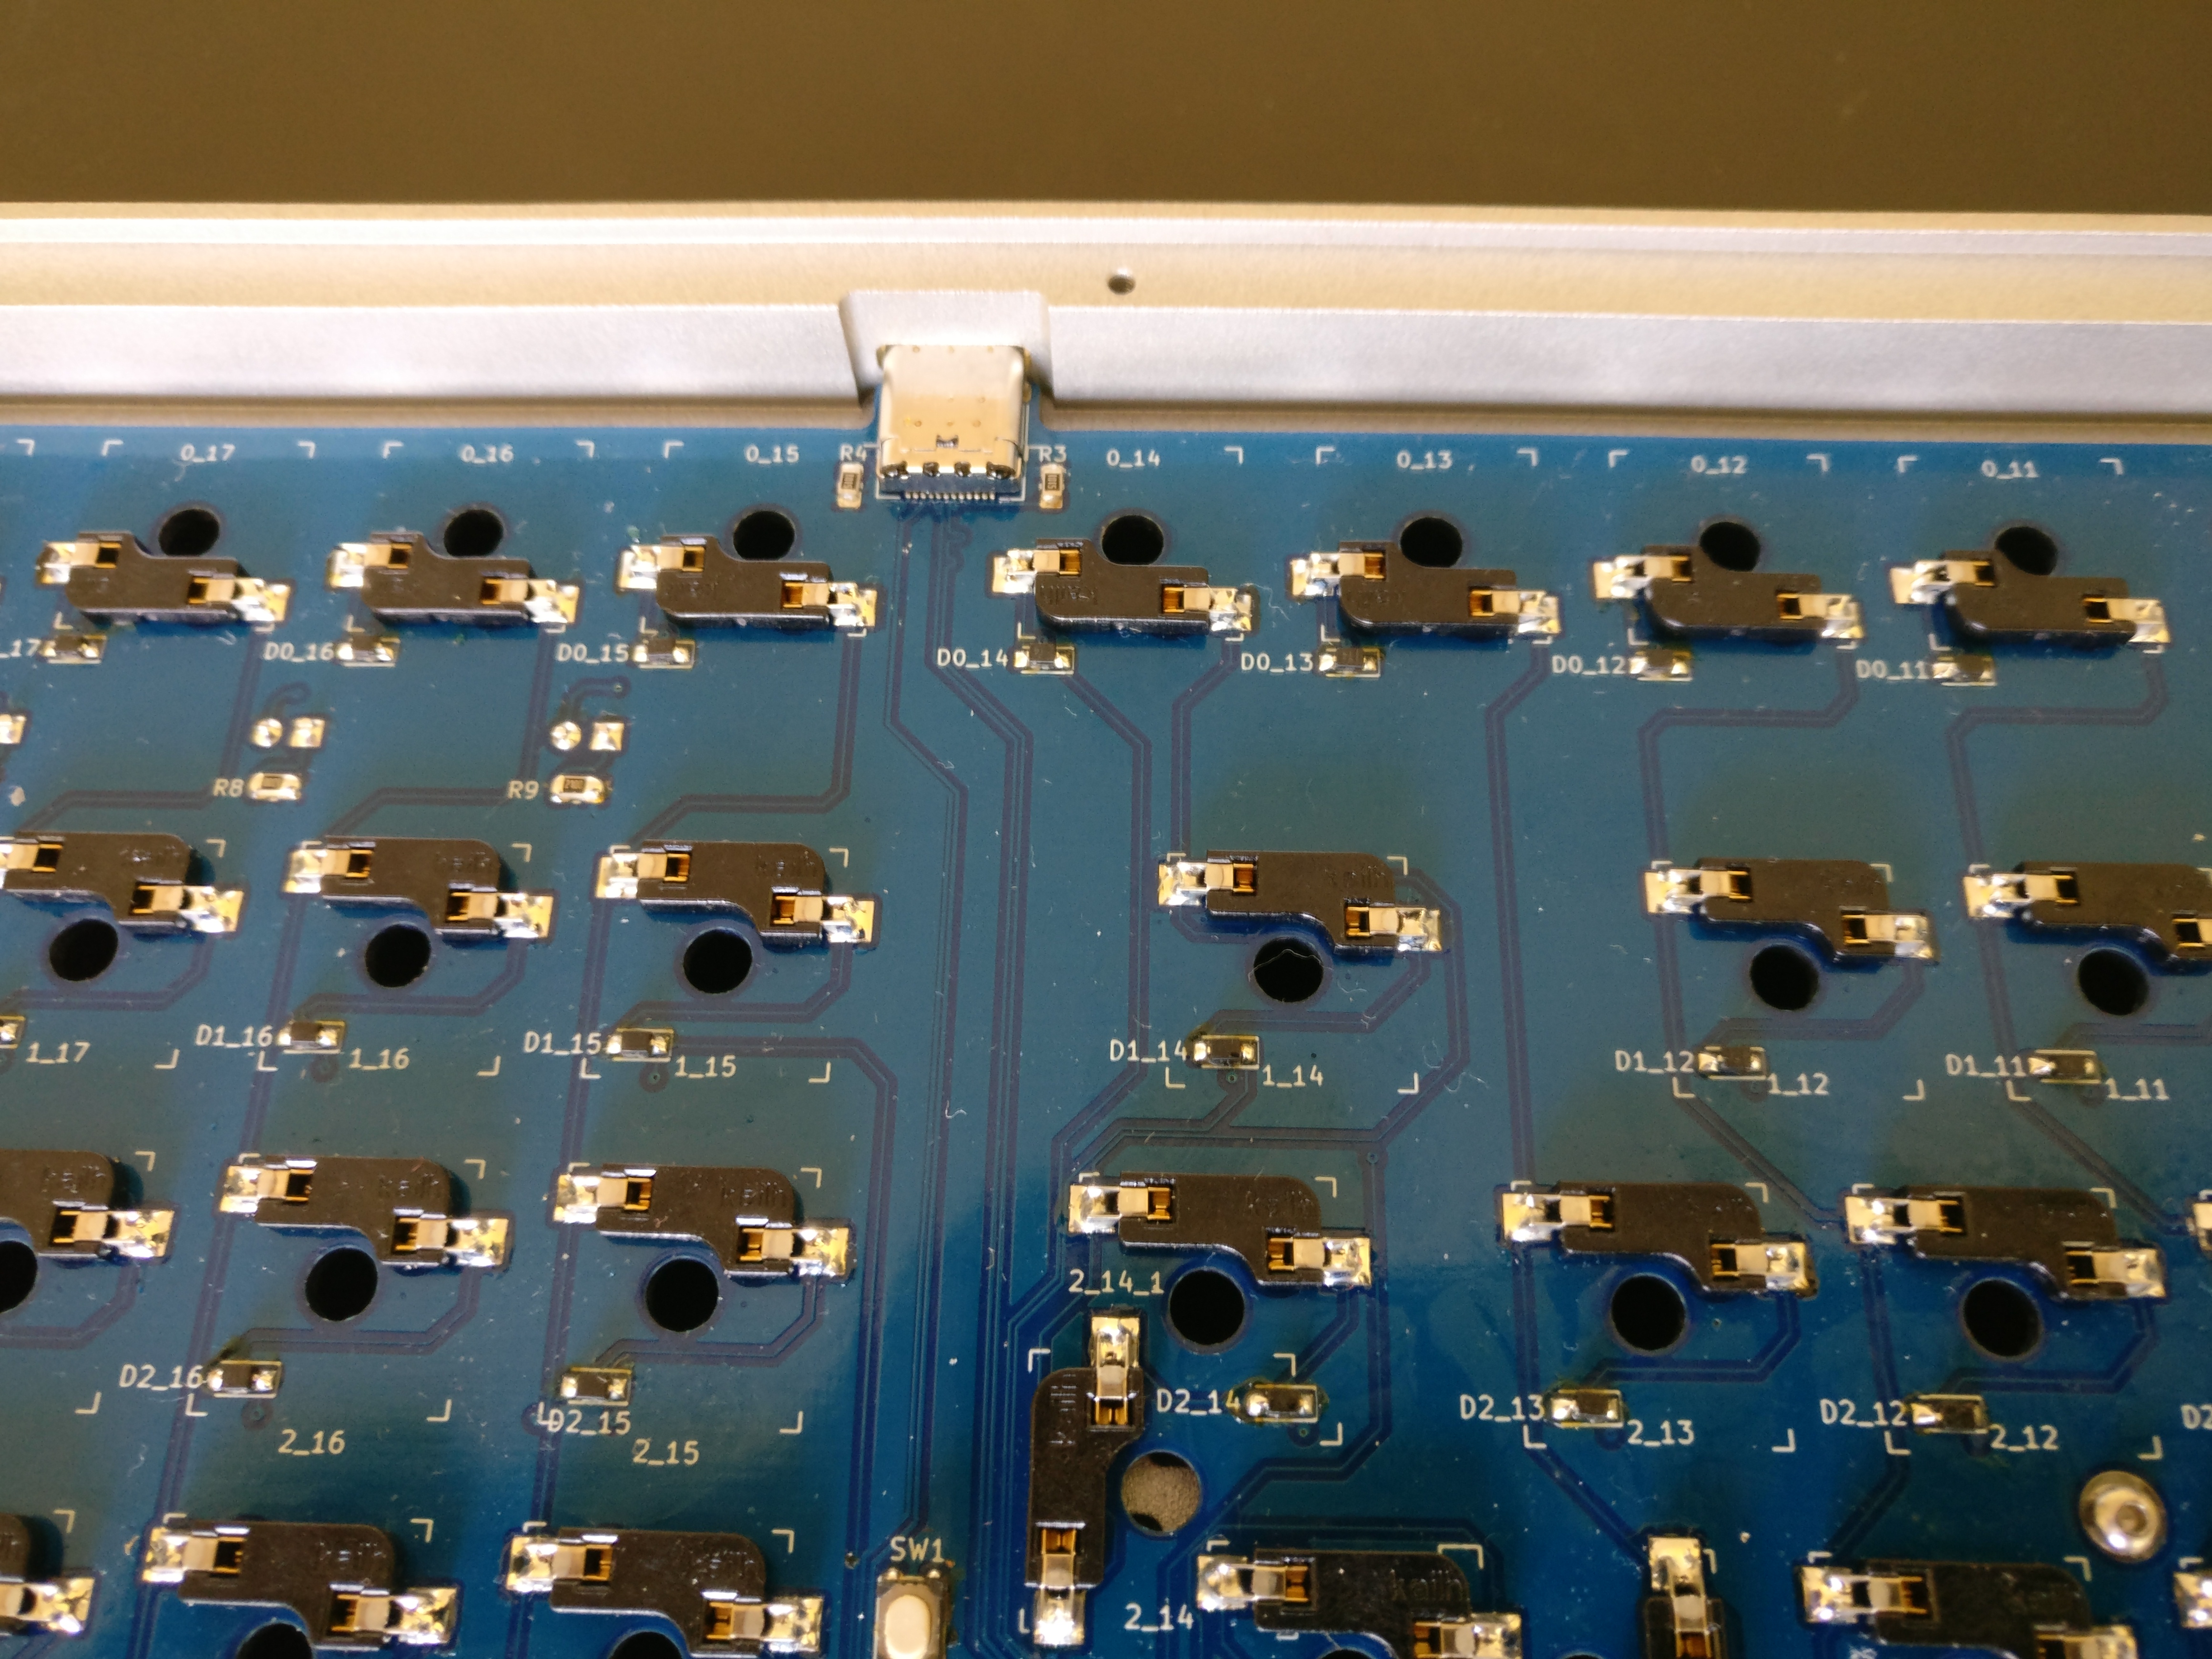
  • Simplest PCB design possible with some features that I wanded to experiment with:
  • QMK compatible: my daily job is programming stuff, don’t want to do that much during the weekend.
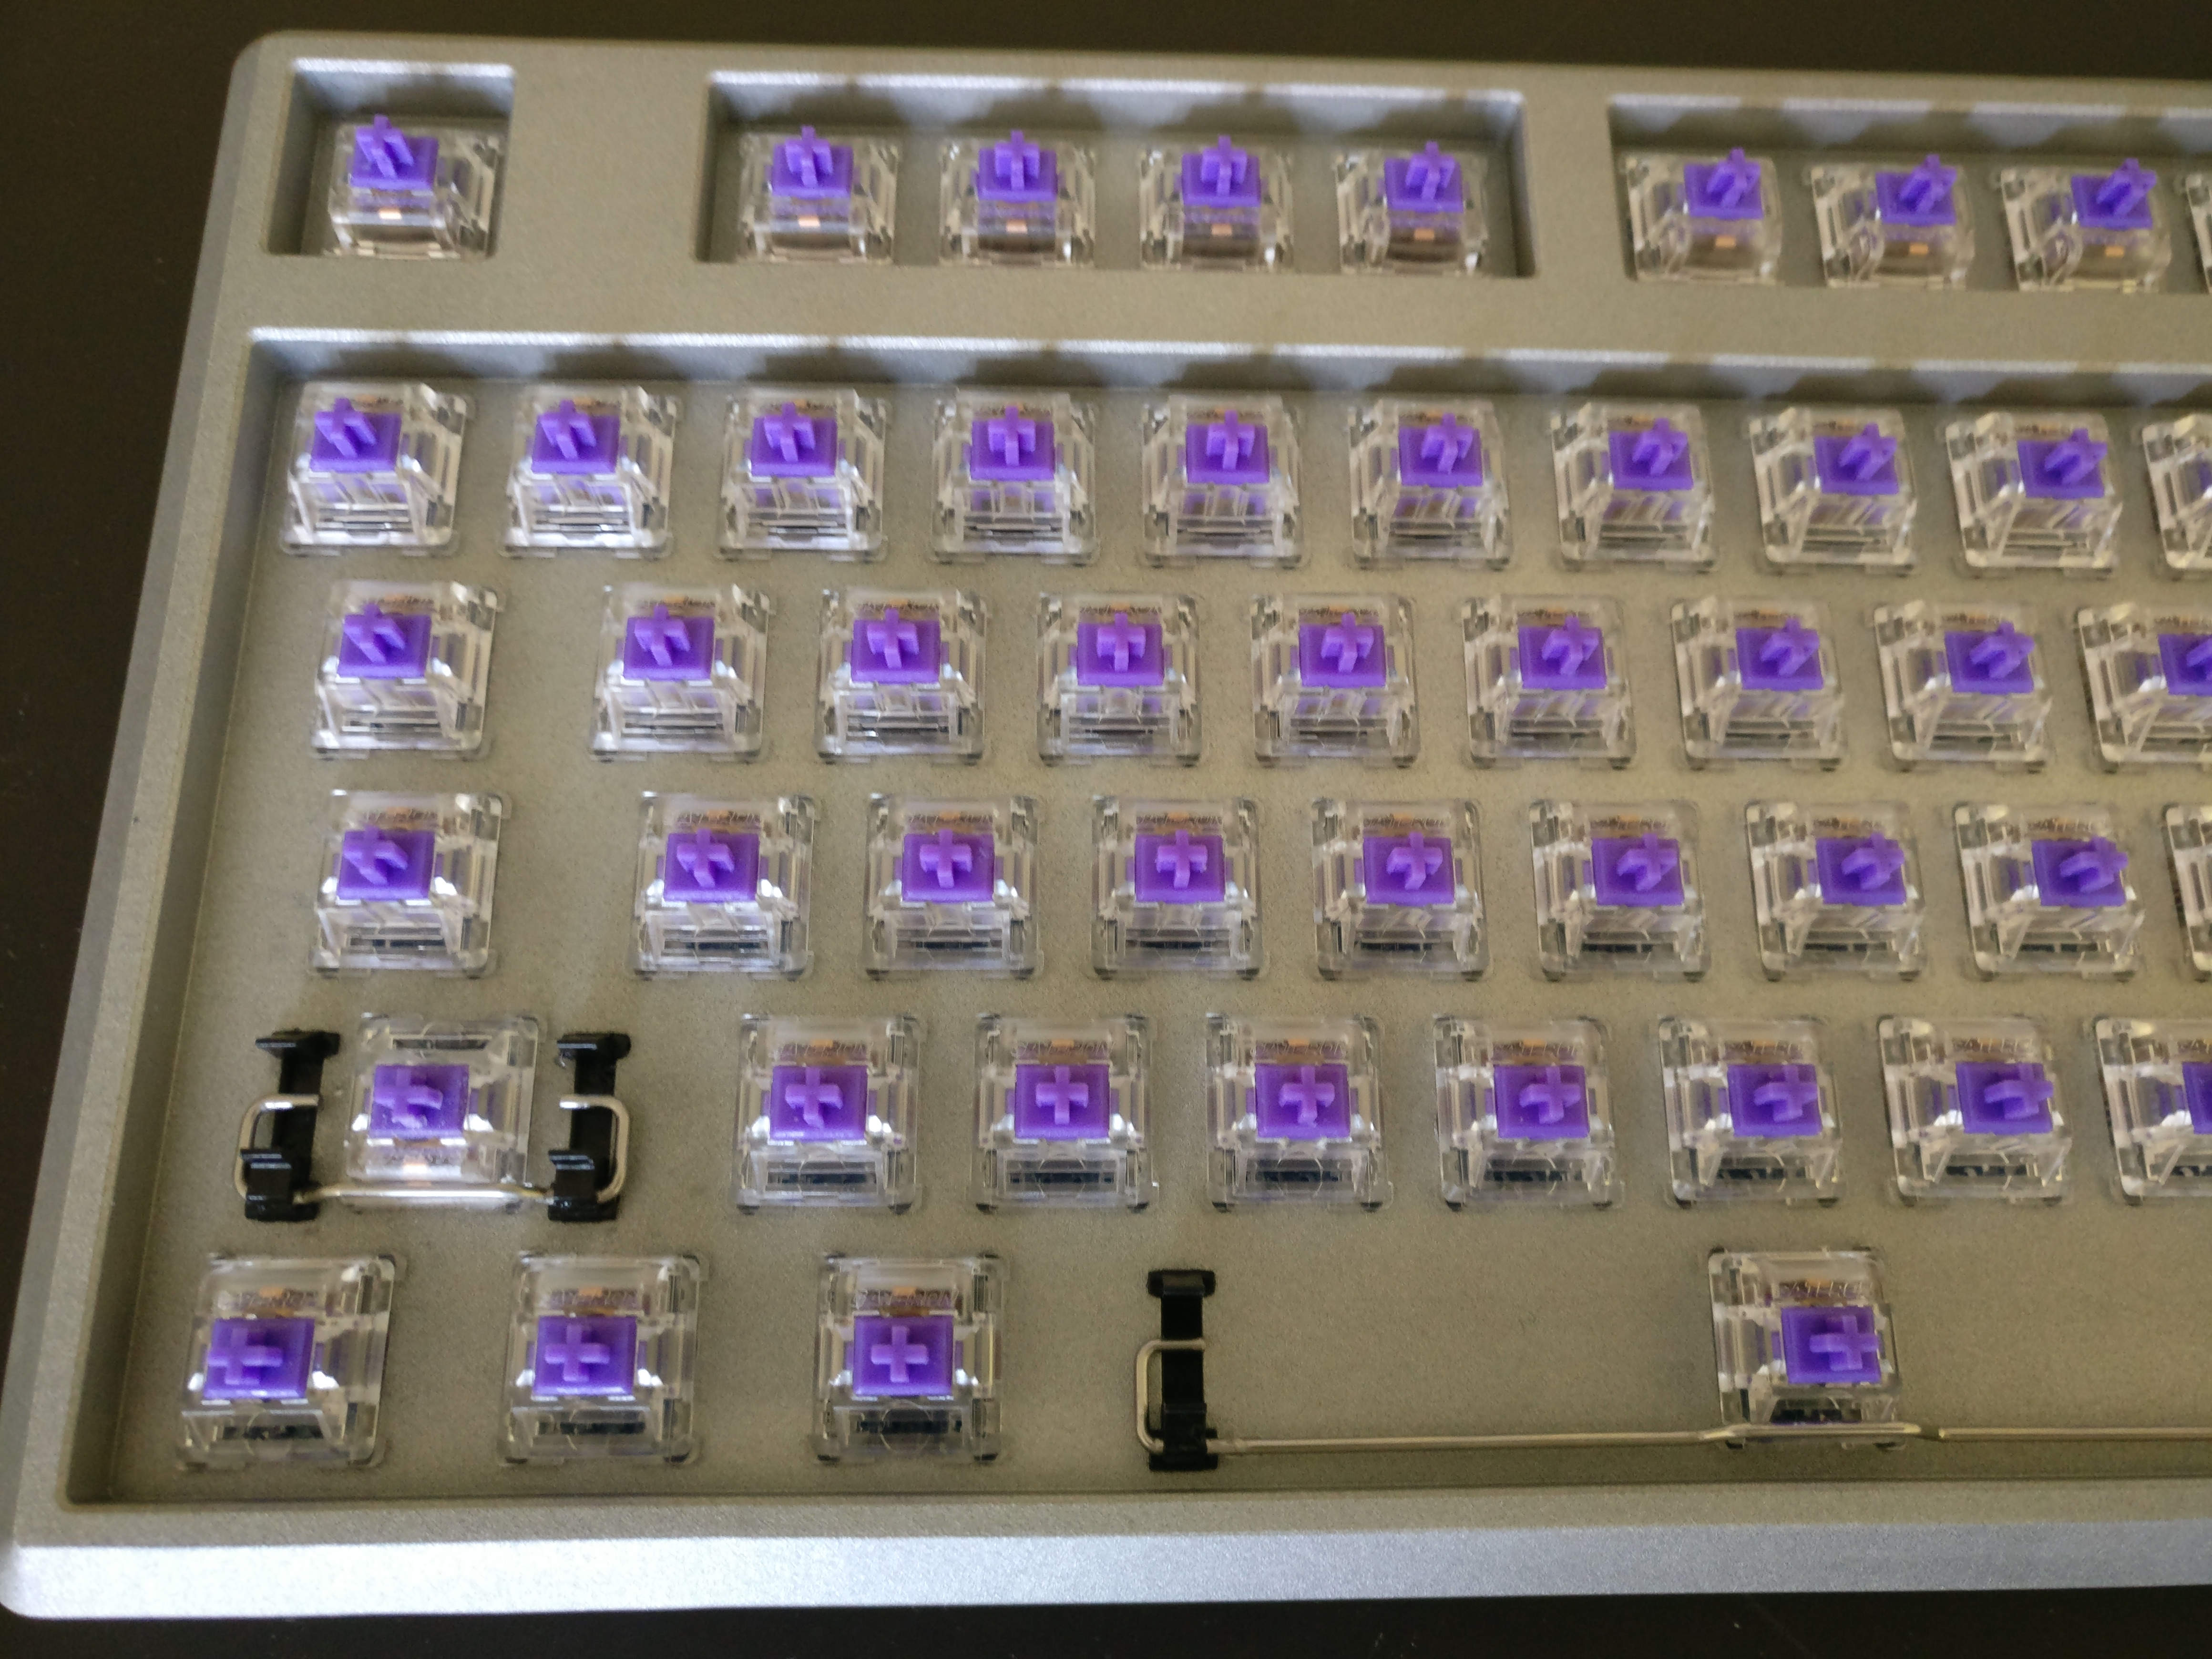
  • Hot swappable using Kailh sockets.
  • ANSI and ISO compatible(yes it’s possible with some constraints), only using ultra standard key sizes (6.25u spacebar only and so on).
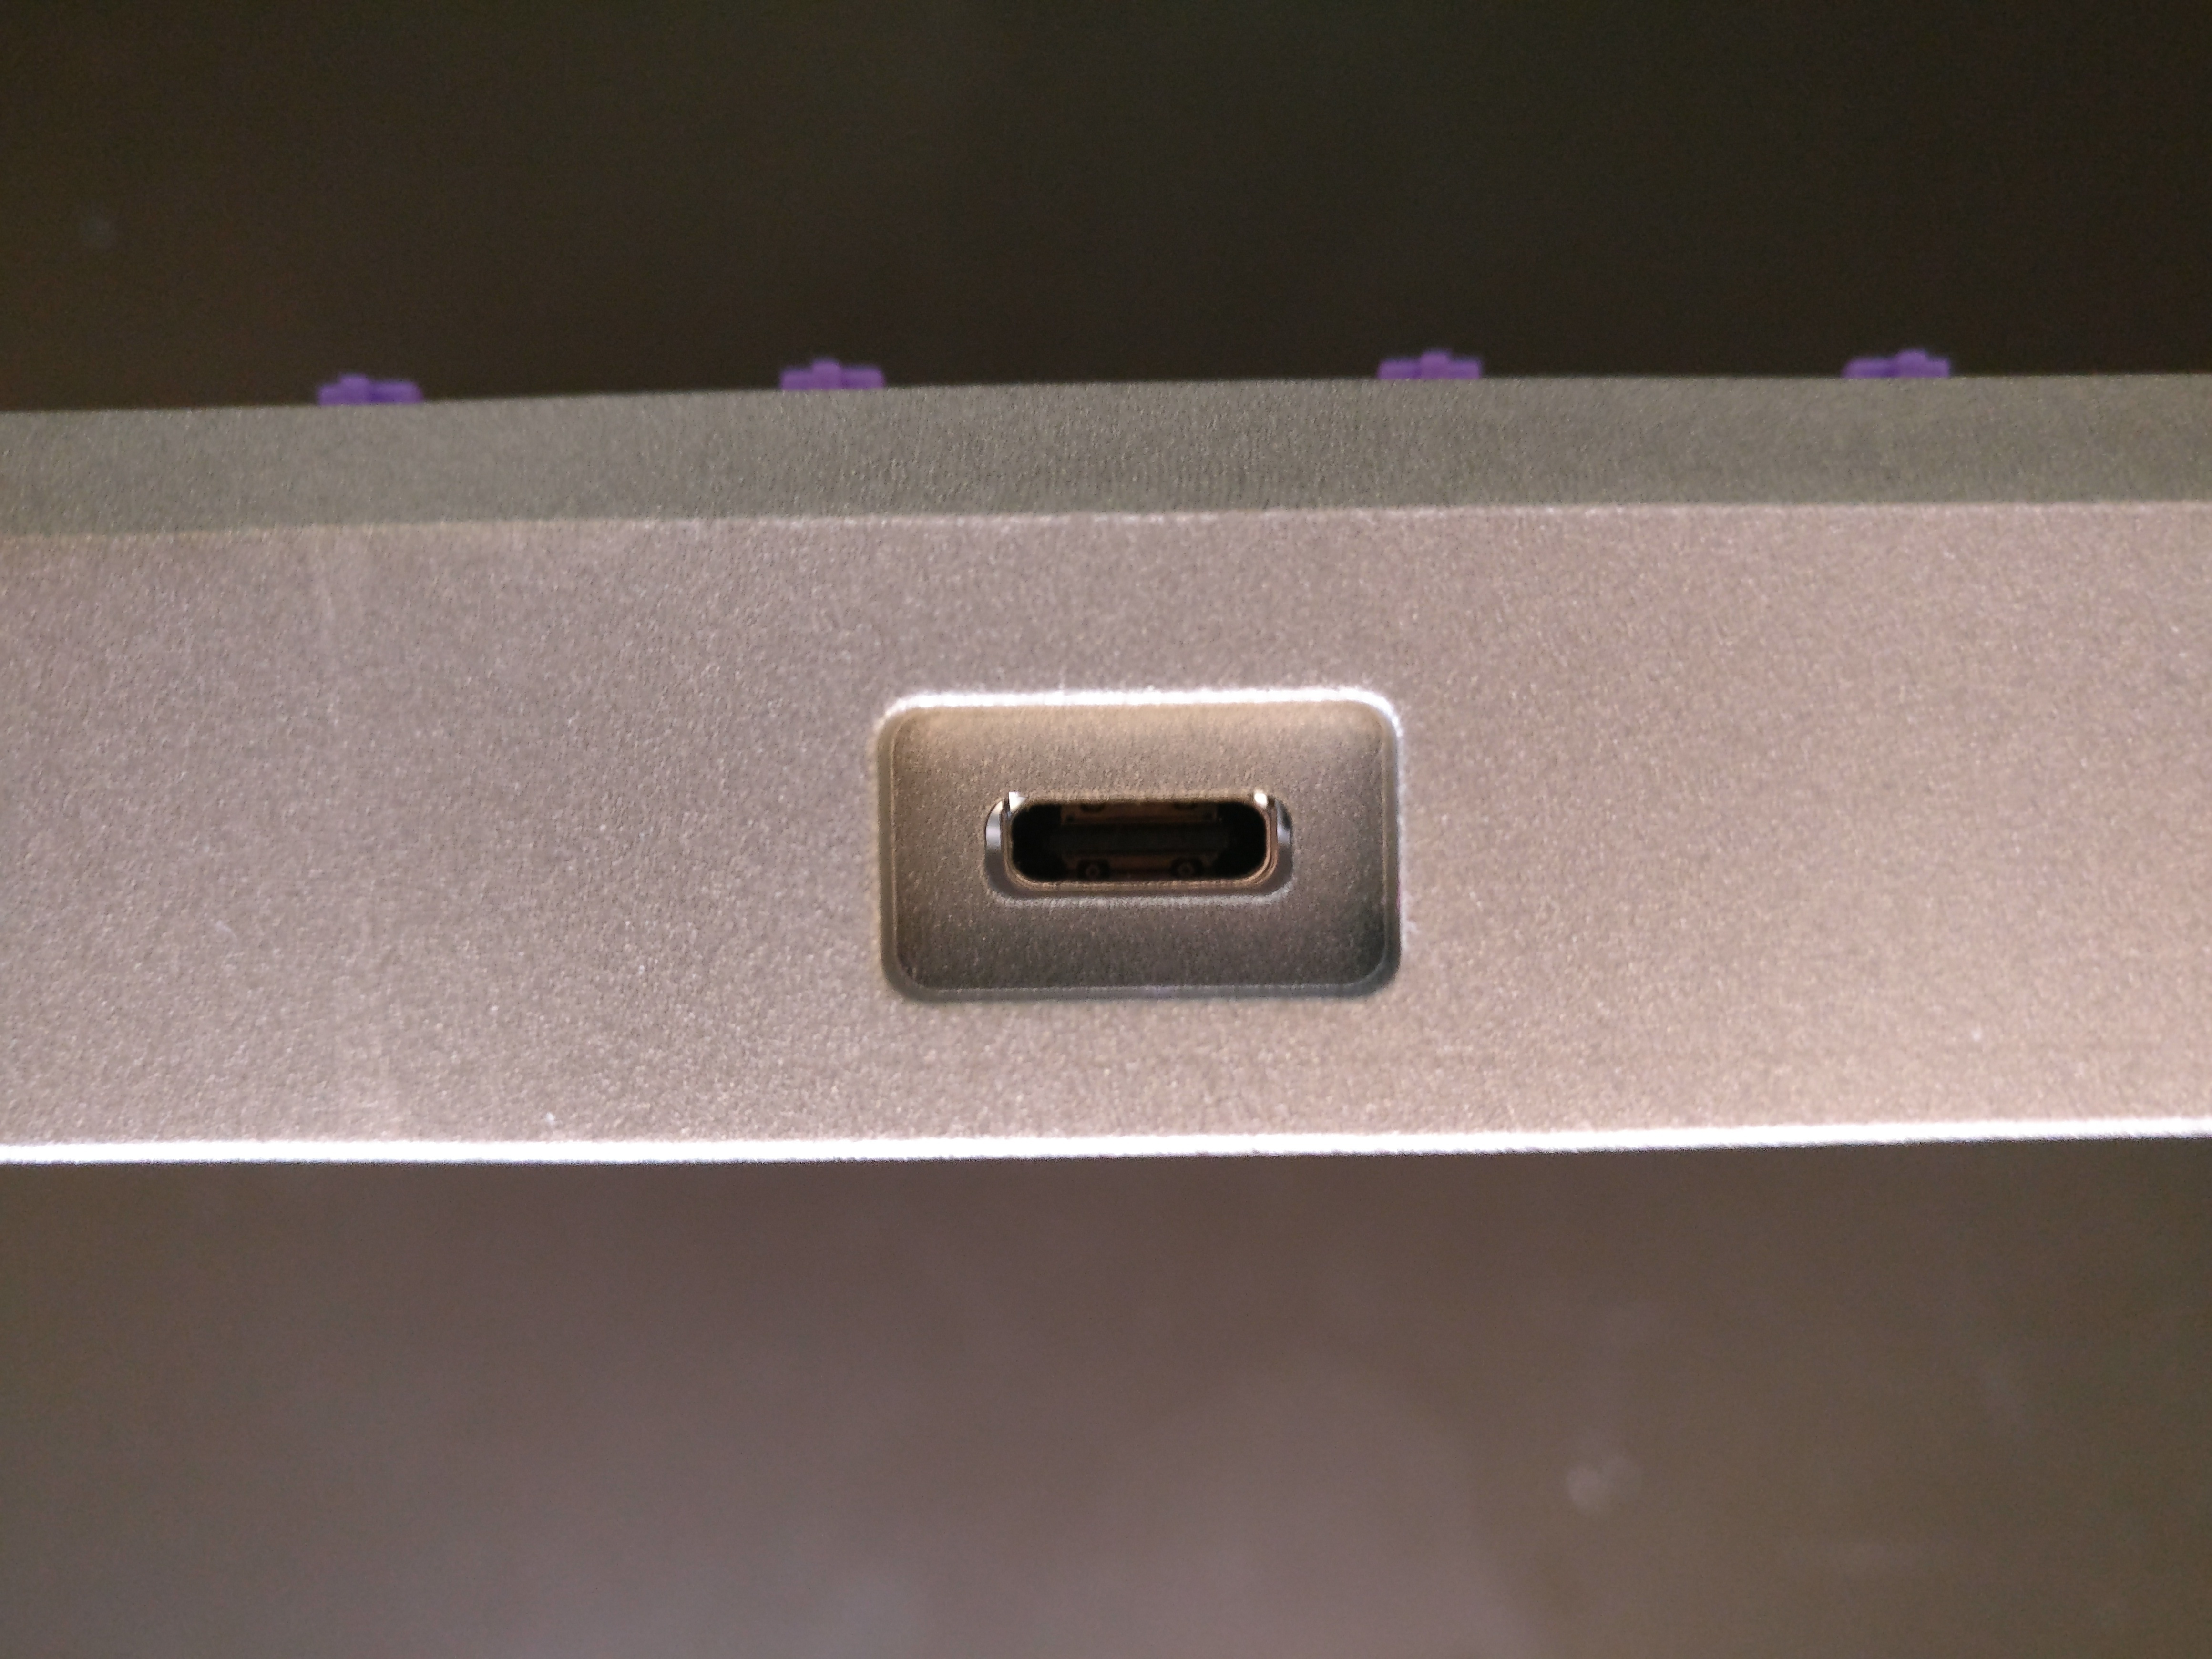
  • USB C connector: may not be “the future” but have always be cursed trying to plug all USB cables the wrong side the first time, sure it happens to everybody also :stuck_out_tongue:
  • No in-switch LEDs:
    • Makes the design more complicated.
    • Don’t see the use ( a keyboard is not a Christmas tree :stuck_out_tongue: ).
    • Still could be added on later revisions.
  • No RGB underglow for the same reasons.
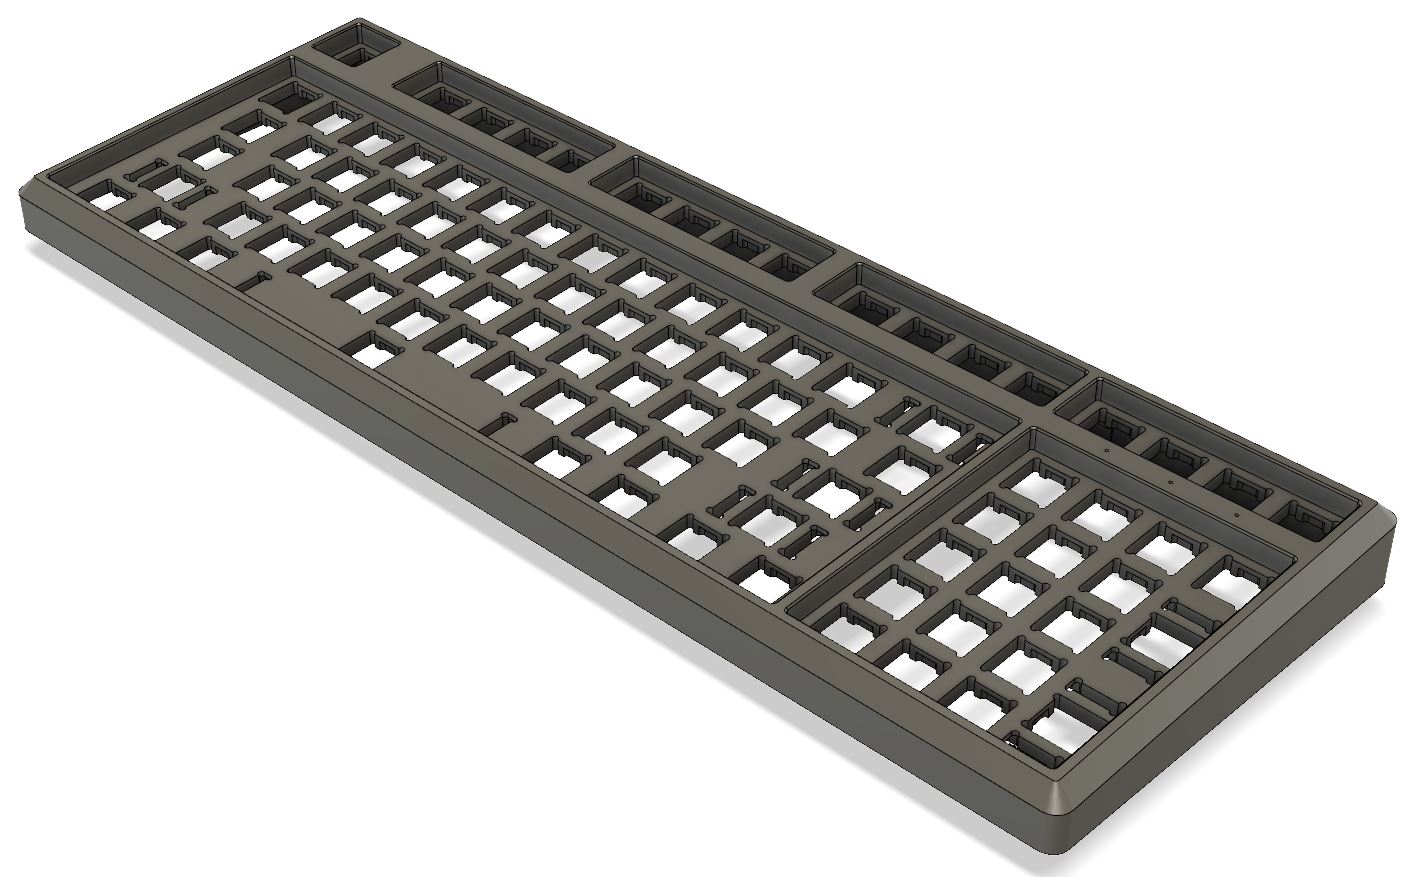
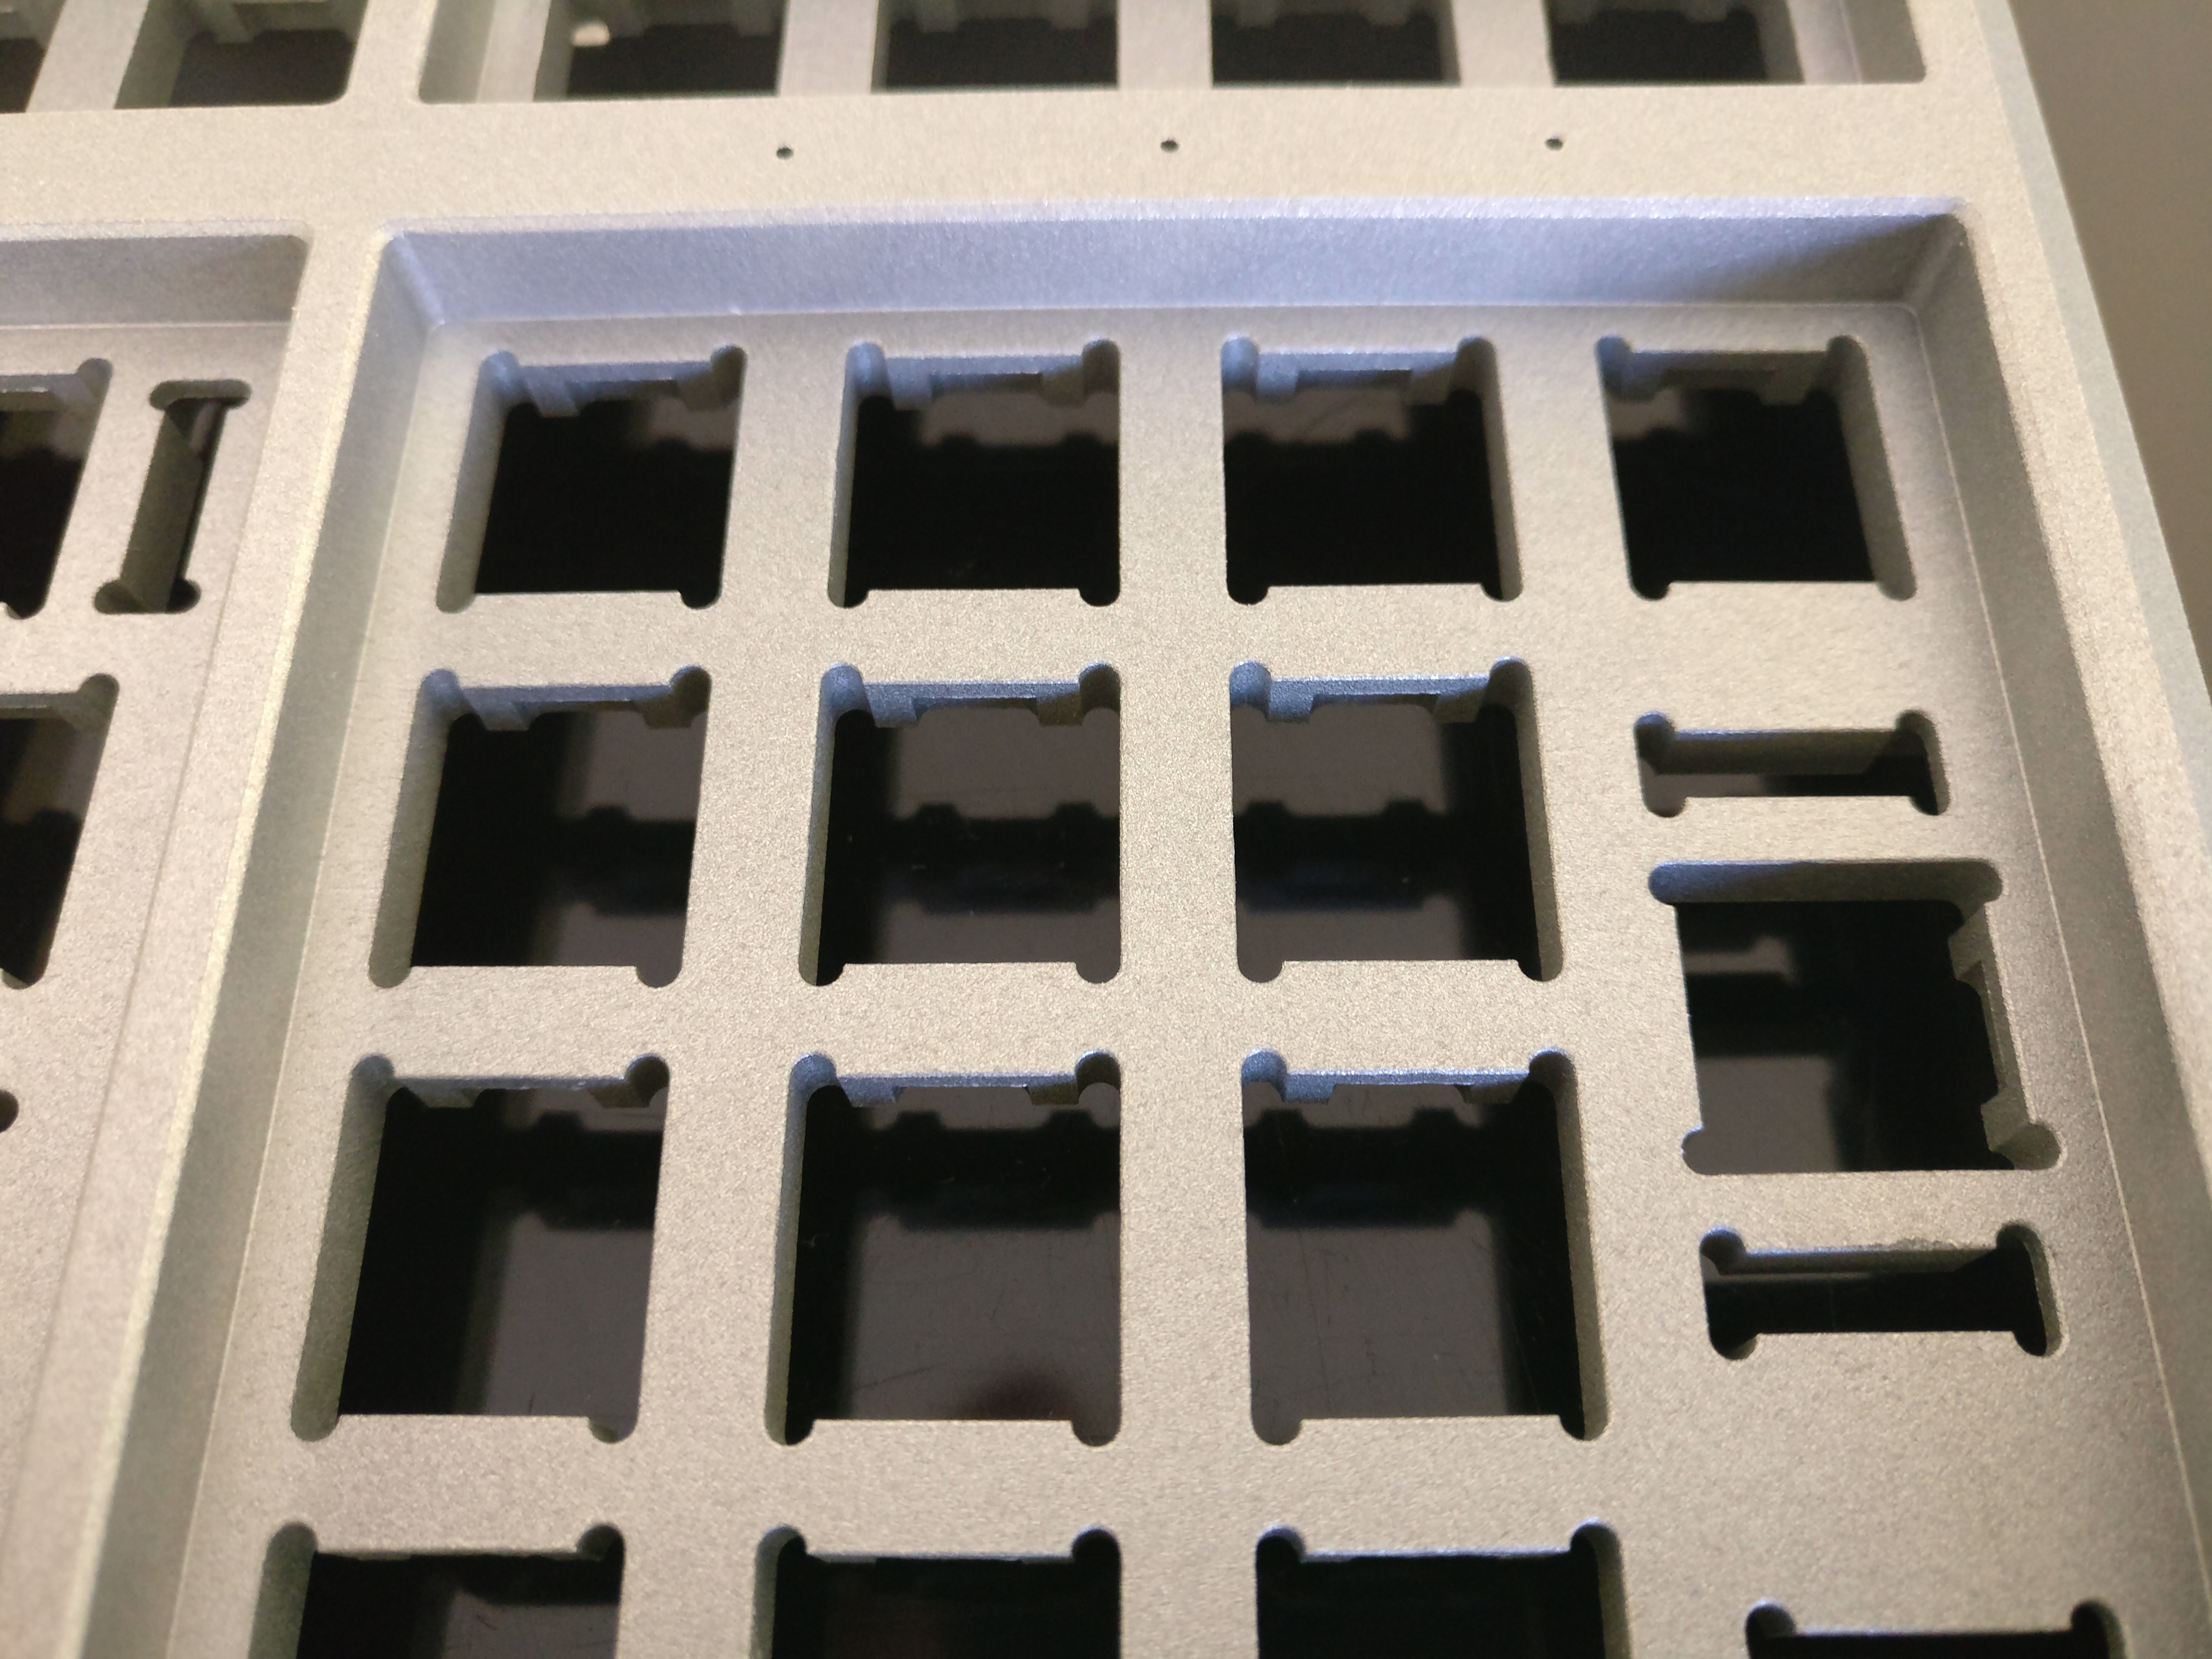
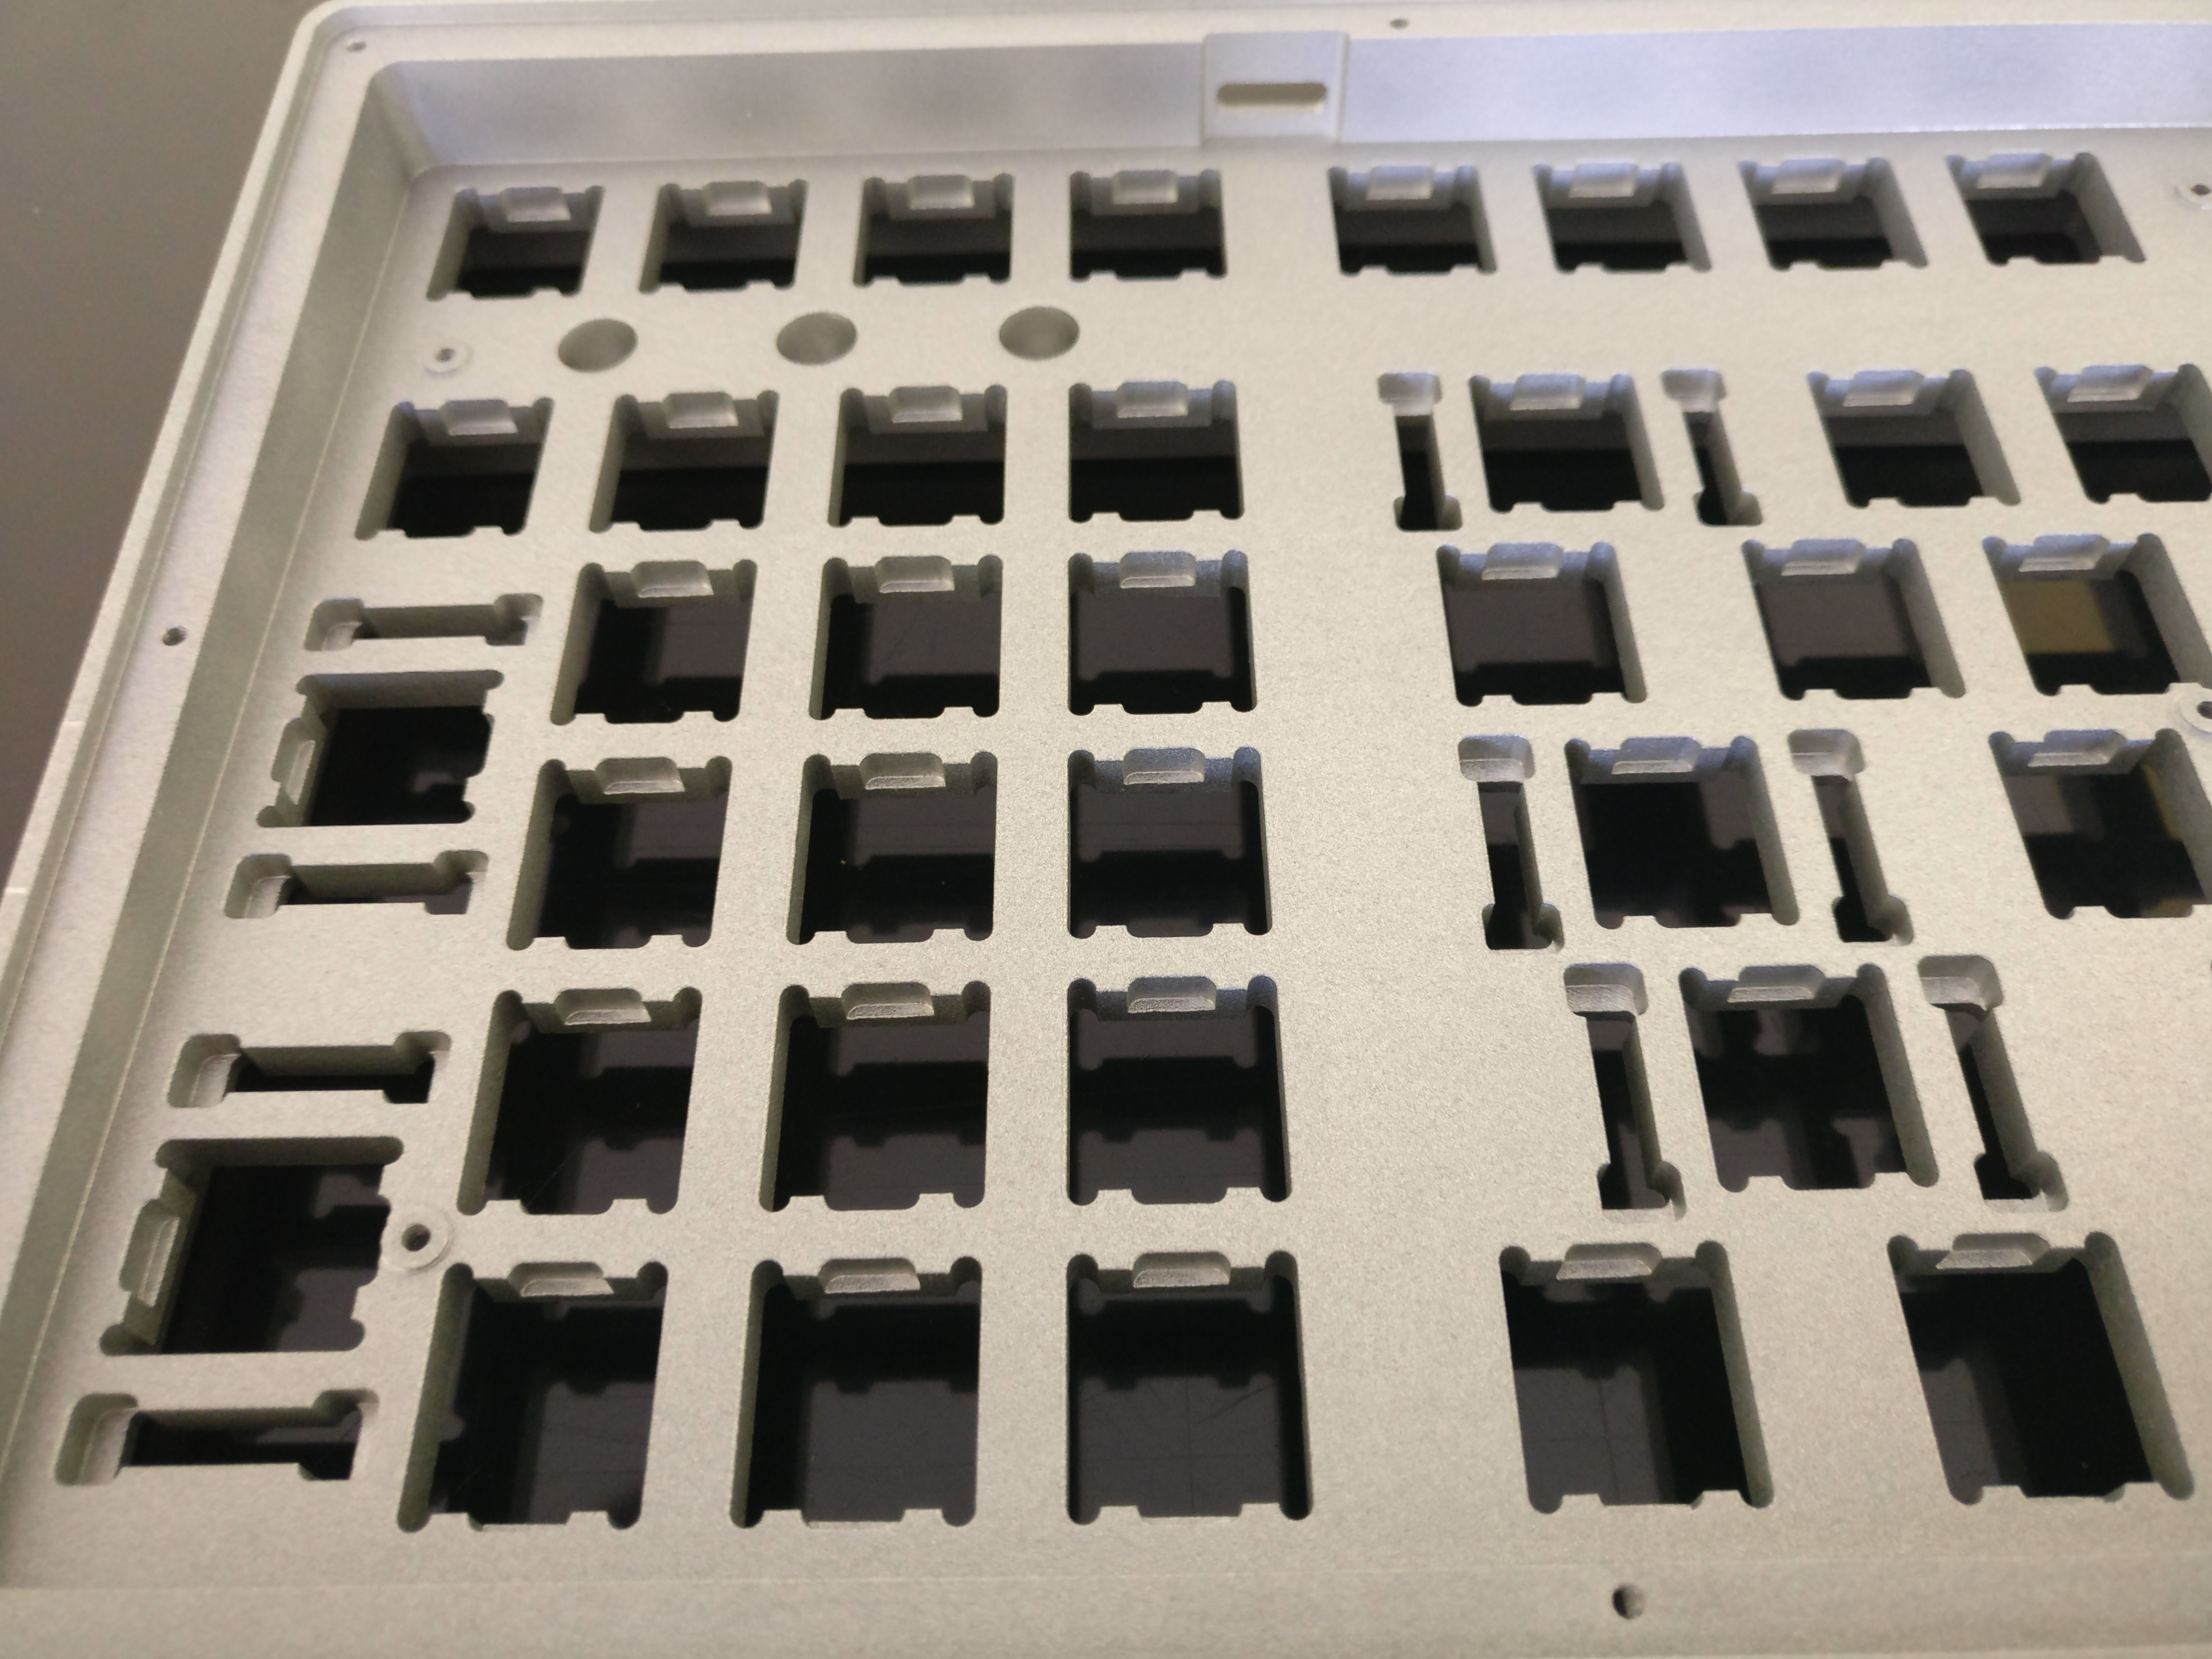
  • Simple CAD case design:
    • Because I’m learning Fusion 360.
    • Doesn’t mean it will be awfull looking :wink:
    • Still it is an integrated plate design, ANSI only (for ISO I will need to make changes to the case design).

Here is a quick summary of the project status:

  • One PCB prototype with an early QMK firmware working:
    • I failed 3 boards and the fourth one went right.
    • Pfff! only one spare PCB remaining :smiley:
  • Case design finished and sent to CNC manufacturing:
    • This one is a BIG unknown as I’ve never done that before.
    • I cross the fingers :wink:

Please note that this is NOT an interest check or a group buy proposal:

  • It seems that this activity is very demanding and stressfull.
  • I have a life, a wife and kids.

But if this works(for the moment it does not as I don’t have it on my desk), I may think of open source it.

For the interested people I will try to give regular updates on the project.

See ya folks!

9 Likes

Interested to see the case. I’ve never used this layout, but I’ve always thought it had a lot of potential.

I can imagine people who need a tenkey also probably use the arrow keys a lot, too. I think i would program the right menu or control to be a function key to allow access to the arrow cluster (one-handed) without turning off the NumLock.

I appreciate the lack of RGB and in-switch leds. Keep it simple. I have so many boards with leds that I don’t even turn on. Ha.

This is ALMOST exactly what I’ve been wanting…

Only downsides for me are lack of backlighting (I’m still not the best at touch typing, and sometimes video games make me have to look at my board), and the integrated plate. But at the end of the day those are just personal preferences for me, I think I’d still like the board regardless.

Hello @pixelpusher!

Yes, I was thinking of activating the numpad with either the numlock key or a special layer that would disable the arrows and activate the numpad by maintaining ALT or CTRL pressed (numpad keys would be deactivated if this layer key is not pressed).
The QMK firmware I have for the moment is very basic, just to validate that the combination of software and hardware works.

1 Like

Hello @hsBlank,

I totally agree with you for the lack of backlighting when gaming, I’m also a gamer :wink:
Even a simple one with uniform color could be useful in this case.
I simply tried not to make my PCB design too difficult or risky for a first try.
Maybe a future revision with leds if I succeed ?

I’m curious to know what is the problem of the integrated plate to you:

  • lack of layout options?
  • too much stiffness?
  • other?

Gathering information is always useful :wink:

1 Like

Agreed, RGB is never a necessity, but I do like light lol…

And yeah my issues with an integrated plate is exactly that, lack of layout options and the stiffness, and also plate material options as well.

1 Like

Having hotswap pretty much limit the layout options already.
As for the stiffness I’ll see if it suits me or not, I’ve never typed on such thing before :wink:

When this project will be finished I may start another one with standard plates and with flex in mind :wink:

1 Like

I’m giving an update to the project.

I started designing the PCB based on the selected layout late 2018.
The tool used for that task is Kicad, a great piece of software that is free an open source.
I my previous projects (non keyboard related) I used Kicad V4.x because of it’s recent addition (at that time) of tracks push and shove feature.
It was great but the feature was not very stable and I was experiencing random crashes :s
This time I used Kicad V5.x and this version is very stable :slight_smile:

I added in the schematics all features that I wanted:

  • USB C connector
  • an Atmel AT90USB1286 CPU (supported by QMK) because I needed quite a high number of pins for the switch matrix.
  • 3 status leds.

Here is the shematic

The PCB design has been more difficult to me, not because of the number of components but because key switches footprints have to be placed very precisely.
Not wanting to make programming/scripting stuff at home I stupidly did that task all by hand using a calculator, it took ages to do and to double/triple check that every key was at the right place.
Next time I’ll write a Python script to do this task, based on raw data of KLE tool.

Here is the Kicad view

I did a few mistakes that I discovered only after having PCBs manufactured.

The first one is I displaced by mistake one of the pads of the reset switch while doing track routing :frowning:

The second one it that one of the mounting holes was exactly were one of the stabilizer cutout is supposed to be :frowning:
Already moved it at another place but it is too late for PCB revision 1.

None of these errors are critical:

  • The reset switch is working fine, but only soldered on 3 legs instead of four.
  • I’ll have to do with a missing PCB mounting hole, there are still plenty remaining.

Here are taken pics of the soldered PCB with status leds still missing.
This one is working fine on my PC with an early QMK firmware flashed into it.
USB C connector has been soldered using a cheap Chinese hot air station, the remaining components have been soldered by hand.

When I saw it working I was of course very happy but also said to myself “well it was not that difficult” :stuck_out_tongue:
While in fact it has been a real pain in the ass :smiley:
I fucked up 3 PCBs before having this one working …
And not taking into account the time to solder all those components …

By looking at the pics you may have seen that the PCB is both ISO and ANSI compatible.
To be able to do that I removed as much holes on the PCB as possible, most notably Cherry stabilizers mounting holes.
So the remaining stabilizers options are only plate mounted, not a big problem because I decided to used Costar stabilizers.
Cherry plate mounted stabilizers should work fine also.

See you later with, I hope, good news for the case manufacturing (still being manufactured)!

1 Like

Hi…I can imagine people who need a tenkey also probably use the arrow keys a lot, too. I think i would program the right menu or control to be a function key to allow access to the arrow cluster without turning off the NumLock.

Hello LionHo,

Yes people who use tenkeys often make heavy use of arrows.

As a programmer I use the arrow keys constantly and often with a combination of other keys so these must be active by default for me.
The numpad is also very useful for my job but used less frequently so I plan to make them available only by pressing a function key(I selected LALT as of now).

When the function key is not pressed the keyboard act as a tenkeyless and other numpad keys are disabled.
When the function key is pressed the tenkeyless keys are disabled and the numpad keys are activated.

A short update on the case design done on Fusion 360 with some images to get a better idea.

I wanted the case to be:

  • High profile to not see the bottom of the switches.
  • As low as possible for a high profile.
  • Integrated plate design with as little holes as possible.
  • A small angle slope to help my old wrists.

So I went with the following:

  • Unibody design with integrated plate.
  • Small 3 degree angle slope.
  • Front of the case only 17mm tall.
  • Simple 2mm (or thicker) laser cut back plate.

Here are some pics:

case_right

I just received the case from the CNC manufacturer :slight_smile:
I will post pics of the real deal soon :wink:

2 Likes

man that’s REALLY cool, love the case and the layout !

Thank you :slight_smile:

I went a little bit overboard with this first try.
I’m inspecting the case at the moment, searching for design errors.
Already found some but fortunately they can be fixed with a little bit of tweaking.

I have some potato shots of the case :wink:
As a non expert, for me CNC machining looks to be extremely well done.
The silver anodization is not perfect, you can see some problems on the pictures but globaly it’s ok for a manufacturer were CNC machining is it’s primary job, not anodization.

2 Likes

Now start were I have to check if everything mechanically fits.

Do the PCB fits correctly in the case?
Can it be screwed?
Do the USB port fits correctly in it’s opening?


Good:)

Now to check if Costar stabs and Cherry switches fit.
I bought Zelios V2 62g that I lubed according to the precious guidances of @Walkerstop in this forum.
I highly recommend having a look at his posts.
Thank you so much man!

Seems to fit, now on to finalize the firmware to do some typing test :stuck_out_tongue:

8 Likes

Excellent work! That looks really nice :grinning:

Wow, I love this keyboard and the way you’re using the layout!

I do something similar with my 980m, when number lock is on the number pad is… Well, a number pad! Then when number lock is off the keys behave as is it’s TKL layout.

But now i see from your layout that i could get the same utility without a separate arrow cluster!

Can’t wait to see it with a GMK keyset :smile:

Unfortunately I don’t have any microphone for sound typing recording.
But I’ll do my best to give you my subjective feeling of how it sounds.

1 Like

1800 layout is really nice and it seems that you found a good solution to have Insert/Supp/Home/End/PgUp/PgDown keys a the usual place.

The layout I selected(called TK) is not my invention at all and can already be found on the market: Plum and Coolermaster have keyboards with this layout.

The caveat with the TK layout is that no good aftermarket keycaps manufacturers like SP/GMK/MaxKey are providing keycaps that fully support this layout for numpad section: for example for the numpad cluster you have to either choose Up arrow or Numpad 2 keycap.

It is always a matter of tradeofs…