What's on your workbench today?

It’s a Macro-pad Sunday extravaganza!

In which I try to finish all these or go mad trying.

From Top to Bottom, Left to Right;

  1. Adafruit Macropad
  2. Doodboard Duckpad
  3. Mechwild Murphpad
  4. Clawboard The Sidekick
  5. Key Hive Maypad

I’ve got one more to finish too, but I need to order some parts to complete it so it’s not in this weekends attempt.

12 Likes

Easing out the day at the diner table while the rest of the family is enjoying TV :smiley:

5 Likes

Just for fun!

5 Likes

I don’t know why, but it feels like it’s been forever since I’ve seen one of those cases

2 Likes

Trying some Lychees in the BDN9


Edit: Really liking them so far; the bump is pretty short and waaay up-top, kind of like an Ink Kangaroo, if a little less sharp.

There’s definitely some light metallic noise; not totally certain yet but I think it’s the leaf contacts, and it almost reminds me of how some BOX leaves sound - I’m guessing due to the sharp, short nature of the bump quickly letting the contacts come together. It’s regular and fairly clean; not rattly or noisy like your typical spring chatter. It sounds “mechanical” - like one might expect a generic physical contact switch to sound, if that makes sense.

I look forward to putting these in the KBD67’s and seeing how they fee in a full board; both with a fairly flexy setup, and with a more firm one.

4 Likes

Ring ring ring ring ring ring ring

Banana stabs


Edit: it’s done!

Had they not been in the kit I would have slept on the Banana Splits - but I’m glad I didn’t. I expected them to be identical to the Silks but they do feel a bit different - they do have a sort of creamy quality to the feel, so the name fits beyond just the colors.

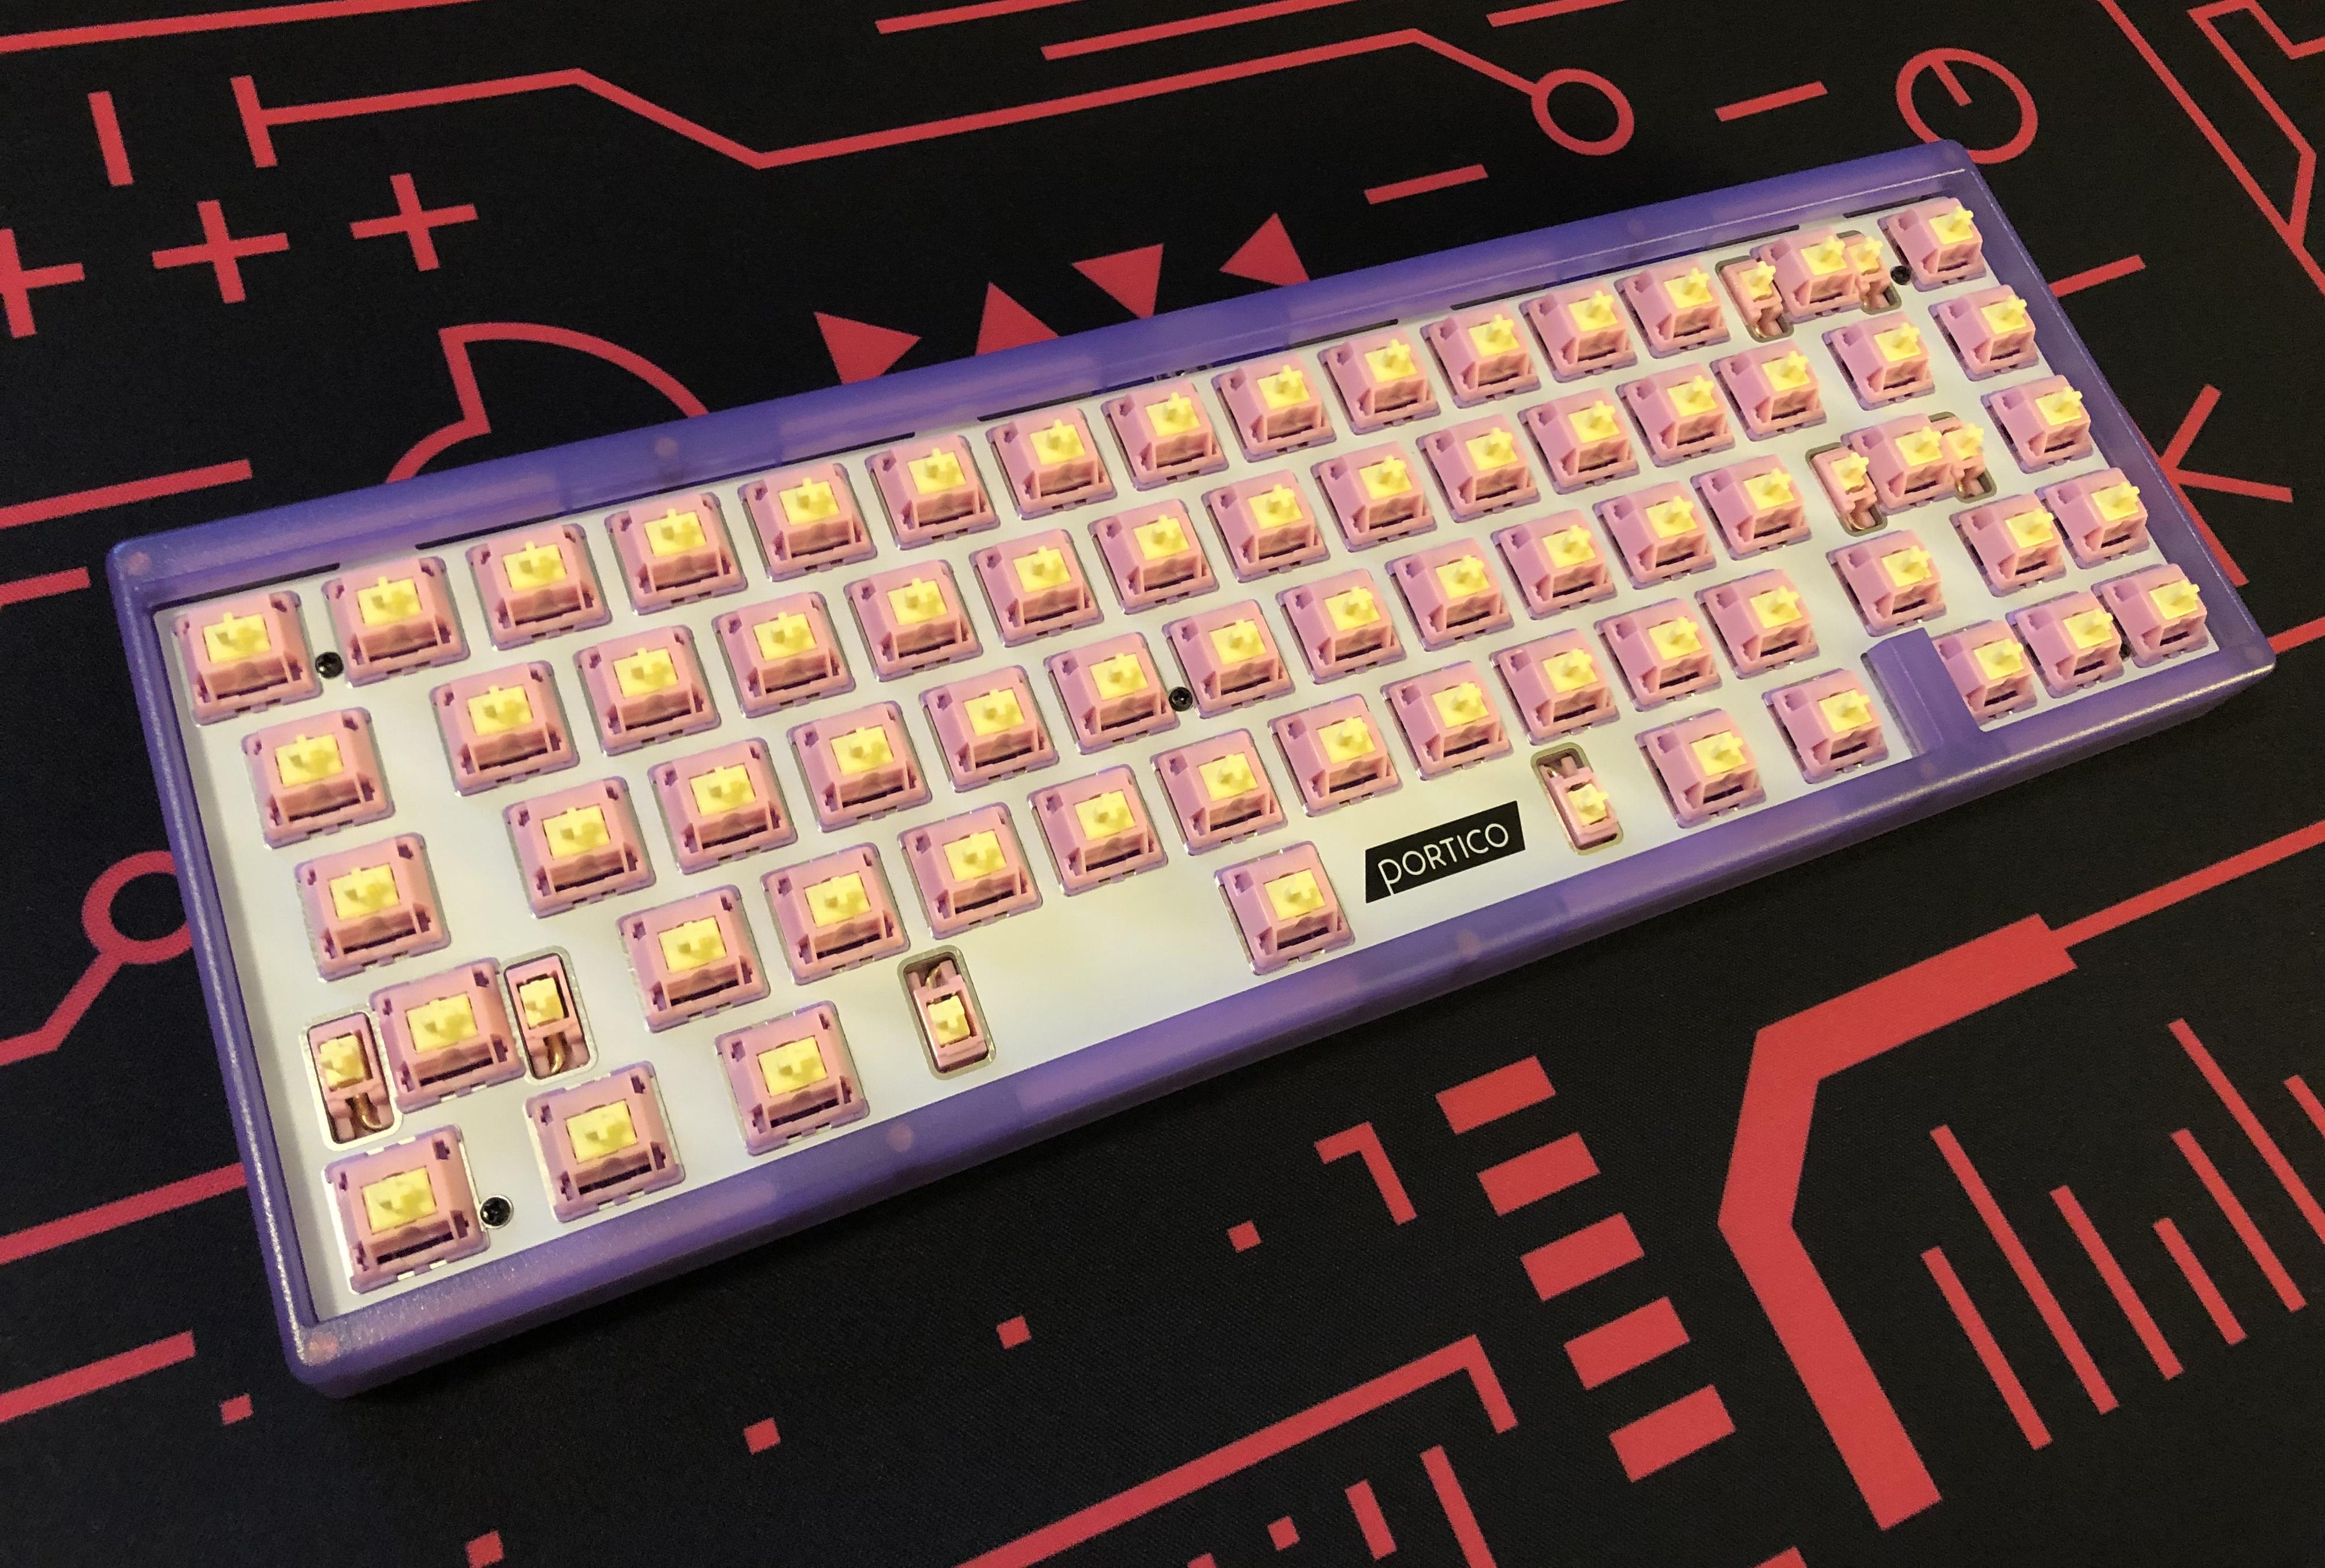
This is my first FR4 plate, and my first time trying this particular implementation of gasket-mounting. I am totally pleased on both accounts.

Squishy bois and an apple snacc

I also tried my own take on a mod I’ve seen done a couple different ways lately, and I’m super happy with how that turned out.

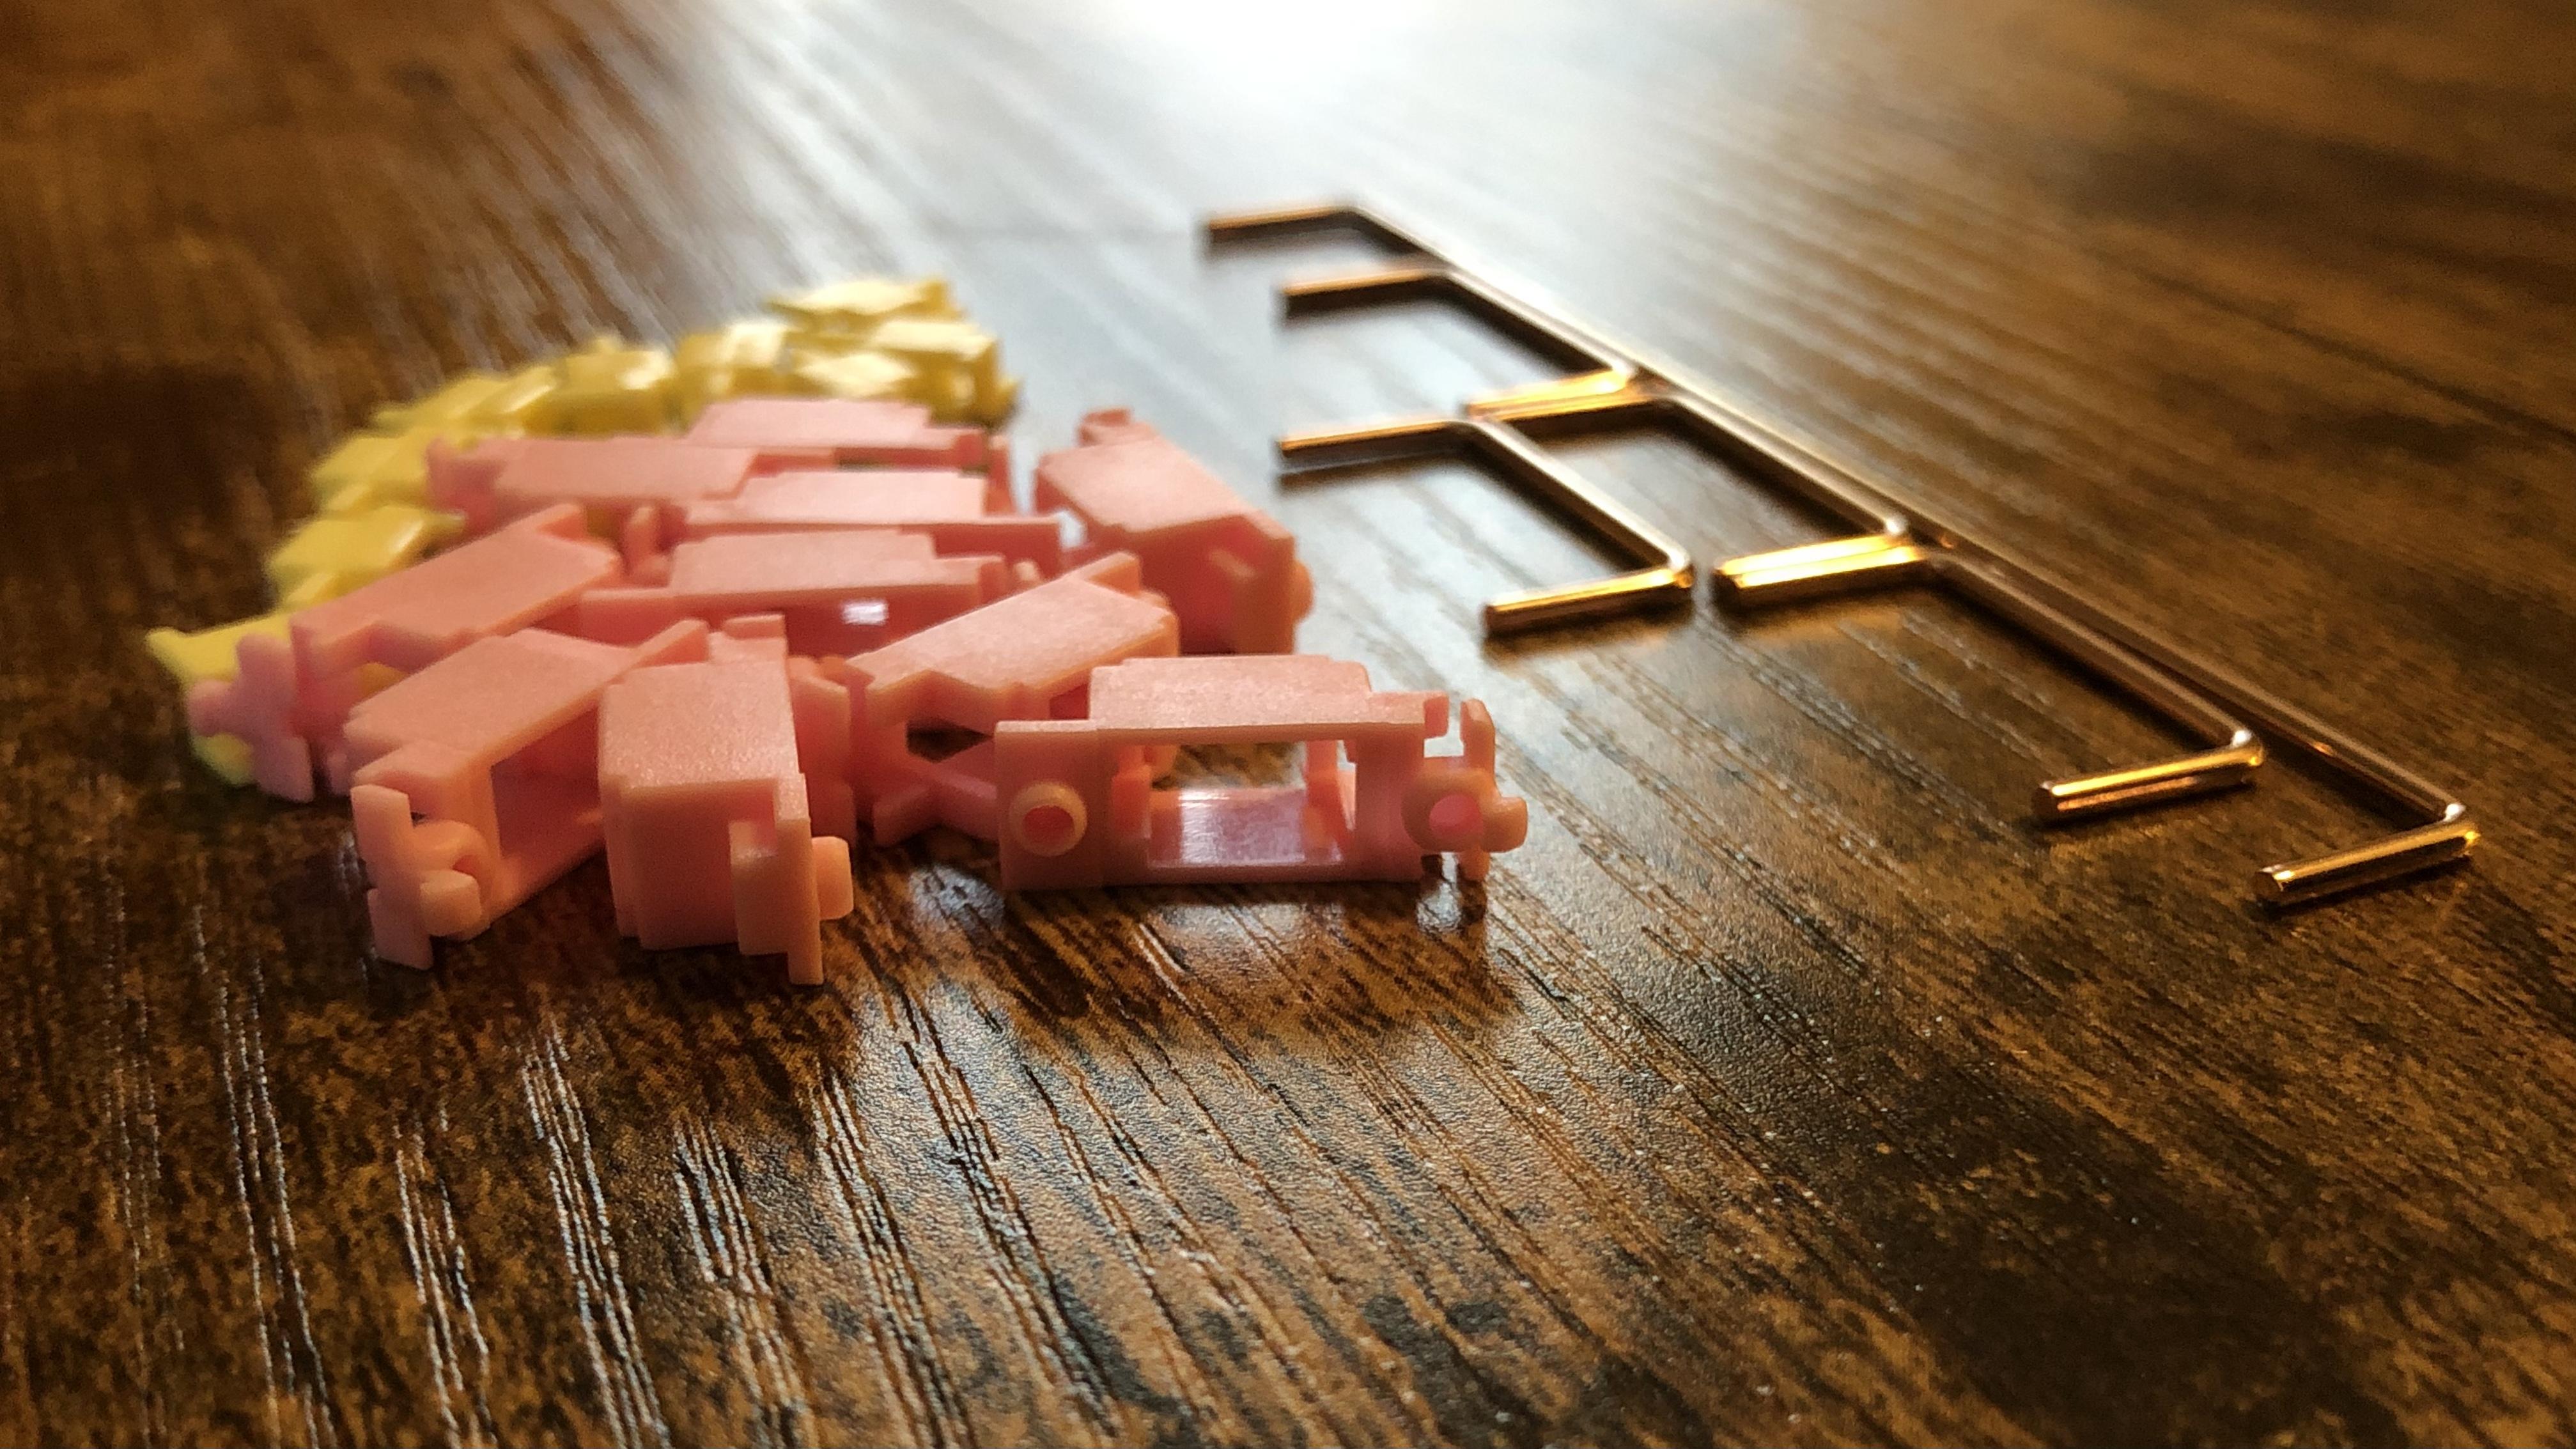
Just a bit of spare gasket foam from the “waste” sections of the sheets of extras; one in the middle of the small stabs, two on either side of the wide one.

Here’s a quick sound test of the completed build as it comes in the kit; stabs modded in the aforementioned way plus lubed with 205g0 including the “lube the bottom” method:

Overall I’m extremely pleased with the kit as far as first impressions go; another very solid option in the realm of reasonably priced keebs.

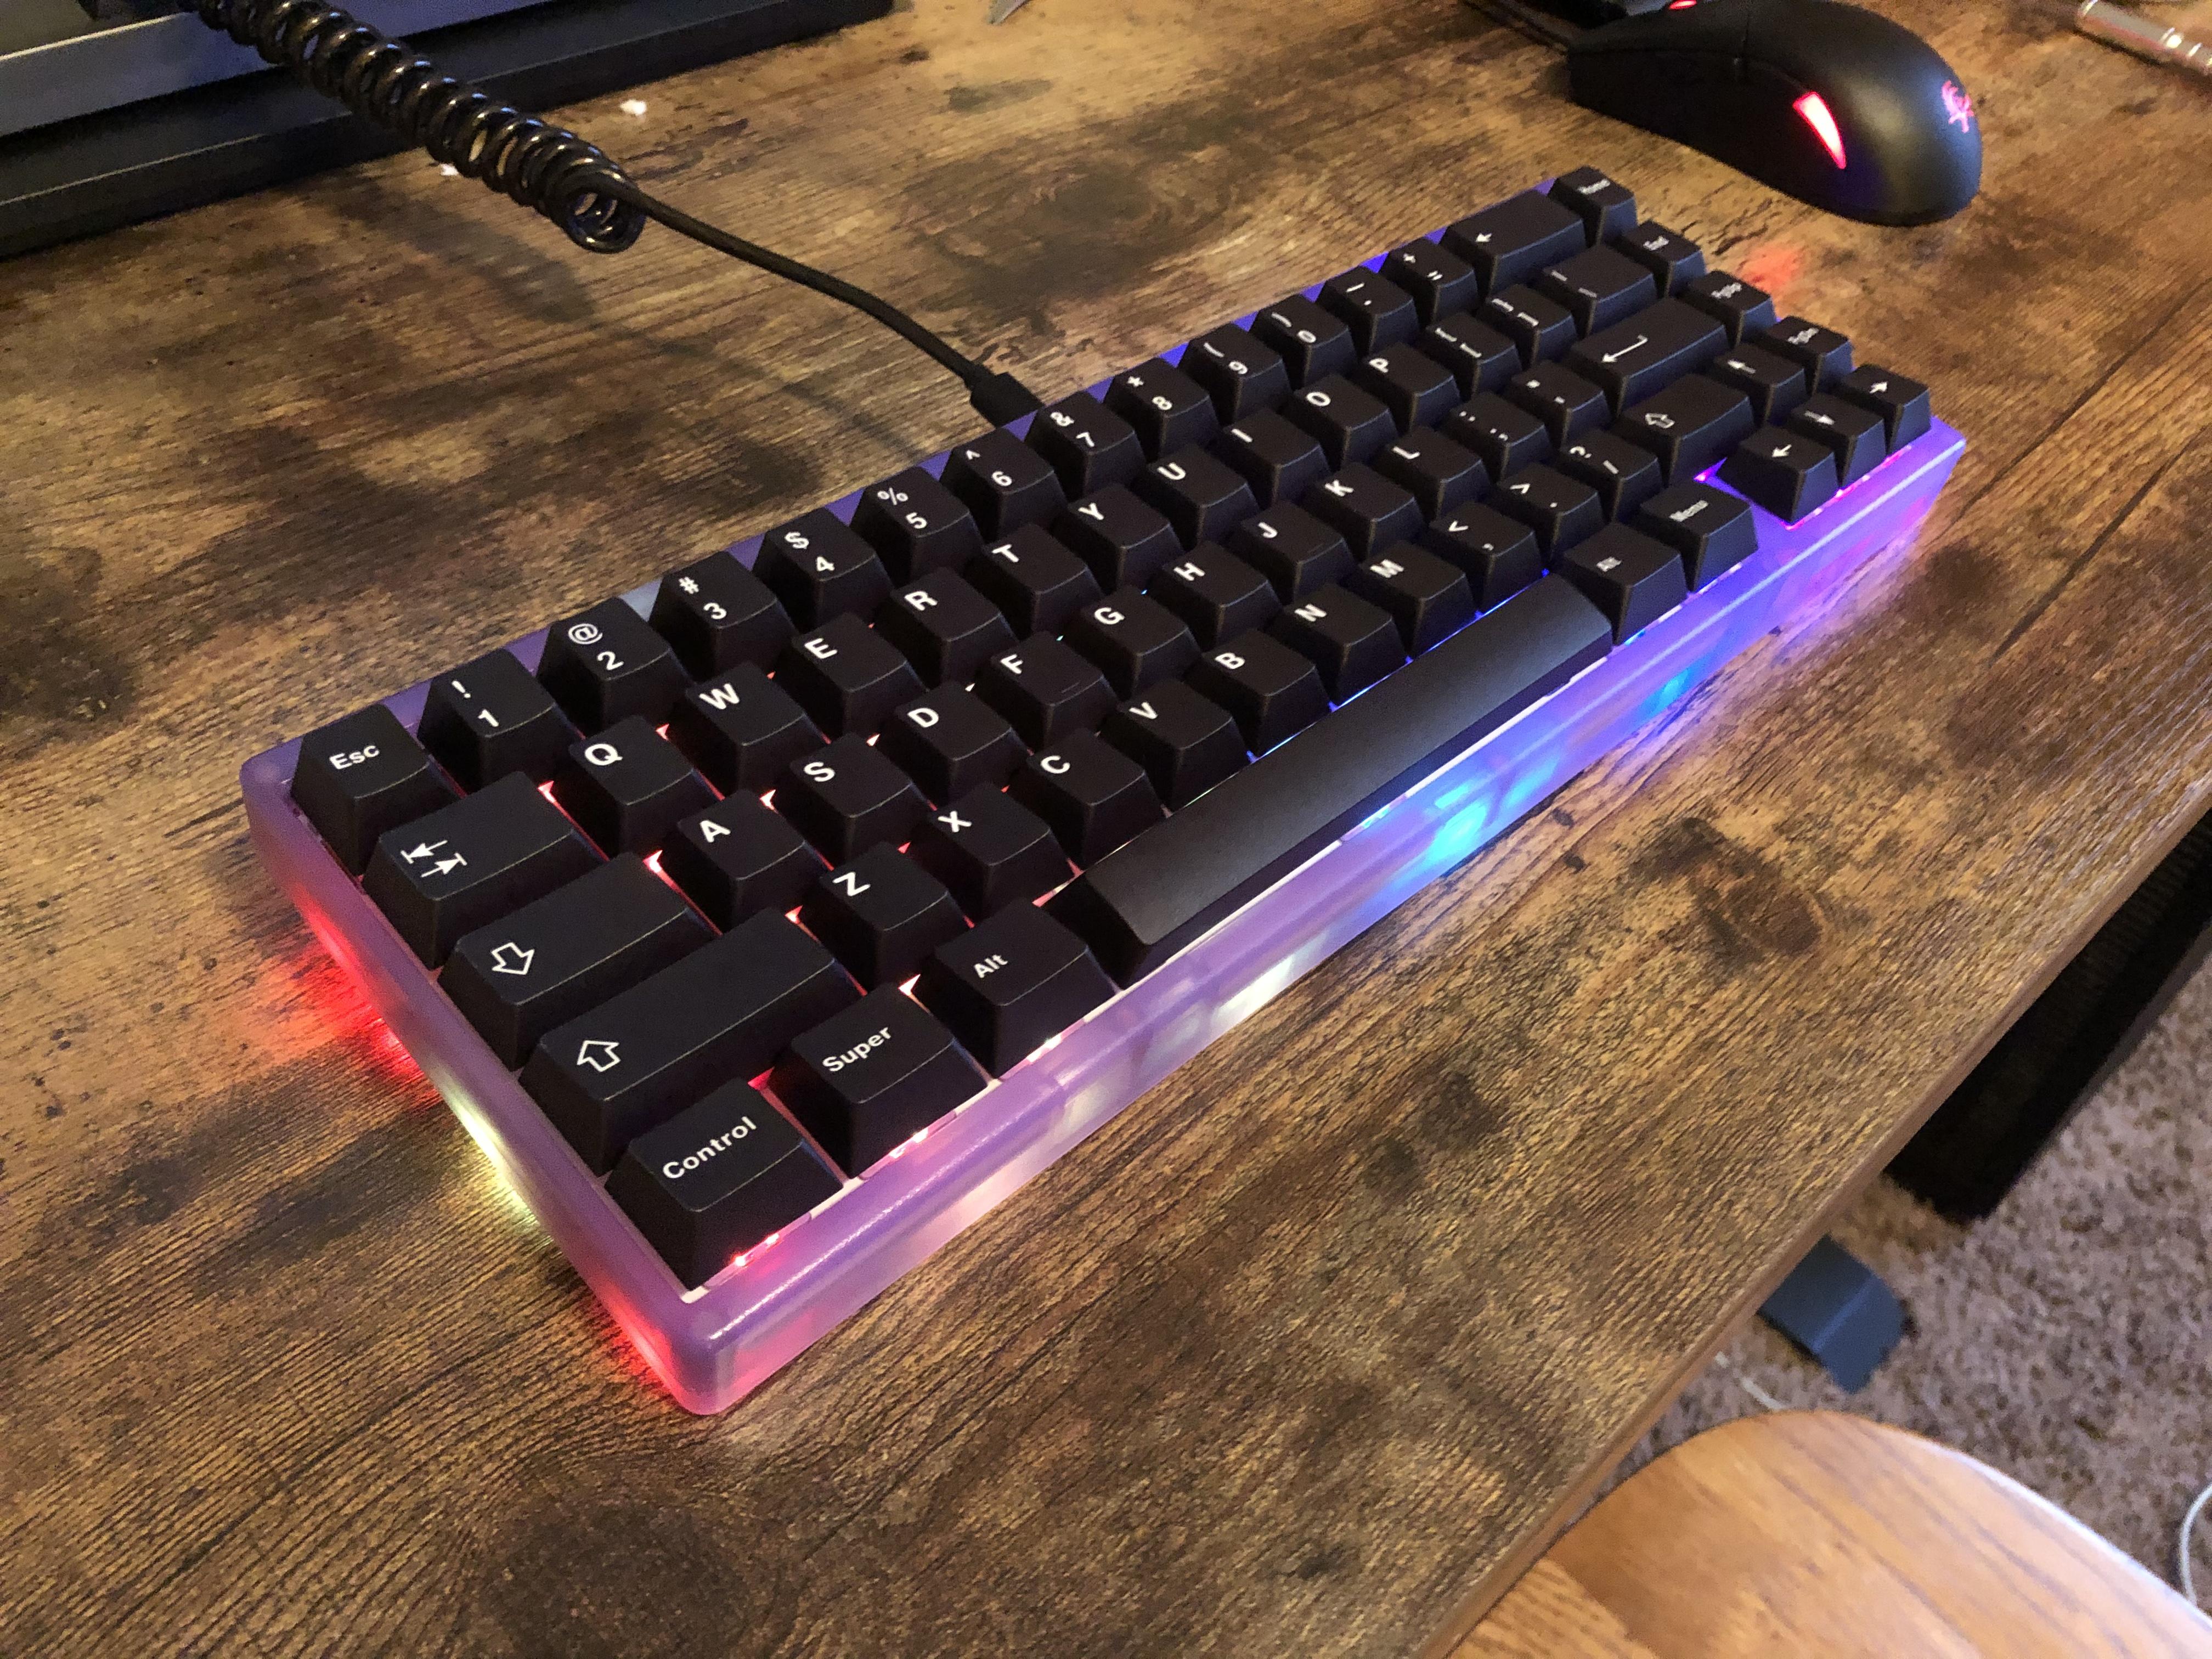
I didn’t expect to like this as much as I do - and I was even a little underwhelmed when I first took it out of the case, finding it a bit dainty - but fully-built, this little keeb is a strong contender for being my middle-market favorite. I have to say, it’s dangerously close to being the best of both worlds between the NK65EE and KBD67L, at least in terms of its combination of genuinely functional features and clean aesthetics bundled into an affordable package.

Compared with most other “entry” boards (including others with “gasket mount”), the Portico has more flex - likely thanks to the flex-cut tabs and soft gaskets. It’s nothing crazy and it’s no trampoline, but it’s got a bit more than the 67L, for example.


One strange wrinkle: the included keyset which you can also buy separately as “Infinikey Portico WoB” does not match the default layout that’s flashed onto the keeb out of the box. Sure you can re-flash it to match the set - but that does seem quite odd to me.

Default layout has RCtrl, but keyset only includes RAlt. The Portico has an FN key, but only a Menu key is included - a function not mapped to the keyboard at all by default. In the right column, R2, 3, and 4 are respectively mapped to PgUp, PgDn, End - but labeled on the keys as End, PgUp, PgDn. Even more strange, the keyset does come with support for 68-key layouts - which no Portico has. And, for a reason I genuinely cannot suss out, the set includes an extra R4 “B” key.

A minor issue with my particular unit: the red portion only of the RGB lighting appears to be dead on keys 1 through 8 - haven’t seen that before - though I rarely use the lighting anyway.


Edit edit: I switched to the stock cable and the red lighting started working again - but the keeb would behave erratically with it on, freezing and then repeating letters. Having seen something like this before with another keeb, I decided to try connecting the the Portico directly to a USB 3.0 port - lo and behold, it appears to be stable and the lighting looks as it should. Seems that with the extension hub I was using prior, not enough power was getting to the board to sustain both lighting and proper function.

Just like with the CTRL, it appears the Portico is best left un-lit unless connected directly to a USB 3.0 port with an appropriate cable.


Last edit I promise u guize: After some more testing (and reading) it turns out the LED inconsistency is a commonly-experienced bug of the Portico - unplugging and re-plugging re-sets the behavior, but it happens pretty regularly.

12 Likes

No pics, but I o-ring/burger mounted (or whatever it’s called) my HHKB because the sorbothane caused it to flex slightly since it doesn’t close all the way.
Makes the back part of the case more even.
Probably does nothing, but I had extra o-rings laying around.

3 Likes

BTW, that is one amazing looking desk bud. The grain is so defined. Looks solid af.

1 Like

I love it - for being fake wood it looks pretty great. I think the desk is sold under a small handful of brands, but mine is an “IRONCK Electric Standing Desk with Storage Bag, Rustic Brown”. Surprisingly affordable, too - I’ll put it this way, the Portico sitting on top of it was more.

It certainly does make for a better photography surface than my old couch. :grin:

2 Likes

My hotswap PCB (GK64x) came in, which meant time to get some mods out!

  1. Weight addition and bottom foam. This substantially improves the perceived quality of the keyboard. With an additional 300g added along with some foam to fill up the blank spaces, the plastic keyboard case weighs about 1 kg fully built. This is just slightly less than a fully built Tofu60 (1.1kg) - pretty darn impressive for a $5 mod

  2. Tape mod. Given how hyped it was, I was really excited to try out the mod. I only wanted to do it on a cheap hotswap due to the risk it might bring to the PCB. I applied 1 layer of tape, but I don’t really feel that there’s a meaningful difference. Neither good nor bad. At least at this stage, it feels more like hype than anything else to me. It comes at the nice price of free so I’m not complaining either.

  3. O ring burger mount. Having watched a couple of videos on how the o ring burger mount creates a softer typing experience, I knew I had to give this a try. By following Keybored’s video tutorial, I managed to get the right o-rings (4x1x1mm) and create a similar setup. The plate does have that bit more flex, which in turn creates a slightly less harsh bottom out experience. Well recommended for a $1 mod

  4. Completed board. With these mods completed, I threw on some spare keycaps just to give the keyboard a try. It’s pretty nice and a great way to make a cheap plastic board feel that much more premium.

Other mods to try:

  • PE Foam mod
  • Plate foam
  • Replacement plate - I’m considering between brass, carbon fibre and FR4 as they’re accessible on Taobao
10 Likes

Had a very busy Sunday afternoon.

Last week I ripped off the USB connector of my good old Simply96, so looked for a way to remake a new PCB for it.
Was surprised to discover that I still had an unpopulated PCB from 2018 and just enough SMD components on hand to revive my keyboard.


So it was time for a good SMD soldering session … and with no place for errors as I just have barely enough to make a new PCB…

The USB connector has been hot air soldered while for the remaining components I used my soldering iron.
One I had the brain soldered (that is the miminum to make the AT90USB1286 boot), did a quick check to ensure that the PCB was recognised by the computer.


Then onto the 96 SOD323 diodes (what a pain) and the Kailh hotswap connector.

All keys working, but QMK changed a lot since I worked on it and could not make my numpad layer work anymore.
Will do a bit of firmware programming when I will have time, maybe add VIAL support ?

But now I’m sure my noisy boy will live again :slight_smile:

10 Likes

I can’t wait to desolder bent pins

10 Likes

Good luck! Step 1 stay hydrated :ballot_box_with_check: :wink:

2 Likes

I’m thinking of making and hand-soldering my first SMD PCB, do you have any tips or tricks?

Personally, although I don’t do a lot of SMD stuff myself, I’d recommend getting a practice kit and watching a few YouTube videos on the subject.

In general though, with simple SMD components like resistors, it’s always easier to tin one pad of the pair first. Then when you’re read to add the component slide it up to the built up solder, re-heat that, and slide in the component. At that point soldering the other side is a breeze.

2 Likes

For soldering resistors or capacitors I sometimes do what @Extra_Fox said.

But as I also have solder paste because I do hot air soldering, I like to put solder paste on one pad, place the component and heat the paste with my soldering iron :stuck_out_tongue:
But I did like everyone I guess, looked at a ton of Youtube videos explaining the different soldering techniques and picked the methods I like the best.

As for the minimum material needed:

  • a good soldering iron/station, like a TS100 or a KSGER T12.
  • fine tips to handle the small componant.
  • a magnifying glass, or a headband magnifying glass (I use that, very convenient and cheap).

Good advice thanks, I’ve consumed a lot of Youtube. I’m thinking of trying my luck at reflow soldering with sand. I don’t have the steadiest of hands and feel a hot air station may be a little bit of an extravagance until I can justify it to myself by eliminating other cheaper options first.

Any tips for PCB design? Should I stick with bigger components? Are there certain package designs to avoid?

I don’t remember the sizes, but there’s definitely sizes toward the smaller end that are all but impossible to hand solder. Generally speaking, bigger is better and less intimidating and it will still be smaller than any through-hole component.

My eyes and hands are also not the most stable for detail work. So I’m a little biased.

Yes, this technique and also the skillet technique that is very close are very good way of soldering componants.
You will need solder paste for that though, and something to check the temperature so that you don’t fry your components :stuck_out_tongue:

The first time I handled SMD components, it was with solder paste, cooked on my kitchen hot plates with a manual infrared temp meter :smiley:
Very approximative but worked well for me :stuck_out_tongue:

I would say the most important thing is good magnifying glasses for soldering but more importantly for inspecting after the soldering session.

Naaahhh, it’s not as bad when you know what you’re in for :smiley: