
Went ahead & built up my Frog 8k with the BSUN Jade Roselles since I’ve been very curious about these switches since I first saw them. First impression are really good, they are super smooth & have nice deep sound to them. The factory lube is a tad heavy, but doesn’t cross the line into them feeling mushy. I think once the switches get broken in & the lube migrates they’ll be just about perfect. No spring or leaf ping/tick at all. These switches are a little on the expensive side, but given how well they perform I would say they’re worth it.
15 Likes
Just an update… I was able to upload the files for the PCB I am designing and they are already nearly complete on manufacturing!

Additionally, I got really excited and already wrote the QMK firmware for the board, the bonus is… I know the firmware works because it will be functionally identical to the Geist Totem in QMK as it’s the same MCU and the matrix maps to the same pins on the MCU less one key on each side. So, I wrote custom QMK firmware for the Geist Totem from scratch and got that all working on the Totem I’m typing this from now. All that was left was removing that one key from each side and accommodating that missing key in the keymap and the firmware for my PCB is all done! Truly just waiting on getting parts in hand now.
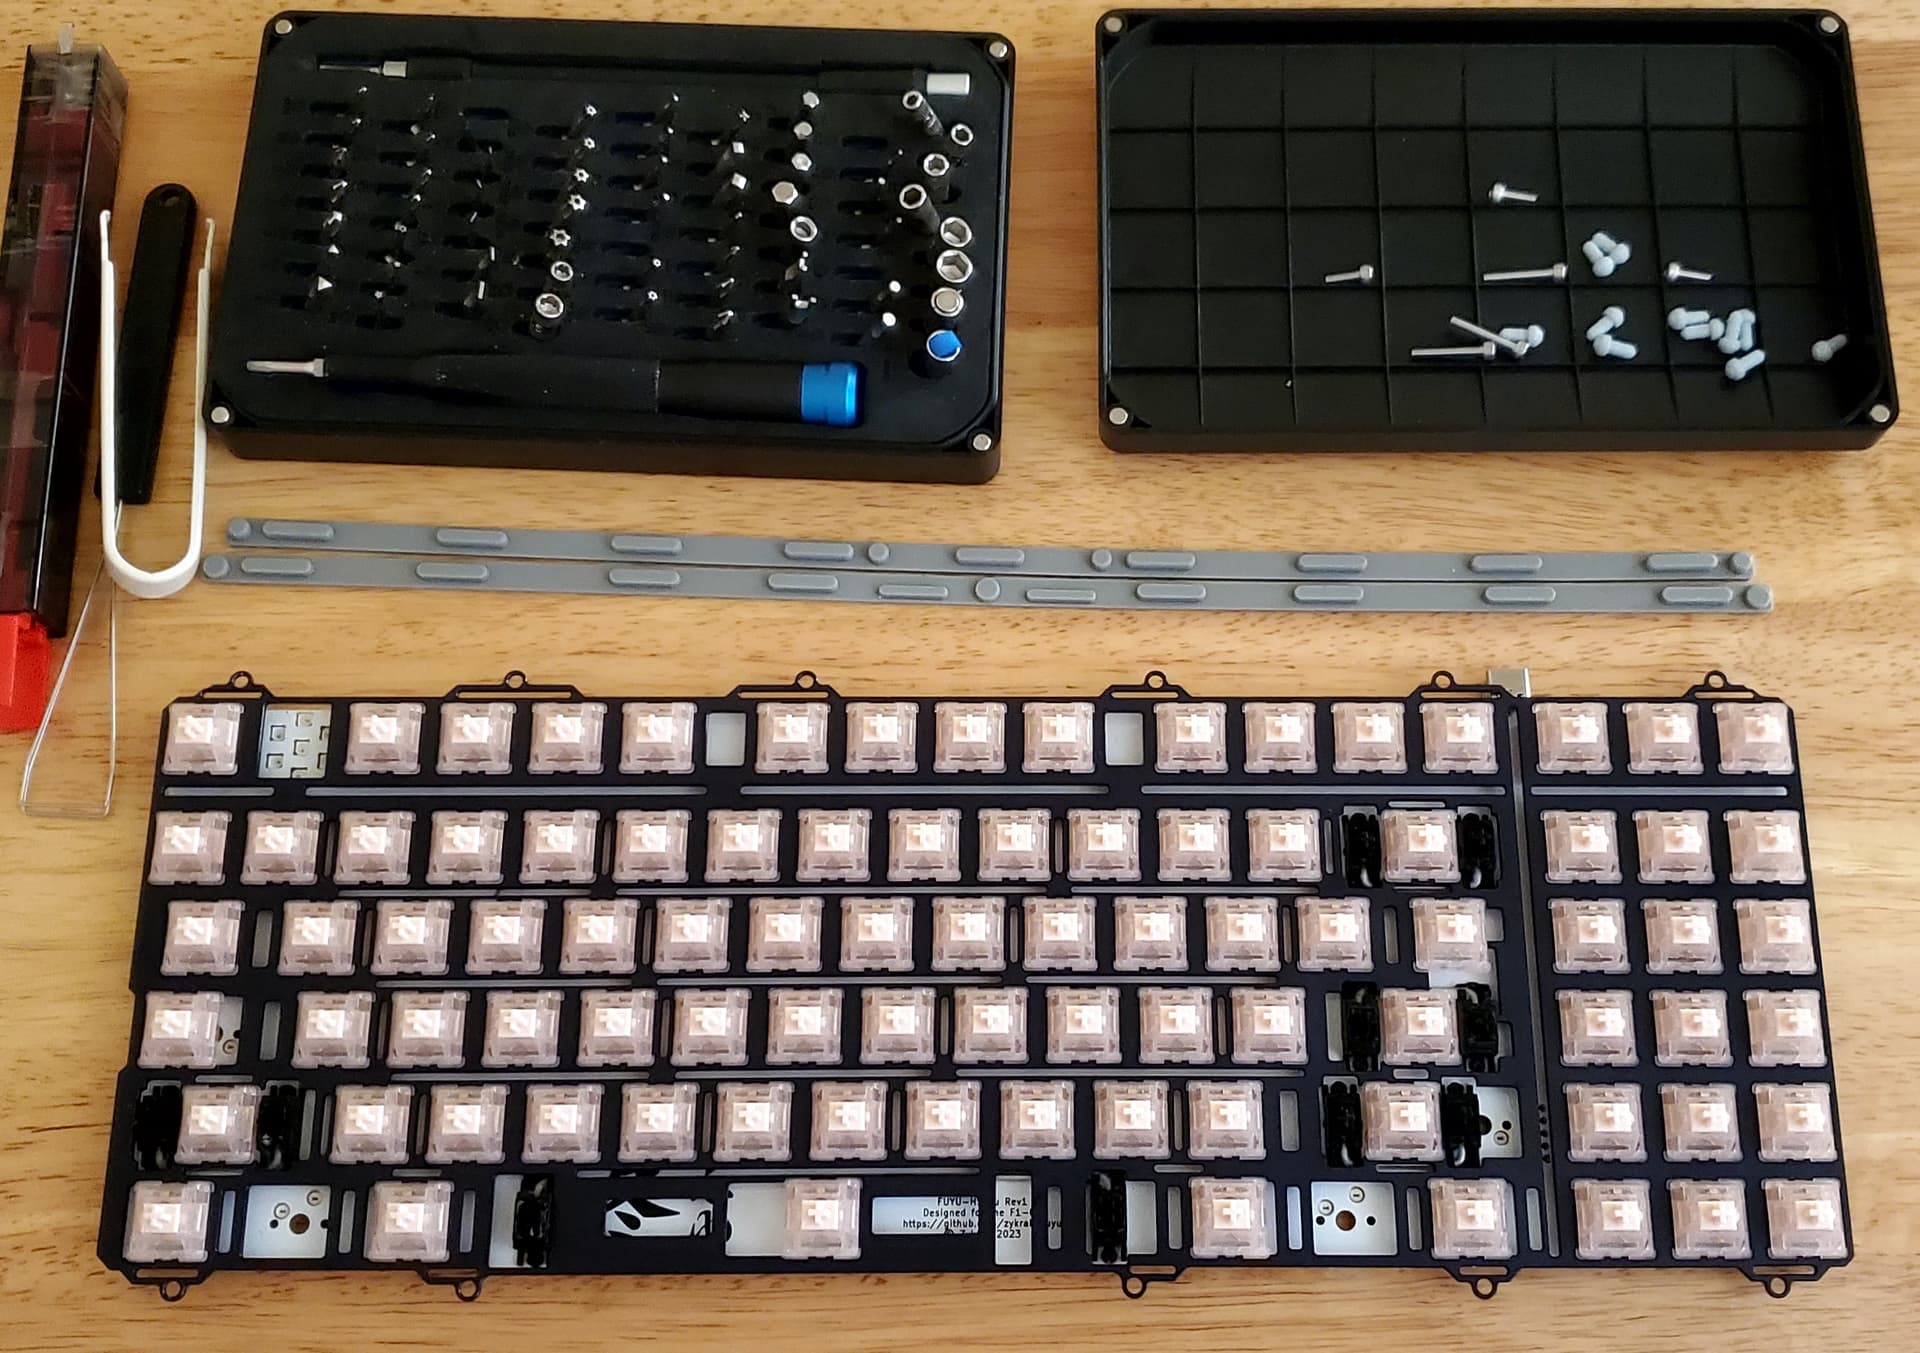
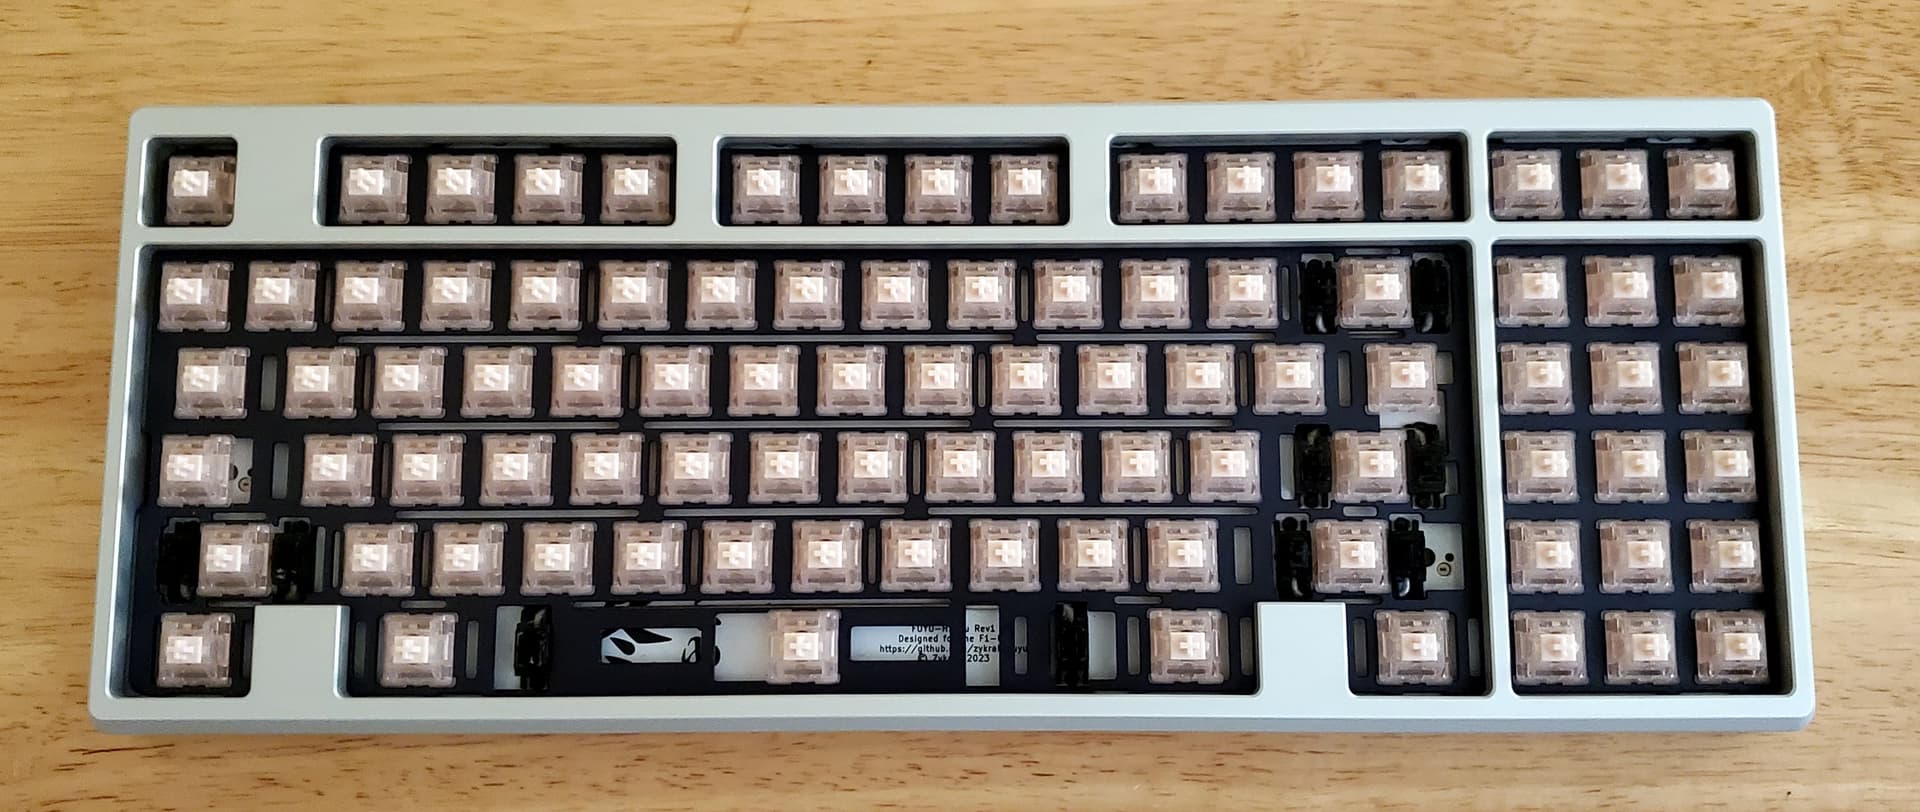
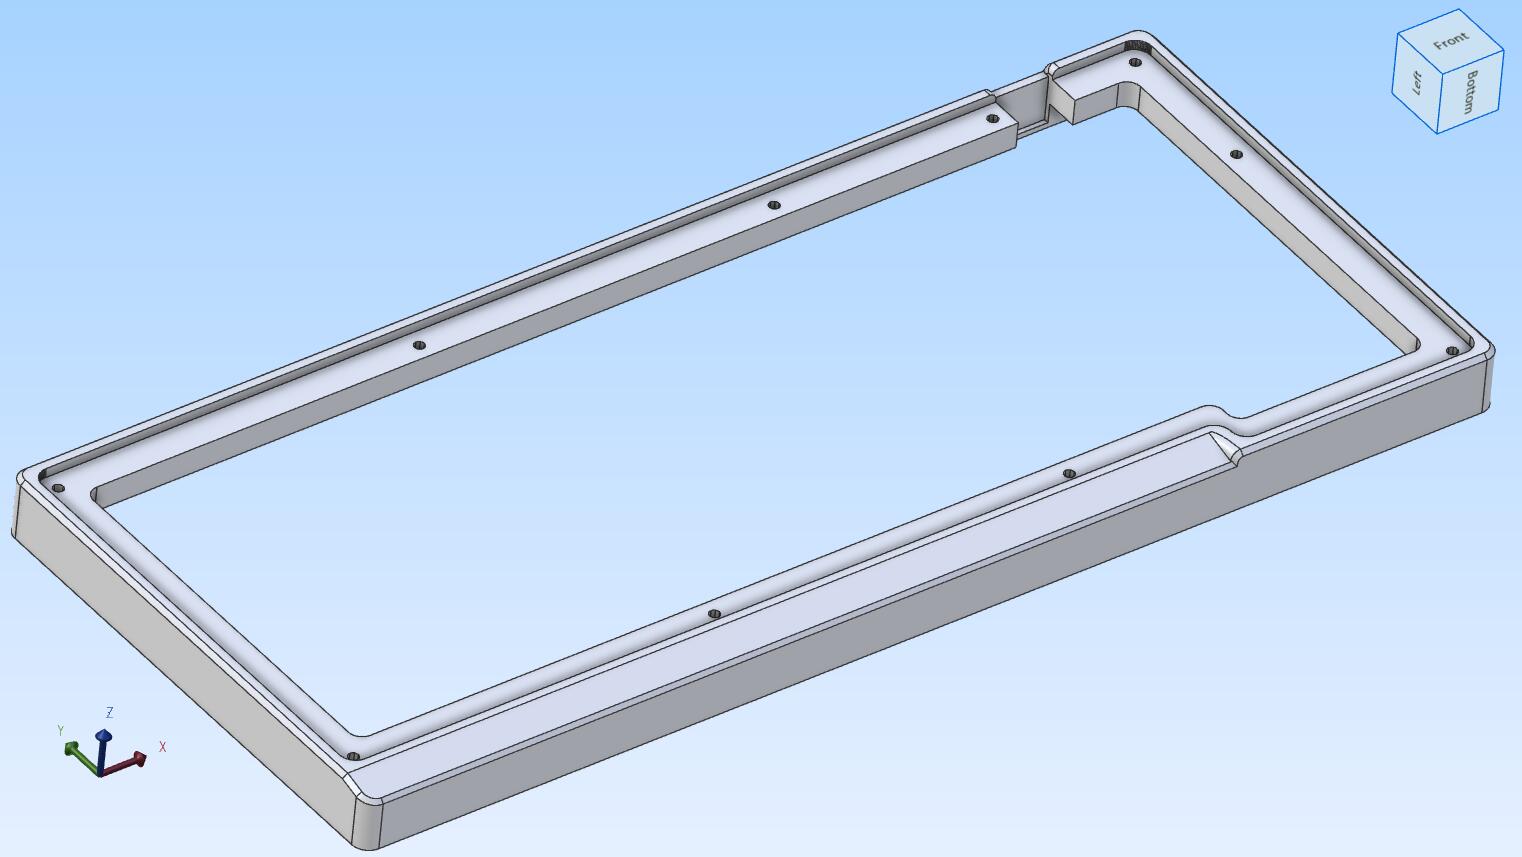
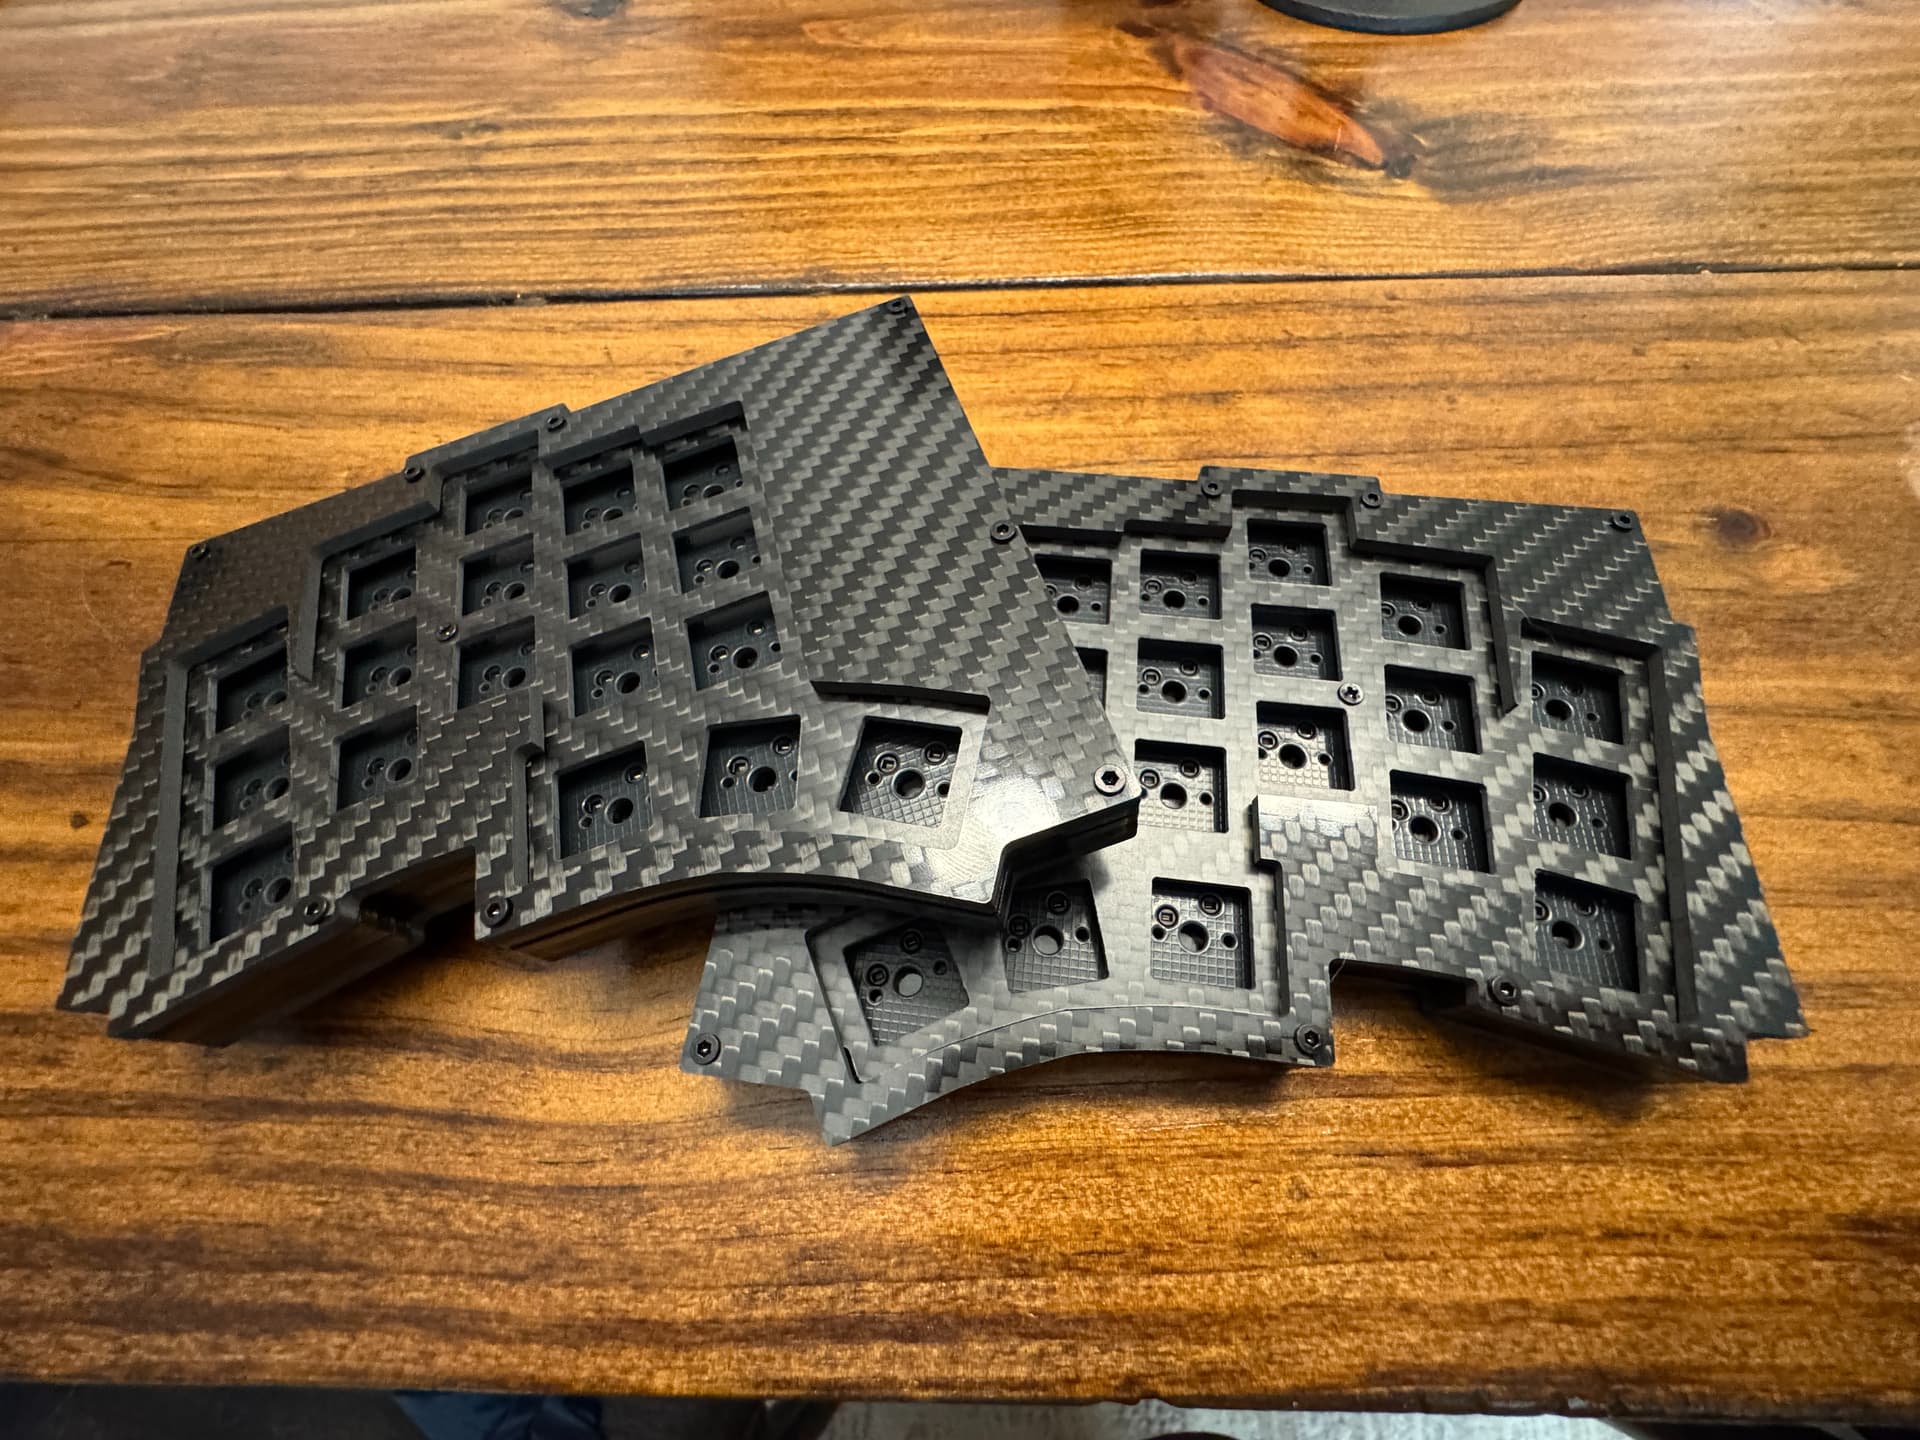
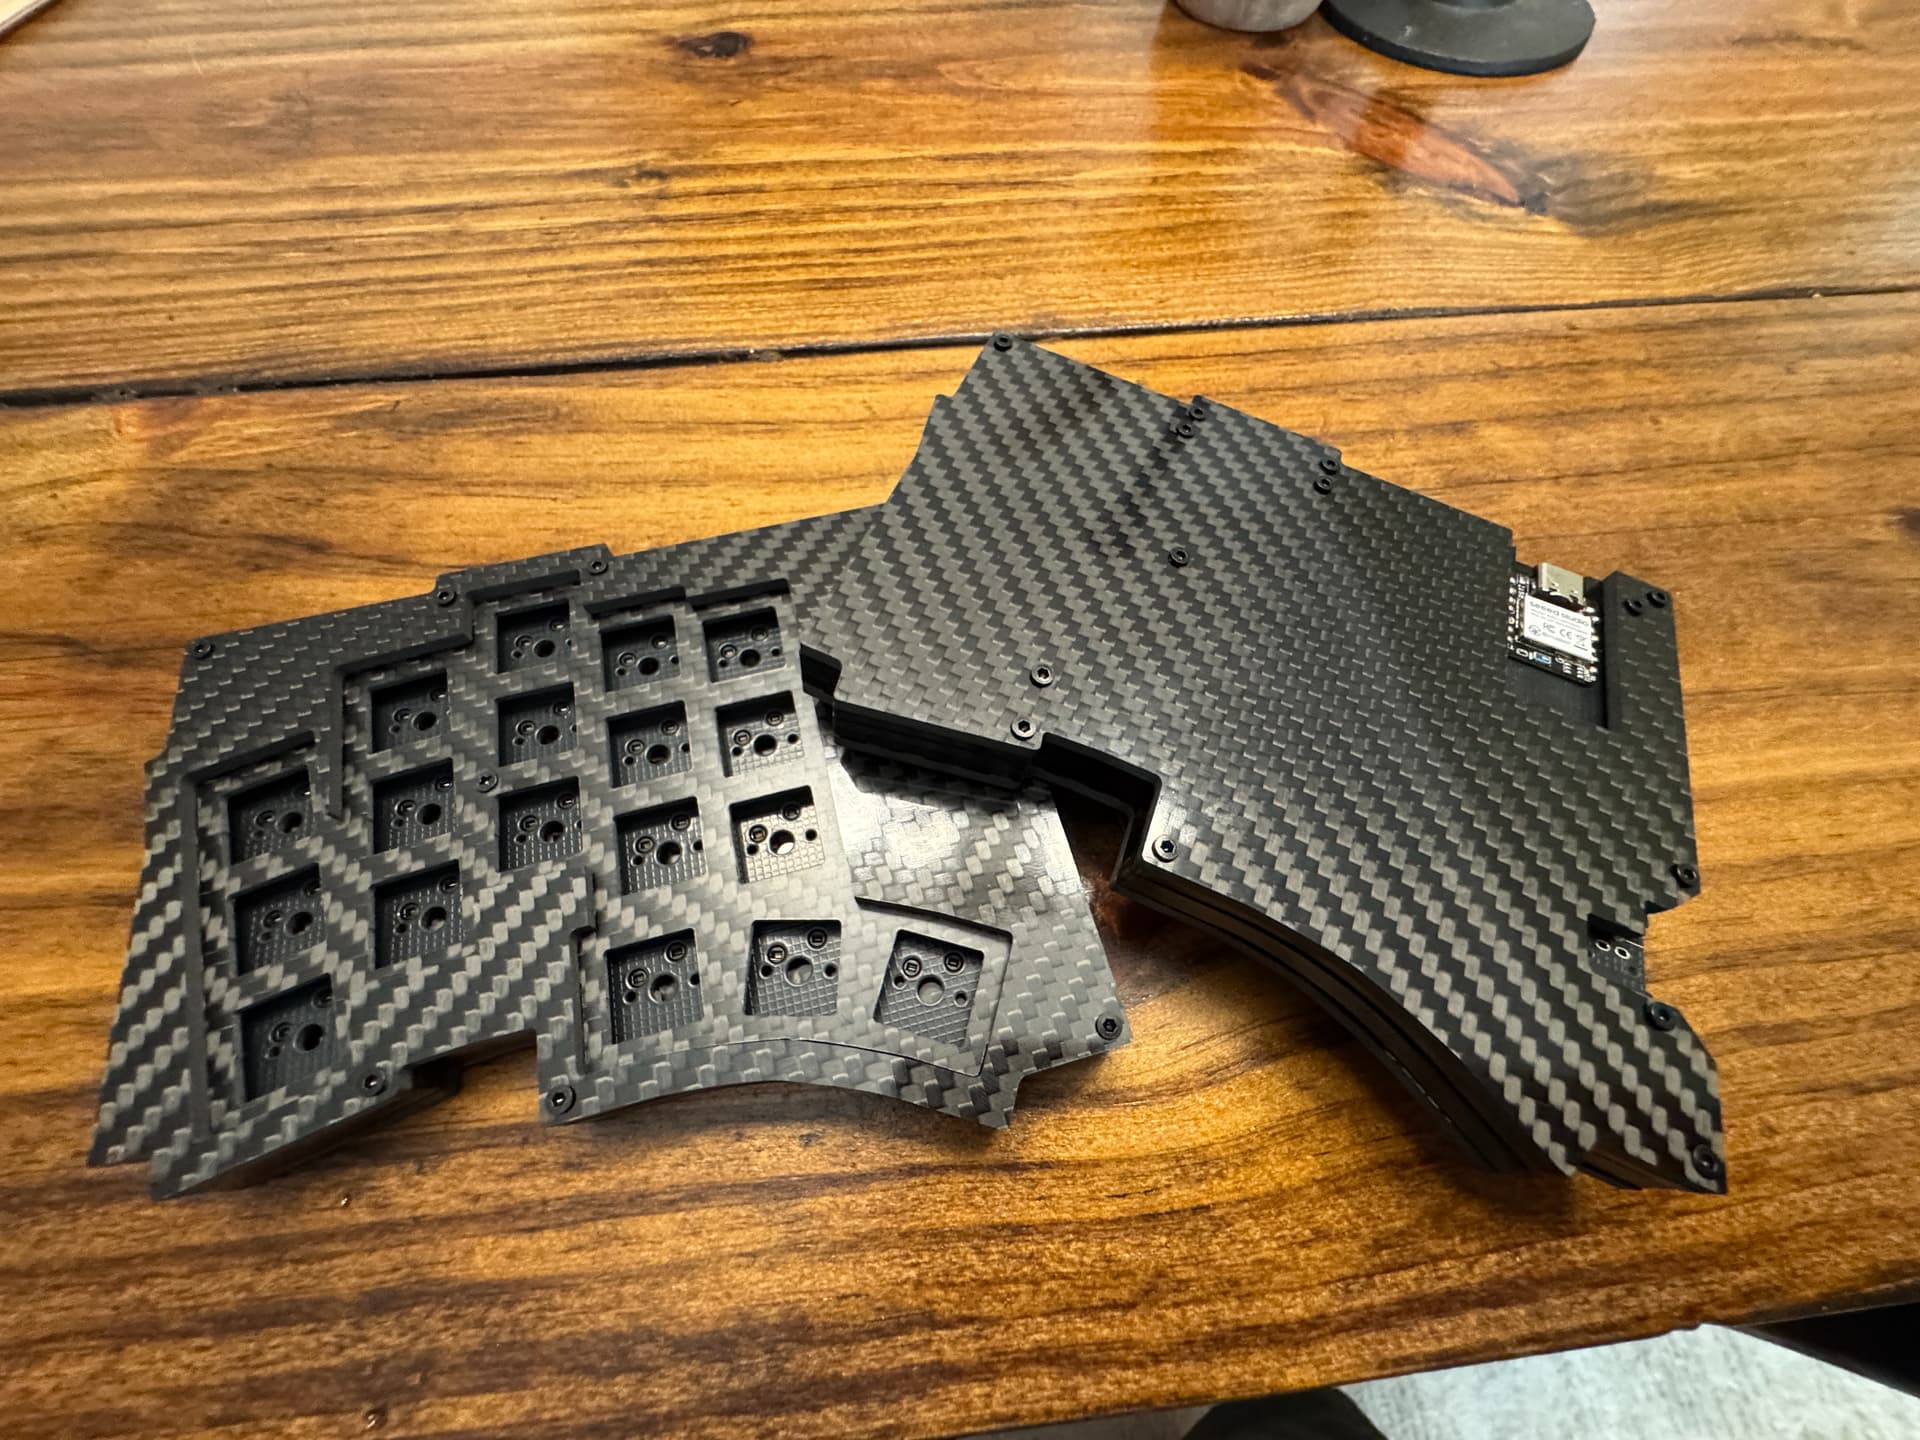
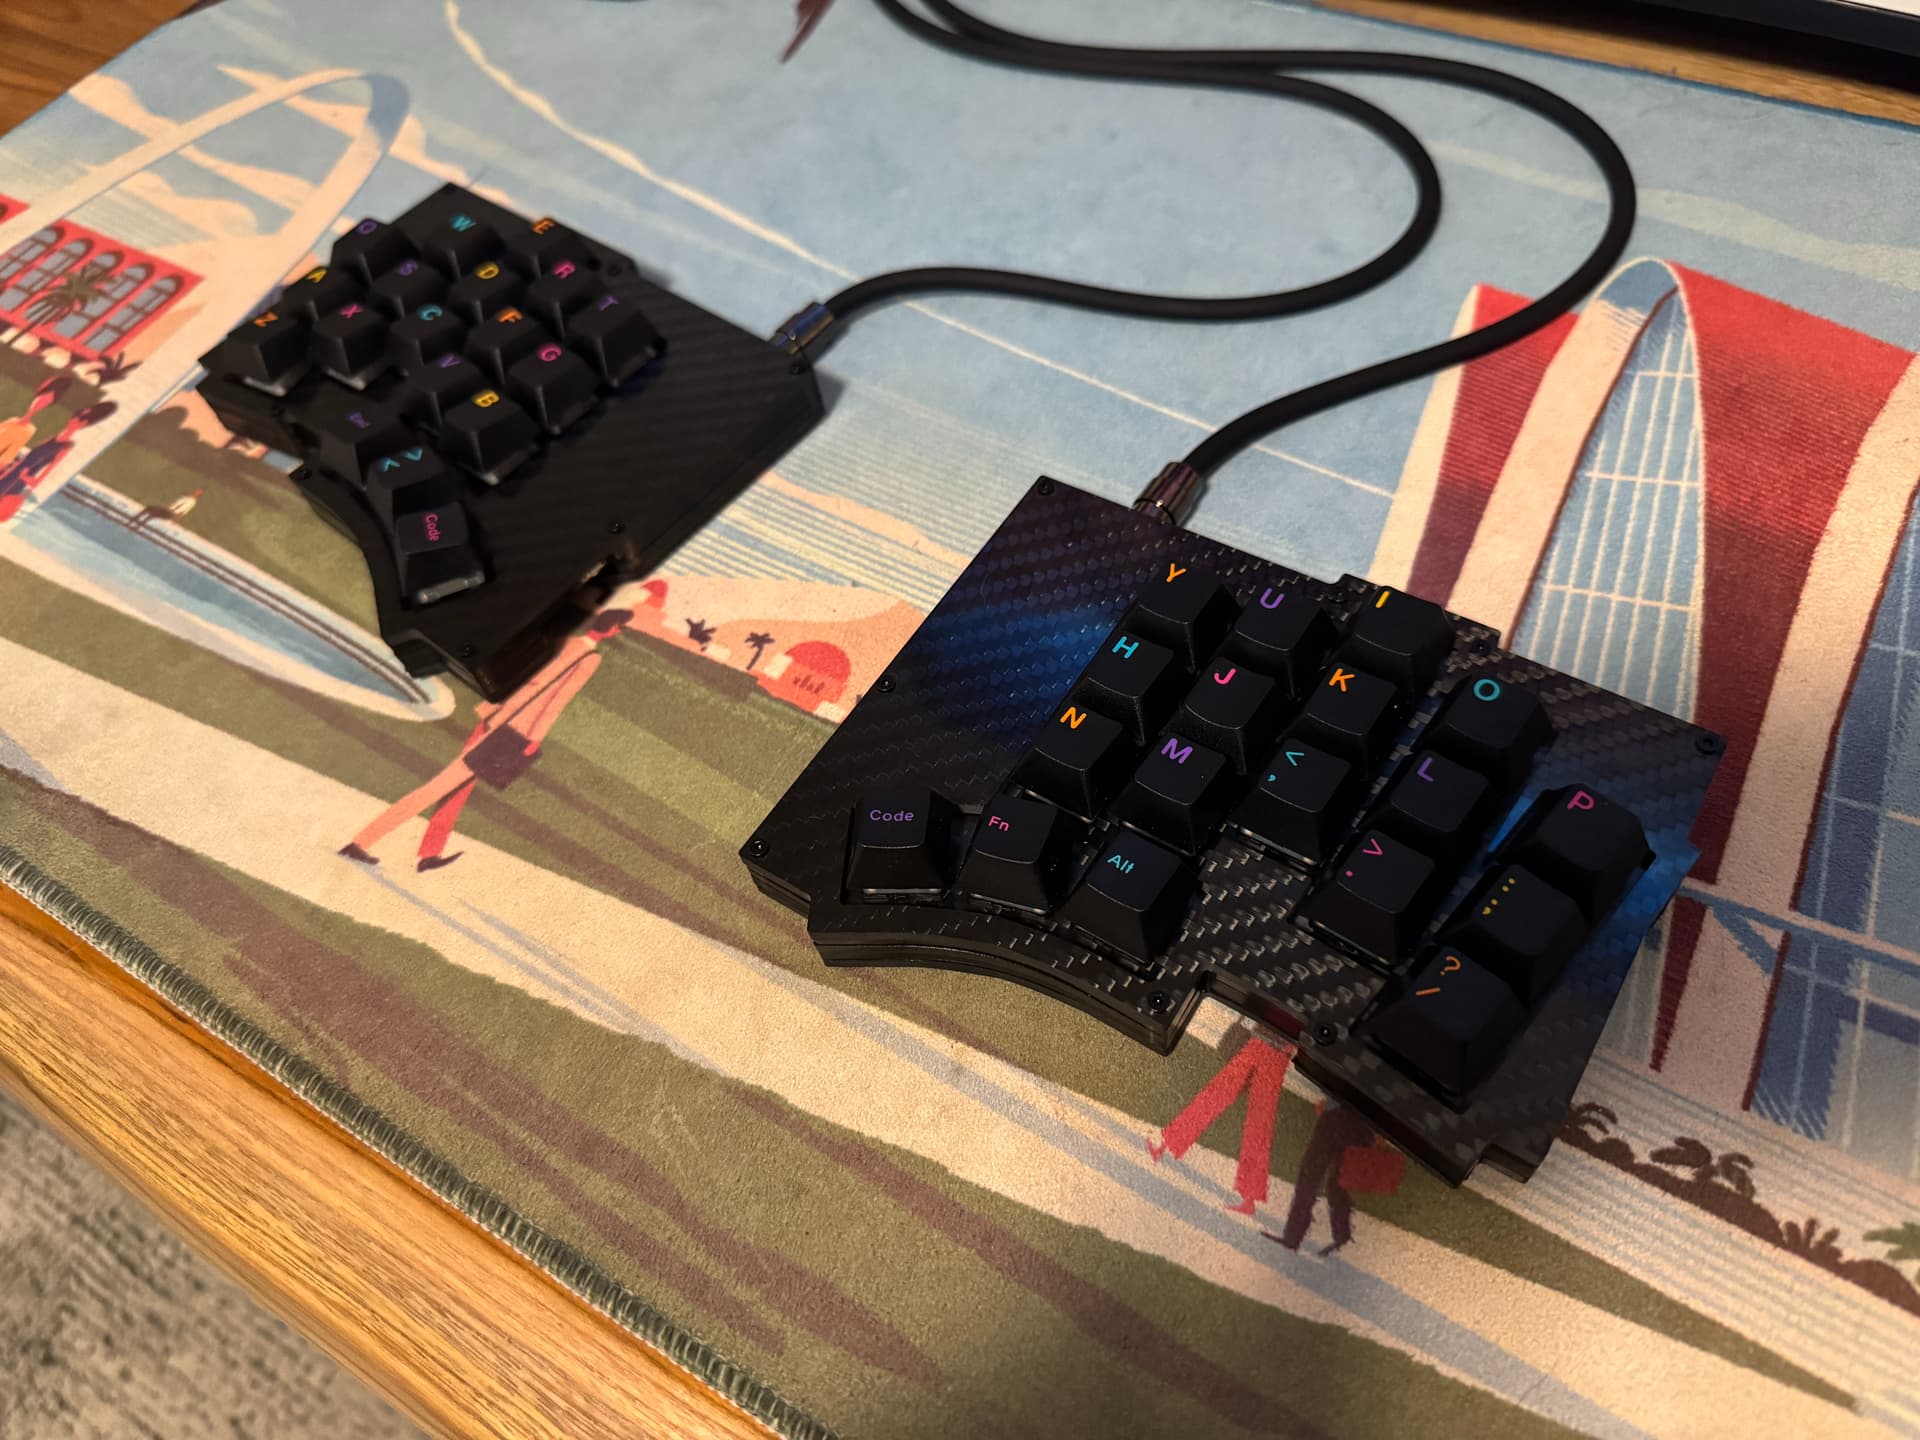
Aside from the PCB itself, I can’t wait to see the bottom plate, top plate, and switch plate that this board will have because the files for that are off to be CNC’ed out of carbon fiber. Glossy for the top and bottom and matte for the switch plate.
7 Likes
Got up early this morning and got to work desoldering the faulty JWICK blacks out of my Merro60 PCB.
I took this chance to also address issues with my Unikorn which was previously built with a 1/2 plate, and amber T1s in holtite sockets. As you you may know, hotswap on an o-ring build is tricky, as the o-ring always wants to pull switches out at the corner of the plate. I was always unhappy with the build. I like the amber T1s for the Unikorn, so I went back with them, except they are now properly soldered into my merr60 with a full FR4 plate.

The merro60 pcb I’m using here is the version with o-ring cutouts and large holes that allow the pcb to not touch any tray mount standoffs. This setup does work in the Unikorn. It does NOT work in the Fjell or the Tofu Redux, for which is was designed. I’m not sure how anyone is using it in those cases unless they just have it sitting on case foam.
The problem is that even though the Fjell and Tofu60 Redux do have tabs around the case for a o-ring to sit, they aren’t designed for that (they aren’t tall enough). So, when you rest the o-ring on the mounts instead of the PCB, you drop down 1.6mm lower in the case. The result is the PCB hits the bottom of the case in the center even from light typing. The Unikorn is properly designed with o-ring support tabs that are about 1mm taller, holding the assembly at a safe height.
I was happy with the build all except the space bar. I tried many different profile keycaps and nothing was pleasing because of the pesky, rough sounding space bar. So… I desoldered the space bar switch and went searching for the best sounding one I could find.
After trying 10-12 different switches on the space bar, I found that a black lotus sounded ideal. So, now I have a Unikorn with a merro60 PCB with amber T1s and a Black Lotus space bar. It’s quite nice. It’s actually not the first board I’ve built with tactile switches and a linear space bar. It’s a combo that sometimes works well. SA keycaps sound the best on this board. Currently have Arcane on it, but I might switch out to Maestro later if the Arcane caps are needed elsewhere.
9 Likes
I run linears on spacebars for all tactile builds. I can’t stand a tactile switch spacebar, lol.
3 Likes
Digital workbench this weekend. I think between some measurements and the official cut files for Yushakobo’s acrylic case, I have the basic spacer frame “case” CAD’ded up for my Primer79 build. Strictly speaking, I don’t really have to do this, as the build instructions allow for caseless (boiling down to “snip the pins short and use tall bumpons”), but this layout is quirky and looks fun and I’d like to put my own spin on it. I have a little bit of shiny black acrylic that cuts okay on my laser but it’s thin and the edges always melt a bit; no go, even for my modest case tolerance expectations, but should allow for a little flair on the small riser panel to cover the MCU.
Still to do:
- Solder the board and flash the Pro Micro. Current plan is to use some JWK 67g heavy linears, in part because I don’t have a board this size with linears, and in part because I’m planning for plateless and they are the only 5-pins I have in sufficient numbers.

- Print a little chunk of case, maybe the top-right, to check fitment to the PCB.
- Decide how to cut the full case for 3D printing. The screwhole spacing suggests a sort of lincoln-log style that works well for my cheap printer, but I may just split it in the middle and add a small dovetail or clip.
- Laser the top and bottom plates and the mentioned MCU cover. As this will be plateless, the top plate is just for aesthetics, kind of like a G80.
- Decide on keycaps. Options include discount WOB in a couple of profiles, NovelKeys R2D2, SA Tatooine, or a few other low-end sets.
9 Likes
It’s time for a game of good news bad news.
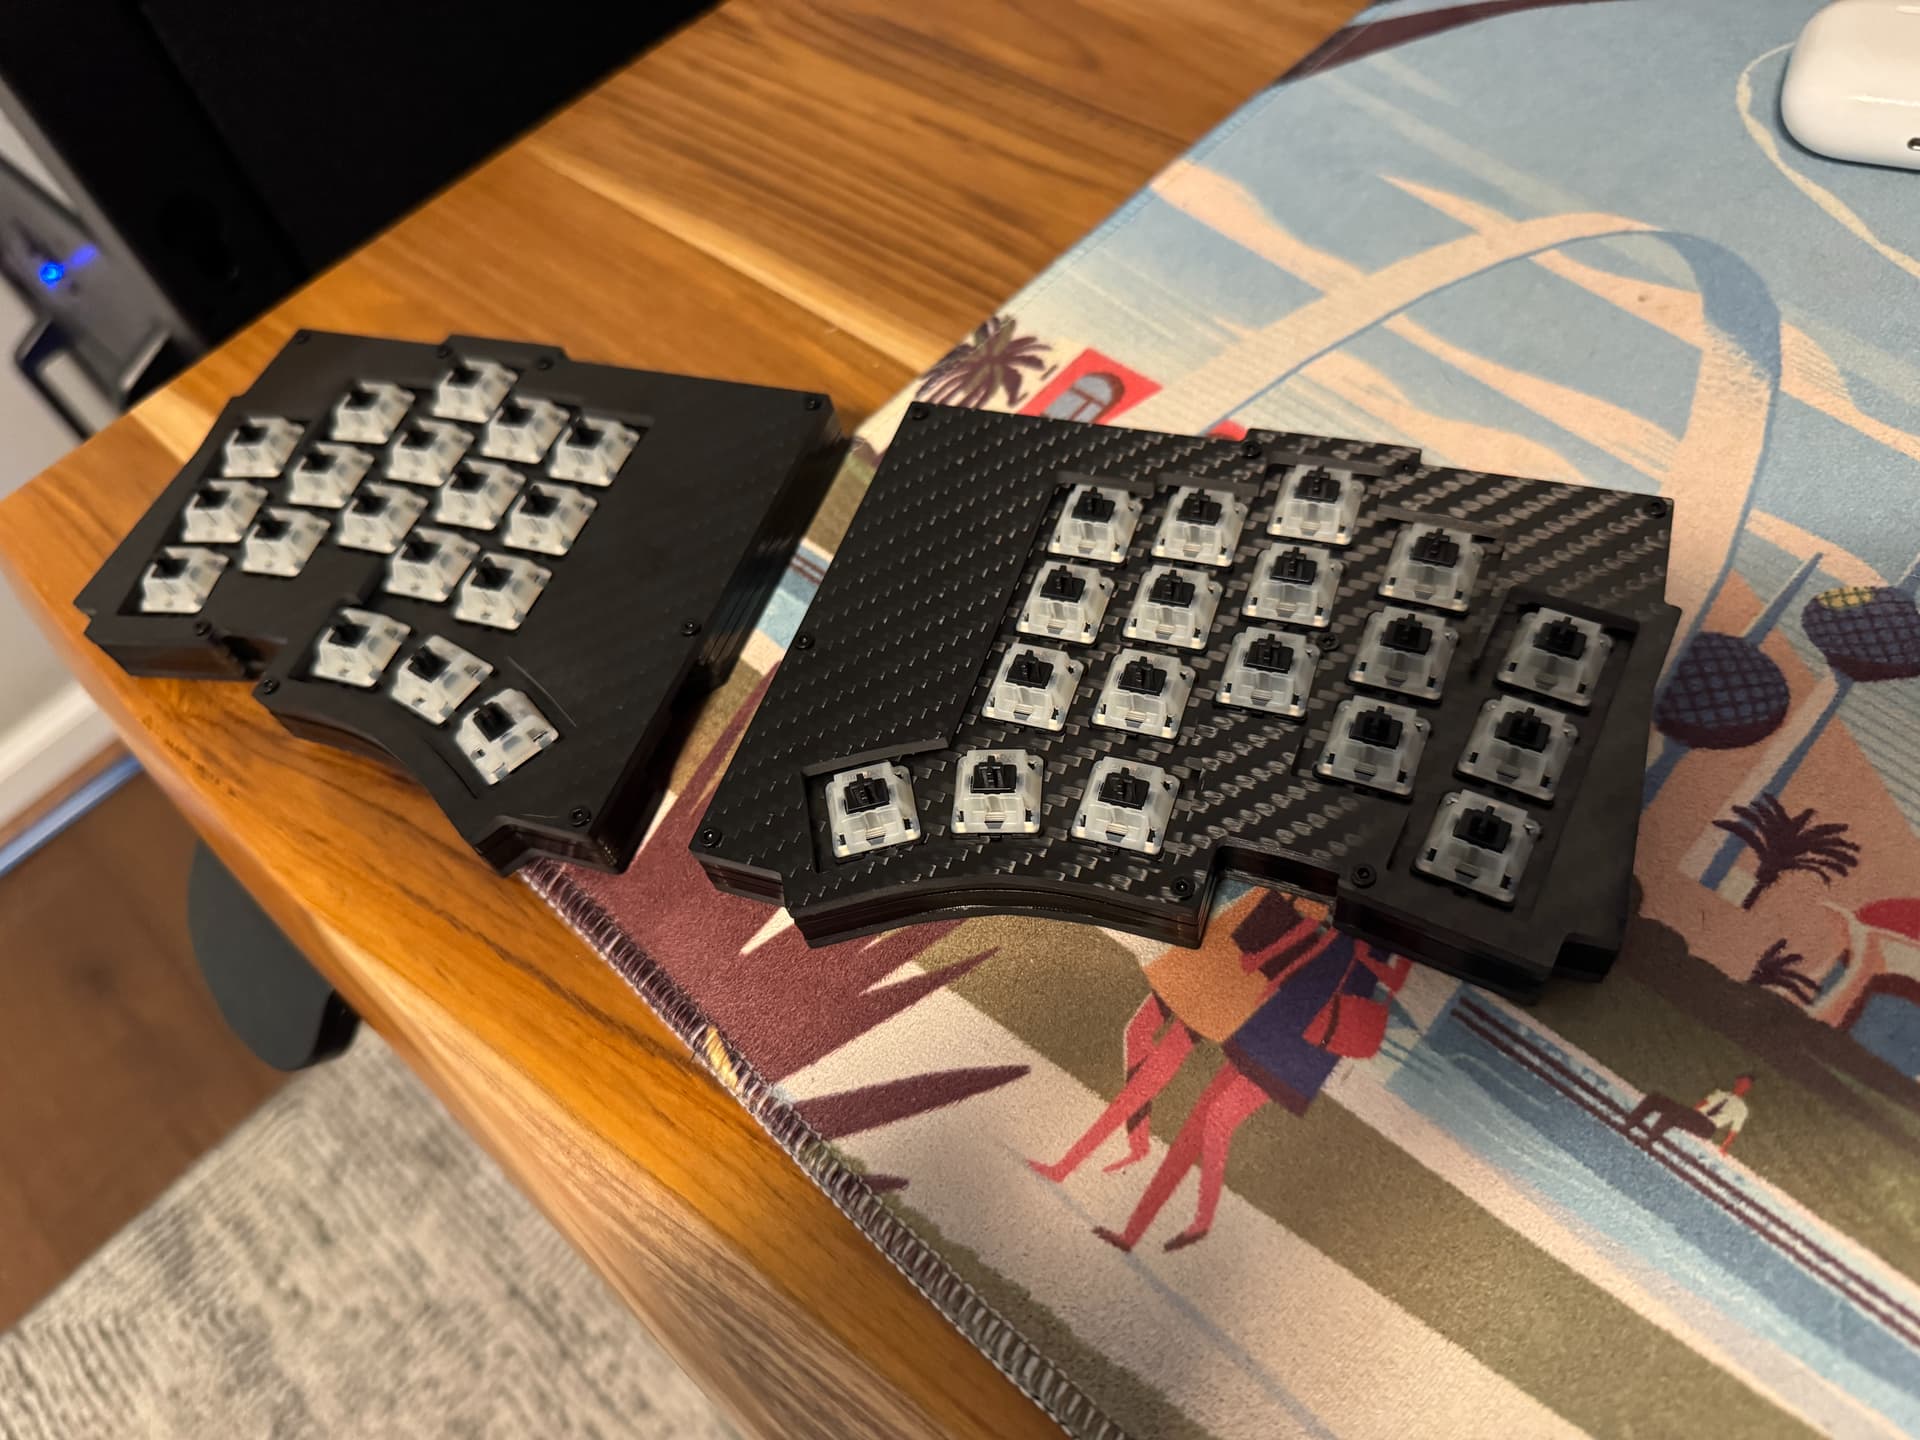
Good news - the PCB I designed to use a Xiao in a Klor form factor worked! I built the board and flashed the ZMK firmware I wrote for it, and every key registered. The final parts of the case come tomorrow, so I can do final assembly and use it, which is cool.
Bad news - I thought the process of designing a PCB was so much fun that I decided to pick up another project in parallel and design a replacement board for my Kinesis Advantage 2 boards that uses a Nice!Nano and ZMK. Referenced the Stapelberg controller and Pillzmods to check against. Schematic is done and board is designed in Kicad already. Once I route the traces, I can send those off to be manufactured next.
4 Likes
I think what you meant to say was awesome news & good news.
2 Likes
I had to make some modifications to the acrylic pieces because of where I put the reset switch, but was able to assemble the case! It came out looking better than I imagined it would.
That’s the fun news.
The not fun news is that something seems to have gone wrong during assembly. Left side has a bunch of keys not registering and the right side is just not doing anything. I’m wondering if I built up some static and fried the boards when assembling. Will need to look into it later.
6 Likes
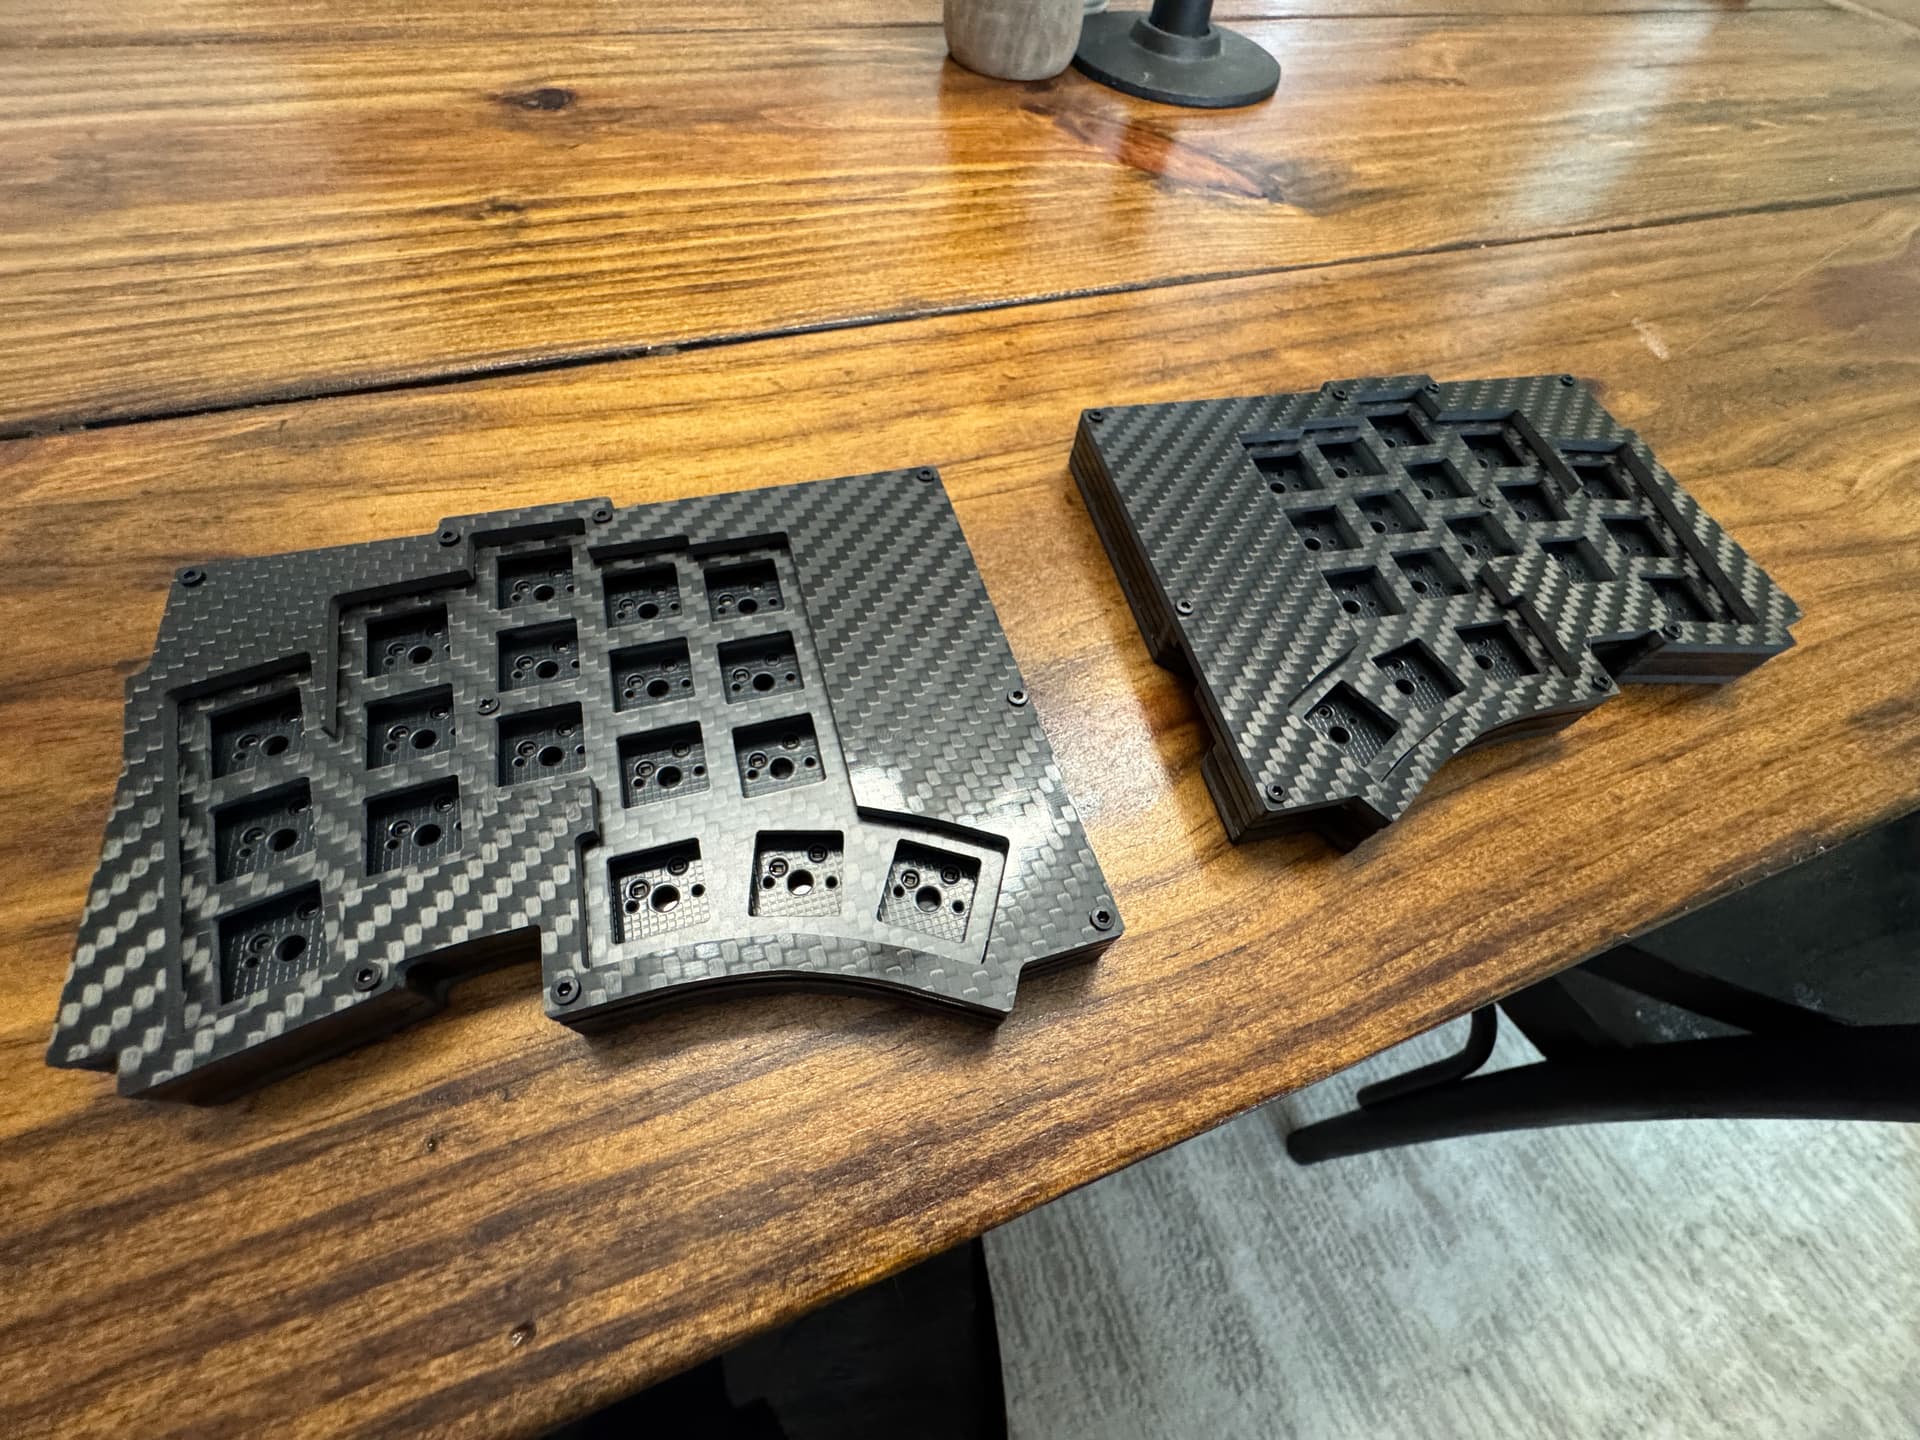
Bummer. Any major electronics on the switch PCBs, or is replacing the Seeeds your worst-case? The carbon fiber came out great on that, btw.
1 Like
I think replacing the seeeds would be the worst case. The board only has MCU, diodes, hot swap sockets, and the reset switch.
Worst worst case I need to build another PCB for both halves and figure out what was the stage that made things fall apart.
Also, thanks! I worked with CNCMadness and they did a fantastic job!
1 Like
That looks pretty slick! Is that acrylic made to look like carbon fiber, or real carbon fiber? A long time ago I went all in on a lightweight carbon fiber 60% because I wanted something that I didn’t have to worry about getting shocked in the winter when it was so dry in my house. Ooops… I didn’t realize carbon fiber was conductive. Would be cool to make it out of acrylic though.
3 Likes
So, the top, bottom, and plate are all real carbon fiber. The other layers of the sandwich are just translucent gray acrylic.
Hmmm, didn’t realize carbon fiber was conductive either… Part of my draw to it was exactly yours. I didn’t want to zap or be zapped by static discharge. That actually does provide a nice clue as to what my issue may be though ![]()
3 Likes
I had no idea either. Apparently it all comes down to how it’s made, and it can be made more or less conductive. I guess mine was highly conductive ![]()
![]()
3 Likes
![]()
It’s less of a problem in my office since I moved a small couch that was near the door. I used to always accidentally rub it with my leg when entering and leaving, which immediately caused static. But I still shock myself once or twice a day. I keep a few usb cables on my desk. Two USB c, one mini, and one micro. I just pick up one of them as I’m sitting down and tap it on the back of my had to shock myself. Computer seems to tolerate it fine.
6 Likes
I think you just diagnosed my problem. I disassembled the board and everything went back to working on the left half. Reassembled and issues again. I think I’m dealing with something getting shorted here.
5 Likes
Time for some tape. I had a sneaking suspicion which is why I brought it up
4 Likes
I’m so glad you did. You saved me TONS of troubleshooting. THANK YOU!!
3 Likes
With a huge thanks to @pixelpusher on the troubleshooting carbon fiber being conductive, I am now typing this post from the PCB I designed way up in this thread. I put a layer of electrical tape on the inside of the bottom plate and spent some quality time with a razor blade to trim it. Everything is now in working order!
Really happy with how this project turned out!
13 Likes
Looks great with Mictlan, awesome work bud!
4 Likes
Worked on a batch of Gateron Smoothies today.
Long story short: 72g traditional springs, 105 oil, better sound, better feel, slightly heavy.
Long details :
the boring stuff here
For this set I swapped the springs for some 72g Sprit springs (traditional, 15mm length). This was an attempt to get these switches to feel more in line with a “normal” Gateron housing, perhaps something like a Gateron black.
Also, when disassembling these, I noticed that every surface seemed fairly evenly coated in a very thin yet very viscous lube. I think it’s one of the things that makes the switch feel smooth yet a bit “dead” on return. I think the lube they use is too viscous.
I cleaned out my 3oz “tub lube” container so that it was perfectly free of lubricant. I added the smoothie stems and gave a good shaking. Then I removed the stems, cleaned the jar, and repeated 3 times. This was an attempt to remove any excess lubrication and coat the stems more evenly overall.
I still had the feeling they were too sticky. I experimented with a few different lube solutions by rubbing a super fine amount between my index finger and thumb. I find this an easy and quick way to judge general viscosity. Sure enough, the smoothie lube was much more viscous than 205g0.
I didn’t want to invest in the time to remove the old lube from them. I thought about putting a small coat of 205g0 over them. But when I tried that on my fingers, the two lubes pretty much mixed together and felt identical. Then I had an idea… What about an oil over the old lube?
I put a spec of oil on my fingers that had the original lubricant on them and it was suuuuper slick. And, it never really seemed to mix together or dry up. I’m not sure if it’s magic or my imagination, but it was the exact result I was looking for. So, I proceeded to put 1 drop of oil per every 10 stems in the tub, plus one to grown on . ![]() (a total of 9 drops). Shake like the devil for 2 minutes or so and reassemble.
(a total of 9 drops). Shake like the devil for 2 minutes or so and reassemble.
Quite pleased with the end result. For one, they definitely feel different. It’s always a bummer to mod a switch and have it end up feeling too similar to it did before, becoming just a massive waste of time and energy.
The springs are slightly heavier than I had hoped. At 72g, they do verge on the heavier side. I think 68g springs would have been more suitable, but also closer to the orginal smoothie switch. So, maybe not ideal, but a nice change of pace.
The lube is quite nice. They don’t feel nearly as sluggish on return as they did previosly. Also, the overall sound is deeper and more even. Probably a result of getting an even coating and applying to the base of the stem.
Anyway… boring stuff, but it’s how I spent my day.
6 Likes